Getting Started
Page 19
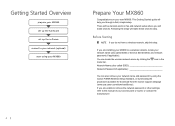
... point's IP address • The configuration, router functions, setup procedures and security functions of the network device vary depending on -screen instructions and do not remove the Setup CD-ROM during setup" in the printed manual: Network Setup Troubleshooting. □ Notes on , a warning message may appear that Canon software is displayed during restarting. Read the following screen...
... point's IP address • The configuration, router functions, setup procedures and security functions of the network device vary depending on -screen instructions and do not remove the Setup CD-ROM during setup" in the printed manual: Network Setup Troubleshooting. □ Notes on , a warning message may appear that Canon software is displayed during restarting. Read the following screen...

Getting Started
Page 21
USB USB Network Red Is this your first time onnecting Yes the machine to use the machine on other computers Para utilizar el equipo en otros ordenadores Setup Flow (Reading Order) Flujo de la instalación (orden de lectura) P.29 P.34 P.50 P.53 P.60 P.20 P.29 P.35 P.20 P.53 P.61 P.21 P.29 P.47...;n del método de conexión Connection Method Selection Selección del método de conexión Which connection method do you intend to the network?
USB USB Network Red Is this your first time onnecting Yes the machine to use the machine on other computers Para utilizar el equipo en otros ordenadores Setup Flow (Reading Order) Flujo de la instalación (orden de lectura) P.29 P.34 P.50 P.53 P.60 P.20 P.29 P.35 P.20 P.53 P.61 P.21 P.29 P.47...;n del método de conexión Connection Method Selection Selección del método de conexión Which connection method do you intend to the network?
Obtaining the Password For Your Existing Wireless Network (Mac OS X)
Page 1
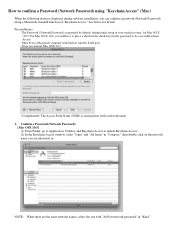
...for Mac OS X v10.5. For Mac OS X 10.4, you will have to be in a Macintosh computer with a network name. 1. The Access Point Name (SSID) is displayed during initial setup of "Keychain Access." How to launch Keychain Access. (2) In the Keychain Access window, select "login" and "All Items..." in "Category," then double click on the network name you are the same network names, select the one with "AirPort network password" in "Kind." ...
...for Mac OS X v10.5. For Mac OS X 10.4, you will have to be in a Macintosh computer with a network name. 1. The Access Point Name (SSID) is displayed during initial setup of "Keychain Access." How to launch Keychain Access. (2) In the Keychain Access window, select "login" and "All Items..." in "Category," then double click on the network name you are the same network names, select the one with "AirPort network password" in "Kind." ...

Obtaining the Password For Your Existing Wireless Network (Mac OS X)
Page 3
... "The Printer could not be fine.) 2. For the setup method, see "Getting Started for the setup instead of them. (Either one your neighbor is displayed when clicking the Connect button, you may select the network name (Access Point name (SSID)) you are displayed, select...case, please select the other one of the Connect button. (5) A Password (Network Password) shows up in the step 1 "Confirm a Password (Network Password)." To use the printer together with the multiple Access Points, click the Manual Setup button for Mac Users" included in the step 1-(4). (3) Click Connect. (1) ...
... "The Printer could not be fine.) 2. For the setup method, see "Getting Started for the setup instead of them. (Either one your neighbor is displayed when clicking the Connect button, you may select the network name (Access Point name (SSID)) you are displayed, select...case, please select the other one of the Connect button. (5) A Password (Network Password) shows up in the step 1 "Confirm a Password (Network Password)." To use the printer together with the multiple Access Points, click the Manual Setup button for Mac Users" included in the step 1-(4). (3) Click Connect. (1) ...
MX860 Getting Started For Mac Users
Page 4
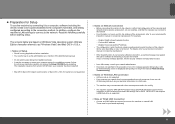
... settings, refer to the manual of your new MX860. icon in fax and network setup where you do not have a wireless network, skip this step. Getting Started Overview prepare your MX860 set up the hardware set up the software connect to your network (optional) start using the Canon PIXMA Wireless Setup Assistant, or by clicking the menu bar. Before...
... settings, refer to the manual of your new MX860. icon in fax and network setup where you do not have a wireless network, skip this step. Getting Started Overview prepare your MX860 set up the hardware set up the software connect to your network (optional) start using the Canon PIXMA Wireless Setup Assistant, or by clicking the menu bar. Before...
MX860 Getting Started For Mac Users
Page 5
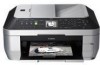
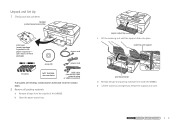
... ink tanks NOT SHOWN: documentation USB cable (needed for initial network setup or USB connection) If any parts are missing, contact Canon (see back cover for contact data). 2 Remove all packing materials a Remove all tape and packing material from the outside of the MX860. scanning unit support print head holder d Remove all tape from...
... ink tanks NOT SHOWN: documentation USB cable (needed for initial network setup or USB connection) If any parts are missing, contact Canon (see back cover for contact data). 2 Remove all packing materials a Remove all tape and packing material from the outside of the MX860. scanning unit support print head holder d Remove all tape from...

MX860 Getting Started For Mac Users
Page 11
Load Paper 1 Remove the cassette 6 Press the OK button 2 Load plain paper with the printing side down a Paper should fit between the adjustable paper guides. paper guide paper guide prepare hardware software network prepare hardware software network 11 prepare hardware software network 5 Close the cover The printer will perform initial start up maintenance. Wait until the "Load plain paper" screen displays before continuing setup.
Load Paper 1 Remove the cassette 6 Press the OK button 2 Load plain paper with the printing side down a Paper should fit between the adjustable paper guides. paper guide paper guide prepare hardware software network prepare hardware software network 11 prepare hardware software network 5 Close the cover The printer will perform initial start up maintenance. Wait until the "Load plain paper" screen displays before continuing setup.
MX860 Getting Started For Mac Users
Page 19
... is powered on page 28 for the initial network setup. The MX860 is set the connection type now for a wired network, set at the factory to connect to page 23. 1 Locate the name and password (if applicable) of your computer with an Ethernet cable On the Canon IJ Network Tool dialog, select LAN connection, then click...
... is powered on page 28 for the initial network setup. The MX860 is set the connection type now for a wired network, set at the factory to connect to page 23. 1 Locate the name and password (if applicable) of your computer with an Ethernet cable On the Canon IJ Network Tool dialog, select LAN connection, then click...
MX860 Getting Started For Mac Users
Page 20
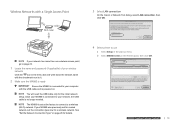
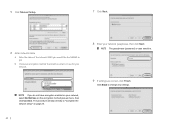
b On your computer, click Next. 6 Complete the network setup When the Setup Completion dialog appears: a Disconnect the USB cable and place the MX860 where it . Measuring Wireless Connection Performance 1 Click Next. The network password is case sensitive. 5 Select your network requires a password, enter it will display. 20 The connection measurement results will be used. If the MX860 does not connect, see section 5.6 of the printed manual "Network Setup Troubleshooting." c Click Connect. b If your wireless network a Select the network name you wrote down in step 1.
b On your computer, click Next. 6 Complete the network setup When the Setup Completion dialog appears: a Disconnect the USB cable and place the MX860 where it . Measuring Wireless Connection Performance 1 Click Next. The network password is case sensitive. 5 Select your network requires a password, enter it will display. 20 The connection measurement results will be used. If the MX860 does not connect, see section 5.6 of the printed manual "Network Setup Troubleshooting." c Click Connect. b If your wireless network a Select the network name you wrote down in step 1.
MX860 Getting Started For Mac Users
Page 23
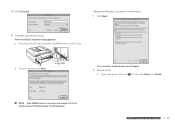
... network setup. c Click OK. prepare hardware software network prepare hardware software network prepare hardware software network prepare hardware software network 23 Once your MX860 is connected to your network, the USB cable is no longer needed. 4 Select printer to "Set the Network Connection Type" on You will need the USB cable only for details. 3 Select LAN connection On the Canon...
... network setup. c Click OK. prepare hardware software network prepare hardware software network prepare hardware software network prepare hardware software network 23 Once your MX860 is connected to your network, the USB cable is no longer needed. 4 Select printer to "Set the Network Connection Type" on You will need the USB cable only for details. 3 Select LAN connection On the Canon...
MX860 Getting Started For Mac Users
Page 24
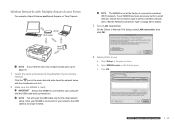
... "Complete the network setup" on the encryption method pop-up menu, then click Connect. 5 Click Manual Setup 7 Click Next 6 Enter network name a Enter the name of the network (SSID) you do not have encryption enabled on your network, select Do Not Use on page 25. 8 Enter your network passphrase, then... click Next The passphrase (password) is in use for your network. b Choose an encryption method that matches what is case sensitive. 9 If settings are correct, click Finish Click Back to join. If you would like the MX860 to change any settings....
... "Complete the network setup" on the encryption method pop-up menu, then click Connect. 5 Click Manual Setup 7 Click Next 6 Enter network name a Enter the name of the network (SSID) you do not have encryption enabled on your network, select Do Not Use on page 25. 8 Enter your network passphrase, then... click Next The passphrase (password) is in use for your network. b Choose an encryption method that matches what is case sensitive. 9 If settings are correct, click Finish Click Back to join. If you would like the MX860 to change any settings....
MX860 Getting Started For Mac Users
Page 25
... a If you see section 5.6 of the printed manual "Network Setup Troubleshooting." If the MX860 does not connect, see a green check mark and the word Good, click Finish. b On your computer, click Next. prepare hardware software network prepare hardware software network prepare hardware software network prepare hardware software network 25 10 Click Connect Measuring Wireless Connection Performance 1 Click...
... a If you see section 5.6 of the printed manual "Network Setup Troubleshooting." If the MX860 does not connect, see a green check mark and the word Good, click Finish. b On your computer, click Next. prepare hardware software network prepare hardware software network prepare hardware software network prepare hardware software network 25 10 Click Connect Measuring Wireless Connection Performance 1 Click...
MX860 Getting Started For Mac Users
Page 28
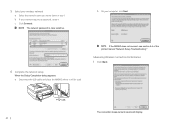
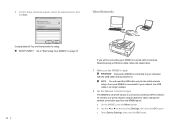
...to the selected device, then Wired Networks click Exit. You are finished with the USB cable and is powered on page 37. Wi-Fi router router If you will need the USB cable only for the initial network setup. Once your MX860 is connected to your network, the USB cable is no ...longer needed. 2 Set the Network Connection Type The MX860 is connected to a wireless (Wi-Fi) network. a On the MX860, press the Menu button. on You will be connecting your ...
...to the selected device, then Wired Networks click Exit. You are finished with the USB cable and is powered on page 37. Wi-Fi router router If you will need the USB cable only for the initial network setup. Once your MX860 is connected to your network, the USB cable is no ...longer needed. 2 Set the Network Connection Type The MX860 is connected to a wireless (Wi-Fi) network. a On the MX860, press the Menu button. on You will be connecting your ...
Solución de problemas de configuración de red [Spanish Version]
Page 2
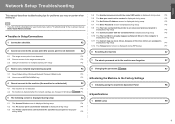
... to the target access point P.2 2.3 Using the machine in a multiple access point setup P.2 3 How to set a network key/network password P.3 3.1 About Network Key (Windows)/Network Password (Macintosh) P.3 3.2 How to set a WEP/WPA/WPA2 key P.3 4 ...setup P.7 5.12 The Timeout error screen is displayed during WPS setup P.7 6 Re-setting the machine P.7 7 The admin password set to the machine was forgotten P.7 8 Changing the port name P.7 ■ Restoring the Machine to the Factory Settings 1 Initializing using the machine's Operation Panel P.8 ■ Specifications 1 MX860...
... to the target access point P.2 2.3 Using the machine in a multiple access point setup P.2 3 How to set a network key/network password P.3 3.1 About Network Key (Windows)/Network Password (Macintosh) P.3 3.2 How to set a WEP/WPA/WPA2 key P.3 4 ...setup P.7 5.12 The Timeout error screen is displayed during WPS setup P.7 6 Re-setting the machine P.7 7 The admin password set to the machine was forgotten P.7 8 Changing the port name P.7 ■ Restoring the Machine to the Factory Settings 1 Initializing using the machine's Operation Panel P.8 ■ Specifications 1 MX860...
Solución de problemas de configuración de red [Spanish Version]
Page 7
...139: a Open the screen for the port. - After installation is complete, to mount the Card Slot using the Canon IJ Network Tool, refer to "Cannot Mount the Card Slot" in "About Network Communication" in "Appendix" of the on -screen manual: Advanced Guide. User Account Control dialog box appears, click ... below. If it appears, click OK. • If the problem is not resolved, click Skip to complete the setup without the network setup of the Card Slot fails during setup This message is not configured on the Exceptions sheet, and click OK. • Change the workgroup name to its ...
...139: a Open the screen for the port. - After installation is complete, to mount the Card Slot using the Canon IJ Network Tool, refer to "Cannot Mount the Card Slot" in "About Network Communication" in "Appendix" of the on -screen manual: Advanced Guide. User Account Control dialog box appears, click ... below. If it appears, click OK. • If the problem is not resolved, click Skip to complete the setup without the network setup of the Card Slot fails during setup This message is not configured on the Exceptions sheet, and click OK. • Change the workgroup name to its ...
Solución de problemas de configuración de red [Spanish Version]
Page 8
... the machine was forgotten Restore the machine setting to the Factory Settings" on the Network Setup of the Card Slot screen. 5.11 The Cannot map any drive letter and try the network setup of the Card Slot again using the Canon IJ Network Tool. 5.12 The Timeout error screen is displayed during WPS... setup This screen is displayed when WPS setup is displayed. The WPS setting screen returns. To do not need ...
... the machine was forgotten Restore the machine setting to the Factory Settings" on the Network Setup of the Card Slot screen. 5.11 The Cannot map any drive letter and try the network setup of the Card Slot again using the Canon IJ Network Tool. 5.12 The Timeout error screen is displayed during WPS... setup This screen is displayed when WPS setup is displayed. The WPS setting screen returns. To do not need ...

Network Setup Troubleshooting
Page 2
... to the target access point P.1 2.3 Using the machine in a multiple access point setup P.1 3 How to set a network key/network password P.2 3.1 About Network Key (Windows)/Network Password (Macintosh) P.2 3.2 How to set a WEP/WPA/WPA2 key P.2 4 ...setup P.6 5.12 The Timeout error screen is displayed during WPS setup P.6 6 Re-setting the machine P.6 7 The admin password set to the machine was forgotten P.6 8 Changing the port name P.6 ■ Restoring the Machine to the Factory Settings 1 Initializing using the machine's Operation Panel P.7 ■ Specifications 1 MX860...
... to the target access point P.1 2.3 Using the machine in a multiple access point setup P.1 3 How to set a network key/network password P.2 3.1 About Network Key (Windows)/Network Password (Macintosh) P.2 3.2 How to set a WEP/WPA/WPA2 key P.2 4 ...setup P.6 5.12 The Timeout error screen is displayed during WPS setup P.6 6 Re-setting the machine P.6 7 The admin password set to the machine was forgotten P.6 8 Changing the port name P.6 ■ Restoring the Machine to the Factory Settings 1 Initializing using the machine's Operation Panel P.7 ■ Specifications 1 MX860...
Network Setup Troubleshooting
Page 7
...Communication with security measures, there is a risk of disclosing data such as you connect to a network that the computer is not resolved, click Skip to complete the setup without the network setup of the Card Slot. User Account Control dialog box appears, click Continue. • Windows XP...The administrator password consists of alphanumeric characters and is complete, to mount the Card Slot using the Canon IJ Network Tool, refer to "Using the Card Slot over a Network" in "About Network Communication" in "Troubleshooting" of the on-screen manual: Advanced Guide. • Make sure ...
...Communication with security measures, there is a risk of disclosing data such as you connect to a network that the computer is not resolved, click Skip to complete the setup without the network setup of the Card Slot. User Account Control dialog box appears, click Continue. • Windows XP...The administrator password consists of alphanumeric characters and is complete, to mount the Card Slot using the Canon IJ Network Tool, refer to "Using the Card Slot over a Network" in "About Network Communication" in "Troubleshooting" of the on-screen manual: Advanced Guide. • Make sure ...

Network Setup Troubleshooting
Page 8
...A new PIN code appears. Set up the machine again to the Factory Settings" on the Network Setup of the Card Slot screen. 5.11 The Cannot map any drive letter and try the network setup of the Card Slot again using the Canon IJ Network Tool. 5.12 The Timeout error screen is displayed during WPS... setup This screen is displayed when WPS setup is not completed within two minutes. • When using the push ...
...A new PIN code appears. Set up the machine again to the Factory Settings" on the Network Setup of the Card Slot screen. 5.11 The Cannot map any drive letter and try the network setup of the Card Slot again using the Canon IJ Network Tool. 5.12 The Timeout error screen is displayed during WPS... setup This screen is displayed when WPS setup is not completed within two minutes. • When using the push ...
Network Guide
Page 9
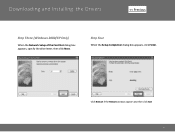
Click Restart if the Restart window appears and then click Exit 9 Step Four When the Setup Completion dialog box appears, click Finish. Downloading and Installing the Drivers > Step Three (Windows 2000/XP Only) When the Network Setup of the Card Slot dialog box appears, specify the drive letter, then click Next.
Click Restart if the Restart window appears and then click Exit 9 Step Four When the Setup Completion dialog box appears, click Finish. Downloading and Installing the Drivers > Step Three (Windows 2000/XP Only) When the Network Setup of the Card Slot dialog box appears, specify the drive letter, then click Next.


