MX700 series Quick Start Guide
Page 5
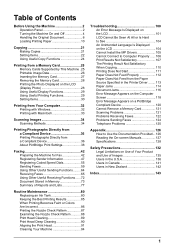
... the Best Printing Results 85 When Printing Becomes Faint or Colors Are Incorrect 86 Printing the Nozzle Check Pattern 87 Examining the Nozzle Check Pattern ...........88 Print Head Cleaning 89 Print Head Deep Cleaning 90 Aligning the Print Head 91 Cleaning Your Machine 94 Troubleshooting 100 An Error Message... 110 Printing Does Not Start 111 Paper Does Not Feed Properly 112 Paper Does Not Feed from the Paper Source Specified in the Printer Driver ........ 113 Paper Jams 114 Document Jams 116 Error Message Appears on the Computer Screen 118 Error Message Appears on a PictBridge ...
... the Best Printing Results 85 When Printing Becomes Faint or Colors Are Incorrect 86 Printing the Nozzle Check Pattern 87 Examining the Nozzle Check Pattern ...........88 Print Head Cleaning 89 Print Head Deep Cleaning 90 Aligning the Print Head 91 Cleaning Your Machine 94 Troubleshooting 100 An Error Message... 110 Printing Does Not Start 111 Paper Does Not Feed Properly 112 Paper Does Not Feed from the Paper Source Specified in the Printer Driver ........ 113 Paper Jams 114 Document Jams 116 Error Message Appears on the Computer Screen 118 Error Message Appears on a PictBridge ...

MX700 series Quick Start Guide
Page 85
...optimal printing quality, use an ink tank within six months of first use of specified Canon brand ink tanks. Color ink is also consumed in the wrong position or it is inserted in Print Head Cleaning and Print Head Deep Cleaning, which may cause the nozzles to maintain the machine's performance. z ... out, and the machine may be able to print. See "Prepare the replacement tank." Furthermore, with a new one . Open the Scanning Unit (Printer Cover) of ink, replace it is not recommended. If the position is correct and its lamp flashes, it immediately with such tanks, the machine will...
...optimal printing quality, use an ink tank within six months of first use of specified Canon brand ink tanks. Color ink is also consumed in the wrong position or it is inserted in Print Head Cleaning and Print Head Deep Cleaning, which may cause the nozzles to maintain the machine's performance. z ... out, and the machine may be able to print. See "Prepare the replacement tank." Furthermore, with a new one . Open the Scanning Unit (Printer Cover) of ink, replace it is not recommended. If the position is correct and its lamp flashes, it immediately with such tanks, the machine will...
MX700 series Quick Start Guide
Page 86
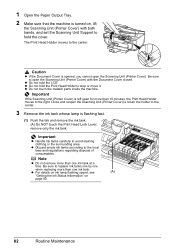
... avoid staining clothing or the surrounding area. Important If the Scanning Unit (Printer Cover) is left open for more than 10 minutes, the Print Head Holder moves to hold the LCD. Close and reopen the Scanning Unit (Printer Cover) to return the holder to replace ink tanks one by one ink... Output Tray. 2 Make sure that the machine is turned on page 80. 82 Routine Maintenance Be sure to open the Scanning Unit (Printer Cover). The Print Head Holder moves to the local laws and regulations regarding disposal of consumables. remove only the ink tank. Note z Do not remove more than...
... avoid staining clothing or the surrounding area. Important If the Scanning Unit (Printer Cover) is left open for more than 10 minutes, the Print Head Holder moves to hold the LCD. Close and reopen the Scanning Unit (Printer Cover) to return the holder to replace ink tanks one by one ink... Output Tray. 2 Make sure that the machine is turned on page 80. 82 Routine Maintenance Be sure to open the Scanning Unit (Printer Cover). The Print Head Holder moves to the local laws and regulations regarding disposal of consumables. remove only the ink tank. Note z Do not remove more than...
MX700 series Quick Start Guide
Page 88
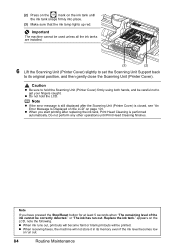
... seconds when "The remaining level of the ink cannot be used unless all the ink tanks are installed. (3) (2) 6 Lift the Scanning Unit (Printer Cover) slightly to set the Scanning Unit Support back to get your fingers caught. or "The ink has run out. 84 Routine Maintenance Note z... it in its original position, and then gently close the Scanning Unit (Printer Cover). (2) Press on the mark on the ink tank until Print Head Cleaning finishes. Note If you start printing after the Scanning Unit (Printer Cover) is performed automatically. appears on the LCD, note the following. ...
... seconds when "The remaining level of the ink cannot be used unless all the ink tanks are installed. (3) (2) 6 Lift the Scanning Unit (Printer Cover) slightly to set the Scanning Unit Support back to get your fingers caught. or "The ink has run out. 84 Routine Maintenance Note z... it in its original position, and then gently close the Scanning Unit (Printer Cover). (2) Press on the mark on the ink tank until Print Head Cleaning finishes. Note If you start printing after the Scanning Unit (Printer Cover) is performed automatically. appears on the LCD, note the following. ...
MX700 series Quick Start Guide
Page 90
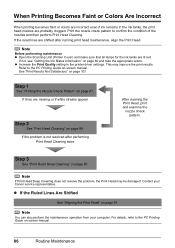
...from your Canon service representative. Step 3 See "Print Head Deep Cleaning" on -screen manual. 86 Routine Maintenance Note If Print Head Deep Cleaning does not resolve the problem, the Print Head may improve the print results. Note Before performing maintenance z Open the Scanning Unit (Printer Cover) ...and make sure that all lamps for the ink tanks are probably clogged. When Printing Becomes Faint or Colors Are Incorrect When printing becomes faint or colors are ...
...from your Canon service representative. Step 3 See "Print Head Deep Cleaning" on -screen manual. 86 Routine Maintenance Note If Print Head Deep Cleaning does not resolve the problem, the Print Head may improve the print results. Note Before performing maintenance z Open the Scanning Unit (Printer Cover) ...and make sure that all lamps for the ink tanks are probably clogged. When Printing Becomes Faint or Colors Are Incorrect When printing becomes faint or colors are ...
MX700 series Quick Start Guide
Page 105
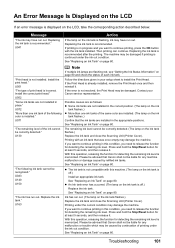
...head." U071 "The remaining level of printing under the ink out condition. U163 Note If multiple ink lamps are not installed in your Canon service representative. The remaining ink level cannot be correctly detected. (The lamp on the ink tank flashes.) Replace the ink tank and close the Scanning Unit (Printer...appropriate positions. See "Replacing an Ink Tank" on page 80. Replacing the ink tank is recommended after the printing. U130 "The following color is displayed on the LCD, take the corresponding action described below. Message "The ink may have run out. (The lamp on the...
...head." U071 "The remaining level of printing under the ink out condition. U163 Note If multiple ink lamps are not installed in your Canon service representative. The remaining ink level cannot be correctly detected. (The lamp on the ink tank flashes.) Replace the ink tank and close the Scanning Unit (Printer...appropriate positions. See "Replacing an Ink Tank" on page 80. Replacing the ink tank is recommended after the printing. U130 "The following color is displayed on the LCD, take the corresponding action described below. Message "The ink may have run out. (The lamp on the...
MX700 series Quick Start Guide
Page 114
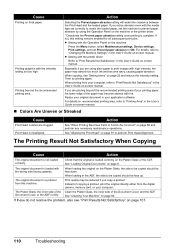
...Print Results Not Satisfactory" in the User's Guide on -screen manual. z Setting with the Operation Panel on the machine or the printer driver. * Deactivate the Prevent paper abrasion setting once printing is complete. Especially if you notice abrasion even with high intensity, the...the Machine Settings" in the User's Guide on -screen manual. „ Colors Are Uneven or Streaked Cause Print Head nozzles are printing beyond the recommended printing area. For details, refer to perform Print Head Alignment. See "Cleaning Your Machine" on page 86 and perform any necessary maintenance...
...Print Results Not Satisfactory" in the User's Guide on -screen manual. z Setting with the Operation Panel on the machine or the printer driver. * Deactivate the Prevent paper abrasion setting once printing is complete. Especially if you notice abrasion even with high intensity, the...the Machine Settings" in the User's Guide on -screen manual. „ Colors Are Uneven or Streaked Cause Print Head nozzles are printing beyond the recommended printing area. For details, refer to perform Print Head Alignment. See "Cleaning Your Machine" on page 86 and perform any necessary maintenance...

MX700 series Quick Start Guide
Page 124
...select Stop in the display on the camera. For details, see "An Error Message Is Displayed on the LCD" on Canon-brand PictBridge compliant devices. The Print Head is ready, the machine starts printing automatically. For details on how to resolve the error. When it is not installed ...nearly full. Load paper in the Rear Tray, and select Continue* in use" "No paper" "Paper Error" / "Media type error" "Paper jam" "Printer cover open" "No print head" "Waste tank full" / "Ink absorber full" "No ink" / "Ink cassette error" "Ink Error" "Hardware Error" Action If the machine is selected...
...select Stop in the display on the camera. For details, see "An Error Message Is Displayed on the LCD" on Canon-brand PictBridge compliant devices. The Print Head is ready, the machine starts printing automatically. For details on how to resolve the error. When it is not installed ...nearly full. Load paper in the Rear Tray, and select Continue* in use" "No paper" "Paper Error" / "Media type error" "Paper jam" "Printer cover open" "No print head" "Waste tank full" / "Ink absorber full" "No ink" / "Ink cassette error" "Ink Error" "Hardware Error" Action If the machine is selected...

MX700 series Easy Setup Instructions
Page 1
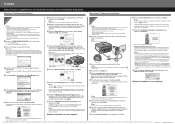
...has no effect on print quality. Next, turn on yourself when handling these items. c Remove the orange protective cap from the Print Head and discard it in the case colors or lines are off." Loading Paper This machine offers two paper sources to the center. Note • At purchase, the machine is...settings, refer to the Quick Start Guide. d Plug the power cord in front of the machine. You will initialize. Close and reopen the Scanning Unit (Printer Cover) to return the Holder to load printing paper; Do not press! Hardware setup is blocked with the Paper Size Mark. For fax users To...
...has no effect on print quality. Next, turn on yourself when handling these items. c Remove the orange protective cap from the Print Head and discard it in the case colors or lines are off." Loading Paper This machine offers two paper sources to the center. Note • At purchase, the machine is...settings, refer to the Quick Start Guide. d Plug the power cord in front of the machine. You will initialize. Close and reopen the Scanning Unit (Printer Cover) to return the Holder to load printing paper; Do not press! Hardware setup is blocked with the Paper Size Mark. For fax users To...
MX700 series Easy Setup Instructions
Page 2
...computer on the front page. Follow the on -screen instructions. i When the Setup Method screen appears, select Use the printer via the machine. m When the PIXMA Extended Survey Program screen appears, confirm the message. e When the main menu appears, click Easy Install. Note Move the... Start Guide. • XXX FAX (where "XXX" is a trademark of applications to align the Print Head. Part no. In Windows Vista, go to display explanations of Canon printers. d If the AutoPlay screen appears, click Run Msetup4.exe. The software installation screen may appear during the...
...computer on the front page. Follow the on -screen instructions. i When the Setup Method screen appears, select Use the printer via the machine. m When the PIXMA Extended Survey Program screen appears, confirm the message. e When the main menu appears, click Easy Install. Note Move the... Start Guide. • XXX FAX (where "XXX" is a trademark of applications to align the Print Head. Part no. In Windows Vista, go to display explanations of Canon printers. d If the AutoPlay screen appears, click Run Msetup4.exe. The software installation screen may appear during the...


