
MX300 series Quick Start Guide
Page 8
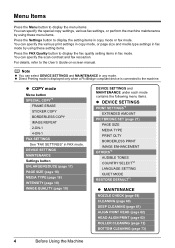
...-1 FAX SETTINGS See "FAX SETTINGS" in copy mode or fax mode. z Direct Printing mode is displayed only when a PictBridge compliant device is connected to the User's Guide on-screen manual. For details, refer to the machine. You can specify the various print settings in copy mode, or page size and media type...
...-1 FAX SETTINGS See "FAX SETTINGS" in copy mode or fax mode. z Direct Printing mode is displayed only when a PictBridge compliant device is connected to the User's Guide on-screen manual. For details, refer to the machine. You can specify the various print settings in copy mode, or page size and media type...
MX300 series Quick Start Guide
Page 9
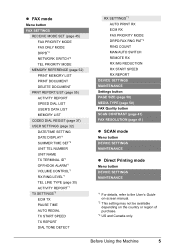
... (page 52) PRINT MEMORY LIST PRINT DOCUMENT DELETE DOCUMENT PRNT REPORT/LIST (page 55) ACTIVITY REPORT SPEED DIAL LIST USER'S DATA LIST MEMORY LIST CODED DIAL REGIST (page 37) USER SETTINGS (page 32) DATE/TIME SETTING DATE DISPLAY*1 SUMMER TIME SET*2 UNIT TEL NUMBER UNIT NAME TX TERMINAL ID*1... RESOLUTION (page 41) z SCAN mode Menu button DEVICE SETTINGS MAINTENANCE z Direct Printing mode Menu button DEVICE SETTINGS MAINTENANCE *1 For details, refer to the User's Guide on-screen manual. *2 This setting may not be available depending on the country or region of purchase. *3 US and Canada only.
... (page 52) PRINT MEMORY LIST PRINT DOCUMENT DELETE DOCUMENT PRNT REPORT/LIST (page 55) ACTIVITY REPORT SPEED DIAL LIST USER'S DATA LIST MEMORY LIST CODED DIAL REGIST (page 37) USER SETTINGS (page 32) DATE/TIME SETTING DATE DISPLAY*1 SUMMER TIME SET*2 UNIT TEL NUMBER UNIT NAME TX TERMINAL ID*1... RESOLUTION (page 41) z SCAN mode Menu button DEVICE SETTINGS MAINTENANCE z Direct Printing mode Menu button DEVICE SETTINGS MAINTENANCE *1 For details, refer to the User's Guide on-screen manual. *2 This setting may not be available depending on the country or region of purchase. *3 US and Canada only.
MX300 series Quick Start Guide
Page 12
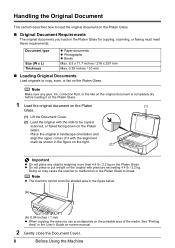
... Cover. 8 Before Using the Machine z Do not press or put weight on the Platen Glass. Note z The machine cannot scan the shaded area in the User's Guide on the printable area of it with the alignment mark as shown in the figure on the right. (2) Important z Do not place any glue, ink...
... Cover. 8 Before Using the Machine z Do not press or put weight on the Platen Glass. Note z The machine cannot scan the shaded area in the User's Guide on the printable area of it with the alignment mark as shown in the figure on the right. (2) Important z Do not place any glue, ink...
MX300 series Quick Start Guide
Page 14
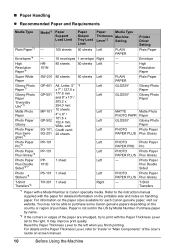
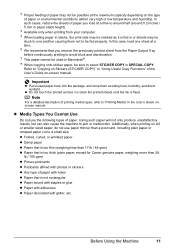
...notes on handling paper. It may not be able to the left when you finish printing. Reset the Paper Thickness Lever to purchase some Canon genuine papers depending on -screen manual. 10 Before Using the Machine „ Paper Handling z Recommended Paper and Requirements Media Type Plain Paper...1 envelope Right - You may improve print quality. T-Shirt Transfers *1 Paper with a Model Number is not sold in "Main Components" of the User's Guide on the country or region of the paper are smudged, try to print with the Paper Thickness Lever set to the instruction manual supplied with...
...notes on handling paper. It may not be able to the left when you finish printing. Reset the Paper Thickness Lever to purchase some Canon genuine papers depending on -screen manual. 10 Before Using the Machine „ Paper Handling z Recommended Paper and Requirements Media Type Plain Paper...1 envelope Right - You may improve print quality. T-Shirt Transfers *1 Paper with a Model Number is not sold in "Main Components" of the User's Guide on the country or region of the paper are smudged, try to print with the Paper Thickness Lever set to the instruction manual supplied with...
MX300 series Quick Start Guide
Page 15
... z Damp paper z Paper that is too thin (weighing less than 17 lb / 64 gsm) z Paper that is too thick (plain paper, except for Canon genuine paper, weighing more than a post card, including plain paper or notepad paper cut to a small size. In such cases, reduce the sheets of paper... the following types of paper. Using such paper will not only produce unsatisfactory results, but can also cause the machine to "Printing Media" in the User's Guide onscreen manual. Important z Put unused paper back into the package, and store them not to be possible at a time. *6 We recommend that is fixed....
... z Damp paper z Paper that is too thin (weighing less than 17 lb / 64 gsm) z Paper that is too thick (plain paper, except for Canon genuine paper, weighing more than a post card, including plain paper or notepad paper cut to a small size. In such cases, reduce the sheets of paper... the following types of paper. Using such paper will not only produce unsatisfactory results, but can also cause the machine to "Printing Media" in the User's Guide onscreen manual. Important z Put unused paper back into the package, and store them not to be possible at a time. *6 We recommend that is fixed....
MX300 series Quick Start Guide
Page 17
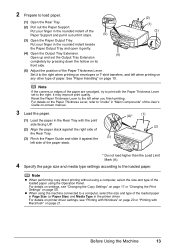
...details on the Paper Thickness Lever, refer to print with the print side facing UP. (2) Align the paper stack against the (3) left side of the User's Guide on page 21. z When using the Operation Panel. Note If the corners or edges of the paper are smudged, try to "Inside" in "... the Copy Settings" on page 17 or "Changing the Print Settings" on its front side. (5) Adjust the position of the Rear Tray. (3) Pinch the Paper Guide and slide it stops. (5) (2) (1) (3) (3) Open the Paper Output Tray. Set it gently. (4) Open the Output Tray Extension. (4) Open up and set to ...
...details on the Paper Thickness Lever, refer to print with the print side facing UP. (2) Align the paper stack against the (3) left side of the User's Guide on page 21. z When using the Operation Panel. Note If the corners or edges of the paper are smudged, try to "Inside" in "... the Copy Settings" on page 17 or "Changing the Print Settings" on its front side. (5) Adjust the position of the Rear Tray. (3) Pinch the Paper Guide and slide it stops. (5) (2) (1) (3) (3) Open the Paper Output Tray. Set it gently. (4) Open the Output Tray Extension. (4) Open up and set to ...
MX300 series Quick Start Guide
Page 19
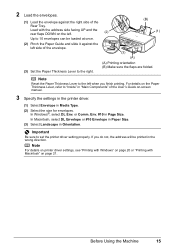
... #10 in Orientation. If you finish printing. In Windows®, select DL Env. Important Be sure to "Inside" in "Main Components" of the User's Guide on page 21. or Comm. Note Reset the Paper Thickness Lever to the left side of the envelope. (3) (A) (3) Set the Paper Thickness Lever ... 2 Load the envelopes. (1) Load the envelope against the left when you do not, the address will be loaded at once. (2) Pinch the Paper Guide and slide it against the right side of the Rear Tray. Load with Macintosh" on -screen manual. 3 Specify the settings in the printer driver. ...
... #10 in Orientation. If you finish printing. In Windows®, select DL Env. Important Be sure to "Inside" in "Main Components" of the User's Guide on page 21. or Comm. Note Reset the Paper Thickness Lever to the left side of the envelope. (3) (A) (3) Set the Paper Thickness Lever ... 2 Load the envelopes. (1) Load the envelope against the left when you do not, the address will be loaded at once. (2) Pinch the Paper Guide and slide it against the right side of the Rear Tray. Load with Macintosh" on -screen manual. 3 Specify the settings in the printer driver. ...

MX300 series Quick Start Guide
Page 21
..., media type, or image quality. Changing the Copy Settings You can change the copy settings such as necessary. z The settings of the User's Guide onscreen manual. For details, see "Changing the Copy Settings" on the machine. Copying Making Copies This section describes the basic procedure to make... copies. 1 Turn on page 17. 6 Press the Color button for color copying, or the Black button for black & white copying. Ex: 1.ENLARGE/REDUCE PRESET RATIO PRESET RATIO / ZOOM / FIT-TO-PAGE Copying ...
..., media type, or image quality. Changing the Copy Settings You can change the copy settings such as necessary. z The settings of the User's Guide onscreen manual. For details, see "Changing the Copy Settings" on the machine. Copying Making Copies This section describes the basic procedure to make... copies. 1 Turn on page 17. 6 Press the Color button for color copying, or the Black button for black & white copying. Ex: 1.ENLARGE/REDUCE PRESET RATIO PRESET RATIO / ZOOM / FIT-TO-PAGE Copying ...
MX300 series Quick Start Guide
Page 23
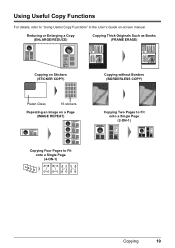
Using Useful Copy Functions For details, refer to Fit onto a Single Page (4-ON-1) Copying 19 Reducing or Enlarging a Copy (ENLARGE/REDUCE) Copying Thick Originals Such as Books (FRAME ERASE) Copying on Stickers (STICKER COPY) Platen Glass 16 stickers Repeating an Image on a Page (IMAGE REPEAT) Copying without Borders (BORDERLESS COPY) Copying Two Pages to Fit onto a Single Page (2-ON-1) Copying Four Pages to "Using Useful Copy Functions" in the User's Guide on-screen manual.
Using Useful Copy Functions For details, refer to Fit onto a Single Page (4-ON-1) Copying 19 Reducing or Enlarging a Copy (ENLARGE/REDUCE) Copying Thick Originals Such as Books (FRAME ERASE) Copying on Stickers (STICKER COPY) Platen Glass 16 stickers Repeating an Image on a Page (IMAGE REPEAT) Copying without Borders (BORDERLESS COPY) Copying Two Pages to Fit onto a Single Page (2-ON-1) Copying Four Pages to "Using Useful Copy Functions" in the User's Guide on-screen manual.
MX300 series Quick Start Guide
Page 26
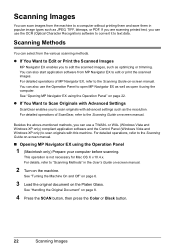
... the SCAN button, then press the Color or Black button. 22 Scanning Images For detailed operations of MP Navigator EX, refer to convert it using the computer. For detailed operations, refer to a computer without printing them and save them in the User's Guide on-screen manual. 2 Turn on... the Platen Glass. Scanning Images You can scan images from the machine to the Scanning Guide on-screen manual. „ Opening MP Navigator EX using the Operation Panel 1...
... the SCAN button, then press the Color or Black button. 22 Scanning Images For detailed operations of MP Navigator EX, refer to convert it using the computer. For detailed operations, refer to a computer without printing them and save them in the User's Guide on-screen manual. 2 Turn on... the Platen Glass. Scanning Images You can scan images from the machine to the Scanning Guide on-screen manual. „ Opening MP Navigator EX using the Operation Panel 1...
MX300 series Quick Start Guide
Page 36
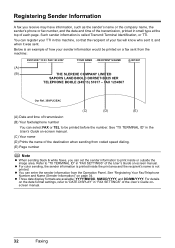
Below is not printed. For details on the date format settings, refer to "TX TERMINAL ID" in "FAX SETTINGS" of the User's Guide on a fax sent from the Operation Panel. z You can select FAX or TEL to print inside the print area and the recipient's name is an ... at the top of each page. z For color sending, the sender information is called Transmit Terminal Identification, or TTI. z Three date display formats are available: YYYY/MM/DD, MM/DD/YYYY, and DD/MM/YYYY. Refer to "DATE DISPLAY" in "FAX SETTINGS" of the User's Guide onscreen manual. 32 Faxing You can set...
Below is not printed. For details on the date format settings, refer to "TX TERMINAL ID" in "FAX SETTINGS" of the User's Guide on a fax sent from the Operation Panel. z You can select FAX or TEL to print inside the print area and the recipient's name is an ... at the top of each page. z For color sending, the sender information is called Transmit Terminal Identification, or TTI. z Three date display formats are available: YYYY/MM/DD, MM/DD/YYYY, and DD/MM/YYYY. Refer to "DATE DISPLAY" in "FAX SETTINGS" of the User's Guide onscreen manual. 32 Faxing You can set...
MX300 series Quick Start Guide
Page 38
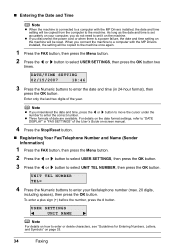
... „ Registering Your Fax/Telephone Number and Name (Sender Information) 1 Press the FAX button, then press the Menu button. 2 Press the [ or ] button to select USER SETTINGS, then press the OK button. 3 Press the [ or ] button to select UNIT TEL NUMBER, then press the OK button. DATE/TIME SETTING 02/15.../2007 18:46 3 Press the Numeric buttons to enter the date and time (in "FAX SETTINGS" of the User's Guide on the machine will be reset. For details on page 33. 34 Faxing Enter only the last two digits of date are available. „ Entering...
... „ Registering Your Fax/Telephone Number and Name (Sender Information) 1 Press the FAX button, then press the Menu button. 2 Press the [ or ] button to select USER SETTINGS, then press the OK button. 3 Press the [ or ] button to select UNIT TEL NUMBER, then press the OK button. DATE/TIME SETTING 02/15.../2007 18:46 3 Press the Numeric buttons to enter the date and time (in "FAX SETTINGS" of the User's Guide on the machine will be reset. For details on page 33. 34 Faxing Enter only the last two digits of date are available. „ Entering...

MX300 series Quick Start Guide
Page 48
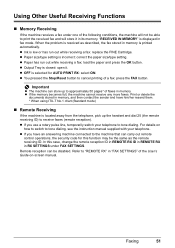
... in ECM (Error Correction Mode). z If ECM sending/receiving is set to "ECM TX" and "ECM RX" in "FAX SETTINGS" of the User's Guide on the line or connection conditions. 44 Faxing Note z If the sender's or receiver's fax is connected to a computer, you can disable ECM ...sending/receiving. For details, refer to the FAX Driver Guide onscreen manual. „ Sending/Receiving Using ECM This machine is enabled, transmission speed may slow down depending on -screen manual. ECM automatically corrects errors...
... in ECM (Error Correction Mode). z If ECM sending/receiving is set to "ECM TX" and "ECM RX" in "FAX SETTINGS" of the User's Guide on the line or connection conditions. 44 Faxing Note z If the sender's or receiver's fax is connected to a computer, you can disable ECM ...sending/receiving. For details, refer to the FAX Driver Guide onscreen manual. „ Sending/Receiving Using ECM This machine is enabled, transmission speed may slow down depending on -screen manual. ECM automatically corrects errors...

MX300 series Quick Start Guide
Page 51
...: The machine receives faxes automatically. In the message, tell your answering machine to TEL PRIORITY MODE. Set MAN/AUTO SWITCH in "FAX SETTINGS" of the User's Guide on -screen manual. Refer to answer the call , be sure to pick up the handset before picking up the handset, then press the Stop/Reset...
...: The machine receives faxes automatically. In the message, tell your answering machine to TEL PRIORITY MODE. Set MAN/AUTO SWITCH in "FAX SETTINGS" of the User's Guide on -screen manual. Refer to answer the call , be sure to pick up the handset before picking up the handset, then press the Stop/Reset...

MX300 series Quick Start Guide
Page 52
... upon a country. Note For details on the setting the ring pattern of DRPD service, refer to "DRPD:FAX RNG PAT" in "FAX SETTINGS" of the User's Guide on the country or region of this feature, you order the DRPD service. Contact your telephone company. Pick up the handset to answer the call...
... upon a country. Note For details on the setting the ring pattern of DRPD service, refer to "DRPD:FAX RNG PAT" in "FAX SETTINGS" of the User's Guide on the country or region of this feature, you order the DRPD service. Contact your telephone company. Pick up the handset to answer the call...
MX300 series Quick Start Guide
Page 55
... dial 25 (the remote receiving ID) to the machine that can be able to cancel printing of faxes in RX SETTINGS under one of the User's Guide on how to switch to tone dialing. z If you have him/her resend them. * When using ITU-T No.1 chart (Standard mode) „ Remote Receiving If...
... dial 25 (the remote receiving ID) to the machine that can be able to cancel printing of faxes in RX SETTINGS under one of the User's Guide on how to switch to tone dialing. z If you have him/her resend them. * When using ITU-T No.1 chart (Standard mode) „ Remote Receiving If...

MX300 series Quick Start Guide
Page 59
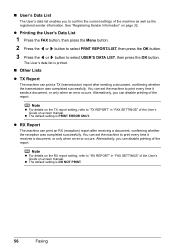
...fax transmission. Report Or List Description Activity report Shows recent fax transactions performed by your machine. See "Activity Report" on page 56. See "User's Data List" on -screen manual. TX (Transmission) report Confirms whether a transmission was completed successfully. See "Printing a List of this ... select ACTIVITY REPORT, then press the OK button. See "RX Report" on page 56. „ Activity Report Prints the history of the User's Guide on page 56. z Printing the Activity Report Manually 1 Press the FAX button, then press the Menu button. 2 Press the [ or ...
...fax transmission. Report Or List Description Activity report Shows recent fax transactions performed by your machine. See "Activity Report" on page 56. See "User's Data List" on -screen manual. TX (Transmission) report Confirms whether a transmission was completed successfully. See "Printing a List of this ... select ACTIVITY REPORT, then press the OK button. See "RX Report" on page 56. „ Activity Report Prints the history of the User's Guide on page 56. z Printing the Activity Report Manually 1 Press the FAX button, then press the Menu button. 2 Press the [ or ...
MX300 series Quick Start Guide
Page 60
...NOT PRINT. 56 Faxing You can set the machine to "RX REPORT" in "FAX SETTINGS" of the User's Guide on page 32. You can set the machine to "TX REPORT" in "FAX SETTINGS" of the User's Guide on-screen manual. Note z For details on the TX report setting, refer to print every time it... receives a document, or only when an error occurs. z Printing the User's Data List 1 Press the FAX button, then press the Menu button...
...NOT PRINT. 56 Faxing You can set the machine to "RX REPORT" in "FAX SETTINGS" of the User's Guide on page 32. You can set the machine to "TX REPORT" in "FAX SETTINGS" of the User's Guide on-screen manual. Note z For details on the TX report setting, refer to print every time it... receives a document, or only when an error occurs. z Printing the User's Data List 1 Press the FAX button, then press the Menu button...

MX300 series Quick Start Guide
Page 62
... beside the Paper Output Tray and open it gently. (2) Open up and set the Paper Thickness Lever. (1) Put your finger in "Main Components" of the User's Guide on-screen manual. 3 Print the nozzle check pattern. (1) Press the Menu button repeatedly until MAINTENANCE appears. (2) Press the [ or ] button to select NOZZLE CHECK, then...
... beside the Paper Output Tray and open it gently. (2) Open up and set the Paper Thickness Lever. (1) Put your finger in "Main Components" of the User's Guide on-screen manual. 3 Print the nozzle check pattern. (1) Press the Menu button repeatedly until MAINTENANCE appears. (2) Press the [ or ] button to select NOZZLE CHECK, then...

MX300 series Quick Start Guide
Page 66
For details on the Paper Thickness Lever, refer to "Inside" in "Main Components" of the User's Guide on its front side. (3) Set the Paper Thickness Lever to select ALIGN PRINT HEAD, then press the OK button. The print head alignment pattern is ...
For details on the Paper Thickness Lever, refer to "Inside" in "Main Components" of the User's Guide on its front side. (3) Set the Paper Thickness Lever to select ALIGN PRINT HEAD, then press the OK button. The print head alignment pattern is ...


