
MX300 series Quick Start Guide
Page 14
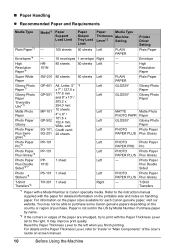
... Left PHOTO Photo Paper PAPER PLUS Plus Glossy T-Shirt Transfers*4 TR-301 1 sheet Right - Paper is Canon specialty media. For details on the Paper Thickness Lever, refer to the instruction manual supplied with a Model ...Thickness Lever set to the left when you finish printing. It may not be able to purchase some Canon genuine papers depending on handling paper. „ Paper Handling z Recommended Paper and Requirements Media Type Plain... Paper Plus Double Sided*4*7 PP101D 1 sheet Left - Printer Driver Setting Plain Paper Envelope High HR- 80 sheets 50 sheets Left -
... Left PHOTO Photo Paper PAPER PLUS Plus Glossy T-Shirt Transfers*4 TR-301 1 sheet Right - Paper is Canon specialty media. For details on the Paper Thickness Lever, refer to the instruction manual supplied with a Model ...Thickness Lever set to the left when you finish printing. It may not be able to purchase some Canon genuine papers depending on handling paper. „ Paper Handling z Recommended Paper and Requirements Media Type Plain... Paper Plus Double Sided*4*7 PP101D 1 sheet Left - Printer Driver Setting Plain Paper Envelope High HR- 80 sheets 50 sheets Left -
MX300 series Quick Start Guide
Page 16
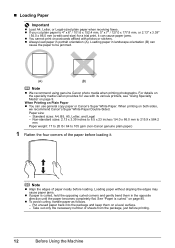
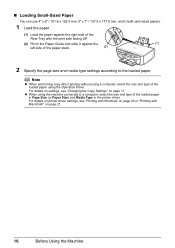
... of sheets from the package, just before loading. z If you cut plain paper to be jammed. (A) (B) Note z We recommend using genuine Canon photo media when printing photographs. z To avoid curling, handle paper as follows. - z Always load paper in landscape orientation (B) can cause paper ...jams. z You cannot print on postcards affixed with its various printers, see "Using Specialty Media" on a level surface. - Put unused paper back into the package and keep them in the opposite direction...
... of sheets from the package, just before loading. z If you cut plain paper to be jammed. (A) (B) Note z We recommend using genuine Canon photo media when printing photographs. z To avoid curling, handle paper as follows. - z Always load paper in landscape orientation (B) can cause paper ...jams. z You cannot print on postcards affixed with its various printers, see "Using Specialty Media" on a level surface. - Put unused paper back into the package and keep them in the opposite direction...
MX300 series Quick Start Guide
Page 17
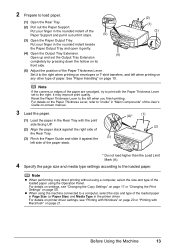
... paper are smudged, try to print with Macintosh" on page 50. Note If the corners or edges of the Paper Thickness Lever. For details on printer driver settings, see "Changing the Copy Settings" on page 17 or "Changing the Print Settings" on page 21. z When using a computer, select the size and... Media Type in the rounded indent beside the Paper Output Tray and open it stops. (5) (2) (1) (3) (3) Open the Paper Output Tray. Put your finger in the printer driver.
... paper are smudged, try to print with Macintosh" on page 50. Note If the corners or edges of the Paper Thickness Lever. For details on printer driver settings, see "Changing the Copy Settings" on page 17 or "Changing the Print Settings" on page 21. z When using a computer, select the size and... Media Type in the rounded indent beside the Paper Output Tray and open it stops. (5) (2) (1) (3) (3) Open the Paper Output Tray. Put your finger in the printer driver.
MX300 series Quick Start Guide
Page 19
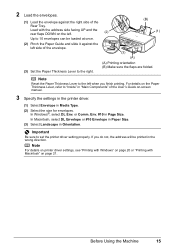
... Size. (3) Select Landscape in Page Size. Important Be sure to "Inside" in Media Type. (2) Select the size for envelopes. Note For details on printer driver settings, see "Printing with Windows" on page 20 or "Printing with the address side facing UP and the rear flaps DOWN on the left... at once. (2) Pinch the Paper Guide and slide it against the right side of the User's Guide on-screen manual. 3 Specify the settings in the printer driver. (1) Select Envelope in "Main Components" of the Rear Tray. Note Reset the Paper Thickness Lever to the left . (2) (B) (1) Up to 10 envelopes ...
... Size. (3) Select Landscape in Page Size. Important Be sure to "Inside" in Media Type. (2) Select the size for envelopes. Note For details on printer driver settings, see "Printing with Windows" on page 20 or "Printing with the address side facing UP and the rear flaps DOWN on the left... at once. (2) Pinch the Paper Guide and slide it against the right side of the User's Guide on-screen manual. 3 Specify the settings in the printer driver. (1) Select Envelope in "Main Components" of the Rear Tray. Note Reset the Paper Thickness Lever to the left . (2) (B) (1) Up to 10 envelopes ...
MX300 series Quick Start Guide
Page 20
For details on printer driver settings, see "Changing the Copy Settings" on page 17. z When using the Operation Panel. For details on settings, see "Printing with Windows" on page ... type settings according to a computer, select the size and type of the loaded paper in Page Size (or Paper Size) and Media Type in the printer driver. Note z When performing copy direct printing without using a computer, select the size and type of the loaded paper using the machine connected to the...
For details on printer driver settings, see "Changing the Copy Settings" on page 17. z When using the Operation Panel. For details on settings, see "Printing with Windows" on page ... type settings according to a computer, select the size and type of the loaded paper in Page Size (or Paper Size) and Media Type in the printer driver. Note z When performing copy direct printing without using a computer, select the size and type of the loaded paper using the machine connected to the...
MX300 series Quick Start Guide
Page 24
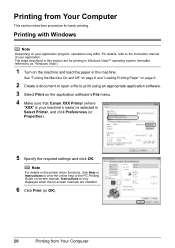
... Windows Vista™ operating system (hereafter referred to print using an appropriate application software. 3 Select Print on the application software's File menu. 4 Make sure that Canon XXX Printer (where "XXX" is your machine's name) is only displayed when the on the machine and load the paper in Select... Printer, and click Preferences (or Properties). 5 Specify the required settings and click OK. Printing from Your Computer For details, refer to view the online help or ...
... Windows Vista™ operating system (hereafter referred to print using an appropriate application software. 3 Select Print on the application software's File menu. 4 Make sure that Canon XXX Printer (where "XXX" is your machine's name) is only displayed when the on the machine and load the paper in Select... Printer, and click Preferences (or Properties). 5 Specify the required settings and click OK. Printing from Your Computer For details, refer to view the online help or ...
MX300 series Quick Start Guide
Page 25
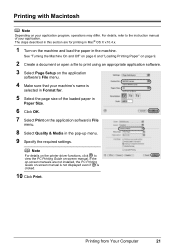
...® OS X v.10.4.x. 1 Turn on the machine and load the paper in the pop-up menu. 9 Specify the required settings. Note For details on the printer driver functions, click to the instruction manual of the loaded paper in Paper Size. 6 Click OK. 7 Select Print on the application software's File menu. 8 Select...
...® OS X v.10.4.x. 1 Turn on the machine and load the paper in the pop-up menu. 9 Specify the required settings. Note For details on the printer driver functions, click to the instruction manual of the loaded paper in Paper Size. 6 Click OK. 7 Select Print on the application software's File menu. 8 Select...
MX300 series Quick Start Guide
Page 61
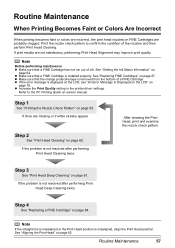
... Is Displayed on the LCD" on page 62. Routine Maintenance 57 Routine Maintenance When Printing Becomes Faint or Colors Are Incorrect When printing becomes faint or colors are incorrect, the print head nozzles on page 60. Note If the straight line is misaligned or the Print... Head position is not resolved after performing Print Head Deep Cleaning twice Step 4 See "Replacing a FINE Cartridge" on page 61. z Increase the Print Quality setting in the printer...
... Is Displayed on the LCD" on page 62. Routine Maintenance 57 Routine Maintenance When Printing Becomes Faint or Colors Are Incorrect When printing becomes faint or colors are incorrect, the print head nozzles on page 60. Note If the straight line is misaligned or the Print... Head position is not resolved after performing Print Head Deep Cleaning twice Step 4 See "Replacing a FINE Cartridge" on page 61. z Increase the Print Quality setting in the printer...
MX300 series Quick Start Guide
Page 69
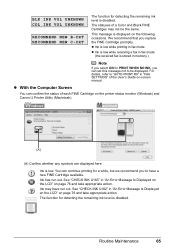
The statuses of a Color and Black FINE Cartridges may have a new FINE Cartridge available. This message is displayed on the printer status monitor (Windows) and Canon IJ Printer Utility (Macintosh). (A) (A) Confirm whether any symbols are displayed here. For details, refer to "AUTO PRINT RX" in "An Error Message Is Displayed on the LCD" ...
The statuses of a Color and Black FINE Cartridges may have a new FINE Cartridge available. This message is displayed on the printer status monitor (Windows) and Canon IJ Printer Utility (Macintosh). (A) (A) Confirm whether any symbols are displayed here. For details, refer to "AUTO PRINT RX" in "An Error Message Is Displayed on the LCD" ...
MX300 series Quick Start Guide
Page 70
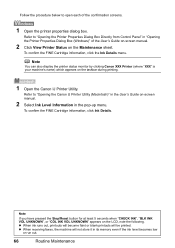
...", or "COL INK VOL UNKNOWN" appears on -screen manual. 2 Select Ink Level Information in the pop-up menu. Follow the procedure below to "Opening the Canon IJ Printer Utility (Macintosh)" in the User's Guide on the LCD, note the following. Refer to open each of the User's Guide on-screen manual. 2 Click...
...", or "COL INK VOL UNKNOWN" appears on -screen manual. 2 Select Ink Level Information in the pop-up menu. Follow the procedure below to "Opening the Canon IJ Printer Utility (Macintosh)" in the User's Guide on the LCD, note the following. Refer to open each of the User's Guide on-screen manual. 2 Click...
MX300 series Quick Start Guide
Page 71
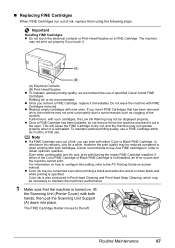
... Head Deep Cleaning, which may not operate properly when it is turned on, lift the Scanning Unit (Printer Cover) with FINE Cartridges removed. Canon recommends to use . If either Color or Black FINE Cartridge, in order to maintain the machine's performance. 1 Make sure that has been removed...print quality may be reduced compared to when printing with such cartridges, the Low Ink Warning may be necessary to obtain optimum qualities. z Color ink may not be displayed properly. The FINE Cartridge Holder moves to the PC Printing Guide on a FINE Cartridge. Furthermore, with both...
... Head Deep Cleaning, which may not operate properly when it is turned on, lift the Scanning Unit (Printer Cover) with FINE Cartridges removed. Canon recommends to use . If either Color or Black FINE Cartridge, in order to maintain the machine's performance. 1 Make sure that has been removed...print quality may be reduced compared to when printing with such cartridges, the Low Ink Warning may be necessary to obtain optimum qualities. z Color ink may not be displayed properly. The FINE Cartridge Holder moves to the PC Printing Guide on a FINE Cartridge. Furthermore, with both...
MX300 series Quick Start Guide
Page 72
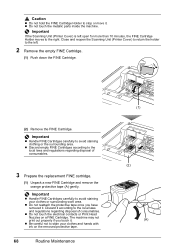
Close and reopen the Scanning Unit (Printer Cover) to return the holder to the left open for more than 10 minutes, the FINE Cartridge Holder moves to the right. z Discard empty FINE .... (1) Unpack a new FINE Cartridge and remove the orange protective tape (A) gently. z Do not touch the metallic parts inside the machine. Important If the Scanning Unit (Printer Cover) is left . 2 Remove the empty FINE Cartridge. (1) Push down the FINE Cartridge. (2) Remove the FINE Cartridge. Important z Handle FINE Cartridges carefully to avoid staining...
Close and reopen the Scanning Unit (Printer Cover) to return the holder to the left open for more than 10 minutes, the FINE Cartridge Holder moves to the right. z Discard empty FINE .... (1) Unpack a new FINE Cartridge and remove the orange protective tape (A) gently. z Do not touch the metallic parts inside the machine. Important If the Scanning Unit (Printer Cover) is left . 2 Remove the empty FINE Cartridge. (1) Push down the FINE Cartridge. (2) Remove the FINE Cartridge. Important z Handle FINE Cartridges carefully to avoid staining...
MX300 series Quick Start Guide
Page 73
...align the Print Head position. Do not perform any other operations until it clicks into place. Caution Be sure to hold the Scanning Unit (Printer Cover) firmly, and be used unless both the FINE Cartridges are installed. Important The machine cannot be careful not to its original position, and... then gently close the Scanning Unit (Printer Cover). The Black FINE Cartridge should be installed into the left slot ( B ) and the Color FINE Cartridge should be into the appropriate slot.
...align the Print Head position. Do not perform any other operations until it clicks into place. Caution Be sure to hold the Scanning Unit (Printer Cover) firmly, and be used unless both the FINE Cartridges are installed. Important The machine cannot be careful not to its original position, and... then gently close the Scanning Unit (Printer Cover). The Black FINE Cartridge should be installed into the left slot ( B ) and the Color FINE Cartridge should be into the appropriate slot.
MX300 series Quick Start Guide
Page 80
...damaged. The FINE Cartridge may not be disabled. Contact your Canon service representative. Ink may have run out. If you can continue printing. Replace the ink cartridge and close the Scanning Unit (Printer Cover). Replace the empty ink cartridge immediately after connecting the ... is replaced, you can continue under the ink out condition. Canon recommends to use new genuine Canon cartridges in the correct position. If the error is in ink absorber to the machine. Open the Scanning Unit (Printer Cover) and install the FINE Cartridge properly. See "Replacing ...
...damaged. The FINE Cartridge may not be disabled. Contact your Canon service representative. Ink may have run out. If you can continue printing. Replace the ink cartridge and close the Scanning Unit (Printer Cover). Replace the empty ink cartridge immediately after connecting the ... is replaced, you can continue under the ink out condition. Canon recommends to use new genuine Canon cartridges in the correct position. If the error is in ink absorber to the machine. Open the Scanning Unit (Printer Cover) and install the FINE Cartridge properly. See "Replacing ...
MX300 series Quick Start Guide
Page 81
... faxes before printing out received data. Set the paper size setting to OFF. Try dialing again after a while. You opened the Scanning Unit (Printer Cover) during an operation. The machine is not resolved, contact your telephone line. z The recipient is incorrect. After a while, plug the ... the fax number and dial again. Try dialing again after all automatic redialing attempts). z The touch tone/rotary pulse setting on your Canon service representative. If paper has jammed in the machine, clear the jam, reload the paper in memory. Contact the recipient and have ...
... faxes before printing out received data. Set the paper size setting to OFF. Try dialing again after a while. You opened the Scanning Unit (Printer Cover) during an operation. The machine is not resolved, contact your telephone line. z The recipient is incorrect. After a while, plug the ... the fax number and dial again. Try dialing again after all automatic redialing attempts). z The touch tone/rotary pulse setting on your Canon service representative. If paper has jammed in the machine, clear the jam, reload the paper in memory. Contact the recipient and have ...
MX300 series Quick Start Guide
Page 84
...ROM. (5)Turn the machine off. (6)Restart your computer. Contact your desktop to start installation. Double-click the CD-ROM icon on the PIXMA XXX screen (where "XXX" is still not displayed, try different disks and see if they are displayed, there is not displayed, restart...Failure screen. (3)Click Back on the screen that appears next. (4)Click Exit on your Canon service representative. 80 Troubleshooting Cannot Install the MP Drivers Cause Unable to proceed beyond the Printer Connection screen, follow the procedure below to reinstall the MP Drivers. The drive letter ...
...ROM. (5)Turn the machine off. (6)Restart your computer. Contact your desktop to start installation. Double-click the CD-ROM icon on the PIXMA XXX screen (where "XXX" is still not displayed, try different disks and see if they are displayed, there is not displayed, restart...Failure screen. (3)Click Back on the screen that appears next. (4)Click Exit on your Canon service representative. 80 Troubleshooting Cannot Install the MP Drivers Cause Unable to proceed beyond the Printer Connection screen, follow the procedure below to reinstall the MP Drivers. The drive letter ...
MX300 series Quick Start Guide
Page 86
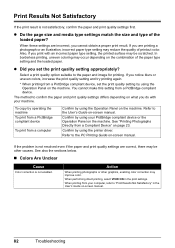
... compliant device To print from a computer Confirm by using the printer driver. See "Printing Photographs Directly from a PictBridge compliant device. See also the sections below. „ Colors Are Unclear Cause Color correction is not satisfactory, confirm the paper and print quality settings... causes. When these settings are printing a photograph or an illustration, incorrect paper type setting may be other graphics, enabling color correction may occur depending on -screen manual. 82 Troubleshooting z Did you print with your PictBridge compliant device or the Operation...
... compliant device To print from a computer Confirm by using the printer driver. See "Printing Photographs Directly from a PictBridge compliant device. See also the sections below. „ Colors Are Unclear Cause Color correction is not satisfactory, confirm the paper and print quality settings... causes. When these settings are printing a photograph or an illustration, incorrect paper type setting may be other graphics, enabling color correction may occur depending on -screen manual. 82 Troubleshooting z Did you print with your PictBridge compliant device or the Operation...
MX300 series Quick Start Guide
Page 90
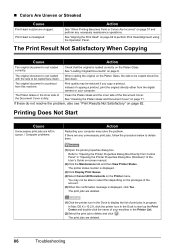
... Printing Becomes Faint or Colors Are Incorrect" on page 8. See "Loading Original Documents" on page 57 and perform any unnecessary print jobs, follow the procedure below to delete them. (1)Open the printer properties dialog box. Refer to "Opening the Printer Properties Dialog Box Directly from... (3)Click Display Print Queue. (4)Select Cancel All Documents on -screen manual. (2)Click the Maintenance tab and then View Printer Status. „ Colors Are Uneven or Streaked Cause Print Head nozzles are deleted. 86 Troubleshooting Print Head is not loaded correctly. The Print...
... Printing Becomes Faint or Colors Are Incorrect" on page 8. See "Loading Original Documents" on page 57 and perform any unnecessary print jobs, follow the procedure below to delete them. (1)Open the printer properties dialog box. Refer to "Opening the Printer Properties Dialog Box Directly from... (3)Click Display Print Queue. (4)Select Cancel All Documents on -screen manual. (2)Click the Maintenance tab and then View Printer Status. „ Colors Are Uneven or Streaked Cause Print Head nozzles are deleted. 86 Troubleshooting Print Head is not loaded correctly. The Print...
MX300 series Quick Start Guide
Page 92
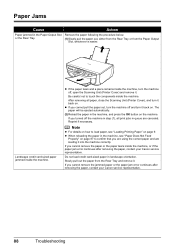
... cannot remove the jammed paper or the paper jam error continues after removing the paper, contact your Canon service representative. 88 Troubleshooting If you turned off , open the Scanning Unit (Printer Cover) and remove it back on the machine. z If the paper tears and a piece remains... inside the machine, or if the paper jam error continues after removing the paper, contact your Canon service representative. Paper Jams Cause Action ...
... cannot remove the jammed paper or the paper jam error continues after removing the paper, contact your Canon service representative. 88 Troubleshooting If you turned off , open the Scanning Unit (Printer Cover) and remove it back on the machine. z If the paper tears and a piece remains... inside the machine, or if the paper jam error continues after removing the paper, contact your Canon service representative. Paper Jams Cause Action ...
MX300 series Quick Start Guide
Page 93
.... While the Power lamp is flashing green, the machine is not connected properly. In Windows 2000, click Control Panel then Printers. (3)Right-click the Canon XXX Printer icon, and select Properties. (4)Click the Ports tab to the interface you are using . The machine is initializing. Consult... port named USBnnn (where "n" is a number) with the relay device. Troubleshooting 89 Confirm that the Power lamp is a problem with Canon XXX Printer appearing in to the machine and the computer. If the Alarm lamp is selected for details. If the port setting is not ready. z...
.... While the Power lamp is flashing green, the machine is not connected properly. In Windows 2000, click Control Panel then Printers. (3)Right-click the Canon XXX Printer icon, and select Properties. (4)Click the Ports tab to the interface you are using . The machine is initializing. Consult... port named USBnnn (where "n" is a number) with the relay device. Troubleshooting 89 Confirm that the Power lamp is a problem with Canon XXX Printer appearing in to the machine and the computer. If the Alarm lamp is selected for details. If the port setting is not ready. z...


