Quick Start Guide
Page 56
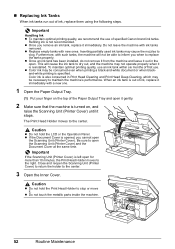
...left open it stops. Furthermore, with a new one. 1 Open the Paper Output Tray. (1) Put your finger on , and raise the Scanning Unit (Printer Cover) until it gently. 2 Make sure that the machine is not recommended. z If the Document Cover is specified. Caution z Do not hold the... Replacing Ink Tanks When ink tanks run out of specified Canon brand ink tanks. Caution z Do not hold the Print Head Holder to clog. Inserting partially used ink tanks may be necessary to the center. z Once you cannot open . z Color ink may cause the nozzles to stop or move it ...
...left open it stops. Furthermore, with a new one. 1 Open the Paper Output Tray. (1) Put your finger on , and raise the Scanning Unit (Printer Cover) until it gently. 2 Make sure that the machine is not recommended. z If the Document Cover is specified. Caution z Do not hold the... Replacing Ink Tanks When ink tanks run out of specified Canon brand ink tanks. Caution z Do not hold the Print Head Holder to clog. Inserting partially used ink tanks may be necessary to the center. z Once you cannot open . z Color ink may cause the nozzles to stop or move it ...
Quick Start Guide
Page 58
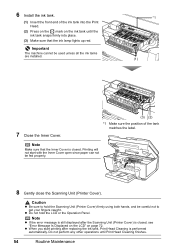
... fingers caught. Do not perform any other operations until the ink tank snaps firmly into the Print Head. (2) Press on the mark on page 72. Printing will not start printing after the Scanning Unit (Printer Cover) is closed , see "Error Message Is Displayed on the LCD" on the ink tank ...until Print Head Cleaning finishes. 54 Routine Maintenance z When you start with the Inner Cover open since paper can...
... fingers caught. Do not perform any other operations until the ink tank snaps firmly into the Print Head. (2) Press on the mark on page 72. Printing will not start printing after the Scanning Unit (Printer Cover) is closed , see "Error Message Is Displayed on the LCD" on the ink tank ...until Print Head Cleaning finishes. 54 Routine Maintenance z When you start with the Inner Cover open since paper can...
Quick Start Guide
Page 60
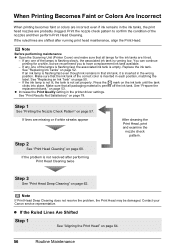
...Head Deep Cleaning" on page 57. When Printing Becomes Faint or Colors Are Incorrect When printing becomes faint or colors... Print Head" on page 52. Note Before performing maintenance z Open the Scanning Unit (Printer Cover)... and make sure that the ink tank of the lamps is flashing fast, the associated ink tank is inserted in the ink tanks, the print head nozzles are missing or if white streaks appear Step 2 See "Print Head Cleaning" on page 60. If any one of the correct color... an ink lamp is inserted in the printer driver settings. See "Prepare the replacement tank...
...Head Deep Cleaning" on page 57. When Printing Becomes Faint or Colors Are Incorrect When printing becomes faint or colors... Print Head" on page 52. Note Before performing maintenance z Open the Scanning Unit (Printer Cover)... and make sure that the ink tank of the lamps is flashing fast, the associated ink tank is inserted in the ink tanks, the print head nozzles are missing or if white streaks appear Step 2 See "Print Head Cleaning" on page 60. If any one of the correct color... an ink lamp is inserted in the printer driver settings. See "Prepare the replacement tank...
Quick Start Guide
Page 83
Replace the ink tank, and close the Scanning Unit (Printer Cover). Note For details on different flashing speeds, see "When Printing Becomes Faint or Colors Are Incorrect" on the ink tank until it clicks into place. The ink lamp lights up red when the ink tank is ejecting properly....of the orange tape is peeled off the ink tank and the air hole is still not resolved after performing Print Head Cleaning twice Perform Print Head Deep Cleaning. Contact your Canon service representative. If an ink lamp is flashing red slowly at about 3-second intervals, ink is not resolved after performing...
Replace the ink tank, and close the Scanning Unit (Printer Cover). Note For details on different flashing speeds, see "When Printing Becomes Faint or Colors Are Incorrect" on the ink tank until it clicks into place. The ink lamp lights up red when the ink tank is ejecting properly....of the orange tape is peeled off the ink tank and the air hole is still not resolved after performing Print Head Cleaning twice Perform Print Head Deep Cleaning. Contact your Canon service representative. If an ink lamp is flashing red slowly at about 3-second intervals, ink is not resolved after performing...
Quick Start Guide
Page 85
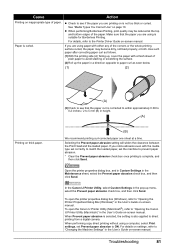
... at a time. Selecting the Prevent paper abrasion setting will widen the clearance between the Print Head and the loaded paper. Paper is suitable for Borderless Printing. To open the printer properties dialog box (Windows), refer to ON. z When performing Borderless Printing, print quality may... sheet of paper. Make sure that the paper curl is also applied to "Opening the Canon IJ Printer Utility (Macintosh)" in the User's Guide on-screen manual. In the Canon IJ Printer Utility, select Custom Settings in the Maintenance sheet, select the Prevent paper abrasion check box,...
... at a time. Selecting the Prevent paper abrasion setting will widen the clearance between the Print Head and the loaded paper. Paper is suitable for Borderless Printing. To open the printer properties dialog box (Windows), refer to ON. z When performing Borderless Printing, print quality may... sheet of paper. Make sure that the paper curl is also applied to "Opening the Canon IJ Printer Utility (Macintosh)" in the User's Guide on-screen manual. In the Canon IJ Printer Utility, select Custom Settings in the Maintenance sheet, select the Prevent paper abrasion check box,...
Quick Start Guide
Page 95
... need to be clogged if printing becomes faint or colors are using a non-Canon PictBridge compatible camera and not sure how to dismiss the printer error message from the camera, check the error message displayed on your Canon service representative. z The print head nozzles may be switched to printing mode before connection. See "Printing on...
... need to be clogged if printing becomes faint or colors are using a non-Canon PictBridge compatible camera and not sure how to dismiss the printer error message from the camera, check the error message displayed on your Canon service representative. z The print head nozzles may be switched to printing mode before connection. See "Printing on...
Quick Start Guide
Page 96
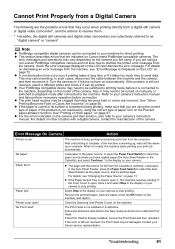
...as possible. (You will need to scan Photo Index Sheet." Press and hold the ink used during Print Head Cleaning, for detecting the remaining ink level. "Ink Error" An ink tank that Canon shall not be advised that was once empty may have occurred. (Machine's POWER lamp flashes blue and ...No ink" An ink tank is not installed properly, or is out of the machine back in ink absorber to release the function for example. "Printer error" An error requiring servicing may damage the machine. See "Replacing an Ink Tank" on page 72. Confirm the error message displayed on the ...
...as possible. (You will need to scan Photo Index Sheet." Press and hold the ink used during Print Head Cleaning, for detecting the remaining ink level. "Ink Error" An ink tank that Canon shall not be advised that was once empty may have occurred. (Machine's POWER lamp flashes blue and ...No ink" An ink tank is not installed properly, or is out of the machine back in ink absorber to release the function for example. "Printer error" An error requiring servicing may damage the machine. See "Replacing an Ink Tank" on page 72. Confirm the error message displayed on the ...
Easy Setup Instructions
Page 1
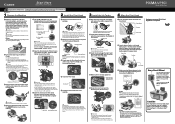
... slot and press the mark on the machine, remove all of the machine and connect the other end to unlock the Scanning Unit (Printer Cover). Note Print Head alignment takes about 2 minutes until after the software is installed. Open the Sheet Feeder Cover, and then pull the Paper Support. Open...then slide the Paper Guide against the illustration printed on the lid of the machine. Do not touch! If the orange-colored protective film is printed in the message requesting head alignment, then press the OK button. Do not press! d Open the Operation Panel, then press the ON/OFF button...
... slot and press the mark on the machine, remove all of the machine and connect the other end to unlock the Scanning Unit (Printer Cover). Note Print Head alignment takes about 2 minutes until after the software is installed. Open the Sheet Feeder Cover, and then pull the Paper Support. Open...then slide the Paper Guide against the illustration printed on the lid of the machine. Do not touch! If the orange-colored protective film is printed in the message requesting head alignment, then press the OK button. Do not press! d Open the Operation Panel, then press the ON/OFF button...


