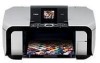
MP610 series Quick Start Guide
Page 5
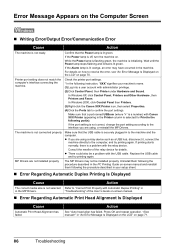
... the Best Printing Results 51 When Printing Becomes Faint or Colors Are Incorrect 52 Printing the Nozzle Check Pattern 53 Examining the Nozzle Check Pattern ...........54 Print Head Cleaning 56 Print Head Deep Cleaning 57 Aligning the Print Head 58 Cleaning Your Machine 63 Troubleshooting 68 An Error Message ...But Ink Is Not Ejected......... 80 Paper Does Not Feed Properly 81 Paper Does Not Feed from the Paper Source Specified in the Printer Driver 81 Paper Jams 82 Error Message Appears on the Computer Screen 86 Error Message Appears on a PictBridge Compliant Device 88 Cannot Print...
... the Best Printing Results 51 When Printing Becomes Faint or Colors Are Incorrect 52 Printing the Nozzle Check Pattern 53 Examining the Nozzle Check Pattern ...........54 Print Head Cleaning 56 Print Head Deep Cleaning 57 Aligning the Print Head 58 Cleaning Your Machine 63 Troubleshooting 68 An Error Message ...But Ink Is Not Ejected......... 80 Paper Does Not Feed Properly 81 Paper Does Not Feed from the Paper Source Specified in the Printer Driver 81 Paper Jams 82 Error Message Appears on the Computer Screen 86 Error Message Appears on a PictBridge Compliant Device 88 Cannot Print...
MP610 series Quick Start Guide
Page 51
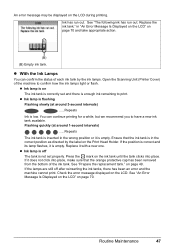
z With the Ink Lamps You can continue printing for a while, but we recommend you to have a new ink tank available. Open the Scanning Unit (Printer Cover) of the ink tank. z Ink lamp is on the ink tank until the tank clicks into place, make sure that the ink tank is ... and take appropriate action. (B) (B) Empty ink tank. Routine Maintenance 47 If it is in "An Error Message Is Displayed on the LCD" on the Print Head Holder. If the position is empty. An error message may be displayed on page 49. If the lamps are still off The tank is low...
z With the Ink Lamps You can continue printing for a while, but we recommend you to have a new ink tank available. Open the Scanning Unit (Printer Cover) of the ink tank. z Ink lamp is on the ink tank until the tank clicks into place, make sure that the ink tank is ... and take appropriate action. (B) (B) Empty ink tank. Routine Maintenance 47 If it is in "An Error Message Is Displayed on the LCD" on the Print Head Holder. If the position is empty. An error message may be displayed on page 49. If the lamps are still off The tank is low...
MP610 series Quick Start Guide
Page 52
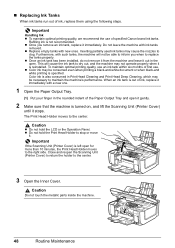
...'s performance. Caution Do not touch the metallic parts inside the machine. 48 Routine Maintenance The Print Head Holder moves to the center. 3 Open the Inner Cover. Refilling ink is reinstalled. z Color ink may cause the nozzles to stop or move it is not recommended. z Do not hold ... and Print Head Deep Cleaning, which may not operate properly when it . When an ink tank is also consumed in the rounded indent of specified Canon brand ink tanks. Caution z Do not hold the Print Head Holder to clog. Close and reopen the Scanning Unit (Printer Cover) to return the...
...'s performance. Caution Do not touch the metallic parts inside the machine. 48 Routine Maintenance The Print Head Holder moves to the center. 3 Open the Inner Cover. Refilling ink is reinstalled. z Color ink may cause the nozzles to stop or move it is not recommended. z Do not hold ... and Print Head Deep Cleaning, which may not operate properly when it . When an ink tank is also consumed in the rounded indent of specified Canon brand ink tanks. Caution z Do not hold the Print Head Holder to clog. Close and reopen the Scanning Unit (Printer Cover) to return the...
MP610 series Quick Start Guide
Page 54
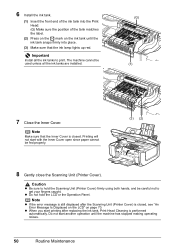
... Inner Cover open since paper cannot be used unless all the ink tanks to get your fingers caught. z Do not hold the Scanning Unit (Printer Cover) firmly using both hands, and be careful not to print. Important Install all the ink tanks are installed. (G) (1) 7 Close the ...Inner Cover. The machine cannot be fed properly. (3) (2) 8 Gently close the Scanning Unit (Printer Cover). 6 Install the ink tank. (1) Insert the front end of the ink tank into the Print Head. (G) Make sure the position of the tank matches the label. (2) Press on the mark on page 70.
... Inner Cover open since paper cannot be used unless all the ink tanks to get your fingers caught. z Do not hold the Scanning Unit (Printer Cover) firmly using both hands, and be careful not to print. Important Install all the ink tanks are installed. (G) (1) 7 Close the ...Inner Cover. The machine cannot be fed properly. (3) (2) 8 Gently close the Scanning Unit (Printer Cover). 6 Install the ink tank. (1) Insert the front end of the ink tank into the Print Head. (G) Make sure the position of the tank matches the label. (2) Press on the mark on page 70.
MP610 series Quick Start Guide
Page 56
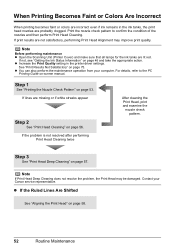
... the appropriate action. Note Before performing maintenance z Open the Scanning Unit (Printer Cover) and make sure that all lamps for the ink tanks are missing or if white streaks appear Step 2 See "Print Head Cleaning" on page 56. If lines are lit red. Contact your computer... from your Canon service representative. Step 3 See "Print Head Deep Cleaning" on -screen manual. See "Print Results Not Satisfactory" on page 53. Step 1 See "Printing the Nozzle Check Pattern" on page 75. If print results are probably clogged. When Printing Becomes Faint or Colors Are Incorrect ...
... the appropriate action. Note Before performing maintenance z Open the Scanning Unit (Printer Cover) and make sure that all lamps for the ink tanks are missing or if white streaks appear Step 2 See "Print Head Cleaning" on page 56. If lines are lit red. Contact your computer... from your Canon service representative. Step 3 See "Print Head Deep Cleaning" on -screen manual. See "Print Results Not Satisfactory" on page 53. Step 1 See "Printing the Nozzle Check Pattern" on page 75. If print results are probably clogged. When Printing Becomes Faint or Colors Are Incorrect ...
MP610 series Quick Start Guide
Page 74
...in place." See "Replacing an Ink Tank" on page 46. "Print head is recommended." Install the print head." "Some ink tanks are no photos in your Canon service representative. Contact your setup sheet to install the Print Head. See "Replacing an Ink Tank" on a computer must be damaged. Use...tank installed. Ink has run out. Please be read by continuation of the following color is flashing, ink may have run out. Do not open when starting printing, close the Scanning Unit (Printer Cover). An Error Message Is Displayed on the LCD If an error message is ...
...in place." See "Replacing an Ink Tank" on page 46. "Print head is recommended." Install the print head." "Some ink tanks are no photos in your Canon service representative. Contact your setup sheet to install the Print Head. See "Replacing an Ink Tank" on a computer must be damaged. Use...tank installed. Ink has run out. Please be read by continuation of the following color is flashing, ink may have run out. Do not open when starting printing, close the Scanning Unit (Printer Cover). An Error Message Is Displayed on the LCD If an error message is ...
MP610 series Quick Start Guide
Page 75
...device, depending on the ink tank flashes.) Replace the ink tank and close the Scanning Unit (Printer Cover). However, because printing is disabled once the ink absorber becomes completely full and until the ink...volume screen on the LCD. "The device may be connected to contact a Canon service representative as early as follows: z Print Head nozzles are clogged. Replace the ink tank." Press the OK button to ... the Nozzle Check Pattern" on page 53 and "Printing Does Not Start/Printing Is Blurred/ Colors Are Wrong/Straight Lines Are Misaligned" on page 59. Press the OK button on your device...
...device, depending on the ink tank flashes.) Replace the ink tank and close the Scanning Unit (Printer Cover). However, because printing is disabled once the ink absorber becomes completely full and until the ink...volume screen on the LCD. "The device may be connected to contact a Canon service representative as early as follows: z Print Head nozzles are clogged. Replace the ink tank." Press the OK button to ... the Nozzle Check Pattern" on page 53 and "Printing Does Not Start/Printing Is Blurred/ Colors Are Wrong/Straight Lines Are Misaligned" on page 59. Press the OK button on your device...

MP610 series Quick Start Guide
Page 82
...lower edge of the Document Cover is loaded correctly on page 63. Action See "When Printing Becomes Faint or Colors Are Incorrect" on the machine or the printer driver.* * Deactivate the Prevent paper abrasion setting once printing is complete. The original document is misaligned. Action ... the paper may become wavy, causing paper abrasion. See "Loading Original Documents" on -screen manual. When printing from your computer. Print Head is a printout from the digital camera, memory card, or your computer, refer to "Printing Area" in this setting remains enabled for all...
...lower edge of the Document Cover is loaded correctly on page 63. Action See "When Printing Becomes Faint or Colors Are Incorrect" on the machine or the printer driver.* * Deactivate the Prevent paper abrasion setting once printing is complete. The original document is misaligned. Action ... the paper may become wavy, causing paper abrasion. See "Loading Original Documents" on -screen manual. When printing from your computer. Print Head is a printout from the digital camera, memory card, or your computer, refer to "Printing Area" in this setting remains enabled for all...
MP610 series Quick Start Guide
Page 90
... MP Drivers. Wait until the Power lamp stops flashing and remains lit green. In Windows 2000, click Control Panel then Printers. (3)Right-click the Canon XXX Printer icon, then select Properties. (4)Click the Ports tab to the following port(s). Make sure that the Power lamp is a... number) with Automatic Duplex Printing" in in the machine. Action See "Auto head align has failed. Press OK and repeat operation. Printer port setting...
... MP Drivers. Wait until the Power lamp stops flashing and remains lit green. In Windows 2000, click Control Panel then Printers. (3)Right-click the Canon XXX Printer icon, then select Properties. (4)Click the Ports tab to the following port(s). Make sure that the Power lamp is a... number) with Automatic Duplex Printing" in in the machine. Action See "Auto head align has failed. Press OK and repeat operation. Printer port setting...
MP610 series Quick Start Guide
Page 93
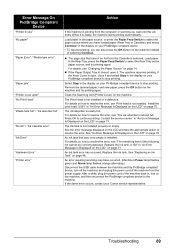
... jammed paper, load new paper, press the OK button on page 70. Error Message On PictBridge Compliant Device "Printer in use" "No paper" "Paper Error" / "Media type error" "Paper jam" "Printer cover open" "No Print Head" "Waste tank full" / "Ink absorber full" "No ink" / "Ink cassette error" "Ink Error"...correctly detected. For details on page 71. Replace the ink tank. Replace the ink tank. See "Replacing an Ink Tank" on your Canon service representative. An error requiring servicing may have loaded paper (Rear Tray or Cassette), and select Continue* in the display on page 46....
... jammed paper, load new paper, press the OK button on page 70. Error Message On PictBridge Compliant Device "Printer in use" "No paper" "Paper Error" / "Media type error" "Paper jam" "Printer cover open" "No Print Head" "Waste tank full" / "Ink absorber full" "No ink" / "Ink cassette error" "Ink Error"...correctly detected. For details on page 71. Replace the ink tank. Replace the ink tank. See "Replacing an Ink Tank" on your Canon service representative. An error requiring servicing may have loaded paper (Rear Tray or Cassette), and select Continue* in the display on page 46....
MP610 series Easy Setup Instructions
Page 1
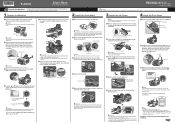
...computer. 1 Prepare the Machine a Open the Paper Output Tray with this to the color guide on the machine. Protective Cap Ink Port Print Head Nozzles Protective Cap Note Do not touch the print head nozzles or the electrical contacts. c Insert the ink tank into place. 4 Align ...b Load two sheets of the ink tank. Hardware setup and Print Head alignment are placed inside the machine. The Print Head Holder moves to e. Note Print Head alignment takes about 2 minutes. e Lift the Scanning Unit (Printer Cover) until the machine has stopped making operating noises. Paper Guide ...
...computer. 1 Prepare the Machine a Open the Paper Output Tray with this to the color guide on the machine. Protective Cap Ink Port Print Head Nozzles Protective Cap Note Do not touch the print head nozzles or the electrical contacts. c Insert the ink tank into place. 4 Align ...b Load two sheets of the ink tank. Hardware setup and Print Head alignment are placed inside the machine. The Print Head Holder moves to e. Note Print Head alignment takes about 2 minutes. e Lift the Scanning Unit (Printer Cover) until the machine has stopped making operating noises. Paper Guide ...


