MP610 series Quick Start Guide
Page 28
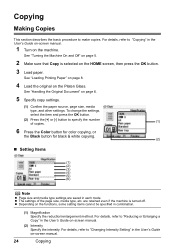
... select the item and press the OK button. (2) Press the [+] or [-] button to "Changing Intensity Setting" in each mode. See "Loading Printing Paper" on page 8. 4 Load the original on page 6. 5 Specify copy settings. (1) Confirm the paper source, page size, media type, and... User's Guide on -screen manual. 24 Copying For details, refer to make copies. z The settings of copies. (1) 6 Press the Color button for color copying, or the Black button for black & white copying. (2) „ Setting Items (1) (2) (3) (4) (5) (6) Note z Page size and media type settings are retained even...
... select the item and press the OK button. (2) Press the [+] or [-] button to "Changing Intensity Setting" in each mode. See "Loading Printing Paper" on page 8. 4 Load the original on page 6. 5 Specify copy settings. (1) Confirm the paper source, page size, media type, and... User's Guide on -screen manual. 24 Copying For details, refer to make copies. z The settings of copies. (1) 6 Press the Color button for color copying, or the Black button for black & white copying. (2) „ Setting Items (1) (2) (3) (4) (5) (6) Note z Page size and media type settings are retained even...
MP610 series Quick Start Guide
Page 29
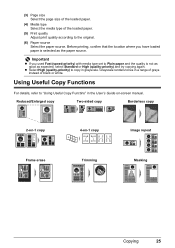
(3) Page size Select the page size of the loaded paper. (4) Media type Select the media type of black or white. Before printing, confirm that the location where you used Fast (speed-priority) with media type set to copy in the User's Guide on -1 copy... Image repeat Frame erase Trimming Masking Copying 25 Grayscale renders tones in a range of grays instead of the loaded paper. (5) Print quality Adjust print quality according to "Using Useful Copy Functins" in grayscale. Reduced/Enlarged copy Two-sided copy Borderless copy 2-on-1 copy 4-on -screen manual....
(3) Page size Select the page size of the loaded paper. (4) Media type Select the media type of black or white. Before printing, confirm that the location where you used Fast (speed-priority) with media type set to copy in the User's Guide on -1 copy... Image repeat Frame erase Trimming Masking Copying 25 Grayscale renders tones in a range of grays instead of the loaded paper. (5) Print quality Adjust print quality according to "Using Useful Copy Functins" in grayscale. Reduced/Enlarged copy Two-sided copy Borderless copy 2-on-1 copy 4-on -screen manual....

MP610 series Quick Start Guide
Page 35
...size. under the following conditions: z Layout print is selected as a print function in the memory card mode, and/or z Credit card is not possible to the photo, such as on black areas. (7) Face brightener Brightens a darkened ...face on a photo. pro*1 Automatically optimizes brightness and tone of a photo. (6) Noise reduction*1 Reduces the noise on blue areas like the sky as well as printing in sepia tones or with a sketch illustration like effect. (13) Fade restoration*2 Corrects the color when printing photos that have faded or color...
...size. under the following conditions: z Layout print is selected as a print function in the memory card mode, and/or z Credit card is not possible to the photo, such as on black areas. (7) Face brightener Brightens a darkened ...face on a photo. pro*1 Automatically optimizes brightness and tone of a photo. (6) Noise reduction*1 Reduces the noise on blue areas like the sky as well as printing in sepia tones or with a sketch illustration like effect. (13) Fade restoration*2 Corrects the color when printing photos that have faded or color...
MP610 series Quick Start Guide
Page 39
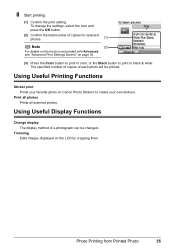
...Canon Photo Stickers to print in black & white. Using Useful Display Functions Change display The display method of copies for selected photos. (1) Note (2) For details on the function associated with Advanced, see "Advanced Print Settings Screen" on the LCD by cropping them. Trimming Edits images displayed on page 30. (3) Press the Color button to print in color..., or the Black button to create your own stickers. 8 Start printing. (1) Confirm the print setting. Print all photos Prints all scanned photos. To change the...
...Canon Photo Stickers to print in black & white. Using Useful Display Functions Change display The display method of copies for selected photos. (1) Note (2) For details on the function associated with Advanced, see "Advanced Print Settings Screen" on the LCD by cropping them. Trimming Edits images displayed on page 30. (3) Press the Color button to print in color..., or the Black button to create your own stickers. 8 Start printing. (1) Confirm the print setting. Print all photos Prints all scanned photos. To change the...
MP610 series Quick Start Guide
Page 47
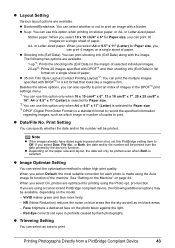
... a single sheet of copies to record the specified information regarding images, such as on black areas. - Note z If the images already have dates superimposed when shot, set this option when printing on sticker paper, or A4- z Bordered/Borderless: You can select the optimization method to...(Letter) is selected for Paper size, you select On, photos are using a Canon-brand PictBridge compliant device, the following two options are available. When you are optimized for each photo is a standard format to print. See "Setting on the Machine" on the photo taken against the light. -...
... a single sheet of copies to record the specified information regarding images, such as on black areas. - Note z If the images already have dates superimposed when shot, set this option when printing on sticker paper, or A4- z Bordered/Borderless: You can select the optimization method to...(Letter) is selected for Paper size, you select On, photos are using a Canon-brand PictBridge compliant device, the following two options are available. When you are optimized for each photo is a standard format to print. See "Setting on the Machine" on the photo taken against the light. -...

MP610 series Quick Start Guide
Page 49
... like effect. *1 Set the items in portraits caused by flash photography. (11) Brightness Adjust brightness. (12) Contrast Adjust contrast. (13) Color hue Adjust color hue. Corrects red eyes in this column to Default on the PictBridge compliant device when you want to specify. Setting Item Description Corresponding Setting..., such as on the machine. *2 When Manual correction is selected, the items (5) to (14) are available to make settings on black areas. (9) Image optimizer Corrects and smooths the jagged contours for printing. (10) Red eye correc. Layout (5) Photo opt.
... like effect. *1 Set the items in portraits caused by flash photography. (11) Brightness Adjust brightness. (12) Contrast Adjust contrast. (13) Color hue Adjust color hue. Corrects red eyes in this column to Default on the PictBridge compliant device when you want to specify. Setting Item Description Corresponding Setting..., such as on the machine. *2 When Manual correction is selected, the items (5) to (14) are available to make settings on black areas. (9) Image optimizer Corrects and smooths the jagged contours for printing. (10) Red eye correc. Layout (5) Photo opt.
MP610 series Quick Start Guide
Page 52
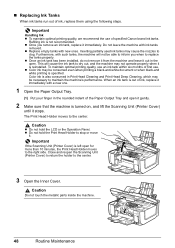
...one. 1 Open the Paper Output Tray. (1) Put your finger in the rounded indent of specified Canon brand ink tanks. To maintain optimal printing quality, use an ink tank within six months of first use of the Paper Output Tray and... remove it from the machine and leave it out in Print Head Cleaning and Print Head Deep Cleaning, which may cause the nozzles to stop or move it. z Color ink may not operate properly when it is not recommended.... ink tanks removed. This will not be consumed even when printing a black-and-white document or when black-and white printing is left open .
...one. 1 Open the Paper Output Tray. (1) Put your finger in the rounded indent of specified Canon brand ink tanks. To maintain optimal printing quality, use an ink tank within six months of first use of the Paper Output Tray and... remove it from the machine and leave it out in Print Head Cleaning and Print Head Deep Cleaning, which may cause the nozzles to stop or move it. z Color ink may not operate properly when it is not recommended.... ink tanks removed. This will not be consumed even when printing a black-and-white document or when black-and white printing is left open .
MP610 series Quick Start Guide
Page 55
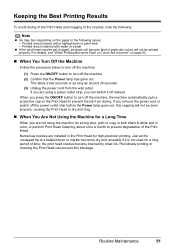
...period of time, the print head nozzles become faint or particular colors will not be done properly, causing the Print Head to dry and clog. „ When You Are Not Using the Machine for a Long Time When you are using the machine for a long time, print or copy in both black & white and in ...the following . Routine Maintenance 51 If you press the ON/OFF button to turn off the machine. (2) Confirm that the Power lamp has gone out. Just as around 30 seconds. (3) Unplug the power cord from drying. For details, see "When Printing Becomes Faint or Colors Are ...
...period of time, the print head nozzles become faint or particular colors will not be done properly, causing the Print Head to dry and clog. „ When You Are Not Using the Machine for a Long Time When you are using the machine for a long time, print or copy in both black & white and in ...the following . Routine Maintenance 51 If you press the ON/OFF button to turn off the machine. (2) Confirm that the Power lamp has gone out. Just as around 30 seconds. (3) Unplug the power cord from drying. For details, see "When Printing Becomes Faint or Colors Are ...
MP610 series Quick Start Guide
Page 62
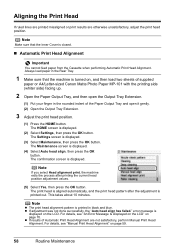
...Put your finger in black and blue. The Settings screen is displayed. The confirmation screen is displayed. (3) Select Maintenance, then press the OK button. This takes about 10 minutes. The HOME screen is displayed. (4) Select Auto head align, then press the OK button. Aligning the Print Head If ruled lines...see "An Error Message Is Displayed on the LCD" on , and then load two sheets of supplied paper or A4/Letter-sized Canon Matte Photo Paper MP-101 with the printing side (whiter side) facing up. 2 Open the Paper Output Tray, and then open it gently. (2) Open the Output Tray ...
...Put your finger in black and blue. The Settings screen is displayed. The confirmation screen is displayed. (3) Select Maintenance, then press the OK button. This takes about 10 minutes. The HOME screen is displayed. (4) Select Auto head align, then press the OK button. Aligning the Print Head If ruled lines...see "An Error Message Is Displayed on the LCD" on , and then load two sheets of supplied paper or A4/Letter-sized Canon Matte Photo Paper MP-101 with the printing side (whiter side) facing up. 2 Open the Paper Output Tray, and then open it gently. (2) Open the Output Tray ...
MP610 series Easy Setup Instructions
Page 1
... Lock Lever. appears, go to the center. Refer to wipe it stops.The Print Head Lock Lever may feel heavy. Document Cover Important Make sure that Yes is selected in black and blue. • When Automatic Print Head Alignment cannot be some transparent or light blue ink on the LCD" in ... nozzles or the electrical contacts. d Use the { or } button on the LCD, press the Back button to return to the color guide on the LCD. And Print Head is printed. Next, open the Sheet Feeder Cover, pull out the Paper Support, then open for the LCD, then press the OK button. (1) ...
... Lock Lever. appears, go to the center. Refer to wipe it stops.The Print Head Lock Lever may feel heavy. Document Cover Important Make sure that Yes is selected in black and blue. • When Automatic Print Head Alignment cannot be some transparent or light blue ink on the LCD" in ... nozzles or the electrical contacts. d Use the { or } button on the LCD, press the Back button to return to the color guide on the LCD. And Print Head is printed. Next, open the Sheet Feeder Cover, pull out the Paper Support, then open for the LCD, then press the OK button. (1) ...


