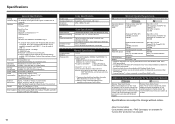
MP560 series Guía de inicio [Spanish Version]
Page 9
...Setup - Firmly raise the Print Head Lock Lever (E) of the Print Head Holder (F). This is normal operation. • If the Print Head Holder does not move, make sure that the Print Head Holder (D) moves to the installation position. Install the Print Head Instalación del hardware - 2 3 E F D Make sure that the machine is turned... posición de instalación. Instalación del cabezal de impresión The machine may not print properly if you touch it stops. Levante firmemente la palanca de bloqueo del cabezal de impresión (E) del soporte del...
MP560 series Guía de inicio [Spanish Version]
Page 43
... paso • The alphanumeric characters after Canon MP560 series is the machine's Bonjour service name or MAC address. • If the machine has not been detected, make sure of the following. − The machine is turned on. − The firewall function of any security software is turned off. − The computer is connected to your operating system for further installation instructions. 2 - Wireless Connection - Install the Software (Registration) Conexión inalá...
MP560 series Guía de inicio [Spanish Version]
Page 45
... Add. Instalación del software (Registro) 43 Select Canon IJ Network in the pop-up menu, select Canon MP560 series in the list of printers. Make sure that Canon MP560 series is added to Step Vaya al paso • When the You have no printers available. Wireless Connection - Cuando aparezca la ventana Lista de impresoras (Printer List), haga clic en Añadir (Add). 2 - C Mac OS X v.10.3.9 1 2 3 When the Printer List window appears, click Add. screen...
Solución de problemas de configuración de red [Spanish Version]
Page 2
...Displayed Connection failed. Multiple access points are used in this manual depending on the Machine Easy Settings The Target Access Point is Displayed WPS Settings Cannot connect. P.7 P.7 P.7 P.8 P.8 P.10 P.11 P.12 P.14 is Not Displayed (Detected) Failed to connect to the onscreen manual: Basic Guide/Advanced Guide. • Names of functions, etc. Instructions as notes for Macintosh users. P.5 P.6 Description for operation or additional explanations. ENGLISH Network Setup Troubleshooting This manual mainly describes problems you cannot find a description for Windows...
Solución de problemas de configuración de red [Spanish Version]
Page 3
...-Scroll Wheel and OK button, select Settings > Device settings > LAN settings > Confirm LAN settings > Wireless LAN setting list, then check MAC address. Problems during Network Setup Easy Settings The Target Access Point is Not Displayed (Detected) Check Check 1 Make sure that you follow Check 1, 2, 5 and 6 of "Connection Checklist" on page 12, then press the left FUNCTION button (A) on the machine to search for the access point again. Check 2 Unplug the access point from the power outlet and plug it A in the printed manual: Getting Started.
Solución de problemas de configuración de red [Spanish Version]
Page 4
... change the settings of the access point, refer to the manual supplied with the access point or contact its manufacturer. Failed to connect to the access point beforehand. Check 2 Make sure that the DHCP function of the access point is Displayed Check Check 1 Is WEP key number 2, 3 or 4 of the access point in wireless connection. • MAC address A unique number assigned to each network device. • MAC address filtering A function to block access from unauthorized wireless devices by saving the MAC addresses of specific wireless devices (computers, printers...
Solución de problemas de configuración de red [Spanish Version]
Page 5
... using multiple access points Select Use multiple APs. • For subsequent operations, go to step in "Entering the Access Point's Wireless LAN Settings Glossary • MAC address A unique number assigned to the Internet. Glossary • DHCP function A function that automatically creates WEP keys? • For details on the access point, refer to the manual supplied with the access point or contact its manufacturer. Access point was not detected is Displayed Check The message...
Solución de problemas de configuración de red [Spanish Version]
Page 6
... the machine is connected to a network, refer to "Confirm Connection Status" on page 22 and onward in the printed manual: Getting Started. Wait for a while, then configure the settings again. Set the access point to accept the IP address of the machine, refer to "Wireless Setup Using WPS (Wi-Fi Protected Setup)" on page 27 in the printed manual: Getting Started. If the machine is Not Displayed (Detected) Cannot connect. Connection failed. is Displayed Check Action A A The message appears when multiple access points are enabled...
Solución de problemas de configuración de red [Spanish Version]
Page 7
... Wheel and OK button, select Settings > Device settings > LAN settings > Confirm LAN settings > Wireless LAN setting list, then check IP address. Check 1 Make sure that automatically assigns required information (IP address, etc.) to computers connected to the Internet. • Privacy separator feature A function to prevent communication between multiple wireless devices connected to an access point. Check Printer Settings dialog box is connected to a network, refer to "Confirm Connection Status" on page 30 in the printed manual: Getting Started. If the machine is active. •...
Solución de problemas de configuración de red [Spanish Version]
Page 8
... computer or network device connected to an access point. The Machine is Not Detected after confirming a valid IP address is assigned to the manual supplied with the access point or contact its manufacturer. Enable the DHCP function of the access point, then click Back (A). • For details on how to check the settings of the access point, refer to the computer. ENGLISH Other Troubleshooting Tips Check 4 When...
Solución de problemas de configuración de red [Spanish Version]
Page 9
... below. 1 Use the Easy-Scroll Wheel to select the character. Disable WEP WPA/WPA2 • When WEP 40 bit is selected in AirPort Utility (AirPort Admin Utility), select WEP (64 bit). • When WEP (Transitional Security Network) is enabled, the Wi-Fi lamp lights blue. 4 Select Easy settings, then press the OK button. 5 Select Directly enter the access point name...
Solución de problemas de configuración de red [Spanish Version]
Page 10
... using AirPort, select WEP key 1 in the screen. Letters are not case sensitive if the format is hexadecimal. 4 Make sure that the network key is 5 or 13 characters. The Settings screen returns. WPA/WPA2 Disable • Select Characters when the network key is correct, then press the OK button. Letters are case sensitive. Select Hexadecimal when it is between the machine and AirPort. 3 Enter...
Solución de problemas de configuración de red [Spanish Version]
Page 11
... OK button. 2 Select Device settings, then press the OK button. 3 Select LAN settings, then press the OK button. 4 Select Other settings, then press the OK button. 5 Select IPv4/IPv6 settings, then press the OK button. 6 Select IPv4, then press the OK button. 7 Select Yes, then press the OK button. 8 Select Manual setup, then press the OK button. • Follow the on-screen instructions to proceed with settings. 10
Solución de problemas de configuración de red [Spanish Version]
Page 12
... the OK button. 6 Make sure that the screen shown to the default state. • Perform setup again by following the procedures in "Wireless Setup" on page 22 and onward in the printed manual: Getting Started. Wireless connection SSID Data encryption TCP/IP setting Inactive BJNPSETUP Inactive Obtain an IP address automatically 4 Select Reset LAN settings, then press the OK button. 11 ENGLISH Restoring the Machine's Default LAN Settings to Perform Setup Again Action...
Solución de problemas de configuración de red [Spanish Version]
Page 13
... enabling wireless LAN, perform setup again by following the procedures in the printed manual: Getting A Started. Check 5 Are the access point and machine installed in an open space where wireless communications are the computer and network device (router, access point, etc.) configured and can the computer connect to always allow access. nearby? Connection Checklist Check Check 1 Before connecting the machine, are possible? Check 2 Are the machine and network device (router, access point, etc.) turned on? If the warning message appears, set...
Solución de problemas de configuración de red [Spanish Version]
Page 14
... IEEE802.11g (2.4 GHz). • For details on how to check the operating mode of the access point, refer to the manual supplied with the access point or contact its manufacturer. Set the access point to operate in IEEE802.11b or IEEE802.11g (2.4 GHz)? • For details on how to change the operating mode of the access point, refer to the Internet and corporate...
Solución de problemas de configuración de red [Spanish Version]
Page 15
... Print Port: PictBridge Bluetooth v2.0 (Option)*2 *3 *4 USB flash drive LAN Port: Wireless LAN: IEEE802.11b/IEEE802.11g*5 Print width Operating environment Storage environment Power supply Power consumption External dimensions Weight Print Head/Ink *1 A computer that you keep your system up to date with Windows Update. Minimum System Requirements Conform to PC Approx. 17.9 (W) x 14.5 (D) x 6.3 (H) inches Approx. 453 (W) x 368 (D) x 160 (H) mm * With the Paper Support and Paper Output Tray retracted. The on-screen manual...