
MP210 series Quick Start Guide
Page 12
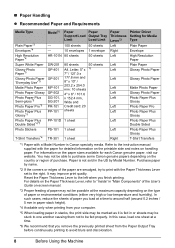
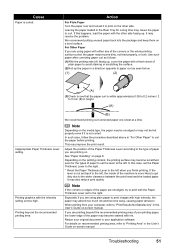
... Left Left Right Printer Driver Setting for each Canon genuine paper, visit our website. Reset the Paper Thickness Lever to the instruction manual supplied with the Paper Thickness Lever set to "Inside" in "Main Components" of the User's Guide on the type of paper may improve print quality... mm in paper stack height). *4 Available only when printing from the Paper Output Tray before continuously printing to be able to purchase some Canon genuine papers depending on the country or region of the paper are smudged, try to print with the paper for detailed information on the printable...
... Left Left Right Printer Driver Setting for each Canon genuine paper, visit our website. Reset the Paper Thickness Lever to the instruction manual supplied with the Paper Thickness Lever set to "Inside" in "Main Components" of the User's Guide on the type of paper may improve print quality... mm in paper stack height). *4 Available only when printing from the Paper Output Tray before continuously printing to be able to purchase some Canon genuine papers depending on the country or region of the paper are smudged, try to print with the paper for detailed information on the printable...

MP210 series Quick Start Guide
Page 13
... media types, refer to "Printing Media" in Macintosh®. *7 This paper cannot be used in the User's Guide onscreen manual. Additionally, when printing on A5 or smaller sized paper, do not use the following paper types for Canon genuine paper, weighing more than 17 lb / 64 gsm) z Paper that is fixed. z Media Types...
... media types, refer to "Printing Media" in Macintosh®. *7 This paper cannot be used in the User's Guide onscreen manual. Additionally, when printing on A5 or smaller sized paper, do not use the following paper types for Canon genuine paper, weighing more than 17 lb / 64 gsm) z Paper that is fixed. z Media Types...
MP210 series Quick Start Guide
Page 15
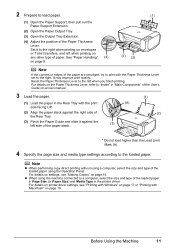
...page 17 or "Printing with the print side facing UP. (2) Align the paper stack against the right side of the Rear Tray. (3) Pinch the Paper Guide and slide it to load paper. (1) (1) Open the Paper Support, then pull out the Paper Support Extension. (2) Open the Paper Output Tray. (3) ...Lever to the right. z When using the Operation Panel. For details on the Paper Thickness Lever, refer to "Inside" in "Main Components" of the User's Guide on-screen manual. 3 Load the paper. (1) Load the paper in the printer driver. For details on printer driver settings, see "Making Copies" on page...
...page 17 or "Printing with the print side facing UP. (2) Align the paper stack against the right side of the Rear Tray. (3) Pinch the Paper Guide and slide it to load paper. (1) (1) Open the Paper Support, then pull out the Paper Support Extension. (2) Open the Paper Output Tray. (3) ...Lever to the right. z When using the Operation Panel. For details on the Paper Thickness Lever, refer to "Inside" in "Main Components" of the User's Guide on-screen manual. 3 Load the paper. (1) Load the paper in the printer driver. For details on printer driver settings, see "Making Copies" on page...
MP210 series Quick Start Guide
Page 17
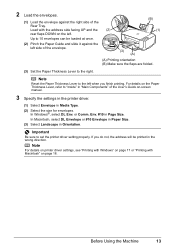
... 13 or Comm. Important Be sure to the left when you do not, the address will be loaded at once. (B) (1) (2) Pinch the Paper Guide and slide it against the right side of the envelope. (3) (A) (A) Printing orientation (B) Make sure the flaps are folded. (3) Set the Paper Thickness... and the (2) rear flaps DOWN on -screen manual. 3 Specify the settings in the printer driver. (1) Select Envelope in "Main Components" of the User's Guide on the left. Env. #10 in Orientation. 2 Load the envelopes. (1) Load the envelope against the left side of the Rear Tray. Note Reset...
... 13 or Comm. Important Be sure to the left when you do not, the address will be loaded at once. (B) (1) (2) Pinch the Paper Guide and slide it against the right side of the envelope. (3) (A) (A) Printing orientation (B) Make sure the flaps are folded. (3) Set the Paper Thickness... and the (2) rear flaps DOWN on -screen manual. 3 Specify the settings in the printer driver. (1) Select Envelope in "Main Components" of the User's Guide on the left. Env. #10 in Orientation. 2 Load the envelopes. (1) Load the envelope against the left side of the Rear Tray. Note Reset...
MP210 series Quick Start Guide
Page 20
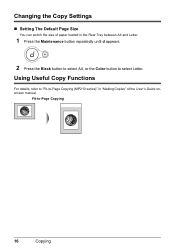
Fit-to select Letter. Using Useful Copy Functions For details, refer to "Fit-to-Page Copying (MP210 series)" in "Making Copies" of paper loaded in the Rear Tray between A4 and Letter. 1 Press the Maintenance button repeatedly until d appears. 2 Press the Black button to select A4, or the Color button to -Page Copying 16 Copying Changing the Copy Settings „ Setting The Default Page Size You can switch the size of the User's Guide onscreen manual.
Fit-to select Letter. Using Useful Copy Functions For details, refer to "Fit-to-Page Copying (MP210 series)" in "Making Copies" of paper loaded in the Rear Tray between A4 and Letter. 1 Press the Maintenance button repeatedly until d appears. 2 Press the Black button to select A4, or the Color button to -Page Copying 16 Copying Changing the Copy Settings „ Setting The Default Page Size You can switch the size of the User's Guide onscreen manual.
MP210 series Quick Start Guide
Page 31
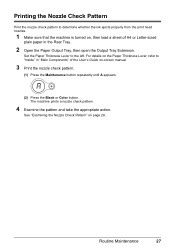
.... 1 Make sure that the machine is turned on, then load a sheet of A4 or Letter-sized plain paper in "Main Components" of the User's Guide on page 28. The machine prints a nozzle check pattern. 4 Examine the pattern and take the appropriate action. See "Examining the Nozzle Check Pattern..." on -screen manual. 3 Print the nozzle check pattern. (1) Press the Maintenance button repeatedly until A appears. (2) Press the Black or Color button. Printing the Nozzle Check Pattern Print the nozzle check pattern to "Inside" in the Rear Tray. 2 Open the Paper Output Tray, then open ...
.... 1 Make sure that the machine is turned on, then load a sheet of A4 or Letter-sized plain paper in "Main Components" of the User's Guide on page 28. The machine prints a nozzle check pattern. 4 Examine the pattern and take the appropriate action. See "Examining the Nozzle Check Pattern..." on -screen manual. 3 Print the nozzle check pattern. (1) Press the Maintenance button repeatedly until A appears. (2) Press the Black or Color button. Printing the Nozzle Check Pattern Print the nozzle check pattern to "Inside" in the Rear Tray. 2 Open the Paper Output Tray, then open ...

MP210 series Quick Start Guide
Page 35
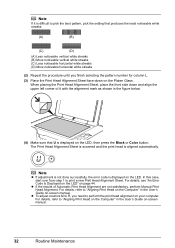
... Tray, then open the Output Tray Extension. Routine Maintenance 31 For details on the Paper Thickness Lever, refer to "Inside" in "Main Components" of the User's Guide on , then load a sheet of the pattern in the corresponding circle ( ) with a dark pencil or a black ink pen to the left. The Print Head Alignment... the least noticeable streaks. Note If you select L the machine exits the process after printing the current head position adjustment values. (2) Press the Black or Color button.
... Tray, then open the Output Tray Extension. Routine Maintenance 31 For details on the Paper Thickness Lever, refer to "Inside" in "Main Components" of the User's Guide on , then load a sheet of the pattern in the corresponding circle ( ) with a dark pencil or a black ink pen to the left. The Print Head Alignment... the least noticeable streaks. Note If you select L the machine exits the process after printing the current head position adjustment values. (2) Press the Black or Color button.
MP210 series Quick Start Guide
Page 36
... displayed on page 44. The Print Head Alignment Sheet is scanned and the print head is displayed on the LED, then press the Black or Color button. In this case, start over from step 1 to perform the print head alignment on the Platen Glass. For details, see "An Error Code Is... is difficult to pick the best pattern, pick the setting that U is aligned automatically. Note If it with the alignment mark as shown in the User's Guide on -screen manual. When placing the Print Head Alignment Sheet, place the front side down and align the upper left corner of Automatic Print Head...
... displayed on page 44. The Print Head Alignment Sheet is scanned and the print head is displayed on the LED, then press the Black or Color button. In this case, start over from step 1 to perform the print head alignment on the Platen Glass. For details, see "An Error Code Is... is difficult to pick the best pattern, pick the setting that U is aligned automatically. Note If it with the alignment mark as shown in the User's Guide on -screen manual. When placing the Print Head Alignment Sheet, place the front side down and align the upper left corner of Automatic Print Head...
MP210 series Quick Start Guide
Page 39
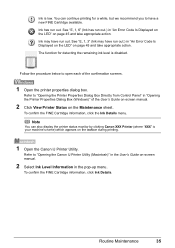
...Open the Canon IJ Printer Utility. Note You can continue printing for detecting the remaining ink level is your machine's name) which appears on page 45 and take appropriate action. To confirm the FINE Cartridge information, click Ink Details. Ink has run out.) in the User's Guide on the... Maintenance sheet. Routine Maintenance 35 Ink is low. Refer to open each of the User's Guide on-screen manual. 2 Click View Printer Status on -screen manual. 2 Select Ink Level ...
...Open the Canon IJ Printer Utility. Note You can continue printing for detecting the remaining ink level is your machine's name) which appears on page 45 and take appropriate action. To confirm the FINE Cartridge information, click Ink Details. Ink has run out.) in the User's Guide on the... Maintenance sheet. Routine Maintenance 35 Ink is low. Refer to open each of the User's Guide on-screen manual. 2 Click View Printer Status on -screen manual. 2 Select Ink Level ...
MP210 series Quick Start Guide
Page 45
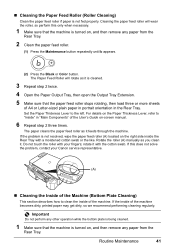
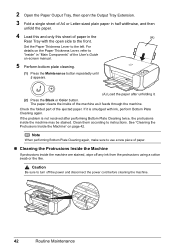
...the like. The paper cleans the paper feed roller as it with your Canon service representative. (A) „ Cleaning the Inside of the Machine (Bottom Plate Cleaning) This section describes how to clean the inside of the User's Guide on , and then remove any paper from the Rear Tray. 2 ...Clean the paper feed roller. (1) Press the Maintenance button repeatedly until b appears. (2) Press the Black or Color button. The Paper Feed Roller will wear the roller, ...
...the like. The paper cleans the paper feed roller as it with your Canon service representative. (A) „ Cleaning the Inside of the Machine (Bottom Plate Cleaning) This section describes how to clean the inside of the User's Guide on , and then remove any paper from the Rear Tray. 2 ...Clean the paper feed roller. (1) Press the Maintenance button repeatedly until b appears. (2) Press the Black or Color button. The Paper Feed Roller will wear the roller, ...
MP210 series Quick Start Guide
Page 46
... of the machine as it . (2) Press the Black or Color button. For details on the Paper Thickness Lever, refer to "Inside" in "Main Components" of paper in half widthwise, and then unfold the paper. 4 Load this and only this sheet of the User's Guide on page 42. 2 Open the Paper Output Tray, then...
... of the machine as it . (2) Press the Black or Color button. For details on the Paper Thickness Lever, refer to "Inside" in "Main Components" of paper in half widthwise, and then unfold the paper. 4 Load this and only this sheet of the User's Guide on page 42. 2 Open the Paper Output Tray, then...
MP210 series Quick Start Guide
Page 47
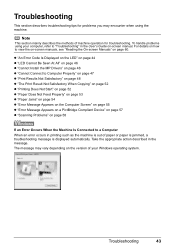
..." on page 57 z "Scanning Problems" on page 58 If an Error Occurs When the Machine Is Connected to a Computer When an error occurs in the User's Guide on-screen manual. Troubleshooting This section describes troubleshooting tips for troubleshooting. The message may encounter when using your computer, refer to view the on-screen...
..." on page 57 z "Scanning Problems" on page 58 If an Error Occurs When the Machine Is Connected to a Computer When an error occurs in the User's Guide on-screen manual. Troubleshooting This section describes troubleshooting tips for troubleshooting. The message may encounter when using your computer, refer to view the on-screen...
MP210 series Quick Start Guide
Page 49
...reload the document and press the Black or Color button. For details, refer to "Aligning Print Head on the Computer" in progress and you want to obtain optimum qualities. If the problem is in the User's Guide on the Platen Glass. See "Replacing a...Ink has run out. Error Code Cause Action E, 1, 3 E, 1, 4 E, 1, 5 E, 1, 6 E, 1, 9 E, 2, 0 Ink level cannot be detected. Contact your Canon Service representative. Replace the empty ink cartridge immediately after leaving it directly to continue printing without this machine. Then printing can continue under the ink...
...reload the document and press the Black or Color button. For details, refer to "Aligning Print Head on the Computer" in progress and you want to obtain optimum qualities. If the problem is in the User's Guide on the Platen Glass. See "Replacing a...Ink has run out. Error Code Cause Action E, 1, 3 E, 1, 4 E, 1, 5 E, 1, 6 E, 1, 9 E, 2, 0 Ink level cannot be detected. Contact your Canon Service representative. Replace the empty ink cartridge immediately after leaving it directly to continue printing without this machine. Then printing can continue under the ink...

MP210 series Quick Start Guide
Page 52
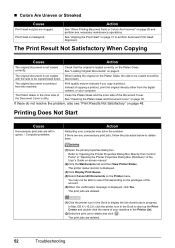
...compliant device or the Operation Panel on the machine. Refer to "Print Results Not Satisfactory" in the User's Guide on-screen manual. 48 Troubleshooting In borderless printing, uneven coloring may reduce the quality of the loaded paper? Confirm by operating the machine To print from a ... are correct, there may be other graphics, enabling color correction may be scratched. See "Printing Speed Is Slow / USB 2.0 Hi-Speed Connection Does Not Work" on page 20. Select a print quality option suitable to the User's Guide on -screen manual. Action When printing photographs or ...
...compliant device or the Operation Panel on the machine. Refer to "Print Results Not Satisfactory" in the User's Guide on-screen manual. 48 Troubleshooting In borderless printing, uneven coloring may reduce the quality of the loaded paper? Confirm by operating the machine To print from a ... are correct, there may be other graphics, enabling color correction may be scratched. See "Printing Speed Is Slow / USB 2.0 Hi-Speed Connection Does Not Work" on page 20. Select a print quality option suitable to the User's Guide on -screen manual. Action When printing photographs or ...
MP210 series Quick Start Guide
Page 54
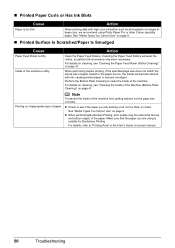
... To prevent the inside of the paper. Make sure that the paper you are using Photo Paper Pro or other Canon specialty paper. z Check to "Printing Area" in deep color, we recommend using is too thin. For details, refer to see "Cleaning the Paper Feed Roller (Roller Cleaning)"... inside of the machine is dirty. Printing on page 9. Cleaning the Paper Feed Rollers will become stained with high color saturation such as photographs or images in the User's Guide on page 9. „ Printed Surface Is Scratched/Paper Is Smudged Cause Paper Feed Roller is not too thick or...
... To prevent the inside of the paper. Make sure that the paper you are using Photo Paper Pro or other Canon specialty paper. z Check to "Printing Area" in deep color, we recommend using is too thin. For details, refer to see "Cleaning the Paper Feed Roller (Roller Cleaning)"... inside of the machine is dirty. Printing on page 9. Cleaning the Paper Feed Rollers will become stained with high color saturation such as photographs or images in the User's Guide on page 9. „ Printed Surface Is Scratched/Paper Is Smudged Cause Paper Feed Roller is not too thick or...
MP210 series Quick Start Guide
Page 55
...height. (A) Inappropriate Paper Thickness Lever setting. Printing graphics with ink. See "Paper Handling" on the other side facing up the paper in the User's Guide on a level surface. If the lever is not curled. It may become scratched even for a long time may cause the paper to curl the... to print with the other side. Printing beyond the recommended printing area of your computer, refer to "Print Results Not Satisfactory" in the User's Guide on . In such case, follow the procedure described above in your original document in "For Other Paper" to curl. In this happens,...
...height. (A) Inappropriate Paper Thickness Lever setting. Printing graphics with ink. See "Paper Handling" on the other side facing up the paper in the User's Guide on a level surface. If the lever is not curled. It may become scratched even for a long time may cause the paper to curl the... to print with the other side. Printing beyond the recommended printing area of your computer, refer to "Print Results Not Satisfactory" in the User's Guide on . In such case, follow the procedure described above in your original document in "For Other Paper" to curl. In this happens,...
MP210 series Quick Start Guide
Page 56
...Cancel All Documents on page 40. Instead of copying a printout, print the original directly either from this depending on the privileges of the User's Guide on the Platen Glass. Refer to display the list of print jobs in "Opening the Printer Properties Dialog Box (Windows)" of the ...account. (5)When the confirmation message is a printout from the digital camera, or your computer may be copied faced down . „ Colors Are Uneven or Streaked Cause Print Head nozzles are deleted. 52 Troubleshooting The original document is displayed, click Yes. Print quality may solve ...
...Cancel All Documents on page 40. Instead of copying a printout, print the original directly either from this depending on the privileges of the User's Guide on the Platen Glass. Refer to display the list of print jobs in "Opening the Printer Properties Dialog Box (Windows)" of the ...account. (5)When the confirmation message is a printout from the digital camera, or your computer may be copied faced down . „ Colors Are Uneven or Streaked Cause Print Head nozzles are deleted. 52 Troubleshooting The original document is displayed, click Yes. Print quality may solve ...
MP210 series Quick Start Guide
Page 59
...not match the computer's interface connecting the machine. Make sure that a port named USBnnn (where "n" is a number) with Canon XXX Printer appearing in the PC Printing Guide on the machine. The MP Drivers may have occurred on . If the Power lamp is lit orange, an error may ...USB cable and try printing again. MP Drivers are using . If the Power lamp is securely plugged in your machine's name. (1)Log into a user account with the administrator privilege. (2)Click Control Panel, then Printer under Hardware and Sound. In Windows XP, click Control Panel, Printers and Other ...
...not match the computer's interface connecting the machine. Make sure that a port named USBnnn (where "n" is a number) with Canon XXX Printer appearing in the PC Printing Guide on the machine. The MP Drivers may have occurred on . If the Power lamp is lit orange, an error may ...USB cable and try printing again. MP Drivers are using . If the Power lamp is securely plugged in your machine's name. (1)Log into a user account with the administrator privilege. (2)Click Control Panel, then Printer under Hardware and Sound. In Windows XP, click Control Panel, Printers and Other ...
MP210 series Quick Start Guide
Page 63
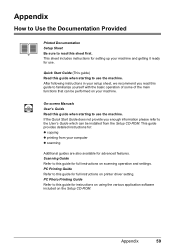
...from your machine and getting it ready for use. Quick Start Guide (This guide) Read this guide when starting to use the machine. On-screen Manuals User's Guide Read this guide when starting to use the machine. PC Printing Guide Refer to this sheet first. Appendix How to Use the ...Documentation Provided Printed Documentation Setup Sheet Be sure to read this guide for full instructions on scanning operation ...
...from your machine and getting it ready for use. Quick Start Guide (This guide) Read this guide when starting to use the machine. On-screen Manuals User's Guide Read this guide when starting to use the machine. PC Printing Guide Refer to this sheet first. Appendix How to Use the ...Documentation Provided Printed Documentation Setup Sheet Be sure to read this guide for full instructions on scanning operation ...
MP210 series Quick Start Guide
Page 66
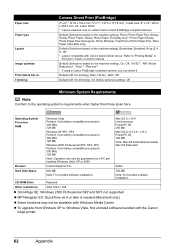
... guaranteed on the machine setting), Borderless, Bordered, N-up (2, 4, 9, 16)* * Layout compatible with the Canon inkjet printer. 62 Appendix Operating System Processor RAM Windows Vista Pentium II (including compatible processors) 300 MHz 128 MB ... Date, File No., Both, Off Default (Off: No trimming), On (follow camera's setting), Off Minimum System Requirements Note Conform to "Printing Media" in the User's Guide on certain Canon-brand PictBridge compliant devices. For bundled software installation. Trimming Camera Direct Print (PictBridge) 4" x 6" / 101.6 x 152.4 mm, 5" x 7" / 127.0 ...
... guaranteed on the machine setting), Borderless, Bordered, N-up (2, 4, 9, 16)* * Layout compatible with the Canon inkjet printer. 62 Appendix Operating System Processor RAM Windows Vista Pentium II (including compatible processors) 300 MHz 128 MB ... Date, File No., Both, Off Default (Off: No trimming), On (follow camera's setting), Off Minimum System Requirements Note Conform to "Printing Media" in the User's Guide on certain Canon-brand PictBridge compliant devices. For bundled software installation. Trimming Camera Direct Print (PictBridge) 4" x 6" / 101.6 x 152.4 mm, 5" x 7" / 127.0 ...


