Network Installation Guide
Page 1
> Installing Your Multifunction to Your Network for the First Time PIXMA MG3120 Mac and Windows OS 1
> Installing Your Multifunction to Your Network for the First Time PIXMA MG3120 Mac and Windows OS 1
Network Installation Guide
Page 2
> Installing Your Multifunction to Your Network for the First Time PIXMA MG3120 Macintosh and Windows OS Preparing to Connect My Multifunction to My Network 3 Network Requirements 3 Notes on Wireless Connection 4 Installing the Drivers & Software 5 2
> Installing Your Multifunction to Your Network for the First Time PIXMA MG3120 Macintosh and Windows OS Preparing to Connect My Multifunction to My Network 3 Network Requirements 3 Notes on Wireless Connection 4 Installing the Drivers & Software 5 2
Network Installation Guide
Page 3
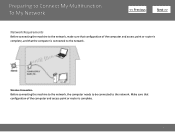
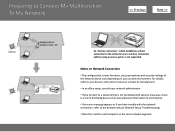
Wireless Connection Before connecting the machine to the network, the computer needs to be connected to the network. Make sure that the computer is complete. 3 Preparing to Connect My Multifunction To My Network > Network Requirements Before connecting the machine to the network, make sure that configuration of the computer and access point or router is complete, and that configuration of the computer and access point or router is connected to the network.
Wireless Connection Before connecting the machine to the network, the computer needs to be connected to the network. Make sure that the computer is complete. 3 Preparing to Connect My Multifunction To My Network > Network Requirements Before connecting the machine to the network, make sure that configuration of the computer and access point or router is complete, and that configuration of the computer and access point or router is connected to the network.
Network Installation Guide
Page 4
... the printed manual: Network Setup Troubleshooting. • Place the machine and computer on your personal information to the computer over a wireless connection without using an access point, is a risk of the network device vary depending on the same network segment. 4 Preparing to Connect My Multifunction To My Network > An "Ad-hoc connection," which establishes a direct connection to a third party. • If an error message appears or if you have trouble...
... the printed manual: Network Setup Troubleshooting. • Place the machine and computer on your personal information to the computer over a wireless connection without using an access point, is a risk of the network device vary depending on the same network segment. 4 Preparing to Connect My Multifunction To My Network > An "Ad-hoc connection," which establishes a direct connection to a third party. • If an error message appears or if you have trouble...
Network Installation Guide
Page 5
... the installation. The installation process takes about 20 minutes. (The installation time varies depending on the computer environment or the number of application software to be necessary to access the network. If such a warning message appears, set the security software to the computer's hard disk. Follow the on , a warning message may apply. Connection fees may appear that Canon software is turned on -screen instructions and do not remove the Setup CD...
... the installation. The installation process takes about 20 minutes. (The installation time varies depending on the computer environment or the number of application software to be necessary to access the network. If such a warning message appears, set the security software to the computer's hard disk. Follow the on , a warning message may apply. Connection fees may appear that Canon software is turned on -screen instructions and do not remove the Setup CD...
Network Installation Guide
Page 6
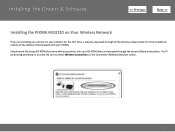
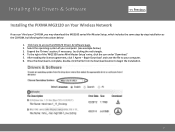
Simply insert the Setup CD-ROM that shipped with your printer into your CD-ROM drive and proceed through of the wireless setup is built in no time. You'll be printing wirelessly in to the installation routine of the software that came with your PIXMA. Be sure to select Wireless Connection on your network for the first time, a step-by-step walk through the easy to follow instructions. Installing the Drivers & Software > Installing the PIXMA MG3120 on Your Wireless Network If you are installing your printer on the Connection Method Selection screen. 6
Simply insert the Setup CD-ROM that shipped with your printer into your CD-ROM drive and proceed through of the wireless setup is built in no time. You'll be printing wirelessly in to the installation routine of the software that came with your PIXMA. Be sure to select Wireless Connection on your network for the first time, a step-by-step walk through the easy to follow instructions. Installing the Drivers & Software > Installing the PIXMA MG3120 on Your Wireless Network If you are installing your printer on the Connection Method Selection screen. 6
Network Installation Guide
Page 7
Installing the Drivers & Software
Installing the Drivers & Software
Firmware Guide
Page 1
AirPrint and Printer Firmware Setup Guide Check If the Airprint Firmware Update is necessary PIXMA MG3120 1
AirPrint and Printer Firmware Setup Guide Check If the Airprint Firmware Update is necessary PIXMA MG3120 1
Firmware Guide
Page 2
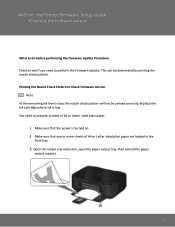
Replace the ink cartridge whose ink is turned on. 2. Make sure that one or more sheets of A4 or Letter-sized plain paper 1. Printing the Nozzle Check Pattern to Check Firmware Version Note •If the remaining ink level is low, the nozzle check pattern will not be determined by printing the nozzle check pattern. Open the output tray extension, open the paper output tray, then extend the paper output support. 2 Make sure that the power is low. AirPrint and Printer Firmware Setup Guide •Checking the...
Replace the ink cartridge whose ink is turned on. 2. Make sure that one or more sheets of A4 or Letter-sized plain paper 1. Printing the Nozzle Check Pattern to Check Firmware Version Note •If the remaining ink level is low, the nozzle check pattern will not be determined by printing the nozzle check pattern. Open the output tray extension, open the paper output tray, then extend the paper output support. 2 Make sure that the power is low. AirPrint and Printer Firmware Setup Guide •Checking the...
Firmware Guide
Page 3
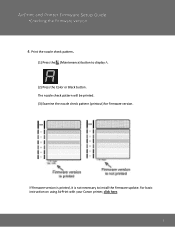
The nozzle check pattern will be printed. (3) Examine the nozzle check pattern (printout) for firmware version. For basic instruction on using AirPrint with your Canon printer, click here. 3 Print the nozzle check pattern. (1) Press the (Maintenance) button to install the firmware update. If firmware version is printed, it is not necessary to display A. (2) Press the Color or Black button. AirPrint and Printer Firmware Setup Guide •Checking the Firmware version 4.
The nozzle check pattern will be printed. (3) Examine the nozzle check pattern (printout) for firmware version. For basic instruction on using AirPrint with your Canon printer, click here. 3 Print the nozzle check pattern. (1) Press the (Maintenance) button to install the firmware update. If firmware version is printed, it is not necessary to display A. (2) Press the Color or Black button. AirPrint and Printer Firmware Setup Guide •Checking the Firmware version 4.
Firmware Guide
Page 4
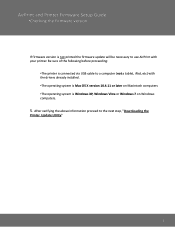
... on Windows computers. 5. Be sure of the following before proceeding: •The printer is connected via USB cable to a computer (not a tablet, iPad, etc) with your printer. AirPrint and Printer Firmware Setup Guide •Checking the Firmware version If firmware version is Windows XP, Windows Vista or Windows 7 on Macintosh computers •The operating system is not printed the firmware update will be necessary to the next step, "Downloading the Printer Update Utility...
... on Windows computers. 5. Be sure of the following before proceeding: •The printer is connected via USB cable to a computer (not a tablet, iPad, etc) with your printer. AirPrint and Printer Firmware Setup Guide •Checking the Firmware version If firmware version is Windows XP, Windows Vista or Windows 7 on Macintosh computers •The operating system is not printed the firmware update will be necessary to the next step, "Downloading the Printer Update Utility...


