LV-X2 Brochure
Page 1
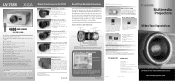
... Canon projectors. Excellent for the LV-7555 Network Imager LV-NI01 The LV-NI01 connects the LV-7555 to your computer - q Replacement Lamp LV-LP18 (LV-7215/LV-7210) q Replacement Lamp LV-LP19 (LV-5210) q Component Video Cable LV-CA32 q Ceiling Mount Adapter LV-CL08 For the LV-S3 q Replacement Lamp LV-LP20 q Component Video Cable LV-CA32 q Ceiling Mount Adapter LV-CL09 For the LV-X2 q Replacement Lamp LV...
... Canon projectors. Excellent for the LV-7555 Network Imager LV-NI01 The LV-NI01 connects the LV-7555 to your computer - q Replacement Lamp LV-LP18 (LV-7215/LV-7210) q Replacement Lamp LV-LP19 (LV-5210) q Component Video Cable LV-CA32 q Ceiling Mount Adapter LV-CL08 For the LV-S3 q Replacement Lamp LV-LP20 q Component Video Cable LV-CA32 q Ceiling Mount Adapter LV-CL09 For the LV-X2 q Replacement Lamp LV...
LV-X2 Brochure
Page 2
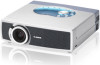
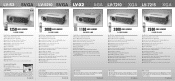
...Auto Grayscale, Auto Fleshtone, Gamma Adjustment q Size (W x D x H): 10.2 x 9.6 x 3.0 in. (260 x 244.5 x 76 mm) Kit Contents q Projector q Wireless Remote Control (AA Batteries Included) q Power Cable q Computer Cable (DVI-VGA) q Mouse Control Cable (USB) q Lens Cap q Soft Carrying Case q ...(V), ±20 Degrees (H) q Gamma Adjustment q Size (W x D x H): 11.8 x 8.9 x 3.2 in. (300 x 227.2 x 82.1 mm) Kit Contents q Projector q Wireless Remote Control (AA Batteries Included) q Power Cable q Computer Cable (DVI-VGA) q Mouse Control Cable (USB) q Lens Cap q Soft carrying Case q Warranty Card ...
...Auto Grayscale, Auto Fleshtone, Gamma Adjustment q Size (W x D x H): 10.2 x 9.6 x 3.0 in. (260 x 244.5 x 76 mm) Kit Contents q Projector q Wireless Remote Control (AA Batteries Included) q Power Cable q Computer Cable (DVI-VGA) q Mouse Control Cable (USB) q Lens Cap q Soft Carrying Case q ...(V), ±20 Degrees (H) q Gamma Adjustment q Size (W x D x H): 11.8 x 8.9 x 3.2 in. (300 x 227.2 x 82.1 mm) Kit Contents q Projector q Wireless Remote Control (AA Batteries Included) q Power Cable q Computer Cable (DVI-VGA) q Mouse Control Cable (USB) q Lens Cap q Soft carrying Case q Warranty Card ...
Owners Manual
Page 2
...USE. Do not cover the ventilation slot on the top, sides and rear of your projector, and can reduce the service life of the projector cabinet for allowing air circulation and cooling the projector. 20cm Minimum clearance must be maintained. REFER SERVICING TO QUALIFIED SERVICE PERSONNEL. Improper operation may... IN THE OWNER'S MANUAL WITH THIS UNIT. 2 Heat build-up can also be dangerous. TO THE OWNER Before operating this projector, read this manual again, check operations and cable connections and try the solutions in the "TROUBLESHOOTING" section in the way indicated.
...USE. Do not cover the ventilation slot on the top, sides and rear of your projector, and can reduce the service life of the projector cabinet for allowing air circulation and cooling the projector. 20cm Minimum clearance must be maintained. REFER SERVICING TO QUALIFIED SERVICE PERSONNEL. Improper operation may... IN THE OWNER'S MANUAL WITH THIS UNIT. 2 Heat build-up can also be dangerous. TO THE OWNER Before operating this projector, read this manual again, check operations and cable connections and try the solutions in the "TROUBLESHOOTING" section in the way indicated.
Owners Manual
Page 3
...cleaning. This will often require extensive work by the manufacturers. Do not use a mounting kit approved by a qualified technician to restore the projector to lightning and power line surges. Use only with care. Never push objects of power supplied, consult your authorized dealer or local power... operating instructions. Wanneer deze leeg zijn, moet u ze niet weggooien maar inleveren als KCA. 3 The openings should be covered with the projector. Voor de klanten in fire or electric shock. Read all servicing to rain or use liquid or aerosol cleaners. Use a damp cloth ...
...cleaning. This will often require extensive work by the manufacturers. Do not use a mounting kit approved by a qualified technician to restore the projector to lightning and power line surges. Use only with care. Never push objects of power supplied, consult your authorized dealer or local power... operating instructions. Wanneer deze leeg zijn, moet u ze niet weggooien maar inleveren als KCA. 3 The openings should be covered with the projector. Voor de klanten in fire or electric shock. Read all servicing to rain or use liquid or aerosol cleaners. Use a damp cloth ...

Owners Manual
Page 4
...outlet on , the user is listed by the Underwriters Laboratories (UL) and certified by the Canadian Standard Association (CSA). One Canon Plaza, Lake Success, NY 11042, U.S.A. Reorient or relocate the receiving antenna. - Canadian Radio Interference Regulations This Class B digital ... or television reception, which the receiver is required to radio communications. COMPLIANCES Federal Communication Commission Notice Multimedia Projector, Model : LV-X2U, LV-X2E This device complies with Part 15 of the Canadian Interference-Causing Equipment Regulations. Do not make any...
...outlet on , the user is listed by the Underwriters Laboratories (UL) and certified by the Canadian Standard Association (CSA). One Canon Plaza, Lake Success, NY 11042, U.S.A. Reorient or relocate the receiving antenna. - Canadian Radio Interference Regulations This Class B digital ... or television reception, which the receiver is required to radio communications. COMPLIANCES Federal Communication Commission Notice Multimedia Projector, Model : LV-X2U, LV-X2E This device complies with Part 15 of the Canadian Interference-Causing Equipment Regulations. Do not make any...
Owners Manual
Page 5
...OF CONTENTS FEATURES AND DESIGN 6 COMPUTER INPUT 22 PREPARATION NOMENCHTOR SETTING-UP THE PROJECTOR CONNECTING AC POWER CORD POSITIONING THE PROJECTOR ADJUSTABLE FEET MOUNTING THE LENS COVER MOVING THE PROJECTOR SELECTING THE INPUT SOURCE 22 7 SELECTING THE COMPUTER SYSTEM COMPATIBLE COMPUTER SPECIFICATIONS 22...9 IMAGE LEVEL ADJUSTMENT 28 10 PICTURE SCREEN ADJUSTMENT 29 10 VIDEO INPUT 30 CONNECTING THE PROJECTOR 11 SELECTING THE INPUT SOURCE 30 TERMINALS OF THE PROJECTOR 11 SELECTING THE VIDEO SYSTEM 31 CONNECTING TO A COMPUTER 12 PICTURE IMAGE ADJUSTMENT 32 CONNECTING...
...OF CONTENTS FEATURES AND DESIGN 6 COMPUTER INPUT 22 PREPARATION NOMENCHTOR SETTING-UP THE PROJECTOR CONNECTING AC POWER CORD POSITIONING THE PROJECTOR ADJUSTABLE FEET MOUNTING THE LENS COVER MOVING THE PROJECTOR SELECTING THE INPUT SOURCE 22 7 SELECTING THE COMPUTER SYSTEM COMPATIBLE COMPUTER SPECIFICATIONS 22...9 IMAGE LEVEL ADJUSTMENT 28 10 PICTURE SCREEN ADJUSTMENT 29 10 VIDEO INPUT 30 CONNECTING THE PROJECTOR 11 SELECTING THE INPUT SOURCE 30 TERMINALS OF THE PROJECTOR 11 SELECTING THE VIDEO SYSTEM 31 CONNECTING TO A COMPUTER 12 PICTURE IMAGE ADJUSTMENT 32 CONNECTING...
Owners Manual
Page 6
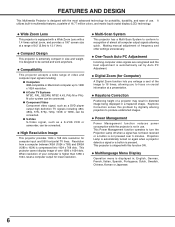
..., durability, and ease of the image to 16 times, allowing you enlarge a sect of use . N High Resolution Image This projector provides 1024 x 768 dots resolution for lower resolution. N One-Touch Auto PC Adjustment Incoming computer video signals are recognized and the ...; Resolution from a computer between XGA (1024 x 768) and SXGA (1280 x 1024) is extremely compact in ; When resolution of a projector may result in distorted image being displayed in multimedia features, a palette of almost all computer output signals allowing quick. N Keystone Correction Positioning height...
..., durability, and ease of the image to 16 times, allowing you enlarge a sect of use . N High Resolution Image This projector provides 1024 x 768 dots resolution for lower resolution. N One-Touch Auto PC Adjustment Incoming computer video signals are recognized and the ...; Resolution from a computer between XGA (1024 x 768) and SXGA (1280 x 1024) is extremely compact in ; When resolution of a projector may result in distorted image being displayed in multimedia features, a palette of almost all computer output signals allowing quick. N Keystone Correction Positioning height...
Owners Manual
Page 7
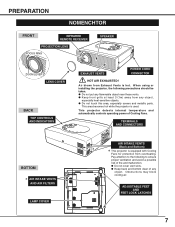
.... TERMINALS AND CONNECTORS BOTTOM ✽ AIR INTAKE VENTS AND AIR FILTERS LAMP COVER AIR INTAKE VENTS (Back and Bottom) ✽ This projector is equipped with Cooling Fans for protection from any object, especially heat-sensitive objects. G Keep back and bottom clear of Cooling Fans. ...temperature and automatically controls operating power of any flammable object near these vents. G Do not cover vent slots. When using or installing the projector, the following to ensure proper ventilation and avoid a possible risk of fire and malfunction. G Keep front grills at least 3'(1m) away...
.... TERMINALS AND CONNECTORS BOTTOM ✽ AIR INTAKE VENTS AND AIR FILTERS LAMP COVER AIR INTAKE VENTS (Back and Bottom) ✽ This projector is equipped with Cooling Fans for protection from any object, especially heat-sensitive objects. G Keep back and bottom clear of Cooling Fans. ...temperature and automatically controls operating power of any flammable object near these vents. G Do not cover vent slots. When using or installing the projector, the following to ensure proper ventilation and avoid a possible risk of fire and malfunction. G Keep front grills at least 3'(1m) away...
Owners Manual
Page 8
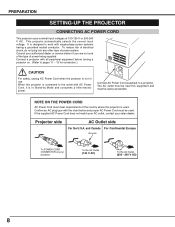
... any other type of 100-120 V or 200-240 V AC. Consult your sales dealer. NOTE ON THE POWER CORD AC Power Cord must be used . Projector side AC Outlet side For the U.S.A. To the AC Outlet. (120 V AC) To the AC Outlet. (200 - 240 V AC) 8 Connect AC Power Cord (supplied) to... pages 11 ~ 13 for connection.) CAUTION For safety, unplug AC Power Cord when the projector is used . If the supplied AC Power Cord does not match your AC outlet, contact your authorized dealer or service station if you are not...
... any other type of 100-120 V or 200-240 V AC. Consult your sales dealer. NOTE ON THE POWER CORD AC Power Cord must be used . Projector side AC Outlet side For the U.S.A. To the AC Outlet. (120 V AC) To the AC Outlet. (200 - 240 V AC) 8 Connect AC Power Cord (supplied) to... pages 11 ~ 13 for connection.) CAUTION For safety, unplug AC Power Cord when the projector is used . If the supplied AC Power Cord does not match your AC outlet, contact your authorized dealer or service station if you are not...
Owners Manual
Page 9
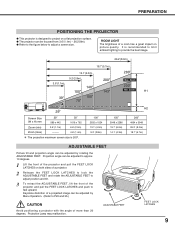
.... Keystone distortion of a projected image can be adjusted to approx. 10 degrees. 1 Lift the front of the projector and pull the FEET LOCK LATCHES on both sides of a projector. 2 Release the FEET LOCK LATCHES to lock the ADJUSTABLE FEET and rotate the ADJUSTABLE FEET to adjust position and ...tilt. 3 To retract the ADJUSTABLE FEET, lift the front of the projector and pull the FEET LOCK LATCHES and push to P20 and 35.) CAUTION Avoid positioning a projector with the angle of a room has a great impact on a flat projection surface. Projection Lamp may...
.... Keystone distortion of a projected image can be adjusted to approx. 10 degrees. 1 Lift the front of the projector and pull the FEET LOCK LATCHES on both sides of a projector. 2 Release the FEET LOCK LATCHES to lock the ADJUSTABLE FEET and rotate the ADJUSTABLE FEET to adjust position and ...tilt. 3 To retract the ADJUSTABLE FEET, lift the front of the projector and pull the FEET LOCK LATCHES and push to P20 and 35.) CAUTION Avoid positioning a projector with the angle of a room has a great impact on a flat projection surface. Projection Lamp may...

Owners Manual
Page 10
... when it is not used for an extended period of a cabinet, and it is not designed to protect the projector from external forces. MOVING THE PROJECTOR When moving a projector, attach the Lens Cover and retract the Adjustable Feet to prevent damage to strong forces or put it to the lens and cabinet. ...When the projector is intended for protection from the AC outlet. 1 Secure the Strap for an extended period, put other things on the surface of time, attach the ...
... when it is not used for an extended period of a cabinet, and it is not designed to protect the projector from external forces. MOVING THE PROJECTOR When moving a projector, attach the Lens Cover and retract the Adjustable Feet to prevent damage to strong forces or put it to the lens and cabinet. ...When the projector is intended for protection from the AC outlet. 1 Secure the Strap for an extended period, put other things on the surface of time, attach the ...
Owners Manual
Page 11
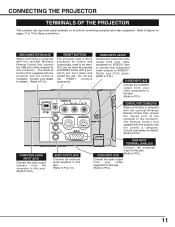
...output to this jack. (Refer to P12.) Connect the audio output from your dealer for details. (Refer to P12.) RESET BUTTON The projector uses a micro processor for control and occasionally, need to 13 for connecting computer and video equipment. Refer to figures on its side ... the mouse port of the computer to this connector. USB CONNECTOR (Series B) When controlling a computer with the projector can be reset. CONNECTING THE PROJECTOR TERMINALS OF THE PROJECTOR This projector has input and output terminals on pages 11 to be done by pressing the RESET button with the...
...output to this jack. (Refer to P12.) Connect the audio output from your dealer for details. (Refer to P12.) RESET BUTTON The projector uses a micro processor for control and occasionally, need to 13 for connecting computer and video equipment. Refer to figures on its side ... the mouse port of the computer to this connector. USB CONNECTOR (Series B) When controlling a computer with the projector can be reset. CONNECTING THE PROJECTOR TERMINALS OF THE PROJECTOR This projector has input and output terminals on pages 11 to be done by pressing the RESET button with the...
Owners Manual
Page 12
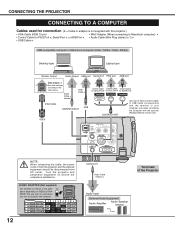
...Cr COMPUTER AUDIO IN CONTROL AV AUDIO IN S-VIDEO IN AUDIO OUT RGB IN NOTE : When connecting the cable, the power cords of the Projector Audio Input External Audio Equipment Audio Amplifier Audio Speaker (stereo) Audio Cable ✽ (stereo) USB Cable ✽ VGA Cable USB COMPUTER AUDIO... USB port Serial port PS/2 port ADB port MAC Adapter ✽ Set slide switches according to use before the computer is not supplied with this projector.) • VGA Cable (HDB 15 pin) • MAC Adapter (When connecting to Macintosh computer) ✽ • Control Cable for ADB ...
...Cr COMPUTER AUDIO IN CONTROL AV AUDIO IN S-VIDEO IN AUDIO OUT RGB IN NOTE : When connecting the cable, the power cords of the Projector Audio Input External Audio Equipment Audio Amplifier Audio Speaker (stereo) Audio Cable ✽ (stereo) USB Cable ✽ VGA Cable USB COMPUTER AUDIO... USB port Serial port PS/2 port ADB port MAC Adapter ✽ Set slide switches according to use before the computer is not supplied with this projector.) • VGA Cable (HDB 15 pin) • MAC Adapter (When connecting to Macintosh computer) ✽ • Control Cable for ADB ...

Owners Manual
Page 13
... and S- VIDEO jack are connected, Y-Pb/Cb-Pr/Cr jacks has priority over VIDEO jack. • When both the projector and the external equipment should be disconnected from AC outlet. 13 Pb / Cb -- VIDEO IN RESET Y -- CONNECTING THE... PROJECTOR CONNECTING VIDEO EQUIPMENT Cables used for connection (✽ = Cable is not supplied with this projector.) • Video Cable (RCA x 1 or RCA x 3) ✽ • S-VIDEO Cable ✽ • Audio Cable (Mini Plug...
... and S- VIDEO jack are connected, Y-Pb/Cb-Pr/Cr jacks has priority over VIDEO jack. • When both the projector and the external equipment should be disconnected from AC outlet. 13 Pb / Cb -- VIDEO IN RESET Y -- CONNECTING THE... PROJECTOR CONNECTING VIDEO EQUIPMENT Cables used for connection (✽ = Cable is not supplied with this projector.) • Video Cable (RCA x 1 or RCA x 3) ✽ • S-VIDEO Cable ✽ • Audio Cable (Mini Plug...
Owners Manual
Page 14
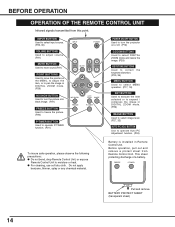
... pointer on the MENU, to adjust the item, or to pan the image in DIGITAL ZOOM mode. (P29) NO SHOW BUTTON Used to turn the projector on or off. (P19) D.ZOOM BUTTONS Used to select DIGITAL ZOOM mode and resize the image. (P29) KEYSTONE BUTTONS Used to correct the keystone distortion...
... pointer on the MENU, to adjust the item, or to pan the image in DIGITAL ZOOM mode. (P29) NO SHOW BUTTON Used to turn the projector on or off. (P19) D.ZOOM BUTTONS Used to select DIGITAL ZOOM mode and resize the image. (P29) KEYSTONE BUTTONS Used to correct the keystone distortion...
Owners Manual
Page 15
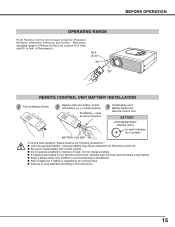
Install with correct polarity. Improper battery may cause malfunction of the projector. 16.4' (5 m) 30° 30° REMOTE CONTROL UNIT BATTERY INSTALLATION 1 Pull out Battery Holder. 2 Replace with new battery. Do not charge a battery. G Keep a battery away ... Remote Control Unit. Maximum operating range for Remote Control Unit is replaced by an incorrect type. BEFORE OPERATION OPERATING RANGE Point Remote Control Unit toward projector (Receiver Window) whenever pressing any button.
Install with correct polarity. Improper battery may cause malfunction of the projector. 16.4' (5 m) 30° 30° REMOTE CONTROL UNIT BATTERY INSTALLATION 1 Pull out Battery Holder. 2 Replace with new battery. Do not charge a battery. G Keep a battery away ... Remote Control Unit. Maximum operating range for Remote Control Unit is replaced by an incorrect type. BEFORE OPERATION OPERATING RANGE Point Remote Control Unit toward projector (Receiver Window) whenever pressing any button.
Owners Manual
Page 16
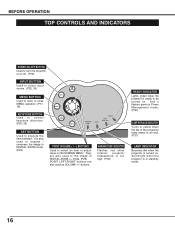
...(P36) LAMP REPLACE INDICATOR Turns to yellow when the life of the projection lamp draws to an end. (P37) LAMP INDICATOR Becomes dim when the projector is ready to be turned on. WARNING TEMP. It is in DIGITAL ZOOM +/- mode. (P29) POINT LEFT/RIGHT buttons are also used as VOLUME ... LAMP REPLACE SET BUTTON Used to correct keystone distortion. (P20, 35) INPUT POWER MENU VOL VOL - + KEY STONE SET WARNING TEMP. And bright when the projector is also used to expand / compress the image in DIGITAL ZOOM mode. (P29) POINT (VOLUME + / - ) BUTTONS Used to the image in stand-by...
...(P36) LAMP REPLACE INDICATOR Turns to yellow when the life of the projection lamp draws to an end. (P37) LAMP INDICATOR Becomes dim when the projector is ready to be turned on. WARNING TEMP. It is in DIGITAL ZOOM +/- mode. (P29) POINT LEFT/RIGHT buttons are also used as VOLUME ... LAMP REPLACE SET BUTTON Used to correct keystone distortion. (P20, 35) INPUT POWER MENU VOL VOL - + KEY STONE SET WARNING TEMP. And bright when the projector is also used to expand / compress the image in DIGITAL ZOOM mode. (P29) POINT (VOLUME + / - ) BUTTONS Used to the image in stand-by...
Owners Manual
Page 17
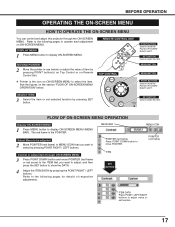
... item by pressing SET button. BEFORE OPERATION OPERATING THE ON-SCREEN MENU HOW TO OPERATE THE ON-SCREEN MENU You can control and adjust this projector through ON-SCREEN MENU 3 Press POINT DOWN button and move the Pointer UP/ DOWN/ RIGHT/ LEFT.
... item by pressing SET button. BEFORE OPERATION OPERATING THE ON-SCREEN MENU HOW TO OPERATE THE ON-SCREEN MENU You can control and adjust this projector through ON-SCREEN MENU 3 Press POINT DOWN button and move the Pointer UP/ DOWN/ RIGHT/ LEFT.
Owners Manual
Page 18
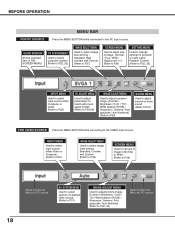
... P22, 23) IMAGE SELECT MENU Used to select image level among Standard, Cinema and Custom. (Refer to P32) SCREEN MENU Used to set size of projector or reset Lamp Replace Counter. (Refer to P35, 36) INPUT MENU Used to select input source either Video or Computer. (Refer to P30) IMAGE SELECT...
... P22, 23) IMAGE SELECT MENU Used to select image level among Standard, Cinema and Custom. (Refer to P32) SCREEN MENU Used to set size of projector or reset Lamp Replace Counter. (Refer to P35, 36) INPUT MENU Used to select input source either Video or Computer. (Refer to P30) IMAGE SELECT...
Owners Manual
Page 19
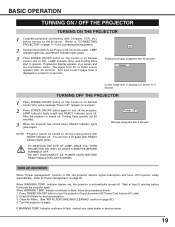
... outlet. 2. And then current image level is displayed on again after 30 seconds. After the projector is automatically turned off , Cooling Fans operate (for 90 seconds). 3 When the projector has cooled down starts. DO NOT DISCONNECT AC POWER CORD BEFORE READY INDICATOR LIGHTS GREEN. Refer ...to flash, contact your sales dealer or service center. 19 Indicator flashes red, the projector is turned off . Press POWER ON-OFF button to turn it on screen for dust accumulation. 3. When WARNING TEMP. If WARNING ...
... outlet. 2. And then current image level is displayed on again after 30 seconds. After the projector is automatically turned off , Cooling Fans operate (for 90 seconds). 3 When the projector has cooled down starts. DO NOT DISCONNECT AC POWER CORD BEFORE READY INDICATOR LIGHTS GREEN. Refer ...to flash, contact your sales dealer or service center. 19 Indicator flashes red, the projector is turned off . Press POWER ON-OFF button to turn it on screen for dust accumulation. 3. When WARNING TEMP. If WARNING ...


