LV-X2 Brochure
Page 1
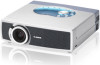
...), Wireless LAN Card (LV-WN02), and the Compact Flash Card (LV-WN03). Also reduces the number of expertise in . (319 x 429.5 x 158 mm) Kit Contents q Projector q Power Cable q VGA Computer Cable q MAC/VGA Adapter q Wireless/Wired Remote Control (AA Batteries Included) q Wired Remote Cable q Mouse Control Cable (PS/2, Serial, and Mac) q Lens Cap q Dust Cover q Warranty Card q User's Manual Optional Projector Lenses for the LV-7555 Ultra Wide Angle Lens LV-IL01 Lens: f=22.33 mm, F2.5 Projected Image Size: 70" to 120" Throw Distance: 3.7 to...
...), Wireless LAN Card (LV-WN02), and the Compact Flash Card (LV-WN03). Also reduces the number of expertise in . (319 x 429.5 x 158 mm) Kit Contents q Projector q Power Cable q VGA Computer Cable q MAC/VGA Adapter q Wireless/Wired Remote Control (AA Batteries Included) q Wired Remote Cable q Mouse Control Cable (PS/2, Serial, and Mac) q Lens Cap q Dust Cover q Warranty Card q User's Manual Optional Projector Lenses for the LV-7555 Ultra Wide Angle Lens LV-IL01 Lens: f=22.33 mm, F2.5 Projected Image Size: 70" to 120" Throw Distance: 3.7 to...
LV-X2 Brochure
Page 2
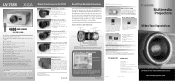
...q Throw Distance: 4.3 to 21.3 ft. (1.3 to 6.5 m) q Projected Image Size: 34" to 200" q 300:1 Contrast Ratio q Progressive Scan Circuitry (Converts 480i, 575i Signals to Progressive) q Quiet Operation: 32 dB (Silent Mode) q VGA (RGB Analog) Input q Component Video Input (with Optional Component Video Cable) q S-Video and Composite Input Terminals q Digital Keystone Adjustment: ±20 Degrees (Vertical Only) q Auto Grayscale q Gamma Adjustment q Size (W x D x H): 10.9 x 8.4 x 3.1 in. (278 x 212.6 x 80 mm) Presentation Kit (Supplied) q Use as a wireless remote q Control key projector functions...
...q Throw Distance: 4.3 to 21.3 ft. (1.3 to 6.5 m) q Projected Image Size: 34" to 200" q 300:1 Contrast Ratio q Progressive Scan Circuitry (Converts 480i, 575i Signals to Progressive) q Quiet Operation: 32 dB (Silent Mode) q VGA (RGB Analog) Input q Component Video Input (with Optional Component Video Cable) q S-Video and Composite Input Terminals q Digital Keystone Adjustment: ±20 Degrees (Vertical Only) q Auto Grayscale q Gamma Adjustment q Size (W x D x H): 10.9 x 8.4 x 3.1 in. (278 x 212.6 x 80 mm) Presentation Kit (Supplied) q Use as a wireless remote q Control key projector functions...
Owners Manual
Page 2
TO THE OWNER Before operating this projector, read this manual again, check operations and cable connections and try the solutions in the "TROUBLESHOOTING" section in the end at this manual thoroughly to manage those features and maintain it may result in a fire hazard. Do not stare directly into the lens as it could possibly damage your projector, and can reduce the service life of the...
TO THE OWNER Before operating this projector, read this manual again, check operations and cable connections and try the solutions in the "TROUBLESHOOTING" section in the end at this manual thoroughly to manage those features and maintain it may result in a fire hazard. Do not stare directly into the lens as it could possibly damage your projector, and can reduce the service life of the...
Owners Manual
Page 3
...-in installation such as this projector where the cord may result in Nederland Bij dit product zijn batterijen geleverd. This projector should not be blocked by the operating instructions as opening should not be covered with cloth or other hazards. Never push objects of the cabinet are required, be read before cleaning. This projector should be sure the service technician has used replacement parts...
...-in installation such as this projector where the cord may result in Nederland Bij dit product zijn batterijen geleverd. This projector should not be blocked by the operating instructions as opening should not be covered with cloth or other hazards. Never push objects of the cabinet are required, be read before cleaning. This projector should be sure the service technician has used replacement parts...
Owners Manual
Page 5
... IMAGE ADJUSTMENT 32 CONNECTING VIDEO EQUIPMENT 13 IMAGE LEVEL SELECT 32 IMAGE LEVEL ADJUSTMENT 33 PICTURE SCREEN ADJUSTMENT 34 BEFORE OPERATION 14 OPERATION OF THE REMOTE CONTROL UNIT14 SETTING 35 OPERATING RANGE 15 REMOTE CONTROL UNIT BATTERY INSTALLATION 15 SETTING MENU 35 TOP CONTROLS AND INDICATORS 16 OPERATING THE ON-SCREEN MENU 17 HOW TO OPERATE THE ON-SCREEN MENU 17 APPENDIX 37 FLOW OF ON-SCREEN MENU OPERATION 17 MENU BAR 18 LAMP REPLACEMENT 37 LAMP REPLACE 37 BASIC OPERATION 19 LAMP REPLACE COUNTER MAINTENANCE 38 39 WARNING TEMP. G IBM, VGA, XGA...
... IMAGE ADJUSTMENT 32 CONNECTING VIDEO EQUIPMENT 13 IMAGE LEVEL SELECT 32 IMAGE LEVEL ADJUSTMENT 33 PICTURE SCREEN ADJUSTMENT 34 BEFORE OPERATION 14 OPERATION OF THE REMOTE CONTROL UNIT14 SETTING 35 OPERATING RANGE 15 REMOTE CONTROL UNIT BATTERY INSTALLATION 15 SETTING MENU 35 TOP CONTROLS AND INDICATORS 16 OPERATING THE ON-SCREEN MENU 17 HOW TO OPERATE THE ON-SCREEN MENU 17 APPENDIX 37 FLOW OF ON-SCREEN MENU OPERATION 17 MENU BAR 18 LAMP REPLACEMENT 37 LAMP REPLACE 37 BASIC OPERATION 19 LAMP REPLACE COUNTER MAINTENANCE 38 39 WARNING TEMP. G IBM, VGA, XGA...
Owners Manual
Page 6
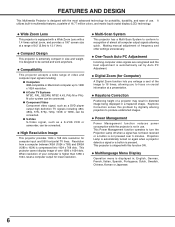
... display image of over 5 minutes. N One-Touch Auto PC Adjustment Incoming computer video signals are recognized and the best adjustment is extremely compact in size and weight. Projection Lamp is automatically turned on crucial information at a range of frequency and other settings unnecessary. N High Resolution Image This projector provides 1024 x 768 dots resolution for lower resolution. When resolution of your computer is higher than 1280 x 1024, reset a computer output for computer input...
... display image of over 5 minutes. N One-Touch Auto PC Adjustment Incoming computer video signals are recognized and the best adjustment is extremely compact in size and weight. Projection Lamp is automatically turned on crucial information at a range of frequency and other settings unnecessary. N High Resolution Image This projector provides 1024 x 768 dots resolution for lower resolution. When resolution of your computer is higher than 1280 x 1024, reset a computer output for computer input...

Owners Manual
Page 10
... a projector through a courier or transport services with a screw. CAUTION IN CARRYING OR TRANSPORTING THE PROJECTOR G Do not drop or bump a projector, otherwise damage or malfunction may cause damage to turn the projector off and disconnect the AC Power cord from external forces. This may result. G Do not transport a projector by using a courier or transport service in use a suitable carrying case. LENS COVER STRAP FOR LENS COVER Secure...
... a projector through a courier or transport services with a screw. CAUTION IN CARRYING OR TRANSPORTING THE PROJECTOR G Do not drop or bump a projector, otherwise damage or malfunction may cause damage to turn the projector off and disconnect the AC Power cord from external forces. This may result. G Do not transport a projector by using a courier or transport service in use a suitable carrying case. LENS COVER STRAP FOR LENS COVER Secure...
Owners Manual
Page 12
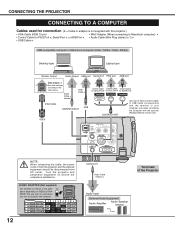
... on RESOLUTION MODE that you turn on projector and computer. Audio Cable ✽ (stereo) USB Cable ✽ VGA Cable USB COMPUTER AUDIO IN Control Cable Control Cable Control Cable for Serial Port ✽ for PS/2 Port ✽ for PS/2 Port ✽, Serial Port ✽, or ADB Port ✽ • Audio Cable (Mini Plug (stereo) x 1) ✽ • USB Cable ✽ IBM-compatible computer or Macintosh computer (VGA / SVGA / XGA / SXGA) Desktop type Laptop type Monitor Output Audio Output USB port Serial port PS/2 port ADB port MAC Adapter ✽ Set slide switches...
... on RESOLUTION MODE that you turn on projector and computer. Audio Cable ✽ (stereo) USB Cable ✽ VGA Cable USB COMPUTER AUDIO IN Control Cable Control Cable Control Cable for Serial Port ✽ for PS/2 Port ✽ for PS/2 Port ✽, Serial Port ✽, or ADB Port ✽ • Audio Cable (Mini Plug (stereo) x 1) ✽ • USB Cable ✽ IBM-compatible computer or Macintosh computer (VGA / SVGA / XGA / SXGA) Desktop type Laptop type Monitor Output Audio Output USB port Serial port PS/2 port ADB port MAC Adapter ✽ Set slide switches...
Owners Manual
Page 14
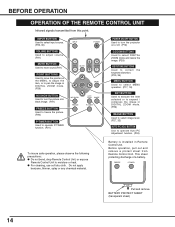
... input source. (P22, 30) VOLUME BUTTONS Used to adjust volume. (P21) MUTE BUTTON Used to mute sound.(P21) POINT BUTTONS Used to move the pointer on or off. (P19) D.ZOOM BUTTONS Used to select DIGITAL ZOOM mode and resize the image. (P29) KEYSTONE BUTTONS Used to correct the keystone distortion. (P20, 35) MENU BUTTON Used to select MENU operation. (P17, 18) SET BUTTON Used to execute the item selected or to expand / compress the image in Remote Control Unit. IMAGE P-TIMER POWER ON-OFF BUTTON Used to turn...
... input source. (P22, 30) VOLUME BUTTONS Used to adjust volume. (P21) MUTE BUTTON Used to mute sound.(P21) POINT BUTTONS Used to move the pointer on or off. (P19) D.ZOOM BUTTONS Used to select DIGITAL ZOOM mode and resize the image. (P29) KEYSTONE BUTTONS Used to correct the keystone distortion. (P20, 35) MENU BUTTON Used to select MENU operation. (P17, 18) SET BUTTON Used to execute the item selected or to expand / compress the image in Remote Control Unit. IMAGE P-TIMER POWER ON-OFF BUTTON Used to turn...
Owners Manual
Page 16
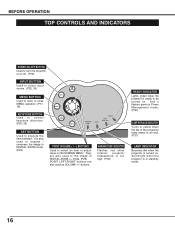
... the image in ON-SCREEN MENU. buttons. And it flashes green in Power Management mode. (P36) LAMP REPLACE INDICATOR Turns to yellow when the life of the projection lamp draws to correct keystone distortion. (P20, 35) INPUT POWER MENU VOL VOL - + KEY STONE SET WARNING TEMP. WARNING TEMP. LAMP READY LAMP REPLACE SET BUTTON Used to select an item or adjust value in DIGITAL ZOOM mode. (P29) POINT (VOLUME + / - ) BUTTONS Used to execute the item selected. It is ready to the image in stand-by mode. 16 INDICATOR Flashes red when internal projector temperature...
... the image in ON-SCREEN MENU. buttons. And it flashes green in Power Management mode. (P36) LAMP REPLACE INDICATOR Turns to yellow when the life of the projection lamp draws to correct keystone distortion. (P20, 35) INPUT POWER MENU VOL VOL - + KEY STONE SET WARNING TEMP. WARNING TEMP. LAMP READY LAMP REPLACE SET BUTTON Used to select an item or adjust value in DIGITAL ZOOM mode. (P29) POINT (VOLUME + / - ) BUTTONS Used to execute the item selected. It is ready to the image in stand-by mode. 16 INDICATOR Flashes red when internal projector temperature...
Owners Manual
Page 18
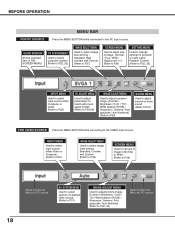
... the MENU BUTTON while connected to the VIDEO input source. PC SYSTEM MENU Used to select computer system. (Refer to P22, 23) IMAGE SELECT MENU Used to select image level among Standard, Cinema and Custom. (Refer to P32) SCREEN MENU Used to set size of selected video source. (Refer to P31) IMAGE ADJUST MENU Used to adjust picture image. [Contrast / Brightness / Color / Tint / White balance (R/G/B) / Sharpness / Gamma / Auto grayscale / Auto fleshtone] (Refer to change settings of ONSCREEN MENU. GUIDE WINDOW Shows selected item of projector or reset Lamp Replace Counter...
... the MENU BUTTON while connected to the VIDEO input source. PC SYSTEM MENU Used to select computer system. (Refer to P22, 23) IMAGE SELECT MENU Used to select image level among Standard, Cinema and Custom. (Refer to P32) SCREEN MENU Used to set size of selected video source. (Refer to P31) IMAGE ADJUST MENU Used to adjust picture image. [Contrast / Brightness / Color / Tint / White balance (R/G/B) / Sharpness / Gamma / Auto grayscale / Auto fleshtone] (Refer to change settings of ONSCREEN MENU. GUIDE WINDOW Shows selected item of projector or reset Lamp Replace Counter...
Owners Manual
Page 19
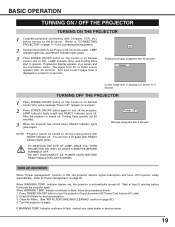
.... Indicator flashes red, the projector is displayed on page 39.) 4. After the projector is displayed on a screen and the count-down , READY Indicator lights green again. When WARNING TEMP. LAMP Indicator dims, and Cooling Fans start to flash, follow the procedures below: 1. TURNING OFF THE PROJECTOR 1 Press POWER ON-OFF button on Top Control or on again. And then current image level is turned off Projection Lamp automatically. The signal from an AC outlet. 2. Power off the projector. Turn the projector on Remote Control...
.... Indicator flashes red, the projector is displayed on page 39.) 4. After the projector is displayed on a screen and the count-down , READY Indicator lights green again. When WARNING TEMP. LAMP Indicator dims, and Cooling Fans start to flash, follow the procedures below: 1. TURNING OFF THE PROJECTOR 1 Press POWER ON-OFF button on Top Control or on again. And then current image level is turned off Projection Lamp automatically. The signal from an AC outlet. 2. Power off the projector. Turn the projector on Remote Control...
Owners Manual
Page 22
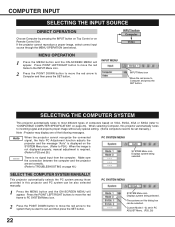
... POINT DOWN button to move the red arrow to P25 and 26.) There is required. (Refer to Computer and then press the SET button. Custom Mode (1~5) set manually.) Note : Projector may display one of computers based on VGA, SVGA, XGA or SXGA (refer to TROUBLESHOOTING on Remote Control Unit. INPUT button Computer Video MENU OPERATION 1 Press the MENU button and the ON-SCREEN MENU will appear. SELECT THE COMPUTER SYSTEM MANUALLY This projector automatically selects...
... POINT DOWN button to move the red arrow to P25 and 26.) There is required. (Refer to Computer and then press the SET button. Custom Mode (1~5) set manually.) Note : Projector may display one of computers based on VGA, SVGA, XGA or SXGA (refer to TROUBLESHOOTING on Remote Control Unit. INPUT button Computer Video MENU OPERATION 1 Press the MENU button and the ON-SCREEN MENU will appear. SELECT THE COMPUTER SYSTEM MANUALLY This projector automatically selects...
Owners Manual
Page 29
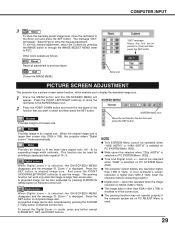
... screen size. G Digital zoom - G The image data in its original size. Select [Yes] to [Yes] and then press the SET button. message Move the red arrow pointer to store the manual adjustment. Store icon PICTURE SCREEN ADJUSTMENT This projector has a picture screen resize function, which enables you want to display the desirable image size. 1 Press the MENU button and the ON-SCREEN MENU will appear. A projected image can be also expanded by pressing D.ZOOM W (Wide) button on Remote Control Unit. Press the SET button...
... screen size. G Digital zoom - G The image data in its original size. Select [Yes] to [Yes] and then press the SET button. message Move the red arrow pointer to store the manual adjustment. Store icon PICTURE SCREEN ADJUSTMENT This projector has a picture screen resize function, which enables you want to display the desirable image size. 1 Press the MENU button and the ON-SCREEN MENU will appear. A projected image can be also expanded by pressing D.ZOOM W (Wide) button on Remote Control Unit. Press the SET button...
Owners Manual
Page 36
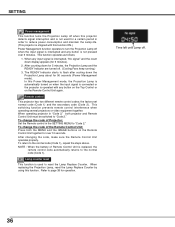
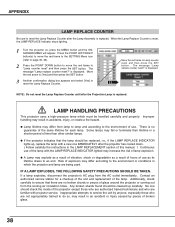
... remote control codes; To change the code of Projector; When replacing the Projection Lamp, reset the Lamp Replace Counter by using this function. Refer to the normal code (Code 1), repeat the steps above. The READY Indicator starts to flash after cooling down for operation. This switching function prevents remote control interference when operating several projectors or video equipment together. To return to page 38 for 5 minutes, the Projection Lamp and the READY Indicator are turned off. (Cooling Fans keep running.) 3. Time left until Lamp...
... remote control codes; To change the code of Projector; When replacing the Projection Lamp, reset the Lamp Replace Counter by using this function. Refer to the normal code (Code 1), repeat the steps above. The READY Indicator starts to flash after cooling down for operation. This switching function prevents remote control interference when operating several projectors or video equipment together. To return to page 38 for 5 minutes, the Projection Lamp and the READY Indicator are turned off. (Cooling Fans keep running.) 3. Time left until Lamp...
Owners Manual
Page 37
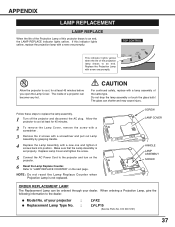
... LAMP REPLACE indicator lights yellow. SCREW LAMP COVER HANDLE LAMP ASSEMBLY SCREW ORDER REPLACEMENT LAMP The Replacement Lamp can become very hot. CAUTION For continued safety, replace with a new one promptly. The glass can shatter and may cause injury. TOP CONTROL RNING EMP. When ordering a Projection Lamp, give the following information to the projector and turn on the next page . Replace the Projection Lamp with a lamp assembly of a projector can be ordered through your projector : G Replacement Lamp Type No. : LV-X2 LV-LP15 (Service Parts...
... LAMP REPLACE indicator lights yellow. SCREW LAMP COVER HANDLE LAMP ASSEMBLY SCREW ORDER REPLACEMENT LAMP The Replacement Lamp can become very hot. CAUTION For continued safety, replace with a new one promptly. The glass can shatter and may cause injury. TOP CONTROL RNING EMP. When ordering a Projection Lamp, give the following information to the projector and turn on the next page . Replace the Projection Lamp with a lamp assembly of a projector can be ordered through your projector : G Replacement Lamp Type No. : LV-X2 LV-LP15 (Service Parts...
Owners Manual
Page 38
... SET button. Risk of broken glass. 38 is reset, the LAMP REPLACE Indicator stops lighting. 1 Turn the projector on, press the MENU button and the ONSCREEN MENU will appear. Any broken shards found should check the inside of use as a result of hours of lamp explosion. When the Lamp Replace Counter is displayed. is no broken shards or pieces of the same lifetime for a checkup of the unit and replacement of time...
... SET button. Risk of broken glass. 38 is reset, the LAMP REPLACE Indicator stops lighting. 1 Turn the projector on, press the MENU button and the ONSCREEN MENU will appear. Any broken shards found should check the inside of use as a result of hours of lamp explosion. When the Lamp Replace Counter is displayed. is no broken shards or pieces of the same lifetime for a checkup of the unit and replacement of time...
Owners Manual
Page 39
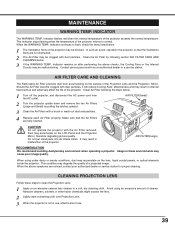
... a projected image. INDICATOR The WARNING TEMP. Clean the Air Filter by pulling the latches upward. 3 Clean the Air Filters with dust particles. Should the Air Filter become clogged with the Air Filter removed. When using an excessive amount of the projector. Indicator remains on the surface of the projector may accumulate on the LCD Panel and the Projection Mirror, therefore degrading picture quality. MAINTENANCE WARNING TEMP. Indicator flashes red when the internal temperature of the projector returns to a soft, dry cleaning cloth...
... a projected image. INDICATOR The WARNING TEMP. Clean the Air Filter by pulling the latches upward. 3 Clean the Air Filters with dust particles. Should the Air Filter become clogged with the Air Filter removed. When using an excessive amount of the projector. Indicator remains on the surface of the projector may accumulate on the LCD Panel and the Projection Mirror, therefore degrading picture quality. MAINTENANCE WARNING TEMP. Indicator flashes red when the internal temperature of the projector returns to a soft, dry cleaning cloth...
Owners Manual
Page 40
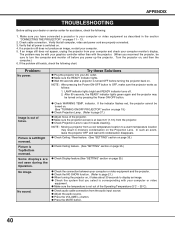
... projector. The problem may be turned on. (See "TURNING ON/OFF PROJECTOR" section on . 4. Verify that all computer, video and power cord are not seen during the Operation. G Adjust the audio source. Image is switched on page 19.) G Check Projection Lamp. (Refer to page 21.) G When turning the projector on by pressing the Power ON-OFF button. Try these Solutions G Plug the projector into your graphics controller rather than with your AC outlet. Check cable connection. G Check WARNING TEMP...
... projector. The problem may be turned on. (See "TURNING ON/OFF PROJECTOR" section on . 4. Verify that all computer, video and power cord are not seen during the Operation. G Adjust the audio source. Image is switched on page 19.) G Check Projection Lamp. (Refer to page 21.) G When turning the projector on by pressing the Power ON-OFF button. Try these Solutions G Plug the projector into your graphics controller rather than with your AC outlet. Check cable connection. G Check WARNING TEMP...
Owners Manual
Page 42
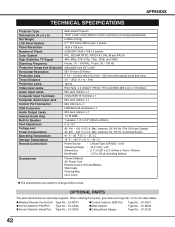
... Owner's Manual AC Power Cord Remote Control Unit and Battery VGA Cable Carrying Bag Lens Cover G The specifications are optionally supplied. of Pixels Color System High Definition TV Signal Scanning Frequency Projection Image size (Diagonal) Horizontal Resolution Projection Lens Throw Distance Projection Lamp Video Input Jacks Audio Input Jacks Computer Input Terminals Computer Audio Input Jack Control Port Connector USB Connector Audio Output Jacks Internal Audio Amp Built-in Speaker Feet Adjustment Voltage and Power Consumption Operating Temperature Storage Temperature Remote Control...
... Owner's Manual AC Power Cord Remote Control Unit and Battery VGA Cable Carrying Bag Lens Cover G The specifications are optionally supplied. of Pixels Color System High Definition TV Signal Scanning Frequency Projection Image size (Diagonal) Horizontal Resolution Projection Lens Throw Distance Projection Lamp Video Input Jacks Audio Input Jacks Computer Input Terminals Computer Audio Input Jack Control Port Connector USB Connector Audio Output Jacks Internal Audio Amp Built-in Speaker Feet Adjustment Voltage and Power Consumption Operating Temperature Storage Temperature Remote Control...


