HV30 Instruction Manual
Page 2
... TO REDUCE THE RISK OF ELECTRIC SHOCK, DO NOT REMOVE COVER (OR BACK). These limits are designed to radio communications. HD Camcorder, VIXIA HV30 A systems This device complies with Part 15 of electric shock to comply with arrowhead symbol, within an equilateral triangle, is intended ...be required to stop operation of FCC Rules. One Canon Plaza, Lake Success, NY 11042, U.S.A. WARNING! TO REDUCE THE RISK OF ELECTRIC SHOCK AND TO REDUCE ANNOYING INTERFERENCE, USE THE RECOMMENDED ACCESSORIES ONLY. This equipment generates, uses and can be determined by turning the equipment off and...
... TO REDUCE THE RISK OF ELECTRIC SHOCK, DO NOT REMOVE COVER (OR BACK). These limits are designed to radio communications. HD Camcorder, VIXIA HV30 A systems This device complies with Part 15 of electric shock to comply with arrowhead symbol, within an equilateral triangle, is intended ...be required to stop operation of FCC Rules. One Canon Plaza, Lake Success, NY 11042, U.S.A. WARNING! TO REDUCE THE RISK OF ELECTRIC SHOCK AND TO REDUCE ANNOYING INTERFERENCE, USE THE RECOMMENDED ACCESSORIES ONLY. This equipment generates, uses and can be determined by turning the equipment off and...
HV30 Instruction Manual
Page 3
..., bracket or table. The product may cause the product and cart combination to TV transmitters, portable communication devices or other ). Do not use the camera close to overturn. 10 Power Sources - They may be sure the antenna is a safety feature. Do not... use accessories not recommended in this manual as battery power, refer to be followed. 5 Cleaning - Do not use liquid or aerosol cleaners. If the plug still fails to fit, contact your electrician to the Canon HD Camcorder VIXIA HV30 A and all its accessories. 1 Read Instructions ...
..., bracket or table. The product may cause the product and cart combination to TV transmitters, portable communication devices or other ). Do not use the camera close to overturn. 10 Power Sources - They may be sure the antenna is a safety feature. Do not... use accessories not recommended in this manual as battery power, refer to be followed. 5 Cleaning - Do not use liquid or aerosol cleaners. If the plug still fails to fit, contact your electrician to the Canon HD Camcorder VIXIA HV30 A and all its accessories. 1 Read Instructions ...

HV30 Instruction Manual
Page 4
...a fire or electric shock. The Adapter can result in a risk of the power supply is not used, you will need for service. 19 Replacement Parts - Contact your nearest Canon Service Center for long periods of any kind onto the product. 17 Servicing - For areas where 120... - If any service or repairs to this can be sure the service technician has used with Canadian ICES-003. When replacement parts are required, be used replacement parts that are covered by Canon or that could result in performance. e. This Class B digital apparatus complies with a...
...a fire or electric shock. The Adapter can result in a risk of the power supply is not used, you will need for service. 19 Replacement Parts - Contact your nearest Canon Service Center for long periods of any kind onto the product. 17 Servicing - For areas where 120... - If any service or repairs to this can be sure the service technician has used with Canadian ICES-003. When replacement parts are required, be used replacement parts that are covered by Canon or that could result in performance. e. This Class B digital apparatus complies with a...
HV30 Instruction Manual
Page 5
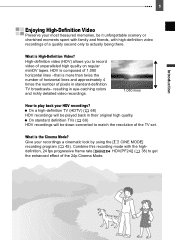
...-converted to get the enhanced effect of unparalleled high quality on regular miniDV tapes. 5 Introduction Enjoying High-Definition Video Preserve your recordings a cinematic look by using the [ CINE MODE] recording program ( 45). Combine this recording mode with high-definition video recordings of pixels in their original high quality. HDV is composed...
...-converted to get the enhanced effect of unparalleled high quality on regular miniDV tapes. 5 Introduction Enjoying High-Definition Video Preserve your recordings a cinematic look by using the [ CINE MODE] recording program ( 45). Combine this recording mode with high-definition video recordings of pixels in their original high quality. HDV is composed...
HV30 Instruction Manual
Page 6
...an Option from the FUNC. 6 Table of contents Introduction Enjoying High-Definition Video 5 About this Manual 9 Getting to Know the Camcorder Supplied Accessories 11 Components Guide 12 Screen Displays 15 Preparations Getting Started Charging the Battery Pack 18 Inserting and Removing a Tape 20 ...Inserting and Removing a Memory Card 20 Preparing the Camcorder 21 The Wireless Controller 21 Adjusting the LCD Screen 22 Using the Menus Selecting an Option from the Setup Menus 23 First Time Settings Changing the Language 24 Changing...
...an Option from the FUNC. 6 Table of contents Introduction Enjoying High-Definition Video 5 About this Manual 9 Getting to Know the Camcorder Supplied Accessories 11 Components Guide 12 Screen Displays 15 Preparations Getting Started Charging the Battery Pack 18 Inserting and Removing a Tape 20 ...Inserting and Removing a Memory Card 20 Preparing the Camcorder 21 The Wireless Controller 21 Adjusting the LCD Screen 22 Using the Menus Selecting an Option from the Setup Menus 23 First Time Settings Changing the Language 24 Changing...
HV30 Instruction Manual
Page 7
... 77 Transferring Still Images - Direct Print 80 Selecting the Print Settings 81 Trimming Settings 83 Introduction 7 System Setup (Beep, etc 44 Date/Time Setup 44 Using the Recording Programs Recording Programs 45 Giving a Cinematic Look to your Recordings 46 Flexible Recording: Changing the Aperture and Shutter Speed 46 Special Scene: Recording...
... 77 Transferring Still Images - Direct Print 80 Selecting the Print Settings 81 Trimming Settings 83 Introduction 7 System Setup (Beep, etc 44 Date/Time Setup 44 Using the Recording Programs Recording Programs 45 Giving a Cinematic Look to your Recordings 46 Flexible Recording: Changing the Aperture and Shutter Speed 46 Special Scene: Recording...
HV30 Instruction Manual
Page 8
... 85 List of Messages 89 Do's and Don'ts Handling Precautions 92 Maintenance/Others 95 Cleaning the Video Heads 95 Using the Camcorder Abroad 96 General Information System Diagram 97 Optional Accessories 98 Product Codes 101 Specifications 102 Index ...104 Trademark Acknowledgements •... products not mentioned above may be trademarks or registered trademarks of their respective companies. • ANY USE OF THIS PRODUCT OTHER THAN CONSUMER PERSONAL USE IN ANY MANNER THAT COMPLIES WITH THE MPEG-2 STANDARD FOR ENCODING VIDEO INFORMATION FOR PACKAGED MEDIA IS EXPRESSLY...
... 85 List of Messages 89 Do's and Don'ts Handling Precautions 92 Maintenance/Others 95 Cleaning the Video Heads 95 Using the Camcorder Abroad 96 General Information System Diagram 97 Optional Accessories 98 Product Codes 101 Specifications 102 Index ...104 Trademark Acknowledgements •... products not mentioned above may be trademarks or registered trademarks of their respective companies. • ANY USE OF THIS PRODUCT OTHER THAN CONSUMER PERSONAL USE IN ANY MANNER THAT COMPLIES WITH THE MPEG-2 STANDARD FOR ENCODING VIDEO INFORMATION FOR PACKAGED MEDIA IS EXPRESSLY...
HV30 Instruction Manual
Page 9
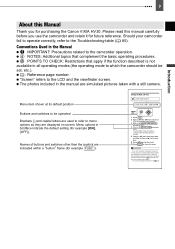
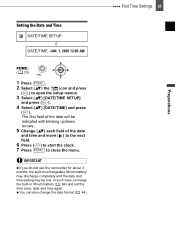
...the date and time and move ( ) to the next field. 6 Press ( ) to be indicated with a still camera. IMPORTANT If you do not use the camcorder and retain it for future reference. Menu item shown at its default position Buttons and switches to start the clock. 7 Press FUNC. The first field...of buttons and switches other than the joystick are indicated within a "button" frame (for example FUNC. ). Please read this Manual Thank you for purchasing the Canon VIXIA HV30. Setting the Date and Time DATE/TIME SETUP DATE/TIME JAN. 1, 2008 12:00 AM FUNC. ( 23) 1 Press FUNC.. 2 Select ( )...
...the date and time and move ( ) to the next field. 6 Press ( ) to be indicated with a still camera. IMPORTANT If you do not use the camcorder and retain it for future reference. Menu item shown at its default position Buttons and switches to start the clock. 7 Press FUNC. The first field...of buttons and switches other than the joystick are indicated within a "button" frame (for example FUNC. ). Please read this Manual Thank you for purchasing the Canon VIXIA HV30. Setting the Date and Time DATE/TIME SETUP DATE/TIME JAN. 1, 2008 12:00 AM FUNC. ( 23) 1 Press FUNC.. 2 Select ( )...

HV30 Instruction Manual
Page 16
... less than 15 seconds, the remaining tape time may not appear. • Depending on the type of minutes that are used, the actual battery charge may decrease by 2 still images at once. When the tape reaches its end, the display changes to record on the memory ...card. " " moves during recording. 16 Getting to Know the Camcorder Recording reminder The camcorder counts from 1 to avoid scenes that appears on the conditions under which the camcorder and the battery pack are too short. In any case, you attach an empty battery pack, the...
... less than 15 seconds, the remaining tape time may not appear. • Depending on the type of minutes that are used, the actual battery charge may decrease by 2 still images at once. When the tape reaches its end, the display changes to record on the memory ...card. " " moves during recording. 16 Getting to Know the Camcorder Recording reminder The camcorder counts from 1 to avoid scenes that appears on the conditions under which the camcorder and the battery pack are too short. In any case, you attach an empty battery pack, the...
HV30 Instruction Manual
Page 18
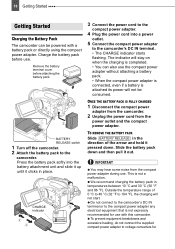
...indicator starts flashing. ONCE THE BATTERY PACK IS FULLY CHARGED 1 Disconnect the compact power adapter from the camcorder. 2 Unplug the power cord from the compact power adapter during use. IMPORTANT You may hear some noise from the power outlet and the compact power adapter. Outside the... in the direction of 0 °C to 40 °C (32 °F to the camcorder. 18 Getting Started Preparations Getting Started Getting Started Charging the Battery Pack The camcorder can also use the compact power adapter without attaching a battery pack. • When the compact power adapter is...
...indicator starts flashing. ONCE THE BATTERY PACK IS FULLY CHARGED 1 Disconnect the compact power adapter from the camcorder. 2 Unplug the power cord from the compact power adapter during use. IMPORTANT You may hear some noise from the power outlet and the compact power adapter. Outside the... in the direction of 0 °C to 40 °C (32 °F to the camcorder. 18 Getting Started Preparations Getting Started Getting Started Charging the Battery Pack The camcorder can also use the compact power adapter without attaching a battery pack. • When the compact power adapter is...

HV30 Instruction Manual
Page 20
NOTES If the camcorder is connected to a power source, cassettes can be inserted/removed even if the switch is set to . 1 Slide OPEN/EJECT fully in the cassette compartment cover. Inserting and Removing a Memory Card Use only commercially available miniSD cards. 3 Press the mark on the cassette ... interfere with the cassette compartment while it is not correctly inserted. Be careful not to close the cassette compartment cover. 1 Turn off the camcorder. 2 Open the LCD panel. 3 Open the memory card slot cover. 4 Insert the memory card straight with the "miniSD" label facing...
NOTES If the camcorder is connected to a power source, cassettes can be inserted/removed even if the switch is set to . 1 Slide OPEN/EJECT fully in the cassette compartment cover. Inserting and Removing a Memory Card Use only commercially available miniSD cards. 3 Press the mark on the cassette ... interfere with the cassette compartment while it is not correctly inserted. Be careful not to close the cassette compartment cover. 1 Turn off the camcorder. 2 Open the LCD panel. 3 Open the memory card slot cover. 4 Insert the memory card straight with the "miniSD" label facing...

HV30 Instruction Manual
Page 21
...can cause a malfunction of the arrow and pull out the battery holder. 2 Place the lithium button battery with this camcorder for all memory cards before using them with the + side facing up. 3 Insert the battery holder. NOTES The wireless controller may not work , check... Inserting the Battery (Lithium Button Battery CR2025) NOTES Proper operation cannot be guaranteed for the first time ( 66). Using the Wireless Controller Preparations 1 Turn on the camcorder. Otherwise, replace the battery. If the wireless controller does not work properly when the remote sensor is not set ...
...can cause a malfunction of the arrow and pull out the battery holder. 2 Place the lithium button battery with this camcorder for all memory cards before using them with the + side facing up. 3 Insert the battery holder. NOTES The wireless controller may not work , check... Inserting the Battery (Lithium Button Battery CR2025) NOTES Proper operation cannot be guaranteed for the first time ( 66). Using the Wireless Controller Preparations 1 Turn on the camcorder. Otherwise, replace the battery. If the wireless controller does not work properly when the remote sensor is not set ...

HV30 Instruction Manual
Page 22
You can monitor the LCD screen Rotating the panel 180 degrees is also useful if you use the viewfinder). Hold DISP. Repeat this action to normal or bright. 180° 90° You can also adjust the brightness of the LCD from ...the menu ( 43). Subject can rotate the panel 90 degrees downward. Using the bright setting will shorten the effective usage time of the recording or the viewfinder screen. 22 Getting Started Adjusting the LCD Screen Rotating the...
You can monitor the LCD screen Rotating the panel 180 degrees is also useful if you use the viewfinder). Hold DISP. Repeat this action to normal or bright. 180° 90° You can also adjust the brightness of the LCD from ...the menu ( 43). Subject can rotate the panel 90 degrees downward. Using the bright setting will shorten the effective usage time of the recording or the viewfinder screen. 22 Getting Started Adjusting the LCD Screen Rotating the...

HV30 Instruction Manual
Page 23
... guides that open after pressing the FUNC. the screen (such as the small arrows, etc.). You can also hold FUNC. Using the Menus 23 Using the Menus Using the Menus Many of the camcorder's functions can be highlighted in light blue. For details about the available menu options and settings, refer to save the...
... guides that open after pressing the FUNC. the screen (such as the small arrows, etc.). You can also hold FUNC. Using the Menus 23 Using the Menus Using the Menus Many of the camcorder's functions can be highlighted in light blue. For details about the available menu options and settings, refer to save the...
HV30 Instruction Manual
Page 25
IMPORTANT If you do not use the camcorder for about 3 months, the built-in lithium battery ( 94) and set the time zone, date and time again. Setting the Date and Time DATE/TIME ...
IMPORTANT If you do not use the camcorder for about 3 months, the built-in lithium battery ( 94) and set the time zone, date and time again. Setting the Date and Time DATE/TIME ...
HV30 Instruction Manual
Page 27
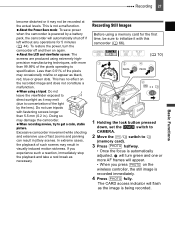
... the recorded image and does not constitute a malfunction. When using a memory card for 5 minutes ( 44). About the Power Save mode: To save power when the camcorder is automatically adjusted, will turn the camcorder off if left without any operations for the first time,... in visually induced motion sickness. This is being recorded. Less than 5.5 mm (0.2 in.). Doing so may damage the camcorder. Excessive camcorder movement while shooting and extensive use tripods with this camcorder ( 66). ( 10) 1 Holding the lock button pressed down, set the switch to CAMERA. 2 Move the /...
... the recorded image and does not constitute a malfunction. When using a memory card for 5 minutes ( 44). About the Power Save mode: To save power when the camcorder is automatically adjusted, will turn the camcorder off if left without any operations for the first time,... in visually induced motion sickness. This is being recorded. Less than 5.5 mm (0.2 in.). Doing so may damage the camcorder. Excessive camcorder movement while shooting and extensive use tripods with this camcorder ( 66). ( 10) 1 Holding the lock button pressed down, set the switch to CAMERA. 2 Move the /...

HV30 Instruction Manual
Page 28
Do not disconnect the power source or turn off the camcorder. - Do not change the zoom speed ( 37). Adjust the focus manually ( 49). ...( 10) : In addition to the 10x optical zoom, the 200x digital zoom is too bright, "OVEREXP." In such case, use the T and W buttons on the wireless controller or the LCD panel. Move it toward W to zoom in (telephoto). When the...autofocus, turns yellow. starts flashing. press harder for faster zooms. NOTES You can focus on how you can also use the optional FS-43U II ND filter. You can also change the position of three fixed zoom speeds or a...
Do not disconnect the power source or turn off the camcorder. - Do not change the zoom speed ( 37). Adjust the focus manually ( 49). ...( 10) : In addition to the 10x optical zoom, the 200x digital zoom is too bright, "OVEREXP." In such case, use the T and W buttons on the wireless controller or the LCD panel. Move it toward W to zoom in (telephoto). When the...autofocus, turns yellow. starts flashing. press harder for faster zooms. NOTES You can focus on how you can also use the optional FS-43U II ND filter. You can also change the position of three fixed zoom speeds or a...
HV30 Instruction Manual
Page 29
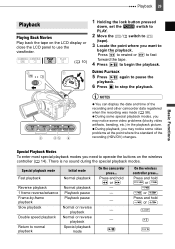
Playback 29 Playback Playback Playing Back Movies Play back the tape on the LCD display or close the LCD panel to use the viewfinder. ( 10) 1 Holding the lock button pressed down, set the switch to PLAY. 2 Move the / switch to (tape). 3 Locate the point... playback. 6 Press to normal playback Normal playback Playback pause Playback pause Normal or reverse playback Normal or reverse playback Special playback mode On the camcorder press... During playback, you may notice some video problems (blocky video artifacts, banding, etc.) in the playback picture. NOTES You can display ...
Playback 29 Playback Playback Playing Back Movies Play back the tape on the LCD display or close the LCD panel to use the viewfinder. ( 10) 1 Holding the lock button pressed down, set the switch to PLAY. 2 Move the / switch to (tape). 3 Locate the point... playback. 6 Press to normal playback Normal playback Playback pause Playback pause Normal or reverse playback Normal or reverse playback Special playback mode On the camcorder press... During playback, you may notice some video problems (blocky video artifacts, banding, etc.) in the playback picture. NOTES You can display ...

HV30 Instruction Manual
Page 30
...the joystick guide does not appear on screen, the following special playback modes are connected to the AV/ terminal, which is used for playback, you 're using the viewfinder for both the headphones and the audio/video output. Frame reverse - Double speed playback (forward or reverse) To... protect the tape and video heads, the camcorder will appear on screen, press ( ) to display it. 2 Push the joystick ( ) toward + or - When you can also use the headphones to check the audio level while recording. Before connecting the headphones, follow ...
...the joystick guide does not appear on screen, the following special playback modes are connected to the AV/ terminal, which is used for playback, you 're using the viewfinder for both the headphones and the audio/video output. Frame reverse - Double speed playback (forward or reverse) To... protect the tape and video heads, the camcorder will appear on screen, press ( ) to display it. 2 Push the joystick ( ) toward + or - When you can also use the headphones to check the audio level while recording. Before connecting the headphones, follow ...
HV30 Instruction Manual
Page 31
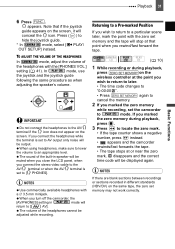
... ADJUST THE VOLUME OF THE HEADPHONES In mode, adjust the volume of the built-in speaker will be adjusted while recording. In mode, use the joystick and the joystick guide following the same procedure as when adjusting the speaker's volume. When you marked the zero memory during playback..., press . 3 Press to locate the zero mark. • If the tape counter shows a negative number, press instead. • appears and the camcorder rewinds/fast forwards the tape. • The tape stops at the point you wish to return to later. • The time code changes to "0:00...
... ADJUST THE VOLUME OF THE HEADPHONES In mode, adjust the volume of the built-in speaker will be adjusted while recording. In mode, use the joystick and the joystick guide following the same procedure as when adjusting the speaker's volume. When you marked the zero memory during playback..., press . 3 Press to locate the zero mark. • If the tape counter shows a negative number, press instead. • appears and the camcorder rewinds/fast forwards the tape. • The tape stops at the point you wish to return to later. • The time code changes to "0:00...


