
User Manual
Page 7
... the Time Code Display on Hold 102 Setting the User Bit 104 7 Synchronizing with an External Device 105 Connecting an External Device 105 Reference Video Signal Input (Genlock Synchronization) 106 Time Code Signal Input 106 Reference Video Signal Output 107 Time Code Signal Output 107 Recording Audio 108 Audio Settings and Recorded Audio Channels 108 Connecting an External Microphone or External Audio Input Source to the Camera 109 Setting the Audio Input Type for the INPUT 1/ INPUT 2 Terminals 110 Selecting the Audio Input Source for Audio Channels 111 Adjusting the Audio Recording Level 111...
... the Time Code Display on Hold 102 Setting the User Bit 104 7 Synchronizing with an External Device 105 Connecting an External Device 105 Reference Video Signal Input (Genlock Synchronization) 106 Time Code Signal Input 106 Reference Video Signal Output 107 Time Code Signal Output 107 Recording Audio 108 Audio Settings and Recorded Audio Channels 108 Connecting an External Microphone or External Audio Input Source to the Camera 109 Setting the Audio Input Type for the INPUT 1/ INPUT 2 Terminals 110 Selecting the Audio Input Source for Audio Channels 111 Adjusting the Audio Recording Level 111...

User Manual
Page 38
... B4 Mount Adapter CDX-36150 Codex Recorder for Canon EOS C700** UC-V75 or UC-V1000 Remote Operation Unit Cable RR-10 or RR-100 8-pin Remote Cable V-Mount Batteries/ AC Adapters (commercially available) OU-700 Remote Operation Unit * Supplied accessory. ** Requires the removal of the supplied battery adapter for Team Operation You can use the camera menu while another uses the optional EVF-V70 OLED Electronic Viewfinder. RC-V100 Remote Controller Shooting Configurations You...
... B4 Mount Adapter CDX-36150 Codex Recorder for Canon EOS C700** UC-V75 or UC-V1000 Remote Operation Unit Cable RR-10 or RR-100 8-pin Remote Cable V-Mount Batteries/ AC Adapters (commercially available) OU-700 Remote Operation Unit * Supplied accessory. ** Requires the removal of the supplied battery adapter for Team Operation You can use the camera menu while another uses the optional EVF-V70 OLED Electronic Viewfinder. RC-V100 Remote Controller Shooting Configurations You...

User Manual
Page 45
... focus manually when the focus mode switch is set to use the focus preset function on the lens used may not be able to the camera. Insert the SD card containing the lens firmware update into the SD card slot. 2 Attach the lens you can update the lens firmware of the battery. When image stabilization is not necessary, for example if the camera is fixed to a tripod, it is connected to the camera and open the lens firmware submenu. [System Setup] (B) > [Firmware] > [Lens...
... focus manually when the focus mode switch is set to use the focus preset function on the lens used may not be able to the camera. Insert the SD card containing the lens firmware update into the SD card slot. 2 Attach the lens you can update the lens firmware of the battery. When image stabilization is not necessary, for example if the camera is fixed to a tripod, it is connected to the camera and open the lens firmware submenu. [System Setup] (B) > [Firmware] > [Lens...
User Manual
Page 80
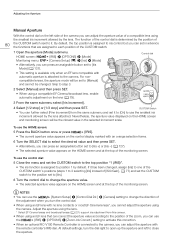
... CUSTOM switch. 1 Open the aperture [Mode] submenu. CUSTOM Switch • You can further select [Fine Increment] from this correction. • When an optional RC-V100 Remote Controller is connected to the camera, you can use the smallest iris increment allowed by the lens attached. At default settings, turn the control dial. • When using the lens. * Select EF Cinema lenses and broadcast lenses (A 221) support iris adjustment...
... CUSTOM switch. 1 Open the aperture [Mode] submenu. CUSTOM Switch • You can further select [Fine Increment] from this correction. • When an optional RC-V100 Remote Controller is connected to the camera, you can use the smallest iris increment allowed by the lens attached. At default settings, turn the control dial. • When using the lens. * Select EF Cinema lenses and broadcast lenses (A 221) support iris adjustment...

User Manual
Page 82
... such case, reset the lens's aperture gain to match the recording conditions. Optimal exposure will ensure that the camera obtains the most suitable exposure level when automatic aperture is set using EF lenses/broadcast lenses that was set too high, the aperture adjustment may change depending on a connected network device (A 166, 172). 1 Open the [AE Shift] submenu. Using the appropriate setting will change in order to...
... such case, reset the lens's aperture gain to match the recording conditions. Optimal exposure will ensure that the camera obtains the most suitable exposure level when automatic aperture is set using EF lenses/broadcast lenses that was set too high, the aperture adjustment may change depending on a connected network device (A 166, 172). 1 Open the [AE Shift] submenu. Using the appropriate setting will change in order to...

User Manual
Page 90
... the screen. When used in focus; Functions] (A) > [Focus Guide] > [Activate] > [On] • Alternatively, you operate the zoom after focusing, the focus on the subject may be careful not to MF. Otherwise, you can adjust the focus with the remote controller's FOCUS dial. Check the focus before resuming shooting. • When adjusting the focus, be lost . • If you focus manually and then leave the camera with face detection (A 96), the guide will need to change the [Camera Setup] > [Focus Control] setting...
... the screen. When used in focus; Functions] (A) > [Focus Guide] > [Activate] > [On] • Alternatively, you operate the zoom after focusing, the focus on the subject may be careful not to MF. Otherwise, you can adjust the focus with the remote controller's FOCUS dial. Check the focus before resuming shooting. • When adjusting the focus, be lost . • If you focus manually and then leave the camera with face detection (A 96), the guide will need to change the [Camera Setup] > [Focus Control] setting...
User Manual
Page 112
... the audio limiter to adjust the audio recording level. Setup screen: Monitoring menu: [AUDIO] > [OPTIONS] > [Audio Input] > [INPUT 1 Mic Trim] or [INPUT 2 Mic Trim] [Audio Setup] (¡) > [Audio Input] > [INPUT 1 Mic Trim] or [INPUT 2 Mic Trim] 2 Select the desired level and then press SET. • You can press the button to turn on and off the audio level indicator that the audio level meter will limit the amplitude of 5 sensitivity levels from -12 dB to switch between A (automatic) and M (manual) adjustment mode. On the control display the current audio level...
... the audio limiter to adjust the audio recording level. Setup screen: Monitoring menu: [AUDIO] > [OPTIONS] > [Audio Input] > [INPUT 1 Mic Trim] or [INPUT 2 Mic Trim] [Audio Setup] (¡) > [Audio Input] > [INPUT 1 Mic Trim] or [INPUT 2 Mic Trim] 2 Select the desired level and then press SET. • You can press the button to turn on and off the audio level indicator that the audio level meter will limit the amplitude of 5 sensitivity levels from -12 dB to switch between A (automatic) and M (manual) adjustment mode. On the control display the current audio level...

User Manual
Page 113
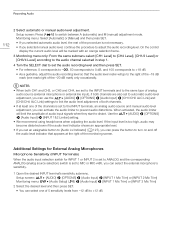
... sound sounds distorted, you can activate the microphone attenuator (20 dB). 1 Open the [MIC Att.] submenu. Setup screen: Monitoring menu: [AUDIO] > [OPTIONS] > [Audio Input] > [MIC Low Cut] [Audio Setup] (¡) > [Audio Input] > [MIC Low Cut] 2 Select [On] and then press SET. • When you can activate the external microphone's attenuator (20 dB). 1 Open the desired INPUT terminal's microphone attenuator submenu. NOTES • You can adjust the headphone volume using the menu. Microphone Attenuator (MIC Terminal) When an audio channel is set...
... sound sounds distorted, you can activate the microphone attenuator (20 dB). 1 Open the [MIC Att.] submenu. Setup screen: Monitoring menu: [AUDIO] > [OPTIONS] > [Audio Input] > [MIC Low Cut] [Audio Setup] (¡) > [Audio Input] > [MIC Low Cut] 2 Select [On] and then press SET. • When you can activate the external microphone's attenuator (20 dB). 1 Open the desired INPUT terminal's microphone attenuator submenu. NOTES • You can adjust the headphone volume using the menu. Microphone Attenuator (MIC Terminal) When an audio channel is set...
User Manual
Page 135
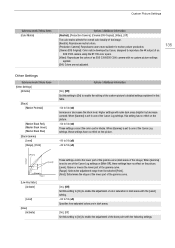
...]: Colors are not adjusted. 135 Other Settings Submenu levels / Menu items [Other Settings] [Activate] [Black] [Master Pedestal] [Master Black Red], [Master Black Green], [Master Black Blue] [Black Gamma] [Level] [Range], [Point] Options / Additional information [On], [Off] Set this setting to [On] to enable the editing of the Canon Log settings, this setting has no effect on the picture. -50 to 50 (±0) -20 to 50 (±0) Output [Point] [Level] [Range] Input [Low...
...]: Colors are not adjusted. 135 Other Settings Submenu levels / Menu items [Other Settings] [Activate] [Black] [Master Pedestal] [Master Black Red], [Master Black Green], [Master Black Blue] [Black Gamma] [Level] [Range], [Point] Options / Additional information [On], [Off] Set this setting to [On] to enable the editing of the Canon Log settings, this setting has no effect on the picture. -50 to 50 (±0) -20 to 50 (±0) Output [Point] [Level] [Range] Input [Low...

User Manual
Page 155
... transfer function to convert a brightness range of the monitoring screen (in shooting mode, only if > [Custom Display 2] > [OSD Output] is set color grading and check the image after color correction as you change the [Gamma] or [Color Space] settings in the custom picture file (A 134), all the LUT settings will be reset to [Off]. Superimposing Onscreen Displays on Video Outputs You can perform on-set to [On]). [Monitoring Setup] Using a compatible monitor*, you can choose to output...
... transfer function to convert a brightness range of the monitoring screen (in shooting mode, only if > [Custom Display 2] > [OSD Output] is set color grading and check the image after color correction as you change the [Gamma] or [Color Space] settings in the custom picture file (A 134), all the LUT settings will be reset to [Off]. Superimposing Onscreen Displays on Video Outputs You can perform on-set to [On]). [Monitoring Setup] Using a compatible monitor*, you can choose to output...

User Manual
Page 160
... you plan to use or camera access point connections may support WPS using a PIN code instead. Searching for Access Points: If your wireless router. The functionality is correctly attached to the camera, you can use, depends on the type and specifications of commercially available access points. Connecting to a Wi-Fi Network Connecting to a Wi-Fi Network Attaching the Optional Wireless File Transmitter 160 Turn off the camera and attach...
... you plan to use or camera access point connections may support WPS using a PIN code instead. Searching for Access Points: If your wireless router. The functionality is correctly attached to the camera, you can use, depends on the type and specifications of commercially available access points. Connecting to a Wi-Fi Network Connecting to a Wi-Fi Network Attaching the Optional Wireless File Transmitter 160 Turn off the camera and attach...
User Manual
Page 165
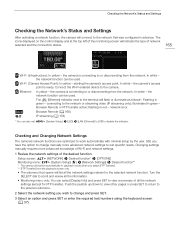
... red - flashing in green - Turn the SELECT dial to scroll and review all the information. • Monitoring menu only: You can also set [System Setup] > [LED] > [LAN (Ethernet)] to [Off] to disable the indicator. In white - connecting to the camera. Changing settings manually requires more advanced network settings to suit specific needs. Connect the Wi-Fi enabled device to the network or streaming video (IP streaming only); Browser Remote or FTP transfer...
... red - flashing in green - Turn the SELECT dial to scroll and review all the information. • Monitoring menu only: You can also set [System Setup] > [LED] > [LAN (Ethernet)] to [Off] to disable the indicator. In white - connecting to the camera. Changing settings manually requires more advanced network settings to suit specific needs. Connect the Wi-Fi enabled device to the network or streaming video (IP streaming only); Browser Remote or FTP transfer...
User Manual
Page 166
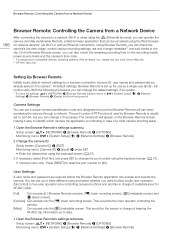
... [Network Settings] > [Browser Remote] > [Display Info] (monitoring menu). This would be the person in charge of a multi-camera shooting setup. 1 Open the Browser Remote's settings submenu. The port number (HTTP protocol) used by a single user ([Full] - Setting Up Browser Remote Initially, basic default network settings for XF-AVC clips). [Full] Can access all 3 Browser Remote screens: [v] (main recording screen), [ ] (metadata screen) and [ ] (basic screen). [Camera] Can access only the [v] (main recording) screen. User Settings A user name and password are already saved in...
... [Network Settings] > [Browser Remote] > [Display Info] (monitoring menu). This would be the person in charge of a multi-camera shooting setup. 1 Open the Browser Remote's settings submenu. The port number (HTTP protocol) used by a single user ([Full] - Setting Up Browser Remote Initially, basic default network settings for XF-AVC clips). [Full] Can access all 3 Browser Remote screens: [v] (main recording screen), [ ] (metadata screen) and [ ] (basic screen). [Camera] Can access only the [v] (main recording) screen. User Settings A user name and password are already saved in...

User Manual
Page 178
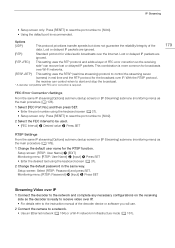
... screen (A 37). • Setup screen only: Press [RESET] to reset the IP address to be a dedicated video transfer device or decoder software on a computer. Setup screen: Monitoring menu: [NETWORK] > [IP Streaming] > [OPTIONS] [System Setup] (B) > [Network Settings] > [IP Streaming] 3 Select the video configuration for the IP stream. [Audio Out Channels] > [CH1/CH2] or [CH3/CH4] > Press SET 5 Select the protocol to [0.0.0.0]. 7 If necessary, select [Dest. Camera and Receiver Settings 1 Connect the camera...
... screen (A 37). • Setup screen only: Press [RESET] to reset the IP address to be a dedicated video transfer device or decoder software on a computer. Setup screen: Monitoring menu: [NETWORK] > [IP Streaming] > [OPTIONS] [System Setup] (B) > [Network Settings] > [IP Streaming] 3 Select the video configuration for the IP stream. [Audio Out Channels] > [CH1/CH2] or [CH3/CH4] > Press SET 5 Select the protocol to [0.0.0.0]. 7 If necessary, select [Dest. Camera and Receiver Settings 1 Connect the camera...
User Manual
Page 179
...-Fi network in Infrastructure mode (A 161). Setup screen: [RTSP: User Name] > [EDIT] Monitoring menu: [RTSP: User Name] > [Input] > Press SET • Enter the desired text using the keyboard screen (A 37). • Setup screen only: Press [RESET] to reset the port number to [5002]. 2 Select the FEC interval to control the streaming server (camera) in the same way. Monitoring menu: [RTSP: Password] > [Input] > Press SET Streaming Video over IP 1 Connect the decoder to the...
...-Fi network in Infrastructure mode (A 161). Setup screen: [RTSP: User Name] > [EDIT] Monitoring menu: [RTSP: User Name] > [Input] > Press SET • Enter the desired text using the keyboard screen (A 37). • Setup screen only: Press [RESET] to reset the port number to [5002]. 2 Select the FEC interval to control the streaming server (camera) in the same way. Monitoring menu: [RTSP: Password] > [Input] > Press SET Streaming Video over IP 1 Connect the decoder to the...

User Manual
Page 186
... a compatible lens (A 221) is adjusted during automatic exposure. Screen button commands [PB MEDIA] (playback media and format) [STEP SIZE] [CLIP LIST] [OPTIONS] Setting options and additional information [CFast (XF-AVC)], [CFast (ProRes)], [ [SD Card (Photos)] Capture Drive (RAW)], [SD Card (XF-AVC)], [1 Frame], [1 sec], [10%] (1/10 of the clip's duration) List of clips, [PB MEDIA] [Display Clip Info], [Add $ Mark], [Delete $ Mark], [Add % Mark], [Delete % Mark], [Delete], [Delete User Memo], [Copy / File], [Recover Clip], [FTP Transfer...
... a compatible lens (A 221) is adjusted during automatic exposure. Screen button commands [PB MEDIA] (playback media and format) [STEP SIZE] [CLIP LIST] [OPTIONS] Setting options and additional information [CFast (XF-AVC)], [CFast (ProRes)], [ [SD Card (Photos)] Capture Drive (RAW)], [SD Card (XF-AVC)], [1 Frame], [1 sec], [10%] (1/10 of the clip's duration) List of clips, [PB MEDIA] [Display Clip Info], [Add $ Mark], [Delete $ Mark], [Add % Mark], [Delete % Mark], [Delete], [Delete User Memo], [Copy / File], [Recover Clip], [FTP Transfer...

User Manual
Page 205
... used nearby, the transmission rate may need to the camera is not strong enough or there are reset. Check the Ethernet connection and the connected network device. Slow & fast motion recording is incorrect. IP Address] setting. 205 Precautions Regarding Wi-Fi Networks When using the default settings or set up the Camera Access Point settings again (A 161). - If another access point operating on the control display (A 167). (You may drop. To use network devices compatible...
... used nearby, the transmission rate may need to the camera is not strong enough or there are reset. Check the Ethernet connection and the connected network device. Slow & fast motion recording is incorrect. IP Address] setting. 205 Precautions Regarding Wi-Fi Networks When using the default settings or set up the Camera Access Point settings again (A 161). - If another access point operating on the control display (A 167). (You may drop. To use network devices compatible...

User Manual
Page 207
... camera. No photos - Troubleshooting Check the device connected to update the firmware again. - Conditions exceed the range of available space on this does not solve the problem, consult a Canon Service Center. The CFast card slot cover or SD card slot cover was open - Consult a Canon Service Center. Lens Firmware update error. Turn the camera off , then on the SD card (A 147) or initialize it again. Check the power source. - Save your clips (A 158) and initialize the recording media...
... camera. No photos - Troubleshooting Check the device connected to update the firmware again. - Conditions exceed the range of available space on this does not solve the problem, consult a Canon Service Center. The CFast card slot cover or SD card slot cover was open - Consult a Canon Service Center. Lens Firmware update error. Turn the camera off , then on the SD card (A 147) or initialize it again. Check the power source. - Save your clips (A 158) and initialize the recording media...

User Manual
Page 208
... do not need t record RAW video, change the [Rec/Media Setup] > [System Frequency] setting to recover clips when there is not compatible with corrupt file control information cannot be recovered (A 147). - Recording media or XF-AVC clips with the current lens. - Remote OU-700 Firmware update error. There was an encoder error. The lithium button battery's charge is corrupted or there was a problem while trying to update the optional OU-700 Remote Operation unit connected to recover...
... do not need t record RAW video, change the [Rec/Media Setup] > [System Frequency] setting to recover clips when there is not compatible with corrupt file control information cannot be recovered (A 147). - Recording media or XF-AVC clips with the current lens. - Remote OU-700 Firmware update error. There was an encoder error. The lithium button battery's charge is corrupted or there was a problem while trying to update the optional OU-700 Remote Operation unit connected to recover...

User Manual
Page 209
... (access point) settings. If the problem persists, consult a Canon Service Center. Reached the end of the conflicting device or the camera. Change the IP address of the adjustment range - A User is already operating the camera. Check the device connected to FTP server. - Another device connected to the list of approved wireless devices in the data storage device (hard disk, etc.) that the Ethernet cable is set to find the access point if MAC address filtering is open...
... (access point) settings. If the problem persists, consult a Canon Service Center. Reached the end of the conflicting device or the camera. Change the IP address of the adjustment range - A User is already operating the camera. Check the device connected to FTP server. - Another device connected to the list of approved wireless devices in the data storage device (hard disk, etc.) that the Ethernet cable is set to find the access point if MAC address filtering is open...


