Instruction Manual
Page 6
... software, which allows multiple C500 / C500 PL cameras to use the MIC terminal for stop motion animation). You can enjoy unparalleled image control to the camera and operate it as a standard file type such as audio and time code signals. During MXF mode, with an external recorder and export it remotely via Wi-Fi using the edge monitor (A 101). The Wi-Fi Remote application lets you monitor the image through live view and remotely control the focus, shutter speed, ISO speed...
... software, which allows multiple C500 / C500 PL cameras to use the MIC terminal for stop motion animation). You can enjoy unparalleled image control to the camera and operate it as a standard file type such as audio and time code signals. During MXF mode, with an external recorder and export it remotely via Wi-Fi using the edge monitor (A 101). The Wi-Fi Remote application lets you monitor the image through live view and remotely control the focus, shutter speed, ISO speed...
Instruction Manual
Page 7
... 46 Checking the Available Recording Time for CF Cards 47 Recovering Data on the CF Card 47 Adjusting the Black Balance 48 Operating the Camera Remotely 49 Using the RC-V100 Remote Controller 49 Remote Operation Via the Wi-Fi Remote Application 50 Preparing the System for MXF Mode 64 Changing Main Camera Functions with the ACES Workflow 22 2. Button 66 Using the Direct Setting Mode 66 Shutter Speed 67 Changing the Shutter Speed Mode and Value 68 Remote Operation Using Wi-Fi Remote 68 or 2K-Compatible External Recorder...
... 46 Checking the Available Recording Time for CF Cards 47 Recovering Data on the CF Card 47 Adjusting the Black Balance 48 Operating the Camera Remotely 49 Using the RC-V100 Remote Controller 49 Remote Operation Via the Wi-Fi Remote Application 50 Preparing the System for MXF Mode 64 Changing Main Camera Functions with the ACES Workflow 22 2. Button 66 Using the Direct Setting Mode 66 Shutter Speed 67 Changing the Shutter Speed Mode and Value 68 Remote Operation Using Wi-Fi Remote 68 or 2K-Compatible External Recorder...
Instruction Manual
Page 8
... Putting the Time Code Display on Hold 85 Setting the User Bit 87 Synchronizing with an External Device 88 Connecting an External Device 88 Reference Video Signal Input (Genlock Synchronization) 88 Time Code Signal Input 89 Reference Video Signal Output 90 Time Code Signal Output 91 Recording Audio 92 Connecting an External Microphone or External Audio Input Source to the Camera 92 Selecting the Audio Input from the XLR Terminals 93 Adjusting the Audio Level from the XLR Terminals 94 Adjusting the Audio Level from the MIC Terminal...
... Putting the Time Code Display on Hold 85 Setting the User Bit 87 Synchronizing with an External Device 88 Connecting an External Device 88 Reference Video Signal Input (Genlock Synchronization) 88 Time Code Signal Input 89 Reference Video Signal Output 90 Time Code Signal Output 91 Recording Audio 92 Connecting an External Microphone or External Audio Input Source to the Camera 92 Selecting the Audio Input from the XLR Terminals 93 Adjusting the Audio Level from the XLR Terminals 94 Adjusting the Audio Level from the MIC Terminal...
Instruction Manual
Page 9
... Playing Back Clips 128 Onscreen Displays 129 Playback Controls 130 Audio Output 131 MXF Clip Operations 132 Using the Clip Menu 132 Displaying Clip Information 133 Adding $ Marks or % Marks 134 Deleting $ Marks or % Marks 134 Copying Clips 135 Deleting Clips 136 Deleting the User Memo 136 Copying a Custom Picture File Embedded in MEDIA Mode 159 Photo Playback 161 Displaying the [Photos] Index Screen 161 Viewing Photos 161 Photo Operations 162 Using the Photo Menu 162 Deleting Photos 162 Protecting Photos 163 Copying Custom Picture Files 164 Photo Numbering 165 8. External Connections...
... Playing Back Clips 128 Onscreen Displays 129 Playback Controls 130 Audio Output 131 MXF Clip Operations 132 Using the Clip Menu 132 Displaying Clip Information 133 Adding $ Marks or % Marks 134 Deleting $ Marks or % Marks 134 Copying Clips 135 Deleting Clips 136 Deleting the User Memo 136 Copying a Custom Picture File Embedded in MEDIA Mode 159 Photo Playback 161 Displaying the [Photos] Index Screen 161 Viewing Photos 161 Photo Operations 162 Using the Photo Menu 162 Deleting Photos 162 Protecting Photos 163 Copying Custom Picture Files 164 Photo Numbering 165 8. External Connections...
Instruction Manual
Page 12
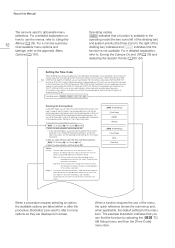
... used to [Free Run] during interval recording and frame recording modes. While playing back video recorded on the picture from the HDMI OUT terminal or SYNC OUT terminal. Additionally, you can output the time code on the CF card. Operating modes: Selecting the Running Mode During MXF mode, you can set to [Rec Run] during normal shooting and slow & fast recording mode; You can superimpose the time code on a CF card, you select [Preset], open the time code [Run...
... used to [Free Run] during interval recording and frame recording modes. While playing back video recorded on the picture from the HDMI OUT terminal or SYNC OUT terminal. Additionally, you can output the time code on the CF card. Operating modes: Selecting the Running Mode During MXF mode, you can set to [Rec Run] during normal shooting and slow & fast recording mode; You can superimpose the time code on a CF card, you select [Preset], open the time code [Run...
Instruction Manual
Page 25
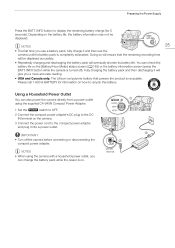
... turned off the camera before connecting or disconnecting the compact power adapter. Please call 1-800-8-BATTERY for 5 seconds). IMPORTANT • Turn off ). Doing so will be displayed. Preparing the Power Supply Press the BATT. Fully charging the battery pack and then discharging it will eventually shorten its battery life. NOTES • When using the supplied CA-940N Compact Power Adapter. 1 Set the Q switch to OFF. 2 Connect the compact power adapter's DC plug...
... turned off the camera before connecting or disconnecting the compact power adapter. Please call 1-800-8-BATTERY for 5 seconds). IMPORTANT • Turn off ). Doing so will be displayed. Preparing the Power Supply Press the BATT. Fully charging the battery pack and then discharging it will eventually shorten its battery life. NOTES • When using the supplied CA-940N Compact Power Adapter. 1 Set the Q switch to OFF. 2 Connect the compact power adapter's DC plug...
Instruction Manual
Page 33
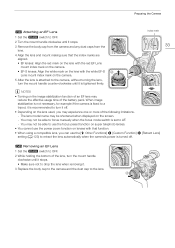
... not be shortened when displayed on the screen. - The lens model name may be able to focus manually when the focus mode switch is set to the lens. When image stabilization is not necessary, for example if the camera is fixed to a tripod, it is recommended to turn it off . 2 Removing an EF Lens 1 Set the Q switch to OFF. 2 While holding the bottom of the lens, turn the mount handle counter...
... not be shortened when displayed on the screen. - The lens model name may be able to focus manually when the focus mode switch is set to the lens. When image stabilization is not necessary, for example if the camera is fixed to a tripod, it is recommended to turn it off . 2 Removing an EF Lens 1 Set the Q switch to OFF. 2 While holding the bottom of the lens, turn the mount handle counter...
Instruction Manual
Page 34
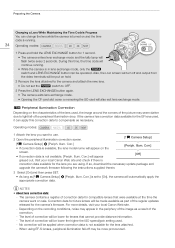
... can change the lens while the camera is turned on and the time code is running . • While the camera is in the periphery of the image as part of the picture may be more details, visit your local Canon Web site and check if there is set the Q switch to light fall -off or peripheral illumination drop. Corr.] • If correction data is available, the lens model...
... can change the lens while the camera is turned on and the time code is running . • While the camera is in the periphery of the image as part of the picture may be more details, visit your local Canon Web site and check if there is set the Q switch to light fall -off or peripheral illumination drop. Corr.] • If correction data is available, the lens model...
Instruction Manual
Page 45
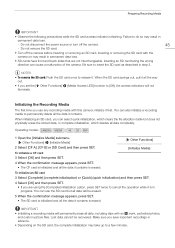
... a recording media to cancel the operation while it first. NOTES • To remove the SD card: Push the SD card once to a few minutes. Initializing the Recording Media The first time you save important recordings in permanent data loss. - To initialize an SD card 3 Select [Complete] (complete initialization) or [Quick] (quick initialization) and then press SET. 4 Select [OK] and then press SET. • If you set the [w Other Functions] > [Media Access LED] function...
... a recording media to cancel the operation while it first. NOTES • To remove the SD card: Push the SD card once to a few minutes. Initializing the Recording Media The first time you save important recordings in permanent data loss. - To initialize an SD card 3 Select [Complete] (complete initialization) or [Quick] (quick initialization) and then press SET. 4 Select [OK] and then press SET. • If you set the [w Other Functions] > [Media Access LED] function...

Instruction Manual
Page 49
... remotely control the aperture (2) and shutter speed, change picture-related settings like the knee and sharpness, and more. For details, consult a Canon Service Center. • Adjusting picture-related settings with the remote controller can be able to control a CINE-SERVO CN7x17 KAS S/E1 lens using the ND button on the remote controller. • The following controls on the remote controller will not operate the camera: AGC button, AUTO KNEE button, AWB button, AF button and AUTO IRIS button. • The ZOOM button on the remote controller...
... remotely control the aperture (2) and shutter speed, change picture-related settings like the knee and sharpness, and more. For details, consult a Canon Service Center. • Adjusting picture-related settings with the remote controller can be able to control a CINE-SERVO CN7x17 KAS S/E1 lens using the ND button on the remote controller. • The following controls on the remote controller will not operate the camera: AGC button, AUTO KNEE button, AWB button, AF button and AUTO IRIS button. • The ZOOM button on the remote controller...
Instruction Manual
Page 53
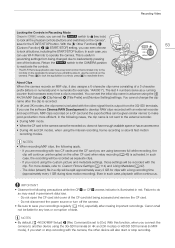
... recording, frame recording or slow & fast motion recording modes. Canon shall not be recorded as a running counter that is activated. NOTES • By default, [ 4K/2K/MXF Setup] > [Rec Command] is recorded. If you use the software Cinema RAW Development to [On]. Return the Q switch to the CAMERA position to reactivate the controls. * The Wi-Fi Remote application also has a key lock function that increases every time a clip is set...
... recording, frame recording or slow & fast motion recording modes. Canon shall not be recorded as a running counter that is activated. NOTES • By default, [ 4K/2K/MXF Setup] > [Rec Command] is recorded. If you use the software Cinema RAW Development to [On]. Return the Q switch to the CAMERA position to reactivate the controls. * The Wi-Fi Remote application also has a key lock function that increases every time a clip is set...
Instruction Manual
Page 66
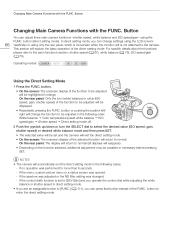
... no operation was opened. - button (direct setting mode). Button You can change the function to be set an assignable button to normal. button. • On the screen: The onscreen display of the selected function will return to [FUNC.] (A 111), you can adjust three main camera functions -shutter speed, white balance and ISO speed/gain- button or pushing the joystick left/ right will change settings using the LCD screen/ 66 viewfinder or using the FUNC. If the menu, custom picture menu or a status screen was...
... no operation was opened. - button (direct setting mode). Button You can change the function to be set an assignable button to normal. button. • On the screen: The onscreen display of the selected function will return to [FUNC.] (A 111), you can adjust three main camera functions -shutter speed, white balance and ISO speed/gain- button or pushing the joystick left/ right will change settings using the LCD screen/ 66 viewfinder or using the FUNC. If the menu, custom picture menu or a status screen was...
Instruction Manual
Page 92
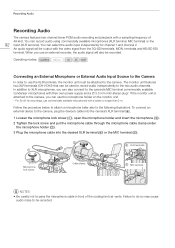
... NOTES • Be careful not to the camera, you use an external recorder, the audio signal will be output with a cable no longer than 3 m. terminals and HD/SD SDI terminal. Operating modes: Connecting an External Microphone or External Audio Input Source to the Camera In order to the camera. An audio signal will also be attached to use commercially available microphones with the video signal from the 3G-SDI terminals, MON.
... NOTES • Be careful not to the camera, you use an external recorder, the audio signal will be output with a cable no longer than 3 m. terminals and HD/SD SDI terminal. Operating modes: Connecting an External Microphone or External Audio Input Source to the Camera In order to the camera. An audio signal will also be attached to use commercially available microphones with the video signal from the 3G-SDI terminals, MON.
Instruction Manual
Page 129
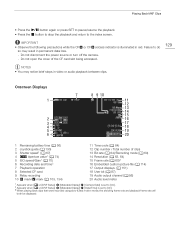
... Audio output channel (A 96) 20 Audio level meter 1 Appears when [£ LCD/VF Setup] > [Metadata Display] > [Camera Data] is set to do so may notice brief stops in permanent data loss. - Playing Back MXF Clips • Press the Ò button again or press SET to pause/resume the playback. • Press the Ñ button to stop the playback and return to [On]. 3 When playing back clips that were recorded using slow & fast motion mode, the shooting frame...
... Audio output channel (A 96) 20 Audio level meter 1 Appears when [£ LCD/VF Setup] > [Metadata Display] > [Camera Data] is set to do so may notice brief stops in permanent data loss. - Playing Back MXF Clips • Press the Ò button again or press SET to pause/resume the playback. • Press the Ñ button to stop the playback and return to [On]. 3 When playing back clips that were recorded using slow & fast motion mode, the shooting frame...
Instruction Manual
Page 159
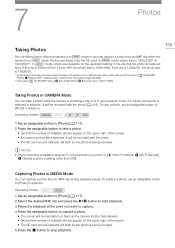
... playback pause. Operating modes: 1 Set an assignable button to [Photo] (A 111). 2 Press the assignable button to take a photo. • * and the number of available photos appear on the upper right of the screen. • If a custom picture file is selected, it will flash as the photo is captured from. Capturing Photos in MEDIA Mode You can save approximately 670 photos on a 1 GB SD card. To capture a photo, set an assignable button to [Photo] in advance. In mode, photo size is 1920x1080. Photos are saved...
... playback pause. Operating modes: 1 Set an assignable button to [Photo] (A 111). 2 Press the assignable button to take a photo. • * and the number of available photos appear on the upper right of the screen. • If a custom picture file is selected, it will flash as the photo is captured from. Capturing Photos in MEDIA Mode You can save approximately 670 photos on a 1 GB SD card. To capture a photo, set an assignable button to [Photo] in advance. In mode, photo size is 1920x1080. Photos are saved...
Instruction Manual
Page 174
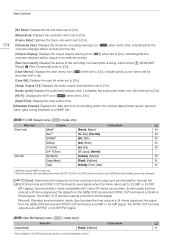
... Display]: Displays the date and time of recording and/or the camera data (shutter speed, aperture value, gain) during playback of an MXF clip. [¤ TC/UB Setup] menu ( mode only) Menu item Submenu Setting options A [Time Code] [Mode]1 [Preset], [Regen.] 84 [Run]1 [Rec Run], [Free Run] 84 [DF/NDF]2 [DF], [NDF] 85 [Setting] [Set], [Reset] 85 [TC In/Out] [In], [Out] 89 [24P TC/Sync] [XF Legacy], [Normal] - [User Bit] [Rec Mode] [Internal], [External] 89 [Output Mode] [Fixed], [Pulldown] 91 [Type] [Setting], [Time], [Date...
... Display]: Displays the date and time of recording and/or the camera data (shutter speed, aperture value, gain) during playback of an MXF clip. [¤ TC/UB Setup] menu ( mode only) Menu item Submenu Setting options A [Time Code] [Mode]1 [Preset], [Regen.] 84 [Run]1 [Rec Run], [Free Run] 84 [DF/NDF]2 [DF], [NDF] 85 [Setting] [Set], [Reset] 85 [TC In/Out] [In], [Out] 89 [24P TC/Sync] [XF Legacy], [Normal] - [User Bit] [Rec Mode] [Internal], [External] 89 [Output Mode] [Fixed], [Pulldown] 91 [Type] [Setting], [Time], [Date...
Instruction Manual
Page 187
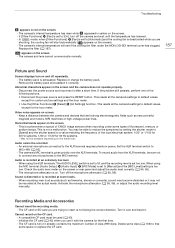
... lens cannot communicate normally. 187 Picture and Sound Screen displays turn off the camera and wait until the temperature has lowered. - Replace or charge the battery pack. - Abnormal characters appear on the screen. - This is given priority over and insert it already contains the maximum number of the following actions. • Disconnect the power source and press the RESET button. Set the XLR terminal switch to the MIC...
... lens cannot communicate normally. 187 Picture and Sound Screen displays turn off the camera and wait until the temperature has lowered. - Replace or charge the battery pack. - Abnormal characters appear on the screen. - This is given priority over and insert it already contains the maximum number of the following actions. • Disconnect the power source and press the RESET button. Set the XLR terminal switch to the MIC...
Instruction Manual
Page 188
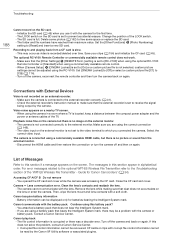
... card slot cover. Battery information can be displayed only for Canon Camcorders' (A 34). Turn off and then on the external monitor. - When [Camera Setup] > [CINEMA Locked] is no image on again. Turn off the camera, reconnect the remote controller and then turn the camera off the camera and back on an external recorder. - The camera is not connected correctly to [On] or a custom picture file is corrupted or there was accessing the CF card. The messages...
... card slot cover. Battery information can be displayed only for Canon Camcorders' (A 34). Turn off and then on the external monitor. - When [Camera Setup] > [CINEMA Locked] is no image on again. Turn off the camera, reconnect the remote controller and then turn the camera off the camera and back on an external recorder. - The camera is not connected correctly to [On] or a custom picture file is corrupted or there was accessing the CF card. The messages...
Instruction Manual
Page 190
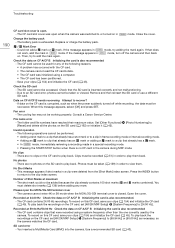
... - Troubleshooting 190 CF card slot cover is inserted correctly and not malfunctioning. - Change the battery pack - If the message appears in a clip were deleted from the [Shot Mark] index screen. Then, try adding the mark again. The CF card cannot be taken or viewed. Check that already has an $ mark or adding a % mark to an SD card error, photos cannot be used by the camera. Data...
... - Troubleshooting 190 CF card slot cover is inserted correctly and not malfunctioning. - Change the battery pack - If the message appears in a clip were deleted from the [Shot Mark] index screen. Then, try adding the mark again. The CF card cannot be taken or viewed. Check that already has an $ mark or adding a % mark to an SD card error, photos cannot be used by the camera. Data...
Instruction Manual
Page 208
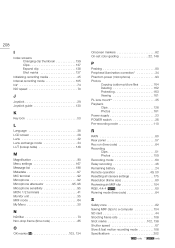
... Photos Copying custom picture files 164 Deleting 162 Protecting 163 Viewing 161 PL lens mount 35 Playback Clips 128 Photos 161 Power supply 23 POWER switch 26 Pre-recording mode 110 R RAW 60 Rear panel 57 Rec run (time code 84 Recording Clips 51 Photos 159 Recording mode 60 Relay recording 46 Remaining battery 24 Remote operation 49, 50 Resetting all camera settings 175 Resolution (frame size 60 Reviewing an MXF clip 104 RGB, 4:4:4 60 Running mode (time code 84 S Safety zone 82 Saving...
... Photos Copying custom picture files 164 Deleting 162 Protecting 163 Viewing 161 PL lens mount 35 Playback Clips 128 Photos 161 Power supply 23 POWER switch 26 Pre-recording mode 110 R RAW 60 Rear panel 57 Rec run (time code 84 Recording Clips 51 Photos 159 Recording mode 60 Relay recording 46 Remaining battery 24 Remote operation 49, 50 Resetting all camera settings 175 Resolution (frame size 60 Reviewing an MXF clip 104 RGB, 4:4:4 60 Running mode (time code 84 S Safety zone 82 Saving...


