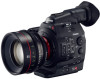
Instruction Manual
Page 2
...Do not make any interference received, including interference that to disconnect the plug in a residential installation. One Canon Park, Melville, NY 11747, USA Tel No. 1-800-OK-CANON (1-800-652-2666) The Mains plug is no guarantee that interference will not occur in the manual. Note...FCC Rules. TO REDUCE THE RISK OF ELECTRIC SHOCK, DO NOT EXPOSE THIS PRODUCT TO DRIPPING OR SPLASHING. FCC NOTICE Digital Cinema Camera, EOS C500 / EOS C500 PL Systems. This device complies with the instructions, may cause harmful interference to radio or television reception, which the receiver is ...
...Do not make any interference received, including interference that to disconnect the plug in a residential installation. One Canon Park, Melville, NY 11747, USA Tel No. 1-800-OK-CANON (1-800-652-2666) The Mains plug is no guarantee that interference will not occur in the manual. Note...FCC Rules. TO REDUCE THE RISK OF ELECTRIC SHOCK, DO NOT EXPOSE THIS PRODUCT TO DRIPPING OR SPLASHING. FCC NOTICE Digital Cinema Camera, EOS C500 / EOS C500 PL Systems. This device complies with the instructions, may cause harmful interference to radio or television reception, which the receiver is ...
Instruction Manual
Page 4
... word "apparatus" 4 refers to qualified service personnel. Install in any way, such as radiators, heat registers, stoves, or other . Refer all servicing to the Canon Digital Cinema Camera EOS C500 / EOS C500 PL and all its subsidiaries in the United States and/or other countries. • Wi-Fi is a trademark of CompactFlash Association. • Microsoft and...
... word "apparatus" 4 refers to qualified service personnel. Install in any way, such as radiators, heat registers, stoves, or other . Refer all servicing to the Canon Digital Cinema Camera EOS C500 / EOS C500 PL and all its subsidiaries in the United States and/or other countries. • Wi-Fi is a trademark of CompactFlash Association. • Microsoft and...
Instruction Manual
Page 5
... gamma (A 58) makes full use CINEMA preset (A 58) to be rotated 270° for shooting with Canon Log gamma. When recording in MXF mode, you to both sets of the EOS C500/C500 PL The Canon Digital Cinema Camera EOS C500/C500 PL has been designed with a Super 35mm CMOS sensor that captures video at an ISO level of...
... gamma (A 58) makes full use CINEMA preset (A 58) to be rotated 270° for shooting with Canon Log gamma. When recording in MXF mode, you to both sets of the EOS C500/C500 PL The Canon Digital Cinema Camera EOS C500/C500 PL has been designed with a Super 35mm CMOS sensor that captures video at an ISO level of...
Instruction Manual
Page 6
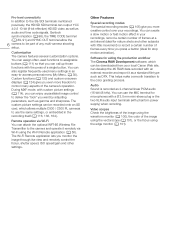
... recordings. Audio Sound is recorded as gamma and sharpness. Software for aiding the production workflow The Cinema RAW Development software, which allows multiple C500 / C500 PL cameras to the camera and operate it as a standard file type such as audio and time code signals. Video scopes Check the brightness of the image using.... The Wi-Fi Remote application lets you more freedom to deliver the "look" you can use the same settings, or embedded in your local Canon Web site, can call up those functions with little movement) or record a certain number of any multi...
... recordings. Audio Sound is recorded as gamma and sharpness. Software for aiding the production workflow The Cinema RAW Development software, which allows multiple C500 / C500 PL cameras to the camera and operate it as a standard file type such as audio and time code signals. Video scopes Check the brightness of the image using.... The Wi-Fi Remote application lets you more freedom to deliver the "look" you can use the same settings, or embedded in your local Canon Web site, can call up those functions with little movement) or record a certain number of any multi...
Instruction Manual
Page 7
... Used in this Manual 11 Supplied Accessories 13 Names of Parts 14 Monitor Unit 19 Handle Unit 19 4K Workflow Overview 21 Color Grading with Canon Log Gamma (View Assistance) 58 Using the Internal Cooling Fan 59 Video Configuration: Type of Recording, Resolution and Frame Rate 60 Selecting the Video ... Card 43 Checking the Status of Contents 1. Preparations 23 Preparing the Power Supply 23 Using a Battery Pack 23 Using a Household Power Outlet 25 Turning the Camera On and Off 26 Date, Time and Language Settings 27 Setting the Date and Time 27 Changing the Time Zone 27 Displaying the Date and...
... Used in this Manual 11 Supplied Accessories 13 Names of Parts 14 Monitor Unit 19 Handle Unit 19 4K Workflow Overview 21 Color Grading with Canon Log Gamma (View Assistance) 58 Using the Internal Cooling Fan 59 Video Configuration: Type of Recording, Resolution and Frame Rate 60 Selecting the Video ... Card 43 Checking the Status of Contents 1. Preparations 23 Preparing the Power Supply 23 Using a Battery Pack 23 Using a Household Power Outlet 25 Turning the Camera On and Off 26 Date, Time and Language Settings 27 Setting the Date and Time 27 Changing the Time Zone 27 Displaying the Date and...
Instruction Manual
Page 8
...89 Reference Video Signal Output 90 Time Code Signal Output 91 Recording Audio 92 Connecting an External Microphone or External Audio Input Source to the Camera 92 Selecting the Audio Input from the XLR Terminals 93 Adjusting the Audio Level from the XLR Terminals 94 Adjusting the Audio Level from the... MIC Terminal 95 Monitoring the Audio with Headphones 96 Using Metadata 97 Setting a User Memo Created with Canon XF Utility 97 Setting a User Memo Using Wi-Fi Remote 98 Color Bars/Audio Reference Signal 99 Recording Color Bars 99 Recording an Audio ...
...89 Reference Video Signal Output 90 Time Code Signal Output 91 Recording Audio 92 Connecting an External Microphone or External Audio Input Source to the Camera 92 Selecting the Audio Input from the XLR Terminals 93 Adjusting the Audio Level from the XLR Terminals 94 Adjusting the Audio Level from the... MIC Terminal 95 Monitoring the Audio with Headphones 96 Using Metadata 97 Setting a User Memo Created with Canon XF Utility 97 Setting a User Memo Using Wi-Fi Remote 98 Color Bars/Audio Reference Signal 99 Recording Color Bars 99 Recording an Audio ...
Instruction Manual
Page 9
Saving and Loading Camera Settings 125 Saving Camera Settings to a Computer 154 Installing Canon XF Utility (Windows) 154 Installing Canon XF Utility (Mac OS) 155 Viewing the Software Instruction Manuals 156 7. External Connections 141 Video Output Configuration 141 Video Configuration and...Single Clip 138 Adding Shot Marks 138 Deleting Shot Marks 139 Changing a Clip's Thumbnail 139 6. Photos 159 Taking Photos 159 Taking Photos in CAMERA Mode 159 Capturing Photos in a Clip 136 Displaying an Index Screen of Shot Marks 137 Displaying a Frame Index Screen of Messages 188 Handling Precautions...
Saving and Loading Camera Settings 125 Saving Camera Settings to a Computer 154 Installing Canon XF Utility (Windows) 154 Installing Canon XF Utility (Mac OS) 155 Viewing the Software Instruction Manuals 156 7. External Connections 141 Video Output Configuration 141 Video Configuration and...Single Clip 138 Adding Shot Marks 138 Deleting Shot Marks 139 Changing a Clip's Thumbnail 139 6. Photos 159 Taking Photos 159 Taking Photos in CAMERA Mode 159 Capturing Photos in a Clip 136 Displaying an Index Screen of Shot Marks 137 Displaying a Frame Index Screen of Messages 188 Handling Precautions...
Instruction Manual
Page 11
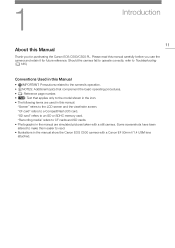
... the model shown in the icon. • The following terms are simulated pictures taken with a Canon EF 50mm f/1.4 USM lens attached. 1 Introduction 11 About this Manual Thank you use the camera and retain it for purchasing the Canon EOS C500/C500 PL. "Screen" refers to read this manual. "Recording media" refers to an SD or SDHC...
... the model shown in the icon. • The following terms are simulated pictures taken with a Canon EF 50mm f/1.4 USM lens attached. 1 Introduction 11 About this Manual Thank you use the camera and retain it for purchasing the Canon EOS C500/C500 PL. "Screen" refers to read this manual. "Recording media" refers to an SD or SDHC...
Instruction Manual
Page 12
...Time Code] [Run] [Free Run] When a procedure requires selecting an option, the available options are displayed on screen. Brackets [ ] are used to Turning the Camera On and Off (A 26) and Selecting the System Priority (A 60, 64). terminals, HD/SD SDI terminal or TIME 84 CODE terminal (A 91). Additionally, you... [Run] setting. [Rec Run]: The time code runs only while recording so clips recorded consecutively on the same CF card will have the camera output the time code signal from the 3G-SDI terminals, MON. For recordings with an External Device (A 88). it in the operating mode ...
...Time Code] [Run] [Free Run] When a procedure requires selecting an option, the available options are displayed on screen. Brackets [ ] are used to Turning the Camera On and Off (A 26) and Selecting the System Priority (A 60, 64). terminals, HD/SD SDI terminal or TIME 84 CODE terminal (A 91). Additionally, you... [Run] setting. [Rec Run]: The time code runs only while recording so clips recorded consecutively on the same CF card will have the camera output the time code signal from the 3G-SDI terminals, MON. For recordings with an External Device (A 88). it in the operating mode ...
Instruction Manual
Page 13
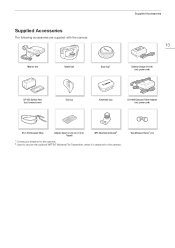
Tape Measure Hooks1 (x 2) Supplied Accessories The following accessories are supplied with the camera. power cord) SS-1200 Shoulder Strap Adapter Base for 0.64 cm (1/4 in.) Tripods WFT Attachment Bracket2 1 Comes pre-attached to the camera. 2 Used to secure the optional WFT-E6 Wireless File Transmitter, when it is attached to the camera. power cord) BP-955 Battery Pack (incl. terminal cover) Eye Cup Viewfinder Cap CA-940N Compact Power Adapter (incl. Monitor Unit Handle Unit Body Cap1 Supplied Accessories 13 Battery Charger CG-940 (incl.
Tape Measure Hooks1 (x 2) Supplied Accessories The following accessories are supplied with the camera. power cord) SS-1200 Shoulder Strap Adapter Base for 0.64 cm (1/4 in.) Tripods WFT Attachment Bracket2 1 Comes pre-attached to the camera. 2 Used to secure the optional WFT-E6 Wireless File Transmitter, when it is attached to the camera. power cord) BP-955 Battery Pack (incl. terminal cover) Eye Cup Viewfinder Cap CA-940N Compact Power Adapter (incl. Monitor Unit Handle Unit Body Cap1 Supplied Accessories 13 Battery Charger CG-940 (incl.
Instruction Manual
Page 21
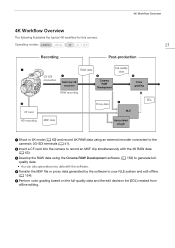
4K Workflow Overview 4K Workflow Overview The following illustrates the typical 4K workflow for this camera. Operating modes: 21 Recording Post-production ᕡ ᕢ CF card HD recording 3G-SDI connection RAW data ᕡ External 4K recorder RAW recording Full-quality ... Associated plugin ᕡ Shoot in 4K mode (A 60) and record 4K RAW data using an external recorder connected to the camera's 3G-SDI terminals (A 41). ᕢ Insert a CF card into the camera to record an MXF clip simultaneously with the 4K RAW data (A 63). ᕣ Develop the RAW data using the Cinema...
4K Workflow Overview 4K Workflow Overview The following illustrates the typical 4K workflow for this camera. Operating modes: 21 Recording Post-production ᕡ ᕢ CF card HD recording 3G-SDI connection RAW data ᕡ External 4K recorder RAW recording Full-quality ... Associated plugin ᕡ Shoot in 4K mode (A 60) and record 4K RAW data using an external recorder connected to the camera's 3G-SDI terminals (A 41). ᕢ Insert a CF card into the camera to record an MXF clip simultaneously with the 4K RAW data (A 63). ᕣ Develop the RAW data using the Cinema...
Instruction Manual
Page 23
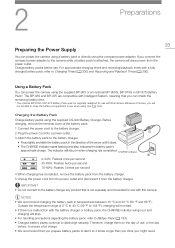
... you can check the remaining battery time. * The optional BP-970G / BP-975 Battery Pack was not originally designed for use with this camera. The indicator will stop. • For handling precautions regarding the battery pack, refer to Battery Pack (A 193). • Charged battery packs... The CHARGE indicator starts flashing and also indicates the battery pack's approximate charge. For approximate charging times and recording/playback times with this camera. Charging the Battery Pack Charge battery packs using the supplied BP-955 or an optional BP-950G, BP-970G or BP-975 Battery...
... you can check the remaining battery time. * The optional BP-970G / BP-975 Battery Pack was not originally designed for use with this camera. The indicator will stop. • For handling precautions regarding the battery pack, refer to Battery Pack (A 193). • Charged battery packs... The CHARGE indicator starts flashing and also indicates the battery pack's approximate charge. For approximate charging times and recording/playback times with this camera. Charging the Battery Pack Charge battery packs using the supplied BP-955 or an optional BP-950G, BP-970G or BP-975 Battery...
Instruction Manual
Page 24
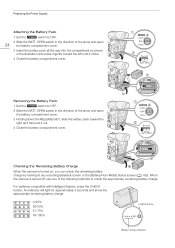
... Battery charge indicator Removing the Battery Pack 1 Set the Q switch to OFF. 2 Slide the BATT. Checking the Remaining Battery Charge When the camera is turned off, use one of the arrow and open 24 the battery compartment cover. 3 Insert the battery pack all the way into the ...toward the left until it out. 4 Close the battery compartment cover. For batteries compatible with Intelligent System, press the CHECK button. When the camera is turned on, you can check the remaining battery charge by looking at any recording/playback screen or the [Battery/Hour Meter] status screen (A...
... Battery charge indicator Removing the Battery Pack 1 Set the Q switch to OFF. 2 Slide the BATT. Checking the Remaining Battery Charge When the camera is turned off, use one of the arrow and open 24 the battery compartment cover. 3 Insert the battery pack all the way into the ...toward the left until it out. 4 Close the battery compartment cover. For batteries compatible with Intelligent System, press the CHECK button. When the camera is turned on, you can check the remaining battery charge by looking at any recording/playback screen or the [Battery/Hour Meter] status screen (A...
Instruction Manual
Page 25
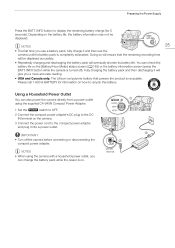
... life. IMPORTANT • Turn off ). You can also power the camera directly from a power outlet using the camera with a household power outlet, you use the camera until the battery pack is turned off the camera before connecting or disconnecting the compact power adapter. Using a Household Power..., the battery information may not be displayed accurately. • Repeatedly charging and discharging the battery pack will be displayed. Depending on the camera. 3 Connect the power cord to the compact power adapter and plug it and then use a battery pack, fully charge it into ...
... life. IMPORTANT • Turn off ). You can also power the camera directly from a power outlet using the camera with a household power outlet, you use the camera until the battery pack is turned off the camera before connecting or disconnecting the compact power adapter. Using a Household Power..., the battery information may not be displayed accurately. • Repeatedly charging and discharging the battery pack will be displayed. Depending on the camera. 3 Connect the power cord to the compact power adapter and plug it and then use a battery pack, fully charge it into ...
Instruction Manual
Page 26
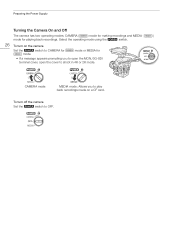
Select the operating mode using the Q switch. 26 To turn off the camera Set the Q switch to OFF. Preparing the Power Supply Turning the Camera On and Off The camera has two operating modes: CAMERA ( ) mode for making recordings and MEDIA ( ) mode for mode. • If a message appears prompting you to shoot in 4K or 2K mode. CAMERA mode MEDIA mode: Allows you to open the MON./3G-SDI terminal cover, open the cover to play back recordings made on the camera Set the Q switch to CAMERA for mode or MEDIA for playing back recordings. To turn on a CF card.
Select the operating mode using the Q switch. 26 To turn off the camera Set the Q switch to OFF. Preparing the Power Supply Turning the Camera On and Off The camera has two operating modes: CAMERA ( ) mode for making recordings and MEDIA ( ) mode for mode. • If a message appears prompting you to shoot in 4K or 2K mode. CAMERA mode MEDIA mode: Allows you to open the MON./3G-SDI terminal cover, open the cover to play back recordings made on the camera Set the Q switch to CAMERA for mode or MEDIA for playing back recordings. To turn on a CF card.

Instruction Manual
Page 27
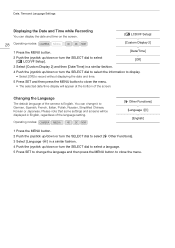
...] > [Set Clock] > [Date/Time] setting. • When the built-in rechargeable lithium battery is exhausted, the date and time setting may be lost. When the camera's clock is [UTC-05:00 New York] or [UTC+01:00 Central Europe], depending on 27 the country/region of purchase). Operating modes: [w Other Functions... dial to close the screen. The default setting is not set, the [Date/Time] screen will need to set the date and time of the camera before you can also press SET (press the joystick itself or press the SET button). 2 Change the rest of the fields in the same way...
...] > [Set Clock] > [Date/Time] setting. • When the built-in rechargeable lithium battery is exhausted, the date and time setting may be lost. When the camera's clock is [UTC-05:00 New York] or [UTC+01:00 Central Europe], depending on 27 the country/region of purchase). Operating modes: [w Other Functions... dial to close the screen. The default setting is not set, the [Date/Time] screen will need to set the date and time of the camera before you can also press SET (press the joystick itself or press the SET button). 2 Change the rest of the fields in the same way...
Instruction Manual
Page 28
... language and then press the MENU button to close the menu. • The selected date/time display will be displayed in English, regardless of the camera is English. Please note that some settings and screens will appear at the bottom of the screen. You can display the date and time on...
... language and then press the MENU button to close the menu. • The selected date/time display will be displayed in English, regardless of the camera is English. Please note that some settings and screens will appear at the bottom of the screen. You can display the date and time on...
Instruction Manual
Page 29
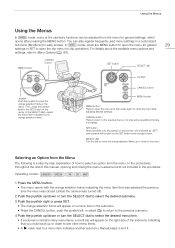
.... • The menu opens with the orange selection frame indicating the menu item that was selected the previous time the menu was closed (unless the camera was turned off). 2 Push the joystick up/down or turn the SELECT dial to select the desired submenu. 3 Push the joystick right or press... The orange selection frame will appear on the right side of how to select the desired menu item. • If a submenu contains many of the camera's functions can also register frequently used menu settings in the menu. Selecting an Option from the Menu The following is labeled as "SET", each joystick...
.... • The menu opens with the orange selection frame indicating the menu item that was selected the previous time the menu was closed (unless the camera was turned off). 2 Push the joystick up/down or turn the SELECT dial to select the desired submenu. 3 Push the joystick right or press... The orange selection frame will appear on the right side of how to select the desired menu item. • If a submenu contains many of the camera's functions can also register frequently used menu settings in the menu. Selecting an Option from the Menu The following is labeled as "SET", each joystick...
Instruction Manual
Page 30
... time closes the menu. • When an optional RC-V100 Remote Controller is connected to the camera, you can use the remote controller's up /down /left/right/SET buttons in the same way as the camera's joystick. • You can press the button to the desired position and then press SET. Operating...
... time closes the menu. • When an optional RC-V100 Remote Controller is connected to the camera, you can use the remote controller's up /down /left/right/SET buttons in the same way as the camera's joystick. • You can press the button to the desired position and then press SET. Operating...
Instruction Manual
Page 32
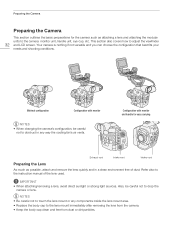
... Replace the body cap to obstruct in a clean environment free of the lens used. Minimal configuration Configuration with monitor and handle for the camera such as possible, attach and remove the lens quickly and in any way the cooling fan's air vents. IMPORTANT • When attaching/...removing a lens, avoid direct sunlight or strong light sources. This section also covers how to drop the camera or lens. Configuration with monitor NOTES • When changing the camera's configuration, be careful not to adjust the viewfinder 32 and LCD screen. Also, be careful not to...
... Replace the body cap to obstruct in a clean environment free of the lens used. Minimal configuration Configuration with monitor and handle for the camera such as possible, attach and remove the lens quickly and in any way the cooling fan's air vents. IMPORTANT • When attaching/...removing a lens, avoid direct sunlight or strong light sources. This section also covers how to drop the camera or lens. Configuration with monitor NOTES • When changing the camera's configuration, be careful not to adjust the viewfinder 32 and LCD screen. Also, be careful not to...

