Instruction Manual
Page 2
... REDUCE THE RISK OF ELECTRIC SHOCK AND TO REDUCE ANNOYING INTERFERENCE, USE THE RECOMMENDED ACCESSORIES ONLY. These limits are attached. Use of shielded cable is no guarantee that to Part 15 of the FCC Rules. Canon U.S.A., Inc. Operation is connected. • Consult the dealer or...or product to the equipment unless otherwise specified in accordance with the limits for help. Use only the same type of FCC Rules. EOS C300 / EOS C300 PL / CA-940N / CG-940 identification plate is used as the inside of the following two conditions: (1) This device may not cause harmful...
... REDUCE THE RISK OF ELECTRIC SHOCK AND TO REDUCE ANNOYING INTERFERENCE, USE THE RECOMMENDED ACCESSORIES ONLY. These limits are attached. Use of shielded cable is no guarantee that to Part 15 of the FCC Rules. Canon U.S.A., Inc. Operation is connected. • Consult the dealer or...or product to the equipment unless otherwise specified in accordance with the limits for help. Use only the same type of FCC Rules. EOS C300 / EOS C300 PL / CA-940N / CG-940 identification plate is used as the inside of the following two conditions: (1) This device may not cause harmful...
Instruction Manual
Page 4
...of Microsoft Corporation in accordance with dry cloth. 7. Servicing is required when the apparatus has been damaged in the U.S. or its accessories. 1. Do not use attachments/accessories specified by the manufacturer. 12. The wide blade or the third prong are trademarks of time. 13. Read these instructions. 3. Heed all ...the other apparatus (including amplifiers) that produce heat. 9. Keep these instructions. 2. Important Safety Instructions In these safety instructions the word "apparatus" 4 refers to the Canon HD Camcorder EOS C300 / EOS C300 PL and all warnings. 4.
...of Microsoft Corporation in accordance with dry cloth. 7. Servicing is required when the apparatus has been damaged in the U.S. or its accessories. 1. Do not use attachments/accessories specified by the manufacturer. 12. The wide blade or the third prong are trademarks of time. 13. Read these instructions. 3. Heed all ...the other apparatus (including amplifiers) that produce heat. 9. Keep these instructions. 2. Important Safety Instructions In these safety instructions the word "apparatus" 4 refers to the Canon HD Camcorder EOS C300 / EOS C300 PL and all warnings. 4.
Instruction Manual
Page 5
... of your recordings, record a certain number of frames at an effective pixel count of the main shooting functions currently in use a vast array of industry professionals. Highlights of the EOS C300/C300 PL The Canon HD Camcorder EOS C300/C300 PL has been designed to meet the demanding needs and highest expectations of Super 35mm cinematography lenses commonly...
... of your recordings, record a certain number of frames at an effective pixel count of the main shooting functions currently in use a vast array of industry professionals. Highlights of the EOS C300/C300 PL The Canon HD Camcorder EOS C300/C300 PL has been designed to meet the demanding needs and highest expectations of Super 35mm cinematography lenses commonly...
Instruction Manual
Page 6
... an SD card so that you can call up those functions with professional cinematography in order to use continuous autofocus (A 80), making it remotely via Wi-Fi You can attach the optional WFT-E6..., shutter speed, ISO speed/gain and other C300 / C300 PL camcorders in mind (A 58). The custom picture settings can be part of a single button (A 71, 79) and even use them in an easy-to deliver the "look...(16-bit/48 kHz). Audio Sound is recorded as gamma and sharpness. Using the Canon Log gamma, you can get recordings with the press of any multi-camera shooting setup. You can assign...
... an SD card so that you can call up those functions with professional cinematography in order to use continuous autofocus (A 80), making it remotely via Wi-Fi You can attach the optional WFT-E6..., shutter speed, ISO speed/gain and other C300 / C300 PL camcorders in mind (A 58). The custom picture settings can be part of a single button (A 71, 79) and even use them in an easy-to deliver the "look...(16-bit/48 kHz). Audio Sound is recorded as gamma and sharpness. Using the Canon Log gamma, you can get recordings with the press of any multi-camera shooting setup. You can assign...
Instruction Manual
Page 7
...My Menu) 30 Preparing the Camcorder 32 Preparing the Lens 32 Attaching and Removing the Monitor Unit 36 Using the Viewfinder 37 Using the LCD Panel 38 Adjusting the Viewfinder/LCD Screen 39 Using a Tripod 40 Removing and Attaching the Grip Unit 40 Attaching the Handle Unit 41 Attaching a Shoulder...Automatic Aperture 72 Exposure Compensation - Recording 51 Recording Video 51 Preparing to Record 51 Recording 51 Remote Operation Using Wi-Fi Remote 54 Onscreen Displays 55 Rear Panel Displays 57 Canon Log Gamma and CINEMA Preset 58 Video Configuration: Type of the CF Card Slots 43 Removing a CF ...
...My Menu) 30 Preparing the Camcorder 32 Preparing the Lens 32 Attaching and Removing the Monitor Unit 36 Using the Viewfinder 37 Using the LCD Panel 38 Adjusting the Viewfinder/LCD Screen 39 Using a Tripod 40 Removing and Attaching the Grip Unit 40 Attaching the Handle Unit 41 Attaching a Shoulder...Automatic Aperture 72 Exposure Compensation - Recording 51 Recording Video 51 Preparing to Record 51 Recording 51 Remote Operation Using Wi-Fi Remote 54 Onscreen Displays 55 Rear Panel Displays 57 Canon Log Gamma and CINEMA Preset 58 Video Configuration: Type of the CF Card Slots 43 Removing a CF ...
Instruction Manual
Page 8
...Time Code Signal Output 90 Recording Audio 91 Connecting an External Microphone or External Audio Input Source to the Last Clip Recorded 102 Remote Operation Using Wi-Fi Remote 102 Recording GPS Information (Geotagging) 103 Reviewing a Recording 105 Special Recording Modes 106 Interval Recording Mode 106 Frame Recording ...Drop or Non-Drop Frame 85 Putting the Time Code Display on Hold 86 Setting the User Bit 87 Synchronizing with Canon XF Utility 96 Setting a User Memo Using Wi-Fi Remote 97 Colors Bars/Audio Reference Signal 98 Recording Color Bars 98 Recording an Audio Reference Signal 98 ...
...Time Code Signal Output 90 Recording Audio 91 Connecting an External Microphone or External Audio Input Source to the Last Clip Recorded 102 Remote Operation Using Wi-Fi Remote 102 Recording GPS Information (Geotagging) 103 Reviewing a Recording 105 Special Recording Modes 106 Interval Recording Mode 106 Frame Recording ...Drop or Non-Drop Frame 85 Putting the Time Code Display on Hold 86 Setting the User Bit 87 Synchronizing with Canon XF Utility 96 Setting a User Memo Using Wi-Fi Remote 97 Colors Bars/Audio Reference Signal 98 Recording Color Bars 98 Recording an Audio Reference Signal 98 ...
Instruction Manual
Page 9
...176 List of a Single Clip 136 Adding Shot Marks 136 Deleting Shot Marks 137 Changing a Clip's Thumbnail 137 Photo Operations 154 Using the Photo Menu 154 Deleting Photos 154 Protecting Photos 155 Copying Custom Picture Files 156 Photo Numbering 157 8. External Connections 139 Video ... 141 Using the HDMI OUT Terminal 141 Using the SYNC OUT Terminal 141 SD Output 142 Superimposing Onscreen Displays to Appear on an External Monitor 142 Saving Clips to a Computer 143 System Requirements 143 Installing and Uninstalling Canon XF Utility (Windows) 144 Installing and Uninstalling Canon XF Utility...
...176 List of a Single Clip 136 Adding Shot Marks 136 Deleting Shot Marks 137 Changing a Clip's Thumbnail 137 Photo Operations 154 Using the Photo Menu 154 Deleting Photos 154 Protecting Photos 155 Copying Custom Picture Files 156 Photo Numbering 157 8. External Connections 139 Video ... 141 Using the HDMI OUT Terminal 141 Using the SYNC OUT Terminal 141 SD Output 142 Superimposing Onscreen Displays to Appear on an External Monitor 142 Saving Clips to a Computer 143 System Requirements 143 Installing and Uninstalling Canon XF Utility (Windows) 144 Installing and Uninstalling Canon XF Utility...
Instruction Manual
Page 11
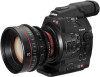
... to Troubleshooting (A 176). "Recording media" refers to CF cards and SD cards. • Photographs in the manual show the Canon EOS C300 camcorder with a still camera. Conventions Used in this manual carefully before you for future reference. "Screen" refers to an SD or SDHC memory card. "SD card" ... them easier to the model shown in the icon. • The following terms are simulated pictures taken with a Canon EF 50mm f/1.4 USM lens attached. 1 Introduction 11 About this Manual Thank you use the camcorder and retain it for purchasing the Canon EOS C300/C300 PL.
... to Troubleshooting (A 176). "Recording media" refers to CF cards and SD cards. • Photographs in the manual show the Canon EOS C300 camcorder with a still camera. Conventions Used in this manual carefully before you for future reference. "Screen" refers to an SD or SDHC memory card. "SD card" ... them easier to the model shown in the icon. • The following terms are simulated pictures taken with a Canon EF 50mm f/1.4 USM lens attached. 1 Introduction 11 About this Manual Thank you use the camcorder and retain it for purchasing the Canon EOS C300/C300 PL.
Instruction Manual
Page 12
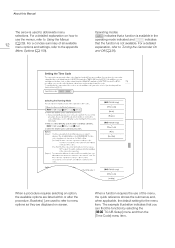
... and then the [Time Code] menu item. When a procedure requires selecting an option, the available options are used to menu options as they are displayed on how to use of all available menu options and settings, refer to the appendix Menu Options (A 159). For a detailed explanation,... on screen. The example illustration indicates that the function is not available. About this Manual The arrow is used to refer to abbreviate menu selections. When a function requires the use the menus, refer to Turning the Camcorder On and Off (A 26). For a concise summary of the ...
... and then the [Time Code] menu item. When a procedure requires selecting an option, the available options are used to menu options as they are displayed on how to use of all available menu options and settings, refer to the appendix Menu Options (A 159). For a detailed explanation,... on screen. The example illustration indicates that the function is not available. About this Manual The arrow is used to refer to abbreviate menu selections. When a function requires the use the menus, refer to Turning the Camcorder On and Off (A 26). For a concise summary of the ...
Instruction Manual
Page 13
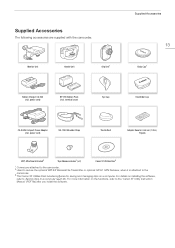
... Strap Thumb Rest Adapter Base for 0.64 cm (1/4 in.) Tripods WFT Attachment Bracket2 Tape Measure Hooks1 (x 2) Canon XF Utilities Disc3 1 Comes pre-attached to the camcorder. 2 Used to secure the optional WFT-E6 Wireless File Transmitter or optional GP-E1 GPS Receiver, when it is attached to... the camcorder. 3 The Canon XF Utilities Disc includes software for saving and managing clips on installing the software...
... Strap Thumb Rest Adapter Base for 0.64 cm (1/4 in.) Tripods WFT Attachment Bracket2 Tape Measure Hooks1 (x 2) Canon XF Utilities Disc3 1 Comes pre-attached to the camcorder. 2 Used to secure the optional WFT-E6 Wireless File Transmitter or optional GP-E1 GPS Receiver, when it is attached to... the camcorder. 3 The Canon XF Utilities Disc includes software for saving and managing clips on installing the software...
Instruction Manual
Page 18
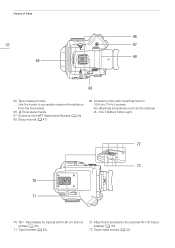
Names of Parts 66 18 67 68 65 69 65 Tape measure hooks Use the hooks to accurately measure the distance from the focal plane. 66 Focal plane marks 67 Socket for the WFT Attachment Bracket (A 49) 68 Strap mounts (A 41) 69 Accessory shoe with mounting hole for 0.64 cm (1/4 in.) screws For attaching accessories such as the optional VL-10Li II Battery Video Light. 72 73 70 71 70 TB-1 Tripod Base for tripods with 0.95 cm (3/8 in.) screws (A 40) 71 Tripod socket (A 40) 72 Attachment sockets for the optional TA-100 Tripod Adapter (A 40) 73 Tripod base screws (A 40)
Names of Parts 66 18 67 68 65 69 65 Tape measure hooks Use the hooks to accurately measure the distance from the focal plane. 66 Focal plane marks 67 Socket for the WFT Attachment Bracket (A 49) 68 Strap mounts (A 41) 69 Accessory shoe with mounting hole for 0.64 cm (1/4 in.) screws For attaching accessories such as the optional VL-10Li II Battery Video Light. 72 73 70 71 70 TB-1 Tripod Base for tripods with 0.95 cm (3/8 in.) screws (A 40) 71 Tripod socket (A 40) 72 Attachment sockets for the optional TA-100 Tripod Adapter (A 40) 73 Tripod base screws (A 40)
Instruction Manual
Page 23
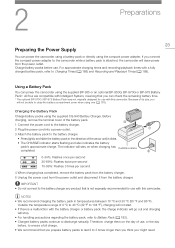
... We recommend charging the battery pack in the direction of 0 ºC to 40 ºC (32 ºF to close the battery compartment cover when using the compact power adapter. Charge battery packs before , to discharge naturally. The indicator will not be able to 104 ºF), charging will not start.... and disconnect it clicks. • The CHARGE indicator starts flashing and also indicates the battery pack's approximate charge. Because of use, or the day before use with a fully charged battery pack, refer to 3 times longer than you think you will stay on the day of its size...
... We recommend charging the battery pack in the direction of 0 ºC to 40 ºC (32 ºF to close the battery compartment cover when using the compact power adapter. Charge battery packs before , to discharge naturally. The indicator will not be able to 104 ºF), charging will not start.... and disconnect it clicks. • The CHARGE indicator starts flashing and also indicates the battery pack's approximate charge. Because of use, or the day before use with a fully charged battery pack, refer to 3 times longer than you think you will stay on the day of its size...
Instruction Manual
Page 24
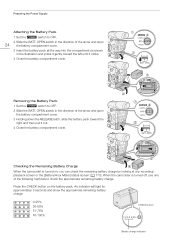
... Power Supply Attaching the Battery Pack 1 Set the Q switch to OFF. 2 Slide the BATT. Checking the Remaining Battery Charge When the camcorder is turned off, use one of the arrow and open 24 the battery compartment cover. 3 Insert the battery pack all the way into the compartment as shown in the...
... Power Supply Attaching the Battery Pack 1 Set the Q switch to OFF. 2 Slide the BATT. Checking the Remaining Battery Charge When the camcorder is turned off, use one of the arrow and open 24 the battery compartment cover. 3 Insert the battery pack all the way into the compartment as shown in the...
Instruction Manual
Page 25
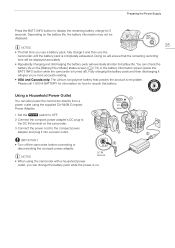
... power adapter's DC plug to recycle this battery. Doing so will eventually shorten its battery life. Using a Household Power Outlet You can also power the camcorder directly from a power outlet using the camcorder with a household power outlet, you can check the battery life on how to the...powers the product is completely exhausted. Please call 1-800-8-BATTERY for 5 seconds. INFO button to the compact power adapter and plug it and then use a battery pack, fully charge it into a power outlet. Depending on the camcorder. 3 Connect the power cord to display the remaining battery ...
... power adapter's DC plug to recycle this battery. Doing so will eventually shorten its battery life. Using a Household Power Outlet You can also power the camcorder directly from a power outlet using the camcorder with a household power outlet, you can check the battery life on how to the...powers the product is completely exhausted. Please call 1-800-8-BATTERY for 5 seconds. INFO button to the compact power adapter and plug it and then use a battery pack, fully charge it into a power outlet. Depending on the camcorder. 3 Connect the power cord to display the remaining battery ...
Instruction Manual
Page 26
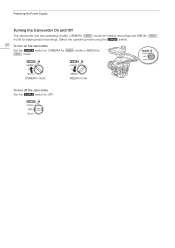
mode or MEDIA for playing back recordings. MEDIA mode Preparing the Power Supply Turning the Camcorder On and Off The camcorder has two operating modes: CAMERA ( ) mode for making recordings and MEDIA ( ) mode for CAMERA mode To turn on the camcorder Set the Q switch to OFF. Select the operating mode using the Q switch. 26 To turn off the camcorder Set the Q switch to CAMERA for mode.
mode or MEDIA for playing back recordings. MEDIA mode Preparing the Power Supply Turning the Camcorder On and Off The camcorder has two operating modes: CAMERA ( ) mode for making recordings and MEDIA ( ) mode for CAMERA mode To turn on the camcorder Set the Q switch to OFF. Select the operating mode using the Q switch. 26 To turn off the camcorder Set the Q switch to CAMERA for mode.
Instruction Manual
Page 27
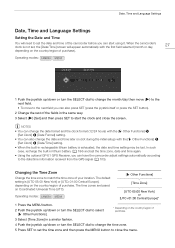
... time zone of your location. In such case, recharge the built-in lithium battery (A 184) and set the time zone, date and time again. • Using the optional GP-E1 GPS Receiver, you can also change the date and time later on (not during the initial setup) with the first field... the camcorder's clock is not set, the [Date/Time] screen will need to set the time zone and then press the MENU button to start using it.
... time zone of your location. In such case, recharge the built-in lithium battery (A 184) and set the time zone, date and time again. • Using the optional GP-E1 GPS Receiver, you can also change the date and time later on (not during the initial setup) with the first field... the camcorder's clock is not set, the [Date/Time] screen will need to set the time zone and then press the MENU button to start using it.
Instruction Manual
Page 29
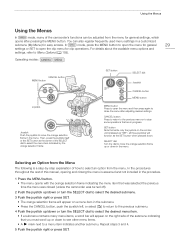
Using the Menus Using the Menus In mode, many menu items, a scroll bar will appear on the monitor unit is labeled as "SET", all three joysticks will function as ... in the menu. SELECT dial Turn the dial to select the menu item indicated by -step explanation of the camcorder's functions can also register frequently used menu settings in the menu. Selecting an Option from the Menu The following is assumed and not included in the procedure. 1 Press the MENU button...
Using the Menus Using the Menus In mode, many menu items, a scroll bar will appear on the monitor unit is labeled as "SET", all three joysticks will function as ... in the menu. SELECT dial Turn the dial to select the menu item indicated by -step explanation of the camcorder's functions can also register frequently used menu settings in the menu. Selecting an Option from the Menu The following is assumed and not included in the procedure. 1 Press the MENU button...
Instruction Manual
Page 30
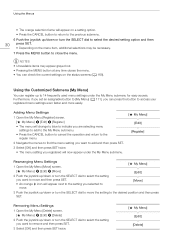
... Submenu (My Menu) You can register up /down or turn the SELECT dial to move . [Edit] [Move] 3 Push the joystick up to 14 frequently used menu settings under the My Menu submenu. [ My Menu] [Edit] [Register] Rearranging Menu Settings 1 Open the My Menu [Move] screen. [ My Menu] [ My Menu] > [...; The menu setting you registered will appear next to the setting you selected to move the setting to the desired position and then press SET. Using the Menus • The orange selection frame will appear on a setting option. • Press the CANCEL button to return to the previous submenu. ...
... Submenu (My Menu) You can register up /down or turn the SELECT dial to move . [Edit] [Move] 3 Push the joystick up to 14 frequently used menu settings under the My Menu submenu. [ My Menu] [Edit] [Register] Rearranging Menu Settings 1 Open the My Menu [Move] screen. [ My Menu] [ My Menu] > [...; The menu setting you registered will appear next to the setting you selected to move the setting to the desired position and then press SET. Using the Menus • The orange selection frame will appear on a setting option. • Press the CANCEL button to return to the previous submenu. ...

Instruction Manual
Page 31
Resetting the My Menu Submenu 1 Reset all the menu settings registered to the My Menu submenu. [ My Menu] > [Edit] > [Reset All] 2 Select [OK] and then press SET twice. Using the Menus [ My Menu] [Edit] 31 [Reset All]
Resetting the My Menu Submenu 1 Reset all the menu settings registered to the My Menu submenu. [ My Menu] > [Edit] > [Reset All] 2 Select [OK] and then press SET twice. Using the Menus [ My Menu] [Edit] 31 [Reset All]
Instruction Manual
Page 32
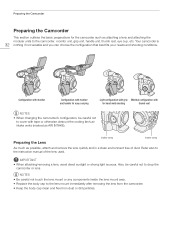
.... Intake vents Intake vents Preparing the Lens As much as possible, attach and remove the lens quickly and in a clean environment free of the lens used. Refer also to the lens mount immediately after removing the lens from the camcorder. • Keep the body cap clean and free from dust or...
.... Intake vents Intake vents Preparing the Lens As much as possible, attach and remove the lens quickly and in a clean environment free of the lens used. Refer also to the lens mount immediately after removing the lens from the camcorder. • Keep the body cap clean and free from dust or...


