
User Manual
Page 26
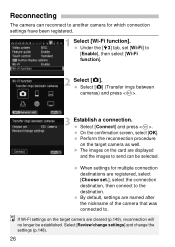
X The images on the card are cleared (p.149), reconnection will no longer be selected. If Wi-Fi settings on the target camera as well. Select [Review/change settings] and change the settings (p.148). 26 Under the [53] tab, set .], select the connection destination, then connect to the destination. On the confirmation ...
X The images on the card are cleared (p.149), reconnection will no longer be selected. If Wi-Fi settings on the target camera as well. Select [Review/change settings] and change the settings (p.148). 26 Under the [53] tab, set .], select the connection destination, then connect to the destination. On the confirmation ...
User Manual
Page 28
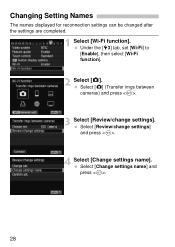
Select [z] (Transfer imgs between cameras) and press . 3 Select [Review/change settings] and press . 4 Select [Change settings name]. Select [Change settings name] and press . 28 Select [Review/change settings]. Under the [53] tab, set [Wi-Fi] to [Enable], then select [Wi-Fi function]. 2 Select [z]. Changing Setting Names The names displayed for reconnection settings can be changed after the settings are completed. 1 Select [Wi-Fi function].
Select [z] (Transfer imgs between cameras) and press . 3 Select [Review/change settings] and press . 4 Select [Change settings name]. Select [Change settings name] and press . 28 Select [Review/change settings]. Under the [53] tab, set [Wi-Fi] to [Enable], then select [Wi-Fi function]. 2 Select [z]. Changing Setting Names The names displayed for reconnection settings can be changed after the settings are completed. 1 Select [Wi-Fi function].
User Manual
Page 40
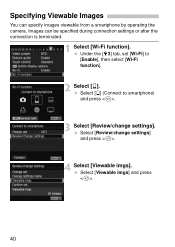
Select [Viewable imgs] and press . 40 Images can specify images viewable from a smartphone by operating the camera. Select [q] (Connect to [Enable], then select [Wi-Fi function]. 2 Select [q]. Under the [53] tab, set [Wi-Fi] to smartphone) and press . 3 Select [Review/change settings] and press . 4 Select [Viewable imgs]. Select [Review/change settings]. Specifying Viewable Images You can be specified during connection settings or after the connection is terminated. 1 Select [Wi-Fi function].
Select [Viewable imgs] and press . 40 Images can specify images viewable from a smartphone by operating the camera. Select [q] (Connect to [Enable], then select [Wi-Fi function]. 2 Select [q]. Under the [53] tab, set [Wi-Fi] to smartphone) and press . 3 Select [Review/change settings] and press . 4 Select [Viewable imgs]. Select [Review/change settings]. Specifying Viewable Images You can be specified during connection settings or after the connection is terminated. 1 Select [Wi-Fi function].
User Manual
Page 81
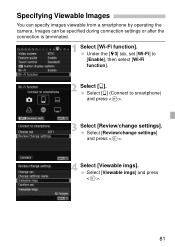
Select [Viewable imgs] and press . 81 Images can specify images viewable from a smartphone by operating the camera. Select [q] (Connect to [Enable], then select [Wi-Fi function]. 2 Select [q]. Under the [53] tab, set [Wi-Fi] to smartphone) and press . 3 Select [Review/change settings] and press . 4 Select [Viewable imgs]. Select [Review/change settings]. Specifying Viewable Images You can be specified during connection settings or after the connection is terminated. 1 Select [Wi-Fi function].
Select [Viewable imgs] and press . 81 Images can specify images viewable from a smartphone by operating the camera. Select [q] (Connect to [Enable], then select [Wi-Fi function]. 2 Select [q]. Under the [53] tab, set [Wi-Fi] to smartphone) and press . 3 Select [Review/change settings] and press . 4 Select [Viewable imgs]. Select [Review/change settings]. Specifying Viewable Images You can be specified during connection settings or after the connection is terminated. 1 Select [Wi-Fi function].
User Manual
Page 147
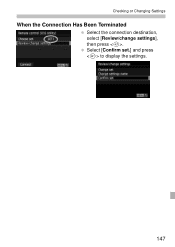
Select [Confirm set.] and press to display the settings. 147 Checking or Changing Settings When the Connection Has Been Terminated Select the connection destination, select [Review/change settings], then press .
Select [Confirm set.] and press to display the settings. 147 Checking or Changing Settings When the Connection Has Been Terminated Select the connection destination, select [Review/change settings], then press .
User Manual
Page 148
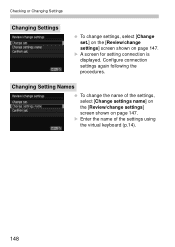
Changing Setting Names To change the name of the settings using the virtual keyboard (p.14). 148 X Enter the name of the settings, select [Change settings name] on the [Review/change settings] screen shown on page 147. Checking or Changing Settings Changing Settings To change settings, select [Change set.] on the [Review/change settings] screen shown on page 147. X A screen for setting connection is displayed. Configure connection settings again following the procedures.
Changing Setting Names To change the name of the settings using the virtual keyboard (p.14). 148 X Enter the name of the settings, select [Change settings name] on the [Review/change settings] screen shown on page 147. Checking or Changing Settings Changing Settings To change settings, select [Change set.] on the [Review/change settings] screen shown on page 147. X A screen for setting connection is displayed. Configure connection settings again following the procedures.
Basic User Manual
Page 7
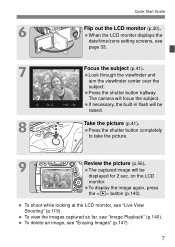
... displays the date/time/zone setting screens, see "Erasing Images" (p.147). 7 Press the shutter button halfway. Press the shutter button completely to take the picture. 9 Review the picture (p.56). To display the image again, press the button (p.140). To delete an image, see page 33. 7 Focus the subject (p.41). If necessary...
... displays the date/time/zone setting screens, see "Erasing Images" (p.147). 7 Press the shutter button halfway. Press the shutter button completely to take the picture. 9 Review the picture (p.56). To display the image again, press the button (p.140). To delete an image, see page 33. 7 Focus the subject (p.41). If necessary...
Basic User Manual
Page 56
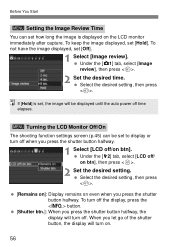
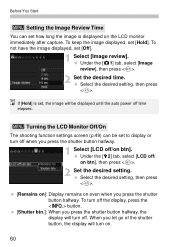
To not have the image displayed, set how long the image is set, the image will be set [Hold]. Under the [z1] tab, select [Image review], then press . 2 Set the desired time. Select the desired setting, then press . [Remains on]: Display remains on btn]. Select the desired setting, then press ...the shutter button, the display will turn off / on . 56 When you press the shutter button halfway. Before You Start 3 Setting the Image Review Time You can be displayed until the auto power off time elapses. 3 Turning the LCD Monitor Off/On The shooting function settings screen (p.45) ...
To not have the image displayed, set how long the image is set, the image will be set [Hold]. Under the [z1] tab, select [Image review], then press . 2 Set the desired time. Select the desired setting, then press . [Remains on]: Display remains on btn]. Select the desired setting, then press ...the shutter button, the display will turn off / on . 56 When you press the shutter button halfway. Before You Start 3 Setting the Image Review Time You can be displayed until the auto power off time elapses. 3 Turning the LCD Monitor Off/On The shooting function settings screen (p.45) ...
Basic User Manual
Page 70
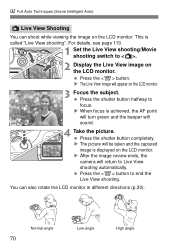
... the LCD monitor. X The picture will return to . 2 Display the Live View image on the LCD monitor. Press the shutter button completely. X After the image review ends, the camera will be taken and the captured image is displayed on the LCD monitor. 3 Focus the subject.
... the LCD monitor. X The picture will return to . 2 Display the Live View image on the LCD monitor. Press the shutter button completely. X After the image review ends, the camera will be taken and the captured image is displayed on the LCD monitor. 3 Focus the subject.
Basic User Manual
Page 120
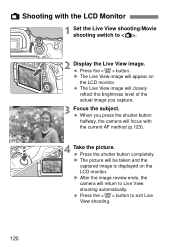
Press the button to . 2 Display the Live View image. X After the image review ends, the camera will appear on the LCD monitor. A Shooting with the current AF method (p.123). 4 Take the picture. X The Live View image will return ...
Press the button to . 2 Display the Live View image. X After the image review ends, the camera will appear on the LCD monitor. A Shooting with the current AF method (p.123). 4 Take the picture. X The Live View image will return ...
Quick Reference Guide
Page 1
CPQ-E059-000 © CANON INC. 2013 E English Preparation Menu Operations button LCD monitor... . A Picture StyleN ooSelect [z4: Picture Style], then press . Q Portrait Nice skin tones and slightly sharp images. Review the picture. Electronic Level ooPress the button to display the setting. 4. Custom FunctionsN C.Fn I: Exposure 1 Exposure level increments...Press the key to select a tab, then press the key to set the Mode Dial to the EOS 70D (W/N) Instruction Manual. Aperture Flash exposure compensation AE lock Highlight tone priority Exposure compensation/ AEB setting ISO...
CPQ-E059-000 © CANON INC. 2013 E English Preparation Menu Operations button LCD monitor... . A Picture StyleN ooSelect [z4: Picture Style], then press . Q Portrait Nice skin tones and slightly sharp images. Review the picture. Electronic Level ooPress the button to display the setting. 4. Custom FunctionsN C.Fn I: Exposure 1 Exposure level increments...Press the key to select a tab, then press the key to set the Mode Dial to the EOS 70D (W/N) Instruction Manual. Aperture Flash exposure compensation AE lock Highlight tone priority Exposure compensation/ AEB setting ISO...
Operation Manual
Page 7
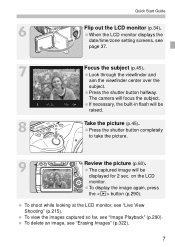
...). Press the shutter button halfway. If necessary, the built-in flash will be displayed for 2 sec. Press the shutter button completely to take the picture. 9 Review the picture (p.60). To view the images captured so far, see "Live View Shooting" (p.215). The captured image will focus the subject. Look through the...
...). Press the shutter button halfway. If necessary, the built-in flash will be displayed for 2 sec. Press the shutter button completely to take the picture. 9 Review the picture (p.60). To view the images captured so far, see "Live View Shooting" (p.215). The captured image will focus the subject. Look through the...
Operation Manual
Page 10
... 54 Before You Start 57 Formatting the Card 57 Disabling the Beeper 59 Setting the Power-off Time/Auto Power Off 59 Setting the Image Review Time 60 Turning the LCD Monitor Off/On 60 Reverting the Camera to the Default Settings 61 Displaying the Grid 64 Q Displaying the Electronic Level...
... 54 Before You Start 57 Formatting the Card 57 Disabling the Beeper 59 Setting the Power-off Time/Auto Power Off 59 Setting the Image Review Time 60 Turning the LCD Monitor Off/On 60 Reverting the Camera to the Default Settings 61 Displaying the Grid 64 Q Displaying the Electronic Level...

Operation Manual
Page 17
... Time code Still photo shooting Video snapshot Î p.251 Î p.273 Î p.265 Î p.267 Î p.268 Î p.270 Î p.261 Î p.277 Playback Image review time Single-image display Shooting information display Index display Image browsing (Jump display) Î p.60 Î p.290 Î p.292 Î p.296 Î p.297 Magnified view... Sensor cleaning Î p.340 Append Dust Delete Data Î p.341 Software Overview Installation Î p.456 Î p.458 Wi-Fi* Wi-Fi Î Separate booklet * The EOS 70D (N) does not have the Wi-Fi function. 17
... Time code Still photo shooting Video snapshot Î p.251 Î p.273 Î p.265 Î p.267 Î p.268 Î p.270 Î p.261 Î p.277 Playback Image review time Single-image display Shooting information display Index display Image browsing (Jump display) Î p.60 Î p.290 Î p.292 Î p.296 Î p.297 Magnified view... Sensor cleaning Î p.340 Append Dust Delete Data Î p.341 Software Overview Installation Î p.456 Î p.458 Wi-Fi* Wi-Fi Î Separate booklet * The EOS 70D (N) does not have the Wi-Fi function. 17
Operation Manual
Page 60
...you press the shutter button halfway. Select the desired setting, then press . Under the [52] tab, select [LCD off . Before You Start 3 Setting the Image Review Time You can be set [Hold]. To not have the image displayed, set how long the image is set, the image will be displayed until... the auto power off time elapses. 3 Turning the LCD Monitor Off/On The shooting function settings screen (p.49) can set [Off]. 1 Select [Image review]. To keep the image displayed, set to display or turn on btn], then press . 2 Set the desired setting. Under the [z1] tab, select [Image...
...you press the shutter button halfway. Select the desired setting, then press . Under the [52] tab, select [LCD off . Before You Start 3 Setting the Image Review Time You can be set [Hold]. To not have the image displayed, set how long the image is set, the image will be displayed until... the auto power off time elapses. 3 Turning the LCD Monitor Off/On The shooting function settings screen (p.49) can set [Off]. 1 Select [Image review]. To keep the image displayed, set to display or turn on btn], then press . 2 Set the desired setting. Under the [z1] tab, select [Image...
Operation Manual
Page 62
... Eye-Fi transmission Disable My Menu settings Unchanged Display from My Menu Disable Wi-Fi* Disable * The EOS 70D (N) does not have the Wi-Fi function (Not Displayed). Beep Enable Release shutter without card Enable Image review 2 sec. Highlight alert Disable AF point display Disable Playback grid Off Histogram display Brightness Movie playback...
... Eye-Fi transmission Disable My Menu settings Unchanged Display from My Menu Disable Wi-Fi* Disable * The EOS 70D (N) does not have the Wi-Fi function (Not Displayed). Beep Enable Release shutter without card Enable Image review 2 sec. Highlight alert Disable AF point display Disable Playback grid Off Histogram display Brightness Movie playback...
Operation Manual
Page 76
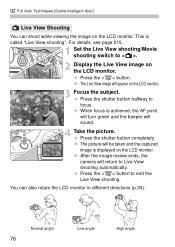
... on the LCD monitor. X When focus is called "Live View shooting". Press the shutter button halfway to end the Live View shooting. X After the image review ends, the camera will sound. 4 Take the picture. For details, see page 215. 1 Set the Live View shooting/Movie shooting switch to Live View shooting...
... on the LCD monitor. X When focus is called "Live View shooting". Press the shutter button halfway to end the Live View shooting. X After the image review ends, the camera will sound. 4 Take the picture. For details, see page 215. 1 Set the Live View shooting/Movie shooting switch to Live View shooting...
Operation Manual
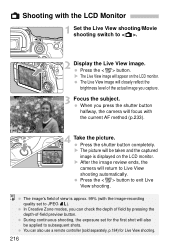
Page 216
... will also be taken and the captured image is approx. 99% (with the image-recording quality set for Live View shooting. 216 X After the image review ends, the camera will appear on the LCD monitor. A Shooting with the LCD Monitor 1 Set the Live View shooting/Movie shooting switch to exit Live...
... will also be taken and the captured image is approx. 99% (with the image-recording quality set for Live View shooting. 216 X After the image review ends, the camera will appear on the LCD monitor. A Shooting with the LCD Monitor 1 Set the Live View shooting/Movie shooting switch to exit Live...
Operation Manual
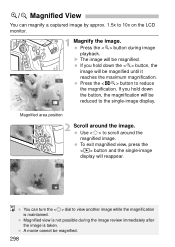
Page 298
... LCD monitor. 1 Magnify the image. Use to scroll around the image. Magnified area position 2 Scroll around the magnified image. Press the button during the image review immediately after the image is taken. To exit magnified view, press the button and the single-image display will be reduced to reduce the magnification...
... LCD monitor. 1 Magnify the image. Use to scroll around the image. Magnified area position 2 Scroll around the magnified image. Press the button during the image review immediately after the image is taken. To exit magnified view, press the button and the single-image display will be reduced to reduce the magnification...
Operation Manual
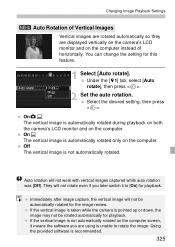
Page 325
You can change the setting for the image review. Under the [51] tab, select [Auto rotate], then press . 2 Set the auto rotation. Immediately after image capture, the vertical image will not be rotated automatically ...
You can change the setting for the image review. Under the [51] tab, select [Auto rotate], then press . 2 Set the auto rotation. Immediately after image capture, the vertical image will not be rotated automatically ...
