Instruction Manual
Page 1
EOS 70D (W) Wi-Fi Function Basic Instruction Manual In this booklet, basic procedures for easy-to-use "Transferring Images between Cameras" and "Connecting to "Wi-Fi Function Instruction Manual" included in the Camera Instruction Manual CD-ROM. E INSTRUCTION MANUAL For detailed explanation about Wi-Fi functions, refer to a smartphone" functions are explained.
EOS 70D (W) Wi-Fi Function Basic Instruction Manual In this booklet, basic procedures for easy-to-use "Transferring Images between Cameras" and "Connecting to "Wi-Fi Function Instruction Manual" included in the Camera Instruction Manual CD-ROM. E INSTRUCTION MANUAL For detailed explanation about Wi-Fi functions, refer to a smartphone" functions are explained.
Instruction Manual
Page 2
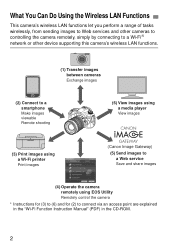
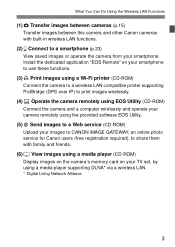
... (6) View images using a media player View images (3) Print images using a Wi-Fi printer Print images (Canon Image Gateway) (5) Send images to a Web service Save and share images (4) Operate the camera remotely using EOS Utility Remotely control the camera * Instructions for (3) to (6) and for (2) to connect via an access point are explained in the "Wi...
... (6) View images using a media player View images (3) Print images using a Wi-Fi printer Print images (Canon Image Gateway) (5) Send images to a Web service Save and share images (4) Operate the camera remotely using EOS Utility Remotely control the camera * Instructions for (3) to (6) and for (2) to connect via an access point are explained in the "Wi...
Instruction Manual
Page 3
What You Can Do Using the Wireless LAN Functions (1) z Transfer images between cameras (p.15) Transfer images between this camera and other Canon cameras with family and friends. (6) View images using a media player supporting DLNA* via a wireless LAN. * Digital Living Network Alliance 3 Install the dedicated application "EOS Remote" on your smartphone to use these functions. (3) l Print images...
What You Can Do Using the Wireless LAN Functions (1) z Transfer images between cameras (p.15) Transfer images between this camera and other Canon cameras with family and friends. (6) View images using a media player supporting DLNA* via a wireless LAN. * Digital Living Network Alliance 3 Install the dedicated application "EOS Remote" on your smartphone to use these functions. (3) l Print images...

Instruction Manual
Page 4
.... Windows is a trademark or registered trademark of Microsoft Corporation in the United States and other countries. In addition, Canon cannot be held liable for using the camera. Wi-Fi Certified, WPA, WPA2, and the Wi-Fi Certified logo are the property of their respective owners. ...wireless LAN" is used on camera settings screens and in this manual are trademarks of the Wi-Fi Alliance. The ** (numbers) for "(p.**)" in the United States and other countries. in this manual indicate reference page numbers for Wi-Fi and Canon's original wireless communication functions. WPS...
.... Windows is a trademark or registered trademark of Microsoft Corporation in the United States and other countries. In addition, Canon cannot be held liable for using the camera. Wi-Fi Certified, WPA, WPA2, and the Wi-Fi Certified logo are the property of their respective owners. ...wireless LAN" is used on camera settings screens and in this manual are trademarks of the Wi-Fi Alliance. The ** (numbers) for "(p.**)" in the United States and other countries. in this manual indicate reference page numbers for Wi-Fi and Canon's original wireless communication functions. WPS...
Instruction Manual
Page 5
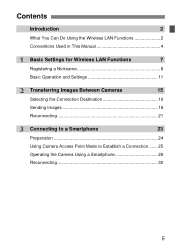
Contents Introduction 2 What You Can Do Using the Wireless LAN Functions 2 Conventions Used in This Manual 4 1 Basic Settings for Wireless LAN Functions 7 Registering a Nickname 8 Basic Operation and Settings 11 2 Transferring Images Between Cameras 15 Selecting the Connection Destination 16 Sending Images 18 Reconnecting 21 3 Connecting to a Smartphone 23 Preparation 24 Using Camera Access Point Mode to Establish a Connection ....... 25 Operating the Camera Using a Smartphone 28 Reconnecting 30 5
Contents Introduction 2 What You Can Do Using the Wireless LAN Functions 2 Conventions Used in This Manual 4 1 Basic Settings for Wireless LAN Functions 7 Registering a Nickname 8 Basic Operation and Settings 11 2 Transferring Images Between Cameras 15 Selecting the Connection Destination 16 Sending Images 18 Reconnecting 21 3 Connecting to a Smartphone 23 Preparation 24 Using Camera Access Point Mode to Establish a Connection ....... 25 Operating the Camera Using a Smartphone 28 Reconnecting 30 5
Instruction Manual
Page 7
Basic Settings for Wireless LAN Functions This chapter describes settings necessary for using the camera's wireless LAN functions. 7
Basic Settings for Wireless LAN Functions This chapter describes settings necessary for using the camera's wireless LAN functions. 7

Instruction Manual
Page 8
..., select [Wi-Fi function], then press . X When this setting is selected for your camera. 1 Select [Wi-Fi]. X [Wi-Fi function] is displayed. Select [OK] and proceed on the device. Press the key to set the camera's nickname. Under the [53] tab, select [Wi-Fi], then press . 2 Select... [Enable]. Registering a Nickname First, set a nickname for the first time, a screen to step 4. 8 When the camera is connected to another device via a wireless LAN, the nickname will be displayed on to register a nickname is now selectable. 3 Select [Wi-Fi function]. Be...
..., select [Wi-Fi function], then press . X When this setting is selected for your camera. 1 Select [Wi-Fi]. X [Wi-Fi function] is displayed. Select [OK] and proceed on the device. Press the key to set the camera's nickname. Under the [53] tab, select [Wi-Fi], then press . 2 Select... [Enable]. Registering a Nickname First, set a nickname for the first time, a screen to step 4. 8 When the camera is connected to another device via a wireless LAN, the nickname will be displayed on to register a nickname is now selectable. 3 Select [Wi-Fi function]. Be...
Instruction Manual
Page 11
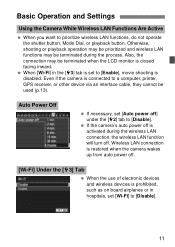
... wireless devices is closed facing inward. Basic Operation and Settings Using the Camera While Wireless LAN Functions Are Active When you want to [Disable]. Even if the camera is connected to [Disable]. 11 Wireless LAN connection is restored when the camera wakes up from auto power off ] under the [52] tab to prioritize... wireless LAN function will turn off is disabled. When [Wi-Fi] in hospitals, set to [Enable], movie shooting is activated during the process. If the camera's auto power off .
... wireless devices is closed facing inward. Basic Operation and Settings Using the Camera While Wireless LAN Functions Are Active When you want to [Disable]. Even if the camera is connected to [Disable]. 11 Wireless LAN connection is restored when the camera wakes up from auto power off ] under the [52] tab to prioritize... wireless LAN function will turn off is disabled. When [Wi-Fi] in hospitals, set to [Enable], movie shooting is activated during the process. If the camera's auto power off .

Instruction Manual
Page 12
... connection (Off) (Off) (Off) Connected Data is being transmitted Waiting for connection/ Waiting for [Wi-Fi] under the [53] tab can be checked on the camera's LCD monitor and LCD panel. Basic Operation and Settings [Wi-Fi] Settings and Connection Status Settings and connection status for reconnection Connection error (IJ) (Blinking...
... connection (Off) (Off) (Off) Connected Data is being transmitted Waiting for connection/ Waiting for [Wi-Fi] under the [53] tab can be checked on the camera's LCD monitor and LCD panel. Basic Operation and Settings [Wi-Fi] Settings and Connection Status Settings and connection status for reconnection Connection error (IJ) (Blinking...
Instruction Manual
Page 13
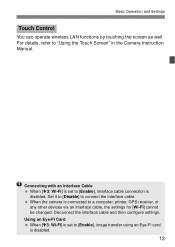
... [Enable], image transfer using an Eye-Fi card is set to "Using the Touch Screen" in the Camera Instruction Manual. Using an Eye-Fi Card When [53: Wi-Fi] is disabled. 13 When the camera is disabled. For details, refer to [Enable], interface cable connection is connected to connect the interface cable...
... [Enable], image transfer using an Eye-Fi card is set to "Using the Touch Screen" in the Camera Instruction Manual. Using an Eye-Fi Card When [53: Wi-Fi] is disabled. 13 When the camera is disabled. For details, refer to [Enable], interface cable connection is connected to connect the interface cable...
Instruction Manual
Page 15
... support Eye-Fi cards. Still photos can be transferred, some target cameras may not be able to Canon cameras without built-in wireless LAN functions. The camera cannot be connected to play them back depending on their file format is possible for Canon cameras with built-in wireless LAN functions marketed in wireless LAN functions. Wireless...
... support Eye-Fi cards. Still photos can be transferred, some target cameras may not be able to Canon cameras without built-in wireless LAN functions. The camera cannot be connected to play them back depending on their file format is possible for Canon cameras with built-in wireless LAN functions marketed in wireless LAN functions. Wireless...

Instruction Manual
Page 16
... [Wi-Fi function]. 2 Select [z]. Under the [53] tab, set [Wi-Fi] to select [z] (Transfer imgs between cameras), then press . 3 Start the connection on the target camera. Selecting the Connection Destination Register the target camera to connect to the instruction manual of the target camera. For the operation procedure, refer to via a wireless LAN. The...
... [Wi-Fi function]. 2 Select [z]. Under the [53] tab, set [Wi-Fi] to select [z] (Transfer imgs between cameras), then press . 3 Start the connection on the target camera. Selecting the Connection Destination Register the target camera to connect to the instruction manual of the target camera. For the operation procedure, refer to via a wireless LAN. The...
Instruction Manual
Page 17
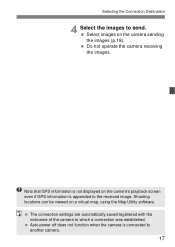
... the images. The connection settings are automatically saved/registered with the nickname of the camera to another camera. 17 Auto power off does not function when the camera is connected to which a connection was established. Selecting the Connection Destination 4 Select the images to the ...received image. Shooting locations can be viewed on the camera's playback screen even if GPS information is not displayed on a virtual map, using the Map Utility software. Note that GPS information ...
... the images. The connection settings are automatically saved/registered with the nickname of the camera to another camera. 17 Auto power off does not function when the camera is connected to which a connection was established. Selecting the Connection Destination 4 Select the images to the ...received image. Shooting locations can be viewed on the camera's playback screen even if GPS information is not displayed on a virtual map, using the Map Utility software. Note that GPS information ...

Instruction Manual
Page 20
... connection. X The [Wi-Fi function] screen will be performed when data is stopped so that the battery is displayed. When [Cancel] is selected on the camera being used to display the confirmation screen. X The transfer progress screen is adequately charged so it if necessary. 5 Send the images. Set it does not...
... connection. X The [Wi-Fi function] screen will be performed when data is stopped so that the battery is displayed. When [Cancel] is selected on the camera being used to display the confirmation screen. X The transfer progress screen is adequately charged so it if necessary. 5 Send the images. Set it does not...

Instruction Manual
Page 21
...Perform the reconnection procedure on the card are displayed and the images to send can reconnect to another camera for multiple connection destinations are named after the nickname of the camera that was connected to [Enable], then select [Wi-Fi function]. 2 Select [z]. Select [z] (...Transfer imgs between cameras) and press . 3 Establish a connection. X The images on the target camera as well. Under the [53] tab, set ...
...Perform the reconnection procedure on the card are displayed and the images to send can reconnect to another camera for multiple connection destinations are named after the nickname of the camera that was connected to [Enable], then select [Wi-Fi function]. 2 Select [z]. Select [z] (...Transfer imgs between cameras) and press . 3 Establish a connection. X The images on the target camera as well. Under the [53] tab, set ...
Instruction Manual
Page 23
You can also use the smartphone to perform remote shooting. Note that movie shooting is disabled. 23 Connecting to a Smartphone Connecting the camera to a smartphone lets you use the smartphone to view, manage, and receive images stored in the camera.
You can also use the smartphone to perform remote shooting. Note that movie shooting is disabled. 23 Connecting to a Smartphone Connecting the camera to a smartphone lets you use the smartphone to view, manage, and receive images stored in the camera.
Instruction Manual
Page 24
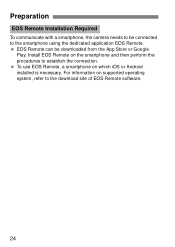
To use EOS Remote, a smartphone on supported operating system, refer to establish the connection. Install EOS Remote on the smartphone and then perform the procedures to the download site of EOS Remote software. 24 Preparation EOS Remote Installation Required To communicate with a smartphone, the camera needs to be downloaded from the App Store or Google Play. EOS Remote can be connected to the smartphone using the dedicated application EOS Remote. For information on which iOS or Android installed is necessary.
To use EOS Remote, a smartphone on supported operating system, refer to establish the connection. Install EOS Remote on the smartphone and then perform the procedures to the download site of EOS Remote software. 24 Preparation EOS Remote Installation Required To communicate with a smartphone, the camera needs to be downloaded from the App Store or Google Play. EOS Remote can be connected to the smartphone using the dedicated application EOS Remote. For information on which iOS or Android installed is necessary.

Instruction Manual
Page 25
...to the next screen. 4 Select [Easy connection]. Select [OK] and press to go to the smartphone instruction manual. 1 Select [Wi-Fi function]. Because the camera acts as an access point, no other access point is necessary, so you are required. For details, refer to the next screen. 25 Select [OK...] and press to go to select [Camera access point mode], then press . Under the [53] tab, set [Wi-Fi] to select [Easy connection], then press . Press the key to [Enable],...
...to the next screen. 4 Select [Easy connection]. Select [OK] and press to go to the smartphone instruction manual. 1 Select [Wi-Fi function]. Because the camera acts as an access point, no other access point is necessary, so you are required. For details, refer to the next screen. 25 Select [OK...] and press to go to select [Camera access point mode], then press . Under the [53] tab, set [Wi-Fi] to select [Easy connection], then press . Press the key to [Enable],...
Instruction Manual
Page 26
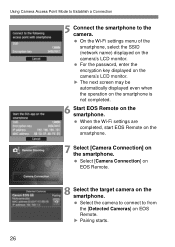
... displayed on the smartphone. X Pairing starts. 26 Select [Camera Connection] on EOS Remote. 8 Select the target camera on the camera's LCD monitor. Select the camera to connect to the camera. When the Wi-Fi settings are completed, start EOS Remote on the smartphone. 7 Select [Camera Connection] on EOS Remote. Using Camera Access Point Mode to Establish a Connection 5 Connect the smartphone...
... displayed on the smartphone. X Pairing starts. 26 Select [Camera Connection] on EOS Remote. 8 Select the target camera on the camera's LCD monitor. Select the camera to connect to the camera. When the Wi-Fi settings are completed, start EOS Remote on the smartphone. 7 Select [Camera Connection] on EOS Remote. Using Camera Access Point Mode to Establish a Connection 5 Connect the smartphone...
Instruction Manual
Page 27
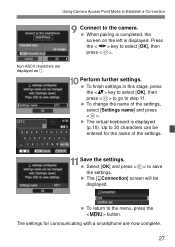
... settings, select [Settings name] and press . Select [OK] and press to 30 characters can be displayed. Using Camera Access Point Mode to Establish a Connection 9 Connect to select [OK], then press . Press the key to the camera. X The [qConnection] screen will be entered for communicating with a smartphone are displayed as 8. 10 Perform further...
... settings, select [Settings name] and press . Select [OK] and press to 30 characters can be displayed. Using Camera Access Point Mode to Establish a Connection 9 Connect to select [OK], then press . Press the key to the camera. X The [qConnection] screen will be entered for communicating with a smartphone are displayed as 8. 10 Perform further...


