Basic User Manual
Page 4
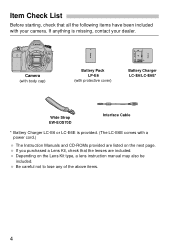
... with a power cord.) The Instruction Manuals and CD-ROMs provided are included. If anything is provided. (The LC-E6E comes with your dealer. Camera (with body cap) Battery Pack LP-E6 (with protective cover) Battery Charger LC-E6/LC-E6E* Wide Strap EW-EOS70D Interface Cable * Battery Charger LC-E6 or...
... with a power cord.) The Instruction Manuals and CD-ROMs provided are included. If anything is provided. (The LC-E6E comes with your dealer. Camera (with body cap) Battery Pack LP-E6 (with protective cover) Battery Charger LC-E6/LC-E6E* Wide Strap EW-EOS70D Interface Cable * Battery Charger LC-E6 or...
Basic User Manual
Page 13
Other certification logos can be found in this Instruction Manual, on the camera body, and on the camera's package. 13 Contents 7 Shooting Movies 133 k Shooting Movies 134 Setting the Movie Recording Size 137 8 Image Playback 139 x Image Playback 140 H ...
Other certification logos can be found in this Instruction Manual, on the camera body, and on the camera's package. 13 Contents 7 Shooting Movies 133 k Shooting Movies 134 Setting the Movie Recording Size 137 8 Image Playback 139 x Image Playback 140 H ...
Basic User Manual
Page 14
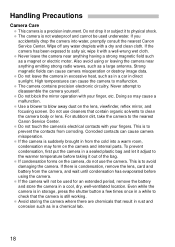
...is still working. Even while the camera is condensation, remove the lens, card and battery from the cold into water, promptly consult the nearest Canon Service Center. Never leave the camera near anything having a strong magnetic field such as a large antenna. High temperatures can cause camera misoperation ...to disassemble the camera yourself. Doing so may form on the camera, do not use cleaners that contain organic solvents to clean the camera body or lens. If the camera will not be used for an extended period, remove the battery and store the camera in direct sunlight....
...is still working. Even while the camera is condensation, remove the lens, card and battery from the cold into water, promptly consult the nearest Canon Service Center. Never leave the camera near anything having a strong magnetic field such as a large antenna. High temperatures can cause camera misoperation ...to disassemble the camera yourself. Doing so may form on the camera, do not use cleaners that contain organic solvents to clean the camera body or lens. If the camera will not be used for an extended period, remove the battery and store the camera in direct sunlight....
Basic User Manual
Page 16
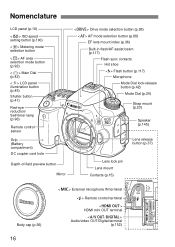
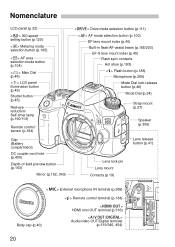
... Mode Dial lock-release button (p.42) Mode Dial (p.20) Strap mount (p.23) Speaker (p.145) Lens release button (p.37) Lens lock pin Lens mount Contacts (p.15) Body cap (p.36) 16 External microphone IN terminal Remote control terminal HDMI mini OUT terminal Audio/video OUT/Digital terminal (p.152)
... Mode Dial lock-release button (p.42) Mode Dial (p.20) Strap mount (p.23) Speaker (p.145) Lens release button (p.37) Lens lock pin Lens mount Contacts (p.15) Body cap (p.36) 16 External microphone IN terminal Remote control terminal HDMI mini OUT terminal Audio/video OUT/Digital terminal (p.152)
Basic User Manual
Page 36
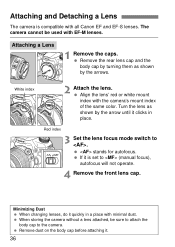
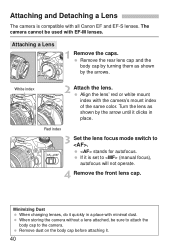
Attaching a Lens 1 Remove the caps. Remove the rear lens cap and the body cap by turning them as shown by the arrows. Red index 3 Set the lens focus mode... arrow until it . 36 Align the lens' red or white mount index with all Canon EF and EF-S lenses. If it quickly in place. Remove dust on the body cap before attaching it clicks in a place with EF-M lenses. White index 2 Attach... 4 Remove the front lens cap. stands for autofocus. The camera cannot be sure to attach the body cap to . When storing the camera without a lens attached, be used with minimal dust.
Attaching a Lens 1 Remove the caps. Remove the rear lens cap and the body cap by turning them as shown by the arrows. Red index 3 Set the lens focus mode... arrow until it . 36 Align the lens' red or white mount index with all Canon EF and EF-S lenses. If it quickly in place. Remove dust on the body cap before attaching it clicks in a place with EF-M lenses. White index 2 Attach... 4 Remove the front lens cap. stands for autofocus. The camera cannot be sure to attach the body cap to . When storing the camera without a lens attached, be used with minimal dust.
Basic User Manual
Page 40
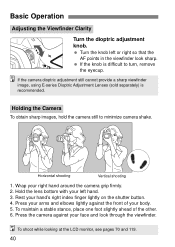
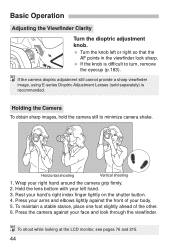
... the camera still to turn, remove the eyecup. Basic Operation Adjusting the Viewfinder Clarity Turn the dioptric adjustment knob. Hold the lens bottom with your body. 5. Press your face and look sharp. To maintain a stable stance, place one foot slightly ahead of your left or right so that the AF points...
... the camera still to turn, remove the eyecup. Basic Operation Adjusting the Viewfinder Clarity Turn the dioptric adjustment knob. Hold the lens bottom with your body. 5. Press your face and look sharp. To maintain a stable stance, place one foot slightly ahead of your left or right so that the AF points...
Basic User Manual
Page 121
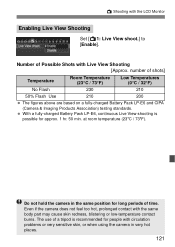
A Shooting with the same body part may cause skin redness, blistering or low-temperature contact burns. The use of Possible Shots with circulation problems or very sensitive skin, or when ...
A Shooting with the same body part may cause skin redness, blistering or low-temperature contact burns. The use of Possible Shots with circulation problems or very sensitive skin, or when ...
Basic User Manual
Page 138
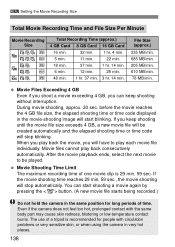
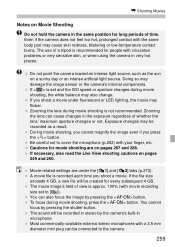
.... before the movie reaches the 4 GB file size, the elapsed shooting time or time code displayed in the same position for people with the same body part may cause skin redness, blistering or low-temperature contact burns.
.... before the movie reaches the 4 GB file size, the elapsed shooting time or time code displayed in the same position for people with the same body part may cause skin redness, blistering or low-temperature contact burns.
Basic User Manual
Page 159
... of time. Also, do not subject the battery pack or back-up battery, insulate the electrical contacts with tape to prevent contact with the same body part may cause skin redness, blistering or low-temperature contact burns. Do not use any battery leakage from the reach of the camera, accessories, connecting...
... of time. Also, do not subject the battery pack or back-up battery, insulate the electrical contacts with tape to prevent contact with the same body part may cause skin redness, blistering or low-temperature contact burns. Do not use any battery leakage from the reach of the camera, accessories, connecting...
Operation Manual
Page 4
Item Check List Before starting, check that the lenses are listed on the Lens Kit type, a lens instruction manual may also be included. Camera (with body cap) Battery Pack LP-E6 (with protective cover) Battery Charger LC-E6/LC-E6E* Wide Strap EW-EOS70D Interface Cable * Battery Charger LC-E6 or ...
Item Check List Before starting, check that the lenses are listed on the Lens Kit type, a lens instruction manual may also be included. Camera (with body cap) Battery Pack LP-E6 (with protective cover) Battery Charger LC-E6/LC-E6E* Wide Strap EW-EOS70D Interface Cable * Battery Charger LC-E6 or ...
Operation Manual
Page 18
..., and wait until condensation has evaporated before taking it adjust to avoid damaging the camera. If the camera has been exposed to clean the camera body or lens. Doing so may form on the lens, viewfinder, reflex mirror, and focusing screen. For stubborn dirt, take the camera to disassemble ...the camera yourself. If the camera is condensation, remove the lens, card and battery from the cold into water, promptly consult the nearest Canon Service Center. If there is suddenly brought in a sealed plastic bag and let it out of the bag. Never attempt to the nearest...
..., and wait until condensation has evaporated before taking it adjust to avoid damaging the camera. If the camera has been exposed to clean the camera body or lens. Doing so may form on the lens, viewfinder, reflex mirror, and focusing screen. For stubborn dirt, take the camera to disassemble ...the camera yourself. If the camera is condensation, remove the lens, card and battery from the cold into water, promptly consult the nearest Canon Service Center. If there is suddenly brought in a sealed plastic bag and let it out of the bag. Never attempt to the nearest...
Operation Manual
Page 20
...) Strap mount (p.27) Speaker (p.308) Lens release button (p.41) Lens lock pin Lens mount Contacts (p.19) External microphone IN terminal (p.269) Remote control terminal (p.184) Body cap (p.40) HDMI mini OUT terminal (p.316) Audio/video OUT/Digital terminal (p.319/346, 454) 20
...) Strap mount (p.27) Speaker (p.308) Lens release button (p.41) Lens lock pin Lens mount Contacts (p.19) External microphone IN terminal (p.269) Remote control terminal (p.184) Body cap (p.40) HDMI mini OUT terminal (p.316) Audio/video OUT/Digital terminal (p.319/346, 454) 20
Operation Manual
Page 40
stands for autofocus. Remove the rear lens cap and the body cap by turning them as shown by the arrows. Minimizing Dust When changing lenses,...Attach the lens. Turn the lens as shown by the arrow until it quickly in place. Remove dust on the body cap before attaching it is compatible with the camera's mount index of the same color. Red index 3 Set the...used with minimal dust. Align the lens' red or white mount index with all Canon EF and EF-S lenses. The camera cannot be sure to attach the body cap to the camera. If it . 40 Attaching and Detaching a Lens The ...
stands for autofocus. Remove the rear lens cap and the body cap by turning them as shown by the arrows. Minimizing Dust When changing lenses,...Attach the lens. Turn the lens as shown by the arrow until it quickly in place. Remove dust on the body cap before attaching it is compatible with the camera's mount index of the same color. Red index 3 Set the...used with minimal dust. Align the lens' red or white mount index with all Canon EF and EF-S lenses. The camera cannot be sure to attach the body cap to the camera. If it . 40 Attaching and Detaching a Lens The ...
Operation Manual
Page 44
Turn the knob left hand. 3. Hold the lens bottom with your body. 5. Rest your right hand around the camera grip firmly. 2. To maintain a stable stance, place one foot slightly ahead of your left or right so that ...
Turn the knob left hand. 3. Hold the lens bottom with your body. 5. Rest your right hand around the camera grip firmly. 2. To maintain a stable stance, place one foot slightly ahead of your left or right so that ...

Operation Manual
Page 109
... low-contrast subjects (Example: Blue sky, solid-color walls, etc.) Subjects in very low light Extremely backlit and reflective subjects (Example: Car with a highly reflective body, etc.) Near and far subjects covered by an AF point (Example: Animal in a cage, etc.) Repetitive patterns (Example: Skyscraper windows, computer keyboards, etc.) In such...
... low-contrast subjects (Example: Blue sky, solid-color walls, etc.) Subjects in very low light Extremely backlit and reflective subjects (Example: Car with a highly reflective body, etc.) Near and far subjects covered by an AF point (Example: Animal in a cage, etc.) Repetitive patterns (Example: Skyscraper windows, computer keyboards, etc.) In such...
Operation Manual
Page 219
... the button (p.65). Note that the Live View image brightness is blinking, it indicates that noise may be grayed out (for people with the same body part may not be displayed when [A1: Expo. If is close to what the captured image will look like. If the or mode is set...
... the button (p.65). Note that the Live View image brightness is blinking, it indicates that noise may be grayed out (for people with the same body part may not be displayed when [A1: Expo. If is close to what the captured image will look like. If the or mode is set...
Operation Manual
Page 259
... careful not to cover the microphone (p.252) with a 3.5 mm diameter mini plug can be recorded in microphone. A movie file is approx. 100% (with the same body part may also change. To focus during movie shooting, the white balance may cause skin redness, blistering or low-temperature contact burns. If necessary, also...
... careful not to cover the microphone (p.252) with a 3.5 mm diameter mini plug can be recorded in microphone. A movie file is approx. 100% (with the same body part may also change. To focus during movie shooting, the white balance may cause skin redness, blistering or low-temperature contact burns. If necessary, also...
Operation Manual
Page 393
Other certification logos can be found in this Instruction Manual, on the camera body, and on the camera's package. 393 Certification Logo Select [54: Certification Logo Display] and press to display some of the logos of the camera's certifications. Reference This chapter provides reference information for camera features, system accessories, etc.
Other certification logos can be found in this Instruction Manual, on the camera body, and on the camera's package. 393 Certification Logo Select [54: Certification Logo Display] and press to display some of the logos of the camera's certifications. Reference This chapter provides reference information for camera features, system accessories, etc.
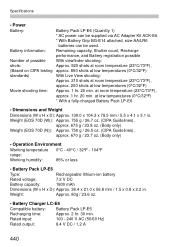
Operation Manual
Page 440
.... 755 g / 26.7 oz. (CIPA Guidelines), approx. 675 g / 23.8 oz. (Body only) Weight (EOS 70D (N)): Approx. 750 g / 26.5 oz. (CIPA Guidelines), approx. 670 g / 23.7 oz. (Body only) • Operation Environment Working temperature 0°C - 40°C / 32°F - 104°F range: Working humidity: 85% or less • Battery Pack LP-E6 Type: ...
.... 755 g / 26.7 oz. (CIPA Guidelines), approx. 675 g / 23.8 oz. (Body only) Weight (EOS 70D (N)): Approx. 750 g / 26.5 oz. (CIPA Guidelines), approx. 670 g / 23.7 oz. (Body only) • Operation Environment Working temperature 0°C - 40°C / 32°F - 104°F range: Working humidity: 85% or less • Battery Pack LP-E6 Type: ...
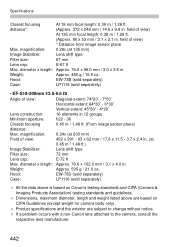
Operation Manual
Page 442
.... Dimensions, maximum diameter, length and weight listed above is based on CIPA Guidelines (except weight for camera body only). Product specifications and the exterior are based on Canon's testing standards and CIPA (Camera & Imaging Products Association) testing standards and guidelines. Weight: Approx. 595... IS Angle of view: 452 x 291 - 93 x 62 mm / 17.8 x 11.5 - 3.7 x 2.4 in . If a problem occurs with a non-Canon lens attached to change without notice. Weight: Approx. 480 g / 16.9 oz. Hood: EW-73B (sold separately) Case: LP1116 (sold separately) All the data above...
.... Dimensions, maximum diameter, length and weight listed above is based on CIPA Guidelines (except weight for camera body only). Product specifications and the exterior are based on Canon's testing standards and CIPA (Camera & Imaging Products Association) testing standards and guidelines. Weight: Approx. 595... IS Angle of view: 452 x 291 - 93 x 62 mm / 17.8 x 11.5 - 3.7 x 2.4 in . If a problem occurs with a non-Canon lens attached to change without notice. Weight: Approx. 480 g / 16.9 oz. Hood: EW-73B (sold separately) Case: LP1116 (sold separately) All the data above...
