Instruction Manual
Page 1
E INSTRUCTION MANUAL For detailed explanation about Wi-Fi functions, refer to a smartphone" functions are explained. EOS 70D (W) Wi-Fi Function Basic Instruction Manual In this booklet, basic procedures for easy-to-use "Transferring Images between Cameras" and "Connecting to "Wi-Fi Function Instruction Manual" included in the Camera Instruction Manual CD-ROM.
E INSTRUCTION MANUAL For detailed explanation about Wi-Fi functions, refer to a smartphone" functions are explained. EOS 70D (W) Wi-Fi Function Basic Instruction Manual In this booklet, basic procedures for easy-to-use "Transferring Images between Cameras" and "Connecting to "Wi-Fi Function Instruction Manual" included in the Camera Instruction Manual CD-ROM.
Instruction Manual
Page 2
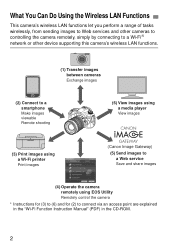
... images using a Wi-Fi printer Print images (Canon Image Gateway) (5) Send images to a Web service Save and share images (4) Operate the camera remotely using EOS Utility Remotely control the camera * Instructions for (3) to (6) and for (2) to connect via an access point are explained in the "Wi-Fi Function Instruction Manual" (PDF) in the CD-ROM. 2
... images using a Wi-Fi printer Print images (Canon Image Gateway) (5) Send images to a Web service Save and share images (4) Operate the camera remotely using EOS Utility Remotely control the camera * Instructions for (3) to (6) and for (2) to connect via an access point are explained in the "Wi-Fi Function Instruction Manual" (PDF) in the CD-ROM. 2
Instruction Manual
Page 13
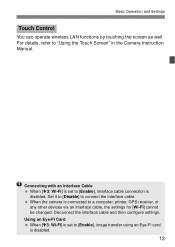
... interface cable and then configure settings. Using an Eye-Fi Card When [53: Wi-Fi] is connected to "Using the Touch Screen" in the Camera Instruction Manual. Basic Operation and Settings Touch Control You can operate wireless LAN functions by touching the screen as well.
... interface cable and then configure settings. Using an Eye-Fi Card When [53: Wi-Fi] is connected to "Using the Touch Screen" in the Camera Instruction Manual. Basic Operation and Settings Touch Control You can operate wireless LAN functions by touching the screen as well.

Instruction Manual
Page 16
... is displayed. 16 For the operation procedure, refer to only one camera at a time. 1 Select [Wi-Fi function]. The camera can be connected to the instruction manual of the target camera. Press the or key to select [z] (Transfer imgs between cameras), then press . 3 Start the connection on the target camera as well...
... is displayed. 16 For the operation procedure, refer to only one camera at a time. 1 Select [Wi-Fi function]. The camera can be connected to the instruction manual of the target camera. Press the or key to select [z] (Transfer imgs between cameras), then press . 3 Start the connection on the target camera as well...

Instruction Manual
Page 25
...]. Select [q] (Connect to select [Easy connection], then press . Select [OK] and press to go to the next screen. 25 For details, refer to the smartphone instruction manual. 1 Select [Wi-Fi function]. To establish connection, operations on the smartphone are out. Using Camera Access Point Mode to Establish a Connection The camera and smartphone...
...]. Select [q] (Connect to select [Easy connection], then press . Select [OK] and press to go to the next screen. 25 For details, refer to the smartphone instruction manual. 1 Select [Wi-Fi function]. To establish connection, operations on the smartphone are out. Using Camera Access Point Mode to Establish a Connection The camera and smartphone...
User Manual
Page 1
EOS 70D (W) Wi-Fi Function Instruction Manual E INSTRUCTION MANUAL
EOS 70D (W) Wi-Fi Function Instruction Manual E INSTRUCTION MANUAL

User Manual
Page 17
... screen as well. For details, refer to [Enable], image transfer using an Eye-Fi card is set to "Using the Touch Screen" in the Camera Instruction Manual. Disconnect the interface cable and then configure settings. Connecting with an Interface Cable When [53: Wi-Fi] is disabled. 17
... screen as well. For details, refer to [Enable], image transfer using an Eye-Fi card is set to "Using the Touch Screen" in the Camera Instruction Manual. Disconnect the interface cable and then configure settings. Connecting with an Interface Cable When [53: Wi-Fi] is disabled. 17

User Manual
Page 20
... is displayed. 20 For the operation procedure, refer to [Enable], then select [Wi-Fi function]. 2 Select [z]. Under the [53] tab, set [Wi-Fi] to the instruction manual of the target camera. When a connection is established, the settings are automatically saved and an image on the card is displayed on the camera, start...
... is displayed. 20 For the operation procedure, refer to [Enable], then select [Wi-Fi function]. 2 Select [z]. Under the [53] tab, set [Wi-Fi] to the instruction manual of the target camera. When a connection is established, the settings are automatically saved and an image on the card is displayed on the camera, start...

User Manual
Page 33
...press to go to the next screen. Select [OK] and press to go to the next screen. 4 Select [Easy connection]. Select [q] (Connect to the smartphone instruction manual. 1 Select [Wi-Fi function]. Press the key to [Enable], then select [Wi-Fi function]. 2 Select [q]. Under the [53] tab, set [Wi-...smartphone are out. Press the key to Establish a Connection The camera and smartphone can establish communications easily even when you are required. For manual connection, see page 36. 33 Because the camera acts as an access point, no other access point is necessary, so you can ...
...press to go to the next screen. Select [OK] and press to go to the next screen. 4 Select [Easy connection]. Select [q] (Connect to the smartphone instruction manual. 1 Select [Wi-Fi function]. Press the key to [Enable], then select [Wi-Fi function]. 2 Select [q]. Under the [53] tab, set [Wi-...smartphone are out. Press the key to Establish a Connection The camera and smartphone can establish communications easily even when you are required. For manual connection, see page 36. 33 Because the camera acts as an access point, no other access point is necessary, so you can ...

User Manual
Page 47
... Camera Access Point Mode to Establish a Connection 5 Set the printer's Wi-Fi settings to connect to . For the printer operation procedure, refer to the printer's instruction manual. 6 Select the printer to connect to the camera. X Some printers may make a beeping sound.
... Camera Access Point Mode to Establish a Connection 5 Set the printer's Wi-Fi settings to connect to . For the printer operation procedure, refer to the printer's instruction manual. 6 Select the printer to connect to the camera. X Some printers may make a beeping sound.

User Manual
Page 50
You can also perform "Direct Printing of the screen indicating that the printer is not displayed, select [Wi-Fi function] under the [53] tab. Terminating the Connection 1 Select [Exit]. If the screen on the upper left is connected. For further operations, refer to terminate the connection. 50 Press the button. X An image is displayed and the icon appears on the left of PrintOrdered Images". Press the key to select [OK], then press to "Printing Images" in the Camera Instruction Manual. Printing Play back an image. Select [Exit] and press . 2 Select [OK].
You can also perform "Direct Printing of the screen indicating that the printer is not displayed, select [Wi-Fi function] under the [53] tab. Terminating the Connection 1 Select [Exit]. If the screen on the upper left is connected. For further operations, refer to terminate the connection. 50 Press the button. X An image is displayed and the icon appears on the left of PrintOrdered Images". Press the key to select [OK], then press to "Printing Images" in the Camera Instruction Manual. Printing Play back an image. Select [Exit] and press . 2 Select [OK].

User Manual
Page 56
When connecting to the access point instruction manual or other documentation. The MAC address can be checked on the [General sett.] screen (p.149). 56 If the network you use filters by Searching Networks If you do not know if the access point you use is not supported • p.67: Manual Connection by MAC address...
When connecting to the access point instruction manual or other documentation. The MAC address can be checked on the [General sett.] screen (p.149). 56 If the network you use filters by Searching Networks If you do not know if the access point you use is not supported • p.67: Manual Connection by MAC address...

User Manual
Page 58
... 4 when selecting [D] or [ ]. Press the access point's WPS button. For details about where the button is selected. Select [OK] and press to the access point's instruction manual. X When a connection with the access point. Go to select [Infrastructure mode], then press . Select [OK] and press to go to the next screen. 5 Connect to...
... 4 when selecting [D] or [ ]. Press the access point's WPS button. For details about where the button is selected. Select [OK] and press to the access point's instruction manual. X When a connection with the access point. Go to select [Infrastructure mode], then press . Select [OK] and press to go to the next screen. 5 Connect to...

User Manual
Page 63
For instructions on the camera's LCD monitor. Press the key to select [WPS (PIN mode)], then press . Press the key to select the IP address setting method, ... to establish a connection with the access point is established, the [IP address set.] screen is specified, select [OK] and press . 6 Connect to the access point's instruction manual. At the access point, specify the 8-digit PIN code displayed on setting PIN codes at the access point. X When a connection with the access point. After...
For instructions on the camera's LCD monitor. Press the key to select [WPS (PIN mode)], then press . Press the key to select the IP address setting method, ... to establish a connection with the access point is established, the [IP address set.] screen is specified, select [OK] and press . 6 Connect to the access point's instruction manual. At the access point, specify the 8-digit PIN code displayed on setting PIN codes at the access point. X When a connection with the access point. After...
User Manual
Page 69
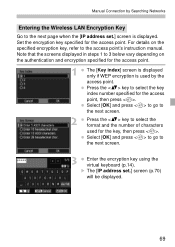
... index] screen is displayed only if WEP encryption is used for the key, then press . Select [OK] and press to go to the access point's instruction manual. Note that the screens displayed in steps 1 to 3 below vary depending on the specified encryption key, refer to the next screen. 3 Enter the encryption key... number of characters used by Searching Networks Entering the Wireless LAN Encryption Key Go to select the key index number specified for the access point. Manual Connection by the access point. Set the encryption key specified for the access point, then press .
... index] screen is displayed only if WEP encryption is used for the key, then press . Select [OK] and press to go to the access point's instruction manual. Note that the screens displayed in steps 1 to 3 below vary depending on the specified encryption key, refer to the next screen. 3 Enter the encryption key... number of characters used by Searching Networks Entering the Wireless LAN Encryption Key Go to select the key index number specified for the access point. Manual Connection by the access point. Set the encryption key specified for the access point, then press .

User Manual
Page 76
...mode, see "Using Camera Access Point Mode to on the smartphone. Select [Camera Connection] on EOS Remote. 3 Select the camera to connect to Establish a Connection" (p.33). 1 Start EOS Remote on the smartphone. Select the camera to connect to from Chapter 5. X Pairing starts..... Using Infrastructure Mode to Establish a Connection These instructions are continued from the [Detected Cameras] on EOS Remote. To establish connection, operations on the smartphone are displayed, identify the camera to connect to the smartphone's instruction manual. When the screen on the left is displayed ...
...mode, see "Using Camera Access Point Mode to on the smartphone. Select [Camera Connection] on EOS Remote. 3 Select the camera to connect to Establish a Connection" (p.33). 1 Start EOS Remote on the smartphone. Select the camera to connect to from Chapter 5. X Pairing starts..... Using Infrastructure Mode to Establish a Connection These instructions are continued from the [Detected Cameras] on EOS Remote. To establish connection, operations on the smartphone are displayed, identify the camera to connect to the smartphone's instruction manual. When the screen on the left is displayed ...

User Manual
Page 90
For further operations, refer to terminate the connection. 90 Terminating the Connection 1 Select [Exit]. Press the button. You can also perform "Direct Printing of the screen indicating that the printer is connected. Press the key to select [OK], then press to "Printing Images" in the Camera Instruction Manual. Select [Exit] and press . 2 Select [OK]. Printing Play back an image. X An image is not displayed, select [Wi-Fi function] under the [53] tab. If the screen on the upper left is displayed and the icon appears on the left of PrintOrdered Images".
For further operations, refer to terminate the connection. 90 Terminating the Connection 1 Select [Exit]. Press the button. You can also perform "Direct Printing of the screen indicating that the printer is connected. Press the key to select [OK], then press to "Printing Images" in the Camera Instruction Manual. Select [Exit] and press . 2 Select [OK]. Printing Play back an image. X An image is not displayed, select [Wi-Fi function] under the [53] tab. If the screen on the upper left is displayed and the icon appears on the left of PrintOrdered Images".

User Manual
Page 98
Note that movie shooting is not displayed, select [Wi-Fi function] under the [53] tab. Press the key to select [OK], then press to remote shooting, various camera operations are available. In addition to terminate the connection. 98 If the screen on the left is disabled. Select [Exit] and press . 2 Select [OK]. Using EOS Utility For EOS Utility instructions, refer to the EOS Utility instruction manual (CD-ROM). Terminating the Connection 1 Select [Exit].
Note that movie shooting is not displayed, select [Wi-Fi function] under the [53] tab. Press the key to select [OK], then press to remote shooting, various camera operations are available. In addition to terminate the connection. 98 If the screen on the left is disabled. Select [Exit] and press . 2 Select [OK]. Using EOS Utility For EOS Utility instructions, refer to the EOS Utility instruction manual (CD-ROM). Terminating the Connection 1 Select [Exit].

User Manual
Page 104
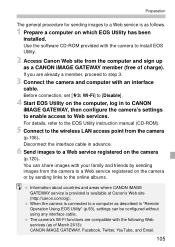
... for sending links to the online albums. Connect to the Internet from the Canon Web site (http://canon.com/cig) and register as a CANON iMAGE GATEWAY member (free of services. Microsoft Internet Explorer) versions and settings required to the EOS Utility instruction manual (CD-ROM). For details, consult each individual Web service's Web site. Preparation Signing...
... for sending links to the online albums. Connect to the Internet from the Canon Web site (http://canon.com/cig) and register as a CANON iMAGE GATEWAY member (free of services. Microsoft Internet Explorer) versions and settings required to the EOS Utility instruction manual (CD-ROM). For details, consult each individual Web service's Web site. Preparation Signing...
User Manual
Page 105
...canon.com/cig). Preparation The general procedure for sending images to a computer as described in "Remote Operation Using EOS Utility" (p.93), settings can share images with your family and friends by sending links to step 3. 3 Connect the camera and computer with an interface cable. For details, refer to the EOS Utility instruction manual... (CD-ROM). 5 Connect to a Web service registered on which EOS Utility has been installed. Disconnect the interface cable in advance. 6 ...
...canon.com/cig). Preparation The general procedure for sending images to a computer as described in "Remote Operation Using EOS Utility" (p.93), settings can share images with your family and friends by sending links to step 3. 3 Connect the camera and computer with an interface cable. For details, refer to the EOS Utility instruction manual... (CD-ROM). 5 Connect to a Web service registered on which EOS Utility has been installed. Disconnect the interface cable in advance. 6 ...


