
Instruction Manual
Page 20
... selected on the camera being sent or received. To transfer other operations can select up to send images, image transfer is stopped so that the battery is started during the process. If playback or shooting operation is adequately charged so it if necessary. 5 Send the images. When sending a large number of...
... selected on the camera being sent or received. To transfer other operations can select up to send images, image transfer is stopped so that the battery is started during the process. If playback or shooting operation is adequately charged so it if necessary. 5 Send the images. When sending a large number of...

User Manual
Page 24
... shooting cannot be sent. You can be terminated. To transfer other operations can select up to send images, image transfer is stopped so that the battery is displayed. When sending a large number of images or large files (total size), make sure that shooting and other images, repeat steps 1 to display the...
... shooting cannot be sent. You can be terminated. To transfer other operations can select up to send images, image transfer is stopped so that the battery is displayed. When sending a large number of images or large files (total size), make sure that shooting and other images, repeat steps 1 to display the...

User Manual
Page 123
... the images. Press the key to a Web Service 4 Reduce the image size. When sending a large number of images or large files, make sure that the battery is started during the process. Sending Images to select [Send], then press . When YouTube is selected as the destination, [Resize images to send] is displayed...
... the images. Press the key to a Web Service 4 Reduce the image size. When sending a large number of images or large files, make sure that the battery is started during the process. Sending Images to select [Send], then press . When YouTube is selected as the destination, [Resize images to send] is displayed...
User Manual
Page 160
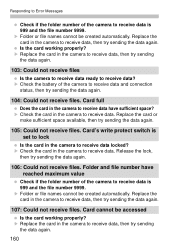
X Folder or file names cannot be created automatically. Is the card working properly? X Check the battery of the camera to receive data is 999 and the file number 9999. Card's write protect switch is 999 and the file number 9999. X Check ...
X Folder or file names cannot be created automatically. Is the card working properly? X Check the battery of the camera to receive data is 999 and the file number 9999. Card's write protect switch is 999 and the file number 9999. X Check ...
Basic User Manual
Page 4
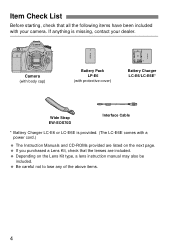
..., a lens instruction manual may also be included. Depending on the next page. Camera (with body cap) Battery Pack LP-E6 (with protective cover) Battery Charger LC-E6/LC-E6E* Wide Strap EW-EOS70D Interface Cable * Battery Charger LC-E6 or LC-E6E is missing, contact your camera. If anything is provided. (The LC...
..., a lens instruction manual may also be included. Depending on the next page. Camera (with body cap) Battery Pack LP-E6 (with protective cover) Battery Charger LC-E6/LC-E6E* Wide Strap EW-EOS70D Interface Cable * Battery Charger LC-E6 or LC-E6E is missing, contact your camera. If anything is provided. (The LC...

Basic User Manual
Page 6
To charge the battery, see page 24. 2 Insert a card (p.27). With the card's label facing toward the back of the same color. 4 Set the lens focus mode switch to (p.... release button at the center. All the necessary camera settings will be set the Mode Dial to , then set automatically. Quick Start Guide 1 Insert the battery (p.26). Align the lens' white or red mount index with the camera's mount index of the camera, insert it into the card slot. 3 White index...
To charge the battery, see page 24. 2 Insert a card (p.27). With the card's label facing toward the back of the same color. 4 Set the lens focus mode switch to (p.... release button at the center. All the necessary camera settings will be set the Mode Dial to , then set automatically. Quick Start Guide 1 Insert the battery (p.26). Align the lens' white or red mount index with the camera's mount index of the camera, insert it into the card slot. 3 White index...

Basic User Manual
Page 10
... and CD-ROMs 5 Quick Start Guide 6 Conventions Used in this Manual 8 Chapters 9 Handling Precautions 14 Nomenclature 16 1 Getting Started 23 Charging the Battery 24 Installing and Removing the Battery 26 Installing and Removing the Card 27 Using the LCD Monitor 30 Turning on the Power 31 Setting the Date, Time, and Zone...
... and CD-ROMs 5 Quick Start Guide 6 Conventions Used in this Manual 8 Chapters 9 Handling Precautions 14 Nomenclature 16 1 Getting Started 23 Charging the Battery 24 Installing and Removing the Battery 26 Installing and Removing the Card 27 Using the LCD Monitor 30 Turning on the Power 31 Setting the Date, Time, and Zone...
Basic User Manual
Page 14
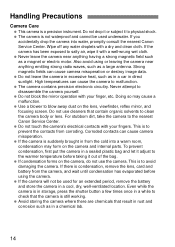
...is still working. To prevent condensation, first put the camera in direct sunlight. Do not drop it or subject it to the nearest Canon Service Center. Strong magnetic fields can cause camera misoperation. If there is a precision instrument. Avoid storing the camera where there are chemicals...mirror, and focusing screen. Also avoid using the camera. Handling Precautions Camera Care This camera is condensation, remove the lens, card and battery from the camera, and wait until condensation has evaporated before taking it out of the bag. If the camera has been exposed to ...
...is still working. To prevent condensation, first put the camera in direct sunlight. Do not drop it or subject it to the nearest Canon Service Center. Strong magnetic fields can cause camera misoperation. If there is a precision instrument. Avoid storing the camera where there are chemicals...mirror, and focusing screen. Also avoid using the camera. Handling Precautions Camera Care This camera is condensation, remove the lens, card and battery from the camera, and wait until condensation has evaporated before taking it out of the bag. If the camera has been exposed to ...
Basic User Manual
Page 16
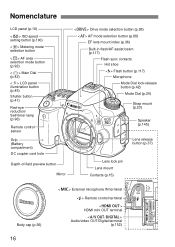
... mode button (p.92) Main Dial (p.42) LCD panel illumination button (p.45) Shutter button (p.41) Red-eye reduction/ Self-timer lamp (p.96) Remote control sensor Grip (Battery compartment) DC coupler cord hole Depth-of-field preview button Mirror Drive mode selection button (p.95) AF mode selection button (p.88) EF lens mount index...
... mode button (p.92) Main Dial (p.42) LCD panel illumination button (p.45) Shutter button (p.41) Red-eye reduction/ Self-timer lamp (p.96) Remote control sensor Grip (Battery compartment) DC coupler cord hole Depth-of-field preview button Mirror Drive mode selection button (p.95) AF mode selection button (p.88) EF lens mount index...

Basic User Manual
Page 17
... lock button/ Index/Reduce button (p.116/141, 142) AF point selection/ Magnify button (p.93/142) Access lamp (p.29) Strap mount (p.23) Card slot cover (p.27) Battery compartment cover release lever (p.26) Battery compartment cover (p.26) Quick Control Dial (p.43) Multi function lock switch (p.44) Setting button (p.48) Card slot (p.27) 17
... lock button/ Index/Reduce button (p.116/141, 142) AF point selection/ Magnify button (p.93/142) Access lamp (p.29) Strap mount (p.23) Card slot cover (p.27) Battery compartment cover release lever (p.26) Battery compartment cover (p.26) Quick Control Dial (p.43) Multi function lock switch (p.44) Setting button (p.48) Card slot (p.27) 17

Basic User Manual
Page 18
... Evaluative metering w Partial metering r Spot metering e Center-weighted average metering Multi Shot Noise Reduction (p.104) HDR shooting Wi-Fi function* 1 2 Battery check (p.32) Multiple-exposure shooting Shutter speed FE lock (FEL) Busy (buSY) Built-in flash recycling (buSY) Multi function lock warning (L) No... level indicator Exposure compensation amount (p.114) AEB range (p.115) Aperture AF point selection ([ - - - ] AF, SEL [ ], SEL AF) * The EOS 70D (N) does not have the Wi-Fi function (Not Displayed). * The display will show only the settings currently applied. 18
... Evaluative metering w Partial metering r Spot metering e Center-weighted average metering Multi Shot Noise Reduction (p.104) HDR shooting Wi-Fi function* 1 2 Battery check (p.32) Multiple-exposure shooting Shutter speed FE lock (FEL) Busy (buSY) Built-in flash recycling (buSY) Multi function lock warning (L) No... level indicator Exposure compensation amount (p.114) AEB range (p.115) Aperture AF point selection ([ - - - ] AF, SEL [ ], SEL AF) * The EOS 70D (N) does not have the Wi-Fi function (Not Displayed). * The display will show only the settings currently applied. 18

Basic User Manual
Page 19
... points (p.91) Focusing screen Nomenclature Zone AF (Manual zone selection) (p.91) 19-point automatic selection AF (p.91) AF points (p.91) Grid (p.58) Electronic level (p.60) Battery check (p.32) AE lock (p.116) / AEB in-progress (p.115) Flash-ready (p.117) Improper FE lock warning FE lock / FEB in flash recycling (buSY) AF point...
... points (p.91) Focusing screen Nomenclature Zone AF (Manual zone selection) (p.91) 19-point automatic selection AF (p.91) AF points (p.91) Grid (p.58) Electronic level (p.60) Battery check (p.32) AE lock (p.116) / AEB in-progress (p.115) Flash-ready (p.117) Improper FE lock warning FE lock / FEB in flash recycling (buSY) AF point...
Basic User Manual
Page 22
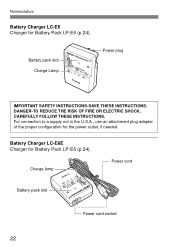
DANGER-TO REDUCE THE RISK OF FIRE OR ELECTRIC SHOCK, CAREFULLY FOLLOW THESE INSTRUCTIONS. For connection to a supply not in the U.S.A., use an attachment plug adapter of the proper configuration for Battery Pack LP-E6 (p.24). Battery Charger LC-E6E Charger for the power outlet, if needed. Charge lamp Power cord Battery pack slot Power cord socket 22 Nomenclature Battery Charger LC-E6 Charger for Battery Pack LP-E6 (p.24). Battery pack slot Charge Lamp Power plug IMPORTANT SAFETY INSTRUCTIONS-SAVE THESE INSTRUCTIONS.
DANGER-TO REDUCE THE RISK OF FIRE OR ELECTRIC SHOCK, CAREFULLY FOLLOW THESE INSTRUCTIONS. For connection to a supply not in the U.S.A., use an attachment plug adapter of the proper configuration for Battery Pack LP-E6 (p.24). Battery Charger LC-E6E Charger for the power outlet, if needed. Charge lamp Power cord Battery pack slot Power cord socket 22 Nomenclature Battery Charger LC-E6 Charger for Battery Pack LP-E6 (p.24). Battery pack slot Charge Lamp Power plug IMPORTANT SAFETY INSTRUCTIONS-SAVE THESE INSTRUCTIONS.

Basic User Manual
Page 24
...shown in low temperatures (5°C - 10°C / 41°F - 50°F) will vary greatly depending on the ambient temperature and the battery's remaining capacity. Charge Level 0-49% 50-74% 75% or higher Fully charged Color Orange Green Charge Lamp Display Blinks once per second Blinks...twice per second Blinks three times per second Lights up It takes approx. 2.5 hours to recharge the battery will take longer (up to the charger. The time required to fully recharge a completely exhausted battery at room temperature (23°C / 73°F). For LC-E6E Connect the power cord to ...
...shown in low temperatures (5°C - 10°C / 41°F - 50°F) will vary greatly depending on the ambient temperature and the battery's remaining capacity. Charge Level 0-49% 50-74% 75% or higher Fully charged Color Orange Green Charge Lamp Display Blinks once per second Blinks...twice per second Blinks three times per second Lights up It takes approx. 2.5 hours to recharge the battery will take longer (up to the charger. The time required to fully recharge a completely exhausted battery at room temperature (23°C / 73°F). For LC-E6E Connect the power cord to ...
Basic User Manual
Page 25
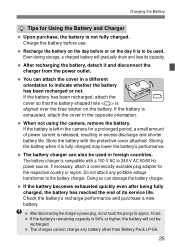
... reached the end of power current is not fully charged. The battery charger is compatible with the protective cover attached. Check the battery's recharge performance and purchase a new battery. If the battery's remaining capacity is fully charged may lower the battery's performance. Charge the battery before or on the day it is left in the camera...
... reached the end of power current is not fully charged. The battery charger is compatible with the protective cover attached. Check the battery's recharge performance and purchase a new battery. If the battery's remaining capacity is fully charged may lower the battery's performance. Charge the battery before or on the day it is left in the camera...
Basic User Manual
Page 26
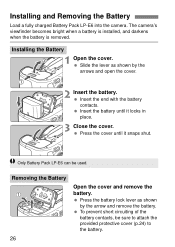
... open the cover. 2 Insert the battery. Removing the Battery 26 Open the cover and remove the battery. Press the battery lock lever as shown by the arrow and remove the battery. Installing and Removing the Battery Load a fully charged Battery Pack LP-E6 into the camera. Installing the Battery 1 Open the cover. Only Battery Pack LP-E6 can be...
... open the cover. 2 Insert the battery. Removing the Battery 26 Open the cover and remove the battery. Press the battery lock lever as shown by the arrow and remove the battery. Installing and Removing the Battery Load a fully charged Battery Pack LP-E6 into the camera. Installing the Battery 1 Open the cover. Only Battery Pack LP-E6 can be...

Basic User Manual
Page 29
..., the image number may then return to normal. If you can damage the image data, card, or camera. • Removing the card. • Removing the battery. • Shaking or banging the camera around. Also, never do any of the following while the access lamp is displayed on the card to or...
..., the image number may then return to normal. If you can damage the image data, card, or camera. • Removing the card. • Removing the battery. • Shaking or banging the camera around. Also, never do any of the following while the access lamp is displayed on the card to or...
Basic User Manual
Page 31
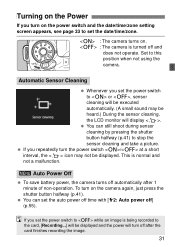
... will display . If you set the date/time/zone. : The camera turns on. : The camera is normal and not a malfunction. 3 Auto Power Off To save battery power, the camera turns off ] (p.55). This is turned off after 1 minute of non-operation. If you repeatedly turn off and does not operate. To...
... will display . If you set the date/time/zone. : The camera turns on. : The camera is normal and not a malfunction. 3 Auto Power Off To save battery power, the camera turns off ] (p.55). This is turned off after 1 minute of non-operation. If you repeatedly turn off and does not operate. To...
Basic User Manual
Page 32
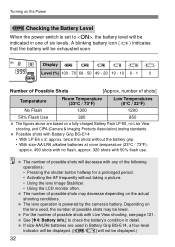
...Stabilizer. • Using the LCD monitor often. The number of possible shots will not be exhausted soon. Depending on the lens used in Battery Grip BG-E14, a four-level indicator will be displayed. ([x/m] will decrease with any of six levels. The lens operation is set to ... may decrease depending on the actual shooting conditions. For the number of possible shots may be indicated in detail. The number of possible shots with Battery Grip BG-E14 • With LP-E6 x 2: approx. number of shots] Temperature Room Temperature (23°C / 73°F) Low Temperatures (0°C / 32...
...Stabilizer. • Using the LCD monitor often. The number of possible shots will not be exhausted soon. Depending on the lens used in Battery Grip BG-E14, a four-level indicator will be displayed. ([x/m] will decrease with any of six levels. The lens operation is set to ... may decrease depending on the actual shooting conditions. For the number of possible shots may be indicated in detail. The number of possible shots with Battery Grip BG-E14 • With LP-E6 x 2: approx. number of shots] Temperature Room Temperature (23°C / 73°F) Low Temperatures (0°C / 32...

Basic User Manual
Page 34
... displayed. Press the key to select the number. Press the key to [Z], the time set . 34 If you store the camera without the battery or if the camera's battery becomes exhausted, the date/time/zone may be set the time zone and date/time again. 3 Setting the Date, Time, and Zone 4 Set...
... displayed. Press the key to select the number. Press the key to [Z], the time set . 34 If you store the camera without the battery or if the camera's battery becomes exhausted, the date/time/zone may be set the time zone and date/time again. 3 Setting the Date, Time, and Zone 4 Set...


