
Basic Guide
Page 8
... 86 Checking the Toner Level 86 Replacing Toner Cartridges 87 Manage Using the Report and List Functions 90 Configure Settings Using the Remote UI 91 Troubleshooting Clear Jams 94 Resolve a Displayed Message 105 Resolve an Error Code 106 Improve Output Quality 107 Resolve a Problem 108 FAQ 109 If a Power Failure Occurs...
... 86 Checking the Toner Level 86 Replacing Toner Cartridges 87 Manage Using the Report and List Functions 90 Configure Settings Using the Remote UI 91 Troubleshooting Clear Jams 94 Resolve a Displayed Message 105 Resolve an Error Code 106 Improve Output Quality 107 Resolve a Problem 108 FAQ 109 If a Power Failure Occurs...

Basic Guide
Page 93
Clear Jams 94 Resolve a Displayed Message 105 Resolve an Error Code 106 Improve Output Quality 107 Resolve a Problem 108 93 Troubleshooting This chapter describes how to clear paper jams and offers solutions to problems you may be having.
Clear Jams 94 Resolve a Displayed Message 105 Resolve an Error Code 106 Improve Output Quality 107 Resolve a Problem 108 93 Troubleshooting This chapter describes how to clear paper jams and offers solutions to problems you may be having.

Basic Guide
Page 95
Clearing Document Jams in the Feeder (MF8580Cdw) After removing any documents placed in the feeder, follow the procedure below to remove jammed documents. 1 Open the feeder cover. 2 Move the lever to align ... machine. • Make sure that the paper meets the requirements for use (→ p.20). • Make sure that you have removed all of the machine. Troubleshooting 95
Clearing Document Jams in the Feeder (MF8580Cdw) After removing any documents placed in the feeder, follow the procedure below to remove jammed documents. 1 Open the feeder cover. 2 Move the lever to align ... machine. • Make sure that the paper meets the requirements for use (→ p.20). • Make sure that you have removed all of the machine. Troubleshooting 95

Basic Guide
Page 97
Clearing Paper Jams in the Front Side (MF8580Cdw) 1 Step Remove the jammed paper inside. 1 Open the front cover. 2 Lift the operation panel. 3 Gently pull out the paper. 2 Step Lower the operation panel and the front cover. 97 Troubleshooting
Clearing Paper Jams in the Front Side (MF8580Cdw) 1 Step Remove the jammed paper inside. 1 Open the front cover. 2 Lift the operation panel. 3 Gently pull out the paper. 2 Step Lower the operation panel and the front cover. 97 Troubleshooting

Basic Guide
Page 99
Lift the operation panel ▶ Gently pull out the paper. 2 Step Lower the operation panel. 3 Step Remove the jammed paper in the front side. Step Close the rear cover. 99 Troubleshooting Open the rear cover ▶ Gently pull out the paper. Clearing Paper Jams in the Front and Back Sides (MF8280Cw) 1 Step Remove the jammed paper in the back side.
Lift the operation panel ▶ Gently pull out the paper. 2 Step Lower the operation panel. 3 Step Remove the jammed paper in the front side. Step Close the rear cover. 99 Troubleshooting Open the rear cover ▶ Gently pull out the paper. Clearing Paper Jams in the Front and Back Sides (MF8280Cw) 1 Step Remove the jammed paper in the back side.

Basic Guide
Page 101
Do not forcibly remove jammed paper from the machine. If the jammed paper cannot be removed easily, proceed to the next step. 1 Gently pull out the paper. 2 Close the tray. 3 Step Remove the jammed document inside the tray. 1 Hold the paper drawer with both hands, and pull it out. 2 Hold the green knobs, and push down this part. 101 Troubleshooting Clearing Paper Jams in the Manual Feed Slot (MF8580Cdw) 1 Step Remove the paper that is loaded in the tray. 2 Step Remove the jammed paper in the tray.
Do not forcibly remove jammed paper from the machine. If the jammed paper cannot be removed easily, proceed to the next step. 1 Gently pull out the paper. 2 Close the tray. 3 Step Remove the jammed document inside the tray. 1 Hold the paper drawer with both hands, and pull it out. 2 Hold the green knobs, and push down this part. 101 Troubleshooting Clearing Paper Jams in the Manual Feed Slot (MF8580Cdw) 1 Step Remove the paper that is loaded in the tray. 2 Step Remove the jammed paper in the tray.

Basic Guide
Page 103
Paper Jams in the Manual Feed Slot (MF8280Cw) 1 Step Hold the paper drawer with both hands, and pull it out. 2 Step Remove the jammed document inside the manual feed slot. 1 Open the cover. 2 Hold the green knobs, and push down this part. 3 Gently pull out the paper. 103 Troubleshooting
Paper Jams in the Manual Feed Slot (MF8280Cw) 1 Step Hold the paper drawer with both hands, and pull it out. 2 Step Remove the jammed document inside the manual feed slot. 1 Open the cover. 2 Hold the green knobs, and push down this part. 3 Gently pull out the paper. 103 Troubleshooting
Basic Guide
Page 105
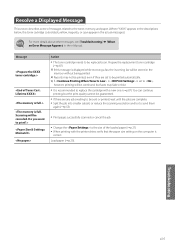
..., and paper. (Where "XXXX" appears in the descriptions below, the toner cartridge colors black, yellow, magenta, or cyan appear in the actual messages.) For more details about other messages, see [Troubleshooting] [When an Error Message Appears] in the e-Manual. Load paper (→...;p.20). Troubleshooting 105 Reports may fade or blur. • It is displayed while receiving a fax, the ...
..., and paper. (Where "XXXX" appears in the descriptions below, the toner cartridge colors black, yellow, magenta, or cyan appear in the actual messages.) For more details about other messages, see [Troubleshooting] [When an Error Message Appears] in the e-Manual. Load paper (→...;p.20). Troubleshooting 105 Reports may fade or blur. • It is displayed while receiving a fax, the ...

Basic Guide
Page 106
... the sender to the fax number. No pause was added to resolve the problem. Contact your administrator for more details about other error codes, see [Troubleshooting] [When an Error Code Appears] in the e-Manual. For details, see [Basic Operations] [Registering in the Address Book] or [Faxing] [Sending and...
... the sender to the fax number. No pause was added to resolve the problem. Contact your administrator for more details about other error codes, see [Troubleshooting] [When an Error Code Appears] in the e-Manual. For details, see [Basic Operations] [Registering in the Address Book] or [Faxing] [Sending and...

Basic Guide
Page 107
... Provide a margin around the data. The bottom edge of spattering toner appear around the text or as patterns. Example Paper creases. Troubleshooting 107 The printed paper has vertical streaks. Provide a margin around the data. Symptom Paper curls. Smudge marks of paper has smudge...; Verify that the appropriate paper is being used (→p.20). • Print a test page with the following actions, see [Troubleshooting] [Printing Results Are Not Satisfactory] in the e-Manual. Improve Output Quality Follow the recommended actions for each symptom to improve ...
... Provide a margin around the data. The bottom edge of spattering toner appear around the text or as patterns. Example Paper creases. Troubleshooting 107 The printed paper has vertical streaks. Provide a margin around the data. Symptom Paper curls. Smudge marks of paper has smudge...; Verify that the appropriate paper is being used (→p.20). • Print a test page with the following actions, see [Troubleshooting] [Printing Results Are Not Satisfactory] in the e-Manual. Improve Output Quality Follow the recommended actions for each symptom to improve ...

Basic Guide
Page 108
... makes strange noises or emits smoke or odors: Turn OFF the machine immediately, disconnect the power cord, and contact the Canon Customer Care Center. If you cannot solve the problem See [Troubleshooting] in Sleep mode (→ p.28). • If the [Energy Saver] key blinks, press it to repair the...the support page of problem • Steps you cannot solve the problem Contact your problem. Do not attempt to resolve your local authorized Canon dealer or the Canon help line for more than 10 seconds, and then turn it may void the limited warranty. 1 Verify that the cables are finished....
... makes strange noises or emits smoke or odors: Turn OFF the machine immediately, disconnect the power cord, and contact the Canon Customer Care Center. If you cannot solve the problem See [Troubleshooting] in Sleep mode (→ p.28). • If the [Energy Saver] key blinks, press it to repair the...the support page of problem • Steps you cannot solve the problem Contact your problem. Do not attempt to resolve your local authorized Canon dealer or the Canon help line for more than 10 seconds, and then turn it may void the limited warranty. 1 Verify that the cables are finished....

Basic Guide
Page 109
... rings, see the external telephone's manual. For details, see the answering machine's manual. Q Fax When an answering machine is set to activate after a few rings. Troubleshooting 109 How do I increase the number of rings when receiving a voice call ? └ A Set the fax receive mode to , and then set to use the...
... rings, see the external telephone's manual. For details, see the answering machine's manual. Q Fax When an answering machine is set to activate after a few rings. Troubleshooting 109 How do I increase the number of rings when receiving a voice call ? └ A Set the fax receive mode to , and then set to use the...

Basic Guide
Page 111
... file when scanning with MF Toolbox. Scan the documents. 111 From the MF Toolbox screen, click [Browse]. 2. From the PDF mode screen of multiple pages, 1. Troubleshooting 2. Q Can I scan multiple images and save as a single PDF file? └ A Yes, you can save multiple images as Type]. To change the folder to save...
... file when scanning with MF Toolbox. Scan the documents. 111 From the MF Toolbox screen, click [Browse]. 2. From the PDF mode screen of multiple pages, 1. Troubleshooting 2. Q Can I scan multiple images and save as a single PDF file? └ A Yes, you can save multiple images as Type]. To change the folder to save...
Wireless Guide
Page 1
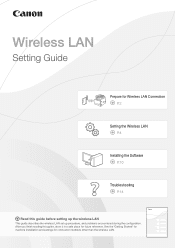
Wireless LAN Setting Guide Prepare for future reference. After you finish reading this guide, store it in a safe place for Wireless LAN Connection P.2 Setting the Wireless LAN P.4 Installing the Software P.10 Troubleshooting P.14 Read this guide before setting up the wireless LAN This guide describes the wireless LAN set up procedure, and problems encountered during the configuration. See the "Getting Started" for machine installation and settings for connection methods other than the wireless LAN. ˛
Wireless LAN Setting Guide Prepare for future reference. After you finish reading this guide, store it in a safe place for Wireless LAN Connection P.2 Setting the Wireless LAN P.4 Installing the Software P.10 Troubleshooting P.14 Read this guide before setting up the wireless LAN This guide describes the wireless LAN set up procedure, and problems encountered during the configuration. See the "Getting Started" for machine installation and settings for connection methods other than the wireless LAN. ˛

Wireless Guide
Page 3
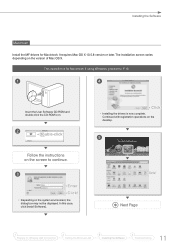
... manual included in the Getting Started Proceed to step 4 on the wireless router. Prepare for Wireless LAN Connection Setting the Wireless LAN Installing the Software Troubleshooting 3 Select the method to set up the wireless LAN from "Connecting the Power Cord" in the product, or contact the product manufacturer. In this case...
... manual included in the Getting Started Proceed to step 4 on the wireless router. Prepare for Wireless LAN Connection Setting the Wireless LAN Installing the Software Troubleshooting 3 Select the method to set up the wireless LAN from "Connecting the Power Cord" in the product, or contact the product manufacturer. In this case...

Wireless Guide
Page 5
... the network connection: You can check if the machine is properly connected to P. 9 1 2 3 4 Prepare for Wireless LAN Connection Setting the Wireless LAN Installing the Software Troubleshooting 5 If the access point cannot be detected even after the connection is completed. Setting the Wireless LAN • You should press the WPS button...
... the network connection: You can check if the machine is properly connected to P. 9 1 2 3 4 Prepare for Wireless LAN Connection Setting the Wireless LAN Installing the Software Troubleshooting 5 If the access point cannot be detected even after the connection is completed. Setting the Wireless LAN • You should press the WPS button...

Wireless Guide
Page 7
... the strongest signal). If no SSID has been found: "Checking SSID or Network Key for Wireless LAN Connection Setting the Wireless LAN Installing the Software Troubleshooting 7 Setting the Wireless LAN 5 8 • Press [▲] or [▼] to highlight . 6 9 • Press [▲] or [▼] to highlight the access point you wrote down. •...
... the strongest signal). If no SSID has been found: "Checking SSID or Network Key for Wireless LAN Connection Setting the Wireless LAN Installing the Software Troubleshooting 7 Setting the Wireless LAN 5 8 • Press [▲] or [▼] to highlight . 6 9 • Press [▲] or [▼] to highlight the access point you wrote down. •...

Wireless Guide
Page 9
Proceed to highlight . Connection is completed when the screen is not displayed." (P.17) 1 2 3 4 Prepare for Wireless LAN Connection Setting the Wireless LAN Installing the Software Troubleshooting 9 Start a Web browser from the computer 7 • Enter [http:///] in the address field, and then press [Enter] on your keyboard. 8 4 • Press [▲] or [▼] ...
Proceed to highlight . Connection is completed when the screen is not displayed." (P.17) 1 2 3 4 Prepare for Wireless LAN Connection Setting the Wireless LAN Installing the Software Troubleshooting 9 Start a Web browser from the computer 7 • Enter [http:///] in the address field, and then press [Enter] on your keyboard. 8 4 • Press [▲] or [▼] ...
Wireless Guide
Page 11
...! • Depending on the desktop. ˝ 5 ◀ Click! ◀ Click! ˝ Next Page 1 Prepare for Wireless LAN Connection 2 Setting the Wireless LAN 3 Installing the Software 4 Troubleshooting 11 In this case, click [Install Software]. ˝ ◀ Click! • Installing the drivers is for Macintosh. Continued with registration operations on the system environment...
...! • Depending on the desktop. ˝ 5 ◀ Click! ◀ Click! ˝ Next Page 1 Prepare for Wireless LAN Connection 2 Setting the Wireless LAN 3 Installing the Software 4 Troubleshooting 11 In this case, click [Install Software]. ˝ ◀ Click! • Installing the drivers is for Macintosh. Continued with registration operations on the system environment...

Wireless Guide
Page 13
Computer connection via the wired LAN is added. Installing the Software ◀ Click! • If you are using Mac OS X 10.5.x, select [Select a driver to use] and the corresponding driver from [Print Using], and then click [Add]. ˝ 8 ◀ 2 Click! ◀ Check that this machine is now complete. 1 Prepare for Wireless LAN Connection 2 Setting the Wireless LAN 3 Installing the Software 4 Troubleshooting 13
Computer connection via the wired LAN is added. Installing the Software ◀ Click! • If you are using Mac OS X 10.5.x, select [Select a driver to use] and the corresponding driver from [Print Using], and then click [Add]. ˝ 8 ◀ 2 Click! ◀ Check that this machine is now complete. 1 Prepare for Wireless LAN Connection 2 Setting the Wireless LAN 3 Installing the Software 4 Troubleshooting 13


