CanoScan D646U Toolbox2.2 for Win Guide
Page 2
Table of Contents About ScanGear Toolbox CS 4 Installing ScanGear Toolbox 5 System Requirements 5 Installing/Uninstalling 5 Starting ScanGear Toolbox 9 Closing ScanGear Toolbox 12 Settings for Each Function 13 Linkable Drivers and Programs 13 Tab Settings 15 Easy Acquire 22 What is Easy Acquire 22 How to specify Easy Acquire 22 Scanning Procedures 23 Appendices 24 ScanGear Toolbox CS Settings Categories/ Settings Chart 24 Index ...26 2
Table of Contents About ScanGear Toolbox CS 4 Installing ScanGear Toolbox 5 System Requirements 5 Installing/Uninstalling 5 Starting ScanGear Toolbox 9 Closing ScanGear Toolbox 12 Settings for Each Function 13 Linkable Drivers and Programs 13 Tab Settings 15 Easy Acquire 22 What is Easy Acquire 22 How to specify Easy Acquire 22 Scanning Procedures 23 Appendices 24 ScanGear Toolbox CS Settings Categories/ Settings Chart 24 Index ...26 2
CanoScan D646U Toolbox2.2 for Win Guide
Page 5
... that you obtain the ScanGear Toolbox through the download service, refer to install/uninstall the software. Before installing ScanGear Toolbox, the scanner driver and the printer driver are those with using the CanoScan Setup Utility CD-ROM bundled with the service. Installing ScanGear Toolbox System Requirements OS: Windows Millennium Edition (Me), Windows 98, Windows...
... that you obtain the ScanGear Toolbox through the download service, refer to install/uninstall the software. Before installing ScanGear Toolbox, the scanner driver and the printer driver are those with using the CanoScan Setup Utility CD-ROM bundled with the service. Installing ScanGear Toolbox System Requirements OS: Windows Millennium Edition (Me), Windows 98, Windows...
CanoScan D646U Toolbox2.2 for Win Guide
Page 6
... will display. Follow the on-screen instructions to the Windows Start menu. 6 In this window, install ScanGear Toolbox CS and other application software (PhotoStudio 2000, OmniPage Pro) simultaneously. 4. Click the [Install the Software] button in the drive. 2. Place the CanoScan Setup Utility CD-ROM in the CD-ROM's menu window. 3. Click the [Start...
... will display. Follow the on-screen instructions to the Windows Start menu. 6 In this window, install ScanGear Toolbox CS and other application software (PhotoStudio 2000, OmniPage Pro) simultaneously. 4. Click the [Install the Software] button in the drive. 2. Place the CanoScan Setup Utility CD-ROM in the CD-ROM's menu window. 3. Click the [Start...
CanoScan D646U Toolbox2.2 for Win Guide
Page 10
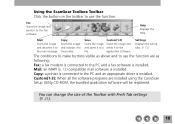
...connected to the application software. Help Displays the Help. Custom(1-3) Scans the image and sends it to the PC and a fax software is installed. Settings Displays the seting tabs. (P. 15) The conditions to make buttons visible as above and to use the function. You can change...the PC and an appropriate driver is installed. Mail: an MAPI (p.13) compatible mail software is connected to the mail message. Using the ScanGear Toolbox Toolbar Click the button on the toolbar to use the function are installed using the CanoScan Setup Utility CD-ROM, the bundled application...
...connected to the application software. Help Displays the Help. Custom(1-3) Scans the image and sends it to the PC and a fax software is installed. Settings Displays the seting tabs. (P. 15) The conditions to make buttons visible as above and to use the function. You can change...the PC and an appropriate driver is installed. Mail: an MAPI (p.13) compatible mail software is connected to the mail message. Using the ScanGear Toolbox Toolbar Click the button on the toolbar to use the function are installed using the CanoScan Setup Utility CD-ROM, the bundled application...
CanoScan D646U Toolbox2.2 for Win Guide
Page 14
... customizable buttons in the [Printers] folder, found by clicking the Windows [Start] button and selecting [Settings] and [Printers]. When you make installations using CanoScan Setup Utility CD-ROM, the application softwares installed simultaneously are connected to your computer, ScanGear Toolbox can switch between them. If two or more printers are automatically registered to...
... customizable buttons in the [Printers] folder, found by clicking the Windows [Start] button and selecting [Settings] and [Printers]. When you make installations using CanoScan Setup Utility CD-ROM, the application softwares installed simultaneously are connected to your computer, ScanGear Toolbox can switch between them. If two or more printers are automatically registered to...
CanoScan D646U Toolbox2.2 for Win Guide
Page 20
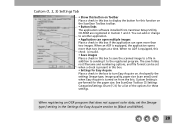
...to [Black and White]. 20 When no ADF is equipped, this check is turned on the ScanGear Toolbox toolbar. • Button links The application software installed from the lists. See ScanGear Toolbox CS Settings Categories/Settings Chart (P.24) for a list of the options for the paper size. Custom (1, 2, 3)... Settings Tab • Show this button on Toolbar Place a check in this box to display the button for this function on from CanoScan Setup Utilitiy CD-ROM are registered in Custom 1 and 2. When an ADF is present in this box. • Settings for Easy Acquire Place a ...
...to [Black and White]. 20 When no ADF is equipped, this check is turned on the ScanGear Toolbox toolbar. • Button links The application software installed from the lists. See ScanGear Toolbox CS Settings Categories/Settings Chart (P.24) for a list of the options for the paper size. Custom (1, 2, 3)... Settings Tab • Show this button on Toolbar Place a check in this box to display the button for this function on from CanoScan Setup Utilitiy CD-ROM are registered in Custom 1 and 2. When an ADF is present in this box. • Settings for Easy Acquire Place a ...

CanoScan D646U Toolbox2.2 for Win Guide
Page 26
Index Closing 12 Copy Setting Tab 18 Custom 1-3 Setting Tab 20 Easy Acquire 22 Fax Setting Tab 16 Installing 6 Linkable Drivers and Programs 13 Mail Setting Tab 17 MAPI 13 OCR program 20 Prefs Tab 21 Progress Dialog 23 Save Setting Tab 19 Settings Categories/Chart 24 Shortcut Icon 11 Starting 9 System Requirements 5 Tab Settings 15 Toolbar 10 Uninstalling 7 26
Index Closing 12 Copy Setting Tab 18 Custom 1-3 Setting Tab 20 Easy Acquire 22 Fax Setting Tab 16 Installing 6 Linkable Drivers and Programs 13 Mail Setting Tab 17 MAPI 13 OCR program 20 Prefs Tab 21 Progress Dialog 23 Save Setting Tab 19 Settings Categories/Chart 24 Shortcut Icon 11 Starting 9 System Requirements 5 Tab Settings 15 Toolbar 10 Uninstalling 7 26
CanoScan D646U Toolbox1.3 for Mac Guide
Page 3
Table of Contents 1 Introduction ...4 About the CanoScan Toolbox ...4 Obtaining Customer Support ...4 2 Installing the CanoScan Toolbox 5 System Requirements...5 Installing the CanoScan Toolbox ...5 3 The CanoScan Toolbox Main Window 6 4 Using the Scanner Button 6 5 Selecting the Scanner ...6 6 Scanning ...7 7 Saving Scanned Images 7 8 Opening Files ...8 Opening a Stored File ...8 Opening a New Image Window ...8 ... an Image to a Catalog...20 Viewing an Image Catalog ...20 Opening a Scanned Image from the Catalog 21 14 Linking Applications to the CanoScan Toolbox 22 CanoScan Toolbox 3
Table of Contents 1 Introduction ...4 About the CanoScan Toolbox ...4 Obtaining Customer Support ...4 2 Installing the CanoScan Toolbox 5 System Requirements...5 Installing the CanoScan Toolbox ...5 3 The CanoScan Toolbox Main Window 6 4 Using the Scanner Button 6 5 Selecting the Scanner ...6 6 Scanning ...7 7 Saving Scanned Images 7 8 Opening Files ...8 Opening a Stored File ...8 Opening a New Image Window ...8 ... an Image to a Catalog...20 Viewing an Image Catalog ...20 Opening a Scanned Image from the Catalog 21 14 Linking Applications to the CanoScan Toolbox 22 CanoScan Toolbox 3
CanoScan D646U Toolbox1.3 for Mac Guide
Page 5
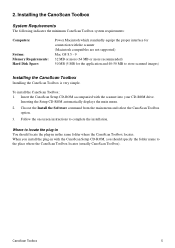
...) 50 MB (5 MB for connection with the scanner into your CD-ROM drive. To install the CanoScan Toolbox: 1. When you install the plug-in the same folder where the CanoScan Toolbox locates. Installing the CanoScan Toolbox System Requirements The following indicates the minimum CanoScan Toolbox system requirements: Computers: System: Memory Requirements: Hard Disk Space: Power Macintosh which...
...) 50 MB (5 MB for connection with the scanner into your CD-ROM drive. To install the CanoScan Toolbox: 1. When you install the plug-in the same folder where the CanoScan Toolbox locates. Installing the CanoScan Toolbox System Requirements The following indicates the minimum CanoScan Toolbox system requirements: Computers: System: Memory Requirements: Hard Disk Space: Power Macintosh which...
CanoScan D646U Toolbox1.3 for Mac Guide
Page 7
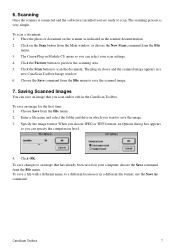
...Click on the scanner as indicated in a new CanoScan Toolbox Image window. 6. Specify the image format. CanoScan Toolbox 7 Scanning Once the scanner is connected and the software is very simple. Click the Scan button to preview the scanning area. 5. Click OK. The Canon Plug-in a different file format, use the Save... from the File menu to a different location or in Module CS opens so you can save the image. 3. 6. The scanning process is installed you want to an image that you scan and/or edit in which you are ready to scan. To save changes to save an image...
...Click on the scanner as indicated in a new CanoScan Toolbox Image window. 6. Specify the image format. CanoScan Toolbox 7 Scanning Once the scanner is connected and the software is very simple. Click the Scan button to preview the scanning area. 5. Click OK. The Canon Plug-in a different file format, use the Save... from the File menu to a different location or in Module CS opens so you can save the image. 3. 6. The scanning process is installed you want to an image that you scan and/or edit in which you are ready to scan. To save changes to save an image...
CanoScan D646U Toolbox1.3 for Mac Guide
Page 17
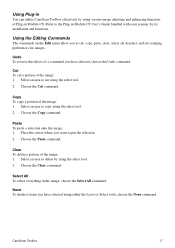
...functions of the image: 1. Cut To cut , copy, paste, clear, select all, deselect, and set scanning preferences for its installation and functions. Choose the Clear command. CanoScan Toolbox 17 Choose the Copy command. Place the cursor where you to copy using the select tool. 2. Select All To select ... command. Select an area to cut a portion of the image: 1. Refer to put the selection. 2. Using Plug-in You can utilize CanoScan Toolbox effectively by using the select tool. 2. Using the Editing Commands The commands on the Edit menu allow you want to the Plug-in the...
...functions of the image: 1. Cut To cut , copy, paste, clear, select all, deselect, and set scanning preferences for its installation and functions. Choose the Clear command. CanoScan Toolbox 17 Choose the Copy command. Place the cursor where you to copy using the select tool. 2. Select All To select ... command. Select an area to cut a portion of the image: 1. Refer to put the selection. 2. Using Plug-in You can utilize CanoScan Toolbox effectively by using the select tool. 2. Using the Editing Commands The commands on the Edit menu allow you want to the Plug-in the...
CanoScan D646U ScanGear CS-U 6.0 for Win Guide
Page 3
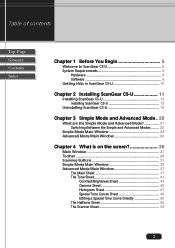
... Glossary Contents Index Chapter 1 Before You Begin 5 Welcome to ScanGear CS-U 6 System Requirements 8 Hardware 8 Software 9 Getting Help in ScanGear CS-U 10 Chapter 2 Installing ScanGear CS-U 11 Installing ScanGear CS-U 12 Installing ScanGear CS-U 13 Uninstalling ScanGear CS-U 19 Chapter 3 Simple Mode and Advanced Mode . 20 What are the Simple Mode and Advanced Mode...
... Glossary Contents Index Chapter 1 Before You Begin 5 Welcome to ScanGear CS-U 6 System Requirements 8 Hardware 8 Software 9 Getting Help in ScanGear CS-U 10 Chapter 2 Installing ScanGear CS-U 11 Installing ScanGear CS-U 12 Installing ScanGear CS-U 13 Uninstalling ScanGear CS-U 19 Chapter 3 Simple Mode and Advanced Mode . 20 What are the Simple Mode and Advanced Mode...
CanoScan D646U ScanGear CS-U 6.0 for Win Guide
Page 8
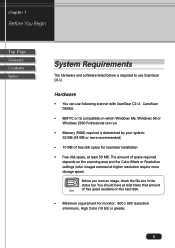
... storage space). You should have at least twice that amount Note of free space available on the hard disk. • Minimum requirement for ScanGear installation • Free disk space, at higher resolution require more recommended) • 10 MB of space required depends on the scanning area and the... Begin Top Page Glossary Contents Index System Requirements The hardware and software listed below is required to use following scanner with ScanGear CS-U: CanoScan D646U. • IBM PC or its compatible on which Windows Me, Windows 98 or Windows 2000 Professional can use ScanGear CS-U.
... storage space). You should have at least twice that amount Note of free space available on the hard disk. • Minimum requirement for ScanGear installation • Free disk space, at higher resolution require more recommended) • 10 MB of space required depends on the scanning area and the... Begin Top Page Glossary Contents Index System Requirements The hardware and software listed below is required to use following scanner with ScanGear CS-U: CanoScan D646U. • IBM PC or its compatible on which Windows Me, Windows 98 or Windows 2000 Professional can use ScanGear CS-U.
CanoScan D646U ScanGear CS-U 6.0 for Win Guide
Page 11
2 chapter Top Page Glossary Contents Index Installing ScanGear CS-U Installing ScanGear CS-U Uninstalling ScanGear CS-U 11
2 chapter Top Page Glossary Contents Index Installing ScanGear CS-U Installing ScanGear CS-U Uninstalling ScanGear CS-U 11
CanoScan D646U ScanGear CS-U 6.0 for Win Guide
Page 12
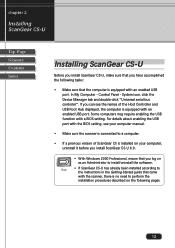
... • Make sure the scanner is connected to a computer. • If a previous version of ScanGear CS is installed on your computer, uninstall it before you install ScanGear CS-U 6.0. • With Windows 2000 Professional, ensure that you can see the names of the Host Controller and ...Started guide that the computer is equipped with an enabled USB port. In My Computer - chapter 2 Installing ScanGear CS-U Top Page Glossary Contents Index Installing ScanGear CS-U Before you install ScanGear CS-U, make sure that you have accomplished the following tasks: • Make sure that came with...
... • Make sure the scanner is connected to a computer. • If a previous version of ScanGear CS is installed on your computer, uninstall it before you install ScanGear CS-U 6.0. • With Windows 2000 Professional, ensure that you can see the names of the Host Controller and ...Started guide that the computer is equipped with an enabled USB port. In My Computer - chapter 2 Installing ScanGear CS-U Top Page Glossary Contents Index Installing ScanGear CS-U Before you install ScanGear CS-U, make sure that you have accomplished the following tasks: • Make sure that came with...
CanoScan D646U ScanGear CS-U 6.0 for Win Guide
Page 13
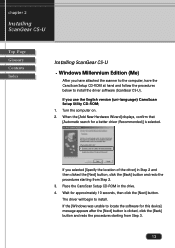
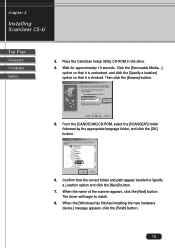
... Utility CD-ROM; 1. Place the CanoScan Setup CD-ROM in Step 2 and then clicked the [Next] button, click the [Back] button and redo the procedures starting from Step 2. 3. The driver will begin to install the driver software (ScanGear CS-U). If the [Windows was unable to locate... from Step 3. 13 Turn the computer on. 2. chapter 2 Installing ScanGear CS-U Top Page Glossary Contents Index Installing ScanGear CS-U • Windows Millennium Edition (Me) After you have attached the scanner to the computer, have the CanoScan Setup CD-ROM at hand and follow the procedures below to...
... Utility CD-ROM; 1. Place the CanoScan Setup CD-ROM in Step 2 and then clicked the [Next] button, click the [Back] button and redo the procedures starting from Step 2. 3. The driver will begin to install the driver software (ScanGear CS-U). If the [Windows was unable to locate... from Step 3. 13 Turn the computer on. 2. chapter 2 Installing ScanGear CS-U Top Page Glossary Contents Index Installing ScanGear CS-U • Windows Millennium Edition (Me) After you have attached the scanner to the computer, have the CanoScan Setup CD-ROM at hand and follow the procedures below to...
CanoScan D646U ScanGear CS-U 6.0 for Win Guide
Page 14
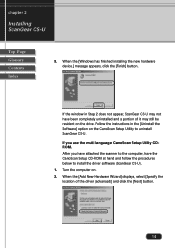
... on the drive. After you use the multi language CanoScan Setup Utility CDROM. Follow the instructions in Step 2 does not appear, ScanGear CS-U may not have the CanoScan Setup CD-ROM at hand and follow the procedures below to install the driver software (ScanGear CS-U). 1. When the ...[Windows has finished installing the new hardware device.] message appears, click the [Finish] button. When the...
... on the drive. After you use the multi language CanoScan Setup Utility CDROM. Follow the instructions in Step 2 does not appear, ScanGear CS-U may not have the CanoScan Setup CD-ROM at hand and follow the procedures below to install the driver software (ScanGear CS-U). 1. When the ...[Windows has finished installing the new hardware device.] message appears, click the [Finish] button. When the...
CanoScan D646U ScanGear CS-U 6.0 for Win Guide
Page 15
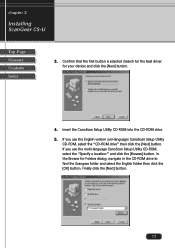
... the Specify a Location option and click the [Next] button. 7. From the [CANOSCAN] CD-ROM, select the [SCANGEAR] folder followed by the appropriate language folder, and click the [OK] button. 6. Confirm that it is checked. When the [Windows has finished installing the new hardware device.] message appears, click the [Finish] button. 15 Then...
... the Specify a Location option and click the [Next] button. 7. From the [CANOSCAN] CD-ROM, select the [SCANGEAR] folder followed by the appropriate language folder, and click the [OK] button. 6. Confirm that it is checked. When the [Windows has finished installing the new hardware device.] message appears, click the [Finish] button. 15 Then...
CanoScan D646U ScanGear CS-U 6.0 for Win Guide
Page 16
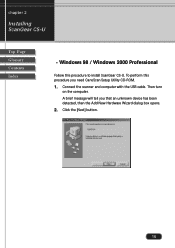
Then turn on the computer. Click the [Next] button. 16 chapter 2 Installing ScanGear CS-U Top Page Glossary Contents Index • Windows 98 / Windows 2000 Professional Follow this procedure you that an unknown device has been detected, then the Add New Hardware Wizard dialog box opens. 2. Connect the scanner and computer with the USB cable. A brief message will tell you need CanoScan Setup Utility CD-ROM. 1. To perform this procedure to install ScanGear CS-U.
Then turn on the computer. Click the [Next] button. 16 chapter 2 Installing ScanGear CS-U Top Page Glossary Contents Index • Windows 98 / Windows 2000 Professional Follow this procedure you that an unknown device has been detected, then the Add New Hardware Wizard dialog box opens. 2. Connect the scanner and computer with the USB cable. A brief message will tell you need CanoScan Setup Utility CD-ROM. 1. To perform this procedure to install ScanGear CS-U.
CanoScan D646U ScanGear CS-U 6.0 for Win Guide
Page 17
... device) and click the [Next] button. 4. If you use the English version (uni-language) CanoScan Setup Utility CD-ROM, select the "CD-ROM drive" then click the [Next] button. Finally click the [Next] button. 17 chapter 2 Installing ScanGear CS-U Top Page Glossary Contents Index 3. Confirm that the first button is selected (Search...
... device) and click the [Next] button. 4. If you use the English version (uni-language) CanoScan Setup Utility CD-ROM, select the "CD-ROM drive" then click the [Next] button. Finally click the [Next] button. 17 chapter 2 Installing ScanGear CS-U Top Page Glossary Contents Index 3. Confirm that the first button is selected (Search...


