User Manual
Page 1
Quick Start Guide Table of Contents Preface 1 Shipping Materials 1 Introduction 1 Setting Up 2 Preparing the Printer 2 Connecting the Printer to the Computer 2 Installing the Print Head 4 Loading Paper 7 Installing the Printer Driver 8 Aligning the Print Head 12 Basic Operations 15 Printing with Windows 15 Printing with Macintosh 18 Print Head Maintenance 20 Appendix 21 Printing Photographs Directly from a Digital Camera 21 Notes on Handling the USB Interface (for Windows Users) 25 For Further Details... 25 BE QA7-3441-V01
Quick Start Guide Table of Contents Preface 1 Shipping Materials 1 Introduction 1 Setting Up 2 Preparing the Printer 2 Connecting the Printer to the Computer 2 Installing the Print Head 4 Loading Paper 7 Installing the Printer Driver 8 Aligning the Print Head 12 Basic Operations 15 Printing with Windows 15 Printing with Macintosh 18 Print Head Maintenance 20 Appendix 21 Printing Photographs Directly from a Digital Camera 21 Notes on Handling the USB Interface (for Windows Users) 25 For Further Details... 25 BE QA7-3441-V01

User Manual
Page 2
...effectively reduce energy consumption. The targeted products are as computers, monitors, printers, faxes and copiers. International ENERGY STAR® Program As an ENERGY STAR® Partner, Canon Inc. Exif Print This printer supports ExifPrint. The International ENERGY STAR® Office Equipment Program is ...of computer and other than that this product meets the ENERGY STAR guidelines for enhancing the communication between digital cameras and printers. Exif Print is used and optimized, yielding extremely high quality prints. Using the incorrect voltage could cause a fire...
...effectively reduce energy consumption. The targeted products are as computers, monitors, printers, faxes and copiers. International ENERGY STAR® Program As an ENERGY STAR® Partner, Canon Inc. Exif Print This printer supports ExifPrint. The International ENERGY STAR® Office Equipment Program is ...of computer and other than that this product meets the ENERGY STAR guidelines for enhancing the communication between digital cameras and printers. Exif Print is used and optimized, yielding extremely high quality prints. Using the incorrect voltage could cause a fire...

User Manual
Page 3
..., Inc., registered in death or serious personal injury caused by incorrect operation of their respective owners. Instructions that all the following symbols to your Canon Service Representative. ‰ Printer ‰ Setup Software & User's Guide CD-ROM ‰ Quick Start Guide ‰ Print Head ‰ 5 Ink Tanks * A USB cable should be transmitted or...
..., Inc., registered in death or serious personal injury caused by incorrect operation of their respective owners. Instructions that all the following symbols to your Canon Service Representative. ‰ Printer ‰ Setup Software & User's Guide CD-ROM ‰ Quick Start Guide ‰ Print Head ‰ 5 Ink Tanks * A USB cable should be transmitted or...

User Manual
Page 4
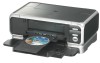
The tape position is subject to change. 2 Connecting the Printer to the Computer USB cable Recommended: Canon or other computer manufacturer cable, up to 5 meters in length. • If your computer has an earth connection, make sure that this is attached. • If you do not intend to use the printer for a long period of time, unplug the power cord from the printer as shown. Setting Up 1 Preparing the Printer 1 Place the printer on a flat surface. 2 Remove the packing material and tape from the power outlet after turning off the printer. 2
The tape position is subject to change. 2 Connecting the Printer to the Computer USB cable Recommended: Canon or other computer manufacturer cable, up to 5 meters in length. • If your computer has an earth connection, make sure that this is attached. • If you do not intend to use the printer for a long period of time, unplug the power cord from the printer as shown. Setting Up 1 Preparing the Printer 1 Place the printer on a flat surface. 2 Remove the packing material and tape from the power outlet after turning off the printer. 2

User Manual
Page 5
If the Add New Hardware Wizard or Found New Hardware Wizard screen appears when carrying out the following operations, click Cancel and turn off . 2 Connect the cable. Follow the steps below to install the printer driver correctly. 1 Ensure that the printer and the computer are turned off the computer. 3
If the Add New Hardware Wizard or Found New Hardware Wizard screen appears when carrying out the following operations, click Cancel and turn off . 2 Connect the cable. Follow the steps below to install the printer driver correctly. 1 Ensure that the printer and the computer are turned off the computer. 3

User Manual
Page 6
... when opening the tray. 4 Remove the tape. 5 Raise the Print Head Lock Lever. The POWER lamp flashes and the printer begins to open the Paper Output Tray. Do NOT turn on the printer. Wait until the POWER lamp remains fully lit. Support the Front Cover with your hands are wet. • Never... ( ) of purchase. 3 Installing the Print Head • Never attempt to plug the power cord into the power outlet. „ Installing the Print Head 1 Plug the printer in the country of the Front Cover to operate.
... when opening the tray. 4 Remove the tape. 5 Raise the Print Head Lock Lever. The POWER lamp flashes and the printer begins to open the Paper Output Tray. Do NOT turn on the printer. Wait until the POWER lamp remains fully lit. Support the Front Cover with your hands are wet. • Never... ( ) of purchase. 3 Installing the Print Head • Never attempt to plug the power cord into the power outlet. „ Installing the Print Head 1 Plug the printer in the country of the Front Cover to operate.

User Manual
Page 7
... from the Print Head. • Do not touch the Print Head Nozzles or electrical contacts. • Do not attempt to touch any parts inside the printer. Do not touch the lever once the Print Head has been installed. „ Installing the Ink Tanks • For safety reasons, store ink tanks out...
... from the Print Head. • Do not touch the Print Head Nozzles or electrical contacts. • Do not attempt to touch any parts inside the printer. Do not touch the lever once the Print Head has been installed. „ Installing the Ink Tanks • For safety reasons, store ink tanks out...

User Manual
Page 9
... open the Paper Output Tray. Sheet Feeder Lamp You now need to page 10 • Other than the Sheet Feeder, you need to install the printer driver: Windows: Go to page 8 Mac OS X: Go to load paper in the Sheet Feeder. „ Loading A4 (Letter) Size Plain Paper in the Sheet... Feeder. When performing the print head alignment, you can select the paper source also from the printer driver. Do not exceed this limit. 3 Slide the paper guide against the left side of the Front Cover to the User's Guide. 7
... open the Paper Output Tray. Sheet Feeder Lamp You now need to page 10 • Other than the Sheet Feeder, you need to install the printer driver: Windows: Go to page 8 Mac OS X: Go to load paper in the Sheet Feeder. „ Loading A4 (Letter) Size Plain Paper in the Sheet... Feeder. When performing the print head alignment, you can select the paper source also from the printer driver. Do not exceed this limit. 3 Slide the paper guide against the left side of the Front Cover to the User's Guide. 7
User Manual
Page 10
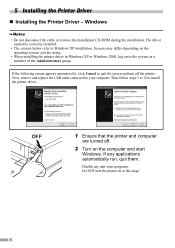
...computer and start Windows. Next, remove and replace the USB cable connected to install the printer driver. If the following screen appears automatically, click Cancel to quit the screen and turn the printer on at this stage. 8 Then follow steps 3 to 12 to your computer. ... the Installation CD-ROM during the installation. Screens may differ depending on the operating system you are turned off the printer. 5 Installing the Printer Driver „ Installing the Printer Driver - The driver cannot be correctly installed. • The screens below refer to the system as a member ...
...computer and start Windows. Next, remove and replace the USB cable connected to install the printer driver. If the following screen appears automatically, click Cancel to quit the screen and turn the printer on at this stage. 8 Then follow steps 3 to 12 to your computer. ... the Installation CD-ROM during the installation. Screens may differ depending on the operating system you are turned off the printer. 5 Installing the Printer Driver „ Installing the Printer Driver - The driver cannot be correctly installed. • The screens below refer to the system as a member ...

User Manual
Page 11
...the installer in the CD-ROM are installed automatically. When a message asking for Windows Users)" on . If the connection is recognized, the printer driver will be automatically installed. For non-Windows XP users, double-click My Computer in the Windows screen, then doubleclick the CD-ROM icon... appears, select a language, then click OK. • If the place selection message appears, select your computer appears on screen. If the printer is not recognized, refer to install, click Custom Install and follow the instructions on the screen. 6 Read the License Agreement and click Yes....
...the installer in the CD-ROM are installed automatically. When a message asking for Windows Users)" on . If the connection is recognized, the printer driver will be automatically installed. For non-Windows XP users, double-click My Computer in the Windows screen, then doubleclick the CD-ROM icon... appears, select a language, then click OK. • If the place selection message appears, select your computer appears on screen. If the printer is not recognized, refer to install, click Custom Install and follow the instructions on the screen. 6 Read the License Agreement and click Yes....

User Manual
Page 12
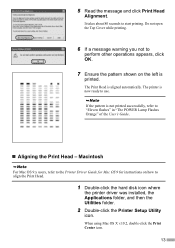
.... 12 When the screen shown on the left appears, ensure that the check box is selected, and then click Restart. „ Installing the Printer Driver - If the screen shows a check box for the printed pattern. 11 After print head alignment is aligned automatically. Macintosh • Do not...differ depending on the operating system you can restart the system instead of A4/ Letter-sized plain paper is loaded in the computer or printer not operating normally. • Before installing the driver, disable all anti-virus programs and automatically loading programs or remove them from your system...
.... 12 When the screen shown on the left appears, ensure that the check box is selected, and then click Restart. „ Installing the Printer Driver - If the screen shows a check box for the printed pattern. 11 After print head alignment is aligned automatically. Macintosh • Do not...differ depending on the operating system you can restart the system instead of A4/ Letter-sized plain paper is loaded in the computer or printer not operating normally. • Before installing the driver, disable all anti-virus programs and automatically loading programs or remove them from your system...

User Manual
Page 13
... have forgotten the administrator name and/or password, click and follow the instructions in Mac Help. 10 A message asking for your confirmation to install the printer driver, and click Continue. 8 Click Install. 9 Enter an administrator name and a password, then click OK. "x" represents a number. 5 Click Continue. 6 Read the License ...and click Continue, then click Agree. Restart your computer appears on page 13. 11 4 Double-click PIXMA iP5000 xxx.pkg. When using the printer, you must carry out the print head alignment on the screen. When you want to restart your computer.
... have forgotten the administrator name and/or password, click and follow the instructions in Mac Help. 10 A message asking for your confirmation to install the printer driver, and click Continue. 8 Click Install. 9 Enter an administrator name and a password, then click OK. "x" represents a number. 5 Click Continue. 6 Read the License ...and click Continue, then click Agree. Restart your computer appears on page 13. 11 4 Double-click PIXMA iP5000 xxx.pkg. When using the printer, you must carry out the print head alignment on the screen. When you want to restart your computer.

User Manual
Page 14
... a sheet of A4 (Letter) size plain paper in the Sheet Feeder. Windows 1 Click Start and select Control Panel, Printers and Other Hardware, and then Printers and Faxes. With the printer on, load a sheet of A4 (Letter) size plain paper in the color registration. • The Print Head can... be aligned also from the printer itself. For non-Windows XP users, click Start, then select Settings, Printers. 2 Click the icon for your printer. 3 Open the File menu and select: • Windows XP/Windows 2000 → Printing Preferences...
... a sheet of A4 (Letter) size plain paper in the Sheet Feeder. Windows 1 Click Start and select Control Panel, Printers and Other Hardware, and then Printers and Faxes. With the printer on, load a sheet of A4 (Letter) size plain paper in the color registration. • The Print Head can... be aligned also from the printer itself. For non-Windows XP users, click Start, then select Settings, Printers. 2 Click the icon for your printer. 3 Open the File menu and select: • Windows XP/Windows 2000 → Printing Preferences...
User Manual
Page 15
... Orange" of the User's Guide. „ Aligning the Print Head - When using Mac OS X v.10.2, double-click the Print Center icon. 13 The printer is printed. If the pattern is aligned automatically. It takes about 80 seconds to align the Print Head. 1 Double-click the hard disk icon where... the printer driver was installed, the Applications folder, and then the Utilities folder. 2 Double-click the Printer Setup Utility icon. The Print Head is not printed successfully, refer to use. Do not open the ...
... Orange" of the User's Guide. „ Aligning the Print Head - When using Mac OS X v.10.2, double-click the Print Center icon. 13 The printer is printed. If the pattern is aligned automatically. It takes about 80 seconds to align the Print Head. 1 Double-click the hard disk icon where... the printer driver was installed, the Applications folder, and then the Utilities folder. 2 Double-click the Printer Setup Utility icon. The Print Head is not printed successfully, refer to use. Do not open the ...

User Manual
Page 16
..., refer to add it on the left is now ready to start printing. When using Mac OS X v.10.2, select your printer from the Name list and click Configure. 4 Select your printer from the pop-up menu, and click Print Head Alignment. 6 Read the message and click Print Head Alignment. The Print Head... is not displayed in the Printer List, you need to "Eleven flashes" in Mac Help. It takes about 80 seconds to use. Do not open the Top Cover while printing. 7 Ensure...
..., refer to add it on the left is now ready to start printing. When using Mac OS X v.10.2, select your printer from the Name list and click Configure. 4 Select your printer from the pop-up menu, and click Print Head Alignment. 6 Read the message and click Print Head Alignment. The Print Head... is not displayed in the Printer List, you need to "Eleven flashes" in Mac Help. It takes about 80 seconds to use. Do not open the Top Cover while printing. 7 Ensure...

User Manual
Page 17
For details about the other than plain paper, refer to "Basic Printing Settings" on the application that your printer is printing. Basic Operations • If you use. „ Printing 1 Print the document from the application. The procedures and the screens that ...appear on your needs allows you to "Changing the Paper Source" on the printer. Contact your local Canon service representative. • To avoid injury, never put your hand or fingers inside the printer while it is selected, then click: • Windows XP → Preferences • Windows Me...
For details about the other than plain paper, refer to "Basic Printing Settings" on the application that your printer is printing. Basic Operations • If you use. „ Printing 1 Print the document from the application. The procedures and the screens that ...appear on your needs allows you to "Changing the Paper Source" on the printer. Contact your local Canon service representative. • To avoid injury, never put your hand or fingers inside the printer while it is selected, then click: • Windows XP → Preferences • Windows Me...

User Manual
Page 18
Sheet Feeder Lamp If not, press the Paper Feed Switch on the printer. Cassette Lamp 5 To start in a few moments. 16 4 Ensure that the proper lamp of the paper source lights. Printing will start printing, click Print.
Sheet Feeder Lamp If not, press the Paper Feed Switch on the printer. Cassette Lamp 5 To start in a few moments. 16 4 Ensure that the proper lamp of the paper source lights. Printing will start printing, click Print.
User Manual
Page 19
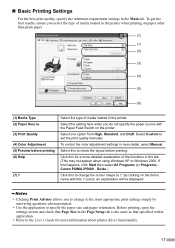
... the print quality manually. To get the best results, ensure you select the type of media loaded in the printer when printing on the printer. Select the type of media loaded in the printer. Select the setting here when you to change the cursor shape to ?. To control the color adjustment settings in... settings screen and check that specified within application. • Refer to the User's Guide for a more detailed explanation of the functions in more information about printer driver functionality. 17 Guide.) Click this happens, click Start then select All Programs (or Programs...
... the print quality manually. To get the best results, ensure you select the type of media loaded in the printer when printing on the printer. Select the type of media loaded in the printer. Select the setting here when you to change the cursor shape to ?. To control the color adjustment settings in... settings screen and check that specified within application. • Refer to the User's Guide for a more detailed explanation of the functions in more information about printer driver functionality. 17 Guide.) Click this happens, click Start then select All Programs (or Programs...

User Manual
Page 20
... the paper source is lit. Check the application's users manual for the actual procedures. 4 Specify the printing settings according to "Basic Printing Settings" on the printer. Check the application's users manual for the actual procedures. 2 Specify the page setup, then click OK. For details, refer to your application. Printing will start...
... the paper source is lit. Check the application's users manual for the actual procedures. 4 Specify the printing settings according to "Basic Printing Settings" on the printer. Check the application's users manual for the actual procedures. 2 Specify the page setup, then click OK. For details, refer to your application. Printing will start...
User Manual
Page 21
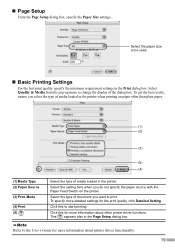
... of the dialog box. To get the best results, ensure you do not specify the paper source with the Paper Feed Switch on paper other printer driver functions. Select Quality & Media from the pop-up menu to be used. „ Basic Printing Settings For the best print quality, specify the... minimum requirement settings in the printer when printing on the printer. „ Page Setup From the Page Setup dialog box, specify the Paper Size settings. Select the setting here when you select the ...
... of the dialog box. To get the best results, ensure you do not specify the paper source with the Paper Feed Switch on paper other printer driver functions. Select Quality & Media from the pop-up menu to be used. „ Basic Printing Settings For the best print quality, specify the... minimum requirement settings in the printer when printing on the printer. „ Page Setup From the Page Setup dialog box, specify the Paper Size settings. Select the setting here when you select the ...


