8800F Quick Start Guide Instructions
Page 8
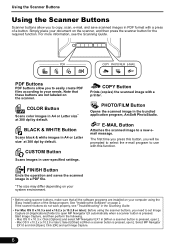
....2.8 or later): Before using the [Easy Install] option of a button. E-MAIL Button Attaches the scanned image to your needs. Click [OK] and quit Image Capture. 6 Using the Scanner Buttons Using the Scanner Buttons Scanner buttons allow you press this function. COLOR Button Scans color images in the bundled application program, ArcSoft PhotoStudio. PHOTO/FILM Button Opens the scanned...
....2.8 or later): Before using the [Easy Install] option of a button. E-MAIL Button Attaches the scanned image to your needs. Click [OK] and quit Image Capture. 6 Using the Scanner Buttons Using the Scanner Buttons Scanner buttons allow you press this function. COLOR Button Scans color images in the bundled application program, ArcSoft PhotoStudio. PHOTO/FILM Button Opens the scanned...
8800F Quick Start Guide Instructions
Page 10
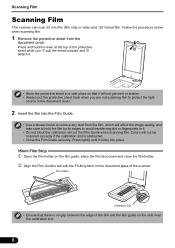
...it . • Do not block the calibration slot on the side near the calibration slot. 8 Colors will not be scanned correctly if the calibration slot is no gap between the edge of the protective... the procedure below when scanning film. 1 Remove the protective sheet from the film, which will affect the image quality, and take care to it . • Store the protective sheet in the document cover. 2 ...film into place. 35mm Film Strip c Open the film holder on the document glass of the scanner. Press and hold the film by its edges to avoid transferring dirt or fingerprints to hold the...
...it . • Do not block the calibration slot on the side near the calibration slot. 8 Colors will not be scanned correctly if the calibration slot is no gap between the edge of the protective... the procedure below when scanning film. 1 Remove the protective sheet from the film, which will affect the image quality, and take care to it . • Store the protective sheet in the document cover. 2 ...film into place. 35mm Film Strip c Open the film holder on the document glass of the scanner. Press and hold the film by its edges to avoid transferring dirt or fingerprints to hold the...
8800F Quick Start Guide Instructions
Page 12
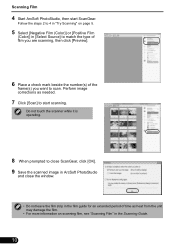
Do not touch the scanner while it is operating. 8 When prompted to scan. Follow the steps 2 to 4 in "Try Scanning" on page 5. 5 Select [Negative Film (Color)] or [Positive Film (Color)] in [Select Source] to match the type of film you are scanning, then click [Preview]. 6 Place a check mark beside the number(s) of time as... film, see "Scanning Film" in the film guide for an extended period of the frame(s) you want to close ScanGear, click [OK]. 9 Save the scanned image in ArcSoft PhotoStudio and close the window. • Do not leave the film strip in the Scanning Guide. 10
Do not touch the scanner while it is operating. 8 When prompted to scan. Follow the steps 2 to 4 in "Try Scanning" on page 5. 5 Select [Negative Film (Color)] or [Positive Film (Color)] in [Select Source] to match the type of film you are scanning, then click [Preview]. 6 Place a check mark beside the number(s) of time as... film, see "Scanning Film" in the film guide for an extended period of the frame(s) you want to close ScanGear, click [OK]. 9 Save the scanned image in ArcSoft PhotoStudio and close the window. • Do not leave the film strip in the Scanning Guide. 10


