User Manual
Page 2
... caused. To avoid botched pictures and accidents, read the Safety Warnings (p.10,11) and Handling Precautions (p.12,13). Also be held liable for demanding shoots, and expands shooting possibilities with 10.10 effective megapixels, DIGIC III, high-precision and high-speed 9-point AF...purchasing a Canon product. Copyrights Copyright laws in your recorded images of your country may prohibit photography even for anything but private enjoyment. If the camera or CF card is a high-performance, digital SLR camera featuring a fine-detail CMOS sensor with system accessories. The EOS 40D is ...
... caused. To avoid botched pictures and accidents, read the Safety Warnings (p.10,11) and Handling Precautions (p.12,13). Also be held liable for demanding shoots, and expands shooting possibilities with 10.10 effective megapixels, DIGIC III, high-precision and high-speed 9-point AF...purchasing a Canon product. Copyrights Copyright laws in your recorded images of your country may prohibit photography even for anything but private enjoyment. If the camera or CF card is a high-performance, digital SLR camera featuring a fine-detail CMOS sensor with system accessories. The EOS 40D is ...

User Manual
Page 3
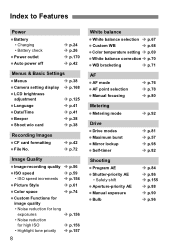
... be checked on the System Map (p.178). ‰ Camera: EOS 40D (includes eyecup, body cap, and installed battery for recording images) is missing, contact your camera. Item Check List Before starting, check that all the following items have been included with eyepiece cover) ‰ 2 CD-ROMs ‰ EOS DIGITAL Solution Disk (bundled software) ‰ Software Instruction...
... be checked on the System Map (p.178). ‰ Camera: EOS 40D (includes eyecup, body cap, and installed battery for recording images) is missing, contact your camera. Item Check List Before starting, check that all the following items have been included with eyepiece cover) ‰ 2 CD-ROMs ‰ EOS DIGITAL Solution Disk (bundled software) ‰ Software Instruction...

User Manual
Page 4
...in this manual assume that the power switch is available only in the Creative Zone modes (p.20). For explanatory purposes, the instructions show the camera attached with an EF-S17-85mm f/4-5.6 IS USM lens. 4 The M icon on the upper right of the button. indicates the Multi-...controller. The icon indicates a function which can thereby shoot immediately. The camera can be changed by pressing the button and changing the setting. indicates the Quick Control Dial. In this Manual indicates the Main Dial. For ...
...in this manual assume that the power switch is available only in the Creative Zone modes (p.20). For explanatory purposes, the instructions show the camera attached with an EF-S17-85mm f/4-5.6 IS USM lens. 4 The M icon on the upper right of the button. indicates the Multi-...controller. The icon indicates a function which can thereby shoot immediately. The camera can be changed by pressing the button and changing the setting. indicates the Quick Control Dial. In this Manual indicates the Main Dial. For ...

User Manual
Page 5
... 41 5 Setting the Date and Time 41 Set the power-off time/Auto power off 42 Formatting the CF Card 42 6 Resetting Camera Settings 44 2 Basic Shooting 45 Fully Automatic Shooting 46 7 Full Auto Techniques 48 Shooting Portraits 49 Shooting Landscapes 50 8 Shooting Close-...51 Shooting Moving Subjects 52 Shooting Portraits at Night 53 Disabling Flash 54 9 3 Image Settings 55 Setting the Image-recording Quality 56 10 Setting the ISO Speed 59 Selecting a Picture Style 61 Customizing the Picture Style 63 11 Registering the Picture Style 65 Setting the White...
... 41 5 Setting the Date and Time 41 Set the power-off time/Auto power off 42 Formatting the CF Card 42 6 Resetting Camera Settings 44 2 Basic Shooting 45 Fully Automatic Shooting 46 7 Full Auto Techniques 48 Shooting Portraits 49 Shooting Landscapes 50 8 Shooting Close-...51 Shooting Moving Subjects 52 Shooting Portraits at Night 53 Disabling Flash 54 9 3 Image Settings 55 Setting the Image-recording Quality 56 10 Setting the ISO Speed 59 Selecting a Picture Style 61 Customizing the Picture Style 63 11 Registering the Picture Style 65 Setting the White...

User Manual
Page 7
...Sensor Cleaning 131 1 9 Direct Printing from the Camera/Digital Print Order Format 133 Preparing to Print 134 2 Printing ...136 Trimming the Image 141 Digital Print Order Format (DPOF 143 Direct Printing with DPOF 146 3 10 Transferring Images to a Personal Computer 147 Transferring ...Images to a Personal Computer 148 4 11 Customizing the Camera 151 Setting Custom Functions 152 Custom Functions...
...Sensor Cleaning 131 1 9 Direct Printing from the Camera/Digital Print Order Format 133 Preparing to Print 134 2 Printing ...136 Trimming the Image 141 Digital Print Order Format (DPOF 143 Direct Printing with DPOF 146 3 10 Transferring Images to a Personal Computer 147 Transferring ...Images to a Personal Computer 148 4 11 Customizing the Camera 151 Setting Custom Functions 152 Custom Functions...
User Manual
Page 8
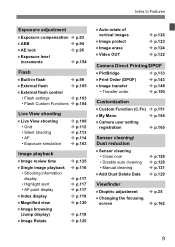
... Features Power Battery • Charging • Battery check Power outlet Auto power off Î p.24 Î p.26 Î p.170 Î p.42 Menus & Basic Settings Menus Camera setting display LCD brightness adjustment Language Date/Time Beeper Shoot w/o card Î p.38 Î p.168 Î p.125 Î p.41 Î p.41 Î p.38 Î p.38...
... Features Power Battery • Charging • Battery check Power outlet Auto power off Î p.24 Î p.26 Î p.170 Î p.42 Menus & Basic Settings Menus Camera setting display LCD brightness adjustment Language Date/Time Beeper Shoot w/o card Î p.38 Î p.168 Î p.125 Î p.41 Î p.41 Î p.38 Î p.38...
User Manual
Page 9
...Î p.120 Auto rotate of vertical images Image protect Image erase Video OUT Î p.126 Î p.123 Î p.124 Î p.122 Camera Direct Printing/DPOF PictBridge Î p.133 Print Order (DPOF) Image transfer • Transfer order Î p.143 Î p.148 Î p.150 ...Customization Custom Function (C.Fn) Î p.151 My Menu Î p.164 Camera user setting registration Î p.165 Sensor cleaning/ Dust reduction Sensor cleaning • Clean now • Disable auto cleaning • Manual cleaning Add...
...Î p.120 Auto rotate of vertical images Image protect Image erase Video OUT Î p.126 Î p.123 Î p.124 Î p.122 Camera Direct Printing/DPOF PictBridge Î p.133 Print Order (DPOF) Image transfer • Transfer order Î p.143 Î p.148 Î p.150 ...Customization Custom Function (C.Fn) Î p.151 My Menu Î p.164 Camera user setting registration Î p.165 Sensor cleaning/ Dust reduction Sensor cleaning • Clean now • Disable auto cleaning • Manual cleaning Add...
User Manual
Page 10
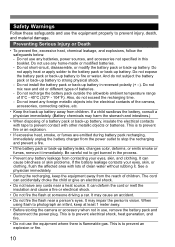
...of children. If a child swallows the battery, consult a physician immediately. (Battery chemicals may harm the stomach and intestines.) • When disposing of the camera, accessories, connecting cables, etc. • Keep the back-up battery. It can deform the cord or melt the insulation and cause a fire or ... generation, and fire. • Do not use any home-made or modified batteries. - Be careful not to prevent an explosion or fire. 10 Do not expose the battery pack or back-up battery leaks, changes color, deforms, or emits smoke or fumes, remove it . This is flammable...
...of children. If a child swallows the battery, consult a physician immediately. (Battery chemicals may harm the stomach and intestines.) • When disposing of the camera, accessories, connecting cables, etc. • Keep the back-up battery. It can deform the cord or melt the insulation and cause a fire or ... generation, and fire. • Do not use any home-made or modified batteries. - Be careful not to prevent an explosion or fire. 10 Do not expose the battery pack or back-up battery leaks, changes color, deforms, or emits smoke or fumes, remove it . This is flammable...

User Manual
Page 11
...catch fire. • If you drop the equipment and the casing breaks open to clean the equipment. Doing so may damage your nearest Canon Service Center. 11 Do not connect too many power plugs to clean off the dust around while it is to the possibility of electrical ...a power plug with a cloth. The equipment may become moist and short-circuit the outlet to prevent fire and electrical shock. • Before using the camera inside a car under the sun without the lens cap attached. When unplugging a power plug, grasp and pull the plug instead of small children. Otherwise,...
...catch fire. • If you drop the equipment and the casing breaks open to clean the equipment. Doing so may damage your nearest Canon Service Center. 11 Do not connect too many power plugs to clean off the dust around while it is to the possibility of electrical ...a power plug with a cloth. The equipment may become moist and short-circuit the outlet to prevent fire and electrical shock. • Before using the camera inside a car under the sun without the lens cap attached. When unplugging a power plug, grasp and pull the plug instead of small children. Otherwise,...

User Manual
Page 12
... well-wrung wet cloth. High temperatures can cause camera misoperation or destroy image data. Do not touch the camera's electrical contacts with your nearest Canon Service Center. Corroded contacts can cause camera misoperation. This is a precision instrument. If the camera has not been used for some time or if ...lab. If you have the camera checked by your Canon dealer or check the camera yourself and make sure it adjust to clean the camera body or lens. If the camera has been exposed to physical shock. Also avoid using the camera. Do not leave the camera in a while to check ...
... well-wrung wet cloth. High temperatures can cause camera misoperation or destroy image data. Do not touch the camera's electrical contacts with your nearest Canon Service Center. Corroded contacts can cause camera misoperation. This is a precision instrument. If the camera has not been used for some time or if ...lab. If you have the camera checked by your Canon dealer or check the camera yourself and make sure it adjust to clean the camera body or lens. If the camera has been exposed to physical shock. Also avoid using the camera. Do not leave the camera in a while to check ...

User Manual
Page 13
...the images recorded on them. Always store your CF cards in hot, dusty, or humid locations. Lens Electrical Contacts After detaching the lens from the camera, attach the lens caps or put down the lens with over 99.99% effective pixels, there might be a few days. Contacts Cautions for Prolonged ...spill any excessive force or physical shock. Do not store the CF card in a case to protect the data stored on for a long period, the camera may occur where you shoot continuously for a prolonged period or use the CF card near a heat source. However, this is left unused for a ...
...the images recorded on them. Always store your CF cards in hot, dusty, or humid locations. Lens Electrical Contacts After detaching the lens from the camera, attach the lens caps or put down the lens with over 99.99% effective pixels, there might be a few days. Contacts Cautions for Prolonged ...spill any excessive force or physical shock. Do not store the CF card in a case to protect the data stored on for a long period, the camera may occur where you shoot continuously for a prolonged period or use the CF card near a heat source. However, this is left unused for a ...
User Manual
Page 14
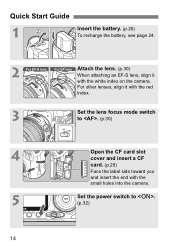
For other lenses, align it with the small holes into the camera. 5 Set the power switch to . (p.30) 4 Open the CF card slot cover and insert a CF card. (p.28) Face the label side toward you and insert the end with the white index on the camera. Quick Start Guide 1 Insert the battery. (p.26) To recharge the battery, see page 24. 2 FoČčrôEĚFϨ-Sϯlζens For EF lens Attach the lens. (p.30) When attaching an EF-S lens, align it with the red index. 3 Set the lens focus mode switch to . (p.32) 14
For other lenses, align it with the small holes into the camera. 5 Set the power switch to . (p.30) 4 Open the CF card slot cover and insert a CF card. (p.28) Face the label side toward you and insert the end with the white index on the camera. Quick Start Guide 1 Insert the battery. (p.26) To recharge the battery, see page 24. 2 FoČčrôEĚFϨ-Sϯlζens For EF lens Attach the lens. (p.30) When attaching an EF-S lens, align it with the red index. 3 Set the lens focus mode switch to . (p.32) 14

User Manual
Page 15
... focus the subject. 8 Take the picture. (p.32) Press the shutter button completely to (Full Auto). (p.46) All the necessary camera settings will be set automatically. 7 Focus the subject. (p.32) Look through the viewfinder and aim the viewfinder center over the subject. on the LCD monitor. (p....
... focus the subject. 8 Take the picture. (p.32) Press the shutter button completely to (Full Auto). (p.46) All the necessary camera settings will be set automatically. 7 Focus the subject. (p.32) Look through the viewfinder and aim the viewfinder center over the subject. on the LCD monitor. (p....

User Manual
Page 20
... Basic Zone All you more control over the result. Nomenclature Mode Dial The Mode Dial has the Basic Zone modes and Creative Zone modes. Camera User Settings Most camera settings can be registered under w, x, or y. (p.165) Creative Zone These modes give you do is press the shutter button. d : Program AE (p.84) s : Shutter...
... Basic Zone All you more control over the result. Nomenclature Mode Dial The Mode Dial has the Basic Zone modes and Creative Zone modes. Camera User Settings Most camera settings can be registered under w, x, or y. (p.165) Creative Zone These modes give you do is press the shutter button. d : Program AE (p.84) s : Shutter...

User Manual
Page 23
Pull the strap to the strap. (p.97) Eyepiece cover 23 The eyepiece cover is also attached to take up any slack and make sure the strap will not loosen from the bottom. Then pass it through the camera's strap mount eyelet from the buckle. Attaching the Strap Pass the end of the strap through the strap's buckle as shown in the illustration. 1 Getting Started This chapter explains preliminary steps and basic camera operations.
Pull the strap to the strap. (p.97) Eyepiece cover 23 The eyepiece cover is also attached to take up any slack and make sure the strap will not loosen from the bottom. Then pass it through the camera's strap mount eyelet from the buckle. Attaching the Strap Pass the end of the strap through the strap's buckle as shown in the illustration. 1 Getting Started This chapter explains preliminary steps and basic camera operations.
User Manual
Page 24
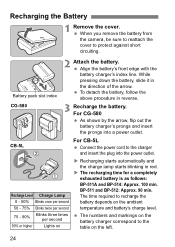
... shown by the arrow, flip out the battery charger's prongs and insert the prongs into the power outlet. When you remove the battery from the camera, be sure to reattach the cover to recharge the battery depends on X Recharging starts automatically and the charge lamp starts blinking in red. Battery pack...
... shown by the arrow, flip out the battery charger's prongs and insert the prongs into the power outlet. When you remove the battery from the camera, be sure to reattach the cover to recharge the battery depends on X Recharging starts automatically and the charge lamp starts blinking in red. Battery pack...
User Manual
Page 25
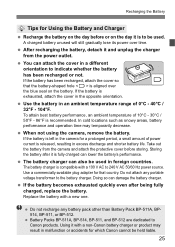
... If the battery becomes exhausted quickly even after it and unplug the charger from the camera and attach the protective cover before or on the battery. Replace the battery with a non-Canon battery charger or product may temporarily decrease. In cold locations such as snowy areas, ...battery performance and operation time may result in malfunction or accidents for which Canon cannot be used in the camera for a prolonged period, a small amount of 10°C - 30°C / 50°F - 86°F is recommended. Take out the battery from the...
... If the battery becomes exhausted quickly even after it and unplug the charger from the camera and attach the protective cover before or on the battery. Replace the battery with a non-Canon battery charger or product may temporarily decrease. In cold locations such as snowy areas, ...battery performance and operation time may result in malfunction or accidents for which Canon cannot be used in the camera for a prolonged period, a small amount of 10°C - 30°C / 50°F - 86°F is recommended. Take out the battery from the...

User Manual
Page 26
... levels: z : Battery level OK. n : Battery must be used. Installing and Removing the Battery Installing the Battery Load a fully charged BP-511A battery pack into the camera. 1 Open the battery compartment cover. Press the cover until it snaps shut. x : Battery level is set to or (p.32), the battery level will be indicated...
... levels: z : Battery level OK. n : Battery must be used. Installing and Removing the Battery Installing the Battery Load a fully charged BP-511A battery pack into the camera. 1 Open the battery compartment cover. Press the cover until it snaps shut. x : Battery level is set to or (p.32), the battery level will be indicated...
User Manual
Page 27
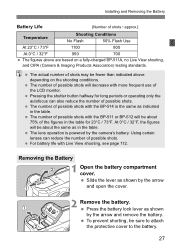
... operating only the autofocus can reduce the number of the LCD monitor. The number of possible shots with the BP-514 is powered by the camera's battery. The lens operation is the same as in the table. Press the battery lock lever as shown by the arrow and remove the ... / 73°F 1100 800 At 0°C / 32°F 950 700 The figures above depending on a fully-charged BP-511A, no Live View shooting, and CIPA (Camera & Imaging Products Association) testing standards. Slide the lever as shown by the arrow and open the cover. 2 Remove the battery. The number of possible shots...
... operating only the autofocus can reduce the number of the LCD monitor. The number of possible shots with the BP-514 is powered by the camera's battery. The lens operation is the same as in the table. Press the battery lock lever as shown by the arrow and remove the ... / 73°F 1100 800 At 0°C / 32°F 950 700 The figures above depending on a fully-charged BP-511A, no Live View shooting, and CIPA (Camera & Imaging Products Association) testing standards. Slide the lever as shown by the arrow and open the cover. 2 Remove the battery. The number of possible shots...

User Manual
Page 28
... the power switch to open it snaps shut. The shots remaining depends on the LCD panel. As shown in the wrong way may damage the camera. X When you and insert the end with 2 GB or higher capacity. Slide the cover as shown by the arrow until it . Although the thickness... remaining capacity of remaining shots will stick out. 3 Close the cover. Label side CF card eject button Shots remaining 2 Insert the CF card. The camera is recorded onto the CF card (sold separately). Installing and Removing the CF Card The captured image is also compatible with Microdrive (hard disk-type...
... the power switch to open it snaps shut. The shots remaining depends on the LCD panel. As shown in the wrong way may damage the camera. X When you and insert the end with 2 GB or higher capacity. Slide the cover as shown by the arrow until it . Although the thickness... remaining capacity of remaining shots will stick out. 3 Close the cover. Label side CF card eject button Shots remaining 2 Insert the CF card. The camera is recorded onto the CF card (sold separately). Installing and Removing the CF Card The captured image is also compatible with Microdrive (hard disk-type...


