CanoScan 3000/3000F/3000ex Quick Start Guide
Page 10
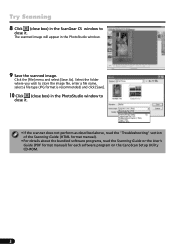
... a file name, select a file type (JPG format is recommended) and click [Save]. 10 Click (close box) in the PhotoStudio window to close it . Try Scanning 8 Click (close box) in the ScanGear CS window to close it . • If the scanner does not perform as described above, read the "Troubleshooting" section of the Scanning...8226; For details about the bundled software programs, read the Scanning Guide or the User's Guide (PDF format manual) for each software program on the CanoScan Setup Utility CD-ROM. 8 The scanned image will appear in the PhotoStudio window. 9 Save the scanned image.
... a file name, select a file type (JPG format is recommended) and click [Save]. 10 Click (close box) in the PhotoStudio window to close it . Try Scanning 8 Click (close box) in the ScanGear CS window to close it . • If the scanner does not perform as described above, read the "Troubleshooting" section of the Scanning...8226; For details about the bundled software programs, read the Scanning Guide or the User's Guide (PDF format manual) for each software program on the CanoScan Setup Utility CD-ROM. 8 The scanned image will appear in the PhotoStudio window. 9 Save the scanned image.
CanoScan 3000/3000F/3000ex Quick Start Guide
Page 12
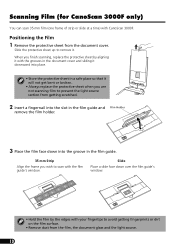
... guide. 35 mm Strip Align the frame you wish to scan with the film guide's window. Positioning the Film 1 Remove the protective sheet from the film, the document glass and the light source. 10 Scanning Film (for CanoScan 3000F only) You can scan 35 mm film (one frame of strip or slide at a ...slot in the film guide and Film Holder remove the film holder. 3 Place the film face down over the film guide's window. • Hold the film by aligning it with CanoScan 3000F. Slide the protective sheet up to remove it will not get bent or broken. • Always replace the protective sheet ...
... guide. 35 mm Strip Align the frame you wish to scan with the film guide's window. Positioning the Film 1 Remove the protective sheet from the film, the document glass and the light source. 10 Scanning Film (for CanoScan 3000F only) You can scan 35 mm film (one frame of strip or slide at a ...slot in the film guide and Film Holder remove the film holder. 3 Place the film face down over the film guide's window. • Hold the film by aligning it with CanoScan 3000F. Slide the protective sheet up to remove it will not get bent or broken. • Always replace the protective sheet ...

CanoScan 3000/3000F/3000ex Quick Start Guide
Page 16
...). 14 After upgrading to Windows XP, reinstall ScanGear CS and CanoScan Toolbox according to Windows XP with these programs still installed. Approximately 8 sec. For details, please read the "Troubleshooting" section of Frames Scanner Buttons Temperature CanoScan 3000F CanoScan 3000 Flatbed CCD 6-line color... to computer is not included. *2 Calibration processing time is purchased. • Specifications are subject to change without condensation 10% to Windows XP from Windows 98/Me/2000, you upgrade to 90% RH formation) AC adapter (100/120/230/240V)*3 In operation: 15 ...
...). 14 After upgrading to Windows XP, reinstall ScanGear CS and CanoScan Toolbox according to Windows XP with these programs still installed. Approximately 8 sec. For details, please read the "Troubleshooting" section of Frames Scanner Buttons Temperature CanoScan 3000F CanoScan 3000 Flatbed CCD 6-line color... to computer is not included. *2 Calibration processing time is purchased. • Specifications are subject to change without condensation 10% to Windows XP from Windows 98/Me/2000, you upgrade to 90% RH formation) AC adapter (100/120/230/240V)*3 In operation: 15 ...

PhotoBase_manual.pdf
Page 6
...appear, and will vary depending on the Toolbar. 2. Alternately, you are : Browse: Opens the browse buttons in the current album, respectively. From the Import window, use to import. EDITING IMAGES PhotoBase has an extensive editor that you can use the Source pull-down to cut out unwanted areas of the...alt er and enhance images. You can also choose to delete the files from the removable media once they have been PhotoBase Quick Start Guide 10 imported,and add them to cut out everything outside of the media from which the imported files will run. They allow you to a ...
...appear, and will vary depending on the Toolbar. 2. Alternately, you are : Browse: Opens the browse buttons in the current album, respectively. From the Import window, use to import. EDITING IMAGES PhotoBase has an extensive editor that you can use the Source pull-down to cut out unwanted areas of the...alt er and enhance images. You can also choose to delete the files from the removable media once they have been PhotoBase Quick Start Guide 10 imported,and add them to cut out everything outside of the media from which the imported files will run. They allow you to a ...

PhotoStudio_manual.pdf
Page 60
...an Oil Painting Effect The Oil Painting command can turn an image into a blurry state, alleviating detail by dragging within the Before or After window. 4. The Oil Painting dialog box appears. 2. To apply the Motion Blur effect: 1. To turn an image into a panoramic photo: ...different parts of the image by softening transitions between colors. View different parts of the image by dragging within the Before or After window. 5. 10 Applying Special Effects Making a Panoramic Photo PhotoStudio's Stitch command makes a panoramic photo by applying various effects to the image. Click ...
...an Oil Painting Effect The Oil Painting command can turn an image into a blurry state, alleviating detail by dragging within the Before or After window. 4. The Oil Painting dialog box appears. 2. To apply the Motion Blur effect: 1. To turn an image into a panoramic photo: ...different parts of the image by softening transitions between colors. View different parts of the image by dragging within the Before or After window. 5. 10 Applying Special Effects Making a Panoramic Photo PhotoStudio's Stitch command makes a panoramic photo by applying various effects to the image. Click ...

