Quick Start Guide
Page 5
... the Nozzle Check Pattern ...........21 Print Head Cleaning 22 Print Head Deep Cleaning 25 Aligning the Print Head 27 Replacing a FINE Cartridge 31 Keeping the Best Printing Results 36 Cleaning Your Printer 37 Troubleshooting 43 Cannot Install the Printer Driver 44 The USB Connection Does Not Work Properly 45 Print Results Not Satisfactory 46 Printer Does Not Start 50 Paper Does Not Feed Properly 51 Paper Jams 52 Alarm Lamp Flashes Orange 53 Message Appears on the Computer Screen.55 Appendix 57 How to Use the Documentation...
... the Nozzle Check Pattern ...........21 Print Head Cleaning 22 Print Head Deep Cleaning 25 Aligning the Print Head 27 Replacing a FINE Cartridge 31 Keeping the Best Printing Results 36 Cleaning Your Printer 37 Troubleshooting 43 Cannot Install the Printer Driver 44 The USB Connection Does Not Work Properly 45 Print Results Not Satisfactory 46 Printer Does Not Start 50 Paper Does Not Feed Properly 51 Paper Jams 52 Alarm Lamp Flashes Orange 53 Message Appears on the Computer Screen.55 Appendix 57 How to Use the Documentation...
Quick Start Guide
Page 10
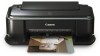
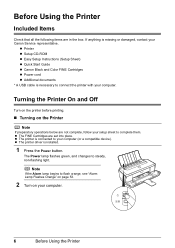
...Turning the Printer On and Off Turn on the printer before printing. „ Turning on your Canon Service representative. The Power lamp flashes green, and changes to complete them. If anything is installed. 1 Press the Power button. z The printer is necessary to your computer. Before Using the Printer Included Items Check that all the following items are set into place. z Printer z Setup CD-ROM z Easy Setup Instructions (Setup Sheet) z Quick Start Guide z Canon Black and Color FINE Cartridges z Power cord z Additional documents * A USB cable is connected to connect the printer...
...Turning the Printer On and Off Turn on the printer before printing. „ Turning on your Canon Service representative. The Power lamp flashes green, and changes to complete them. If anything is installed. 1 Press the Power button. z The printer is necessary to your computer. Before Using the Printer Included Items Check that all the following items are set into place. z Printer z Setup CD-ROM z Easy Setup Instructions (Setup Sheet) z Quick Start Guide z Canon Black and Color FINE Cartridges z Power cord z Additional documents * A USB cable is connected to connect the printer...
Quick Start Guide
Page 13
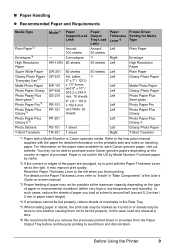
...the Paper Thickness Lever set to the right. „ Paper Handling z Recommended Paper and Requirements Media Type Plain Paper*3 Envelopes*4 High Resolution Paper Super White Paper Glossy Photo Paper "Everyday Use"*5 Matte Photo Paper Photo Paper Glossy Photo Paper Plus Semi-gloss*5 Photo Paper Pro*5 Photo Paper Plus Glossy*5 Photo Paper Plus Glossy II*5 Photo Stickers T-Shirt Transfers Model*1 - - Reset the Paper Thickness Lever to the left when you remove the previously printed sheet or envelope from the Paper Output Tray before continuously printing to purchase some Canon genuine...
...the Paper Thickness Lever set to the right. „ Paper Handling z Recommended Paper and Requirements Media Type Plain Paper*3 Envelopes*4 High Resolution Paper Super White Paper Glossy Photo Paper "Everyday Use"*5 Matte Photo Paper Photo Paper Glossy Photo Paper Plus Semi-gloss*5 Photo Paper Pro*5 Photo Paper Plus Glossy*5 Photo Paper Plus Glossy II*5 Photo Stickers T-Shirt Transfers Model*1 - - Reset the Paper Thickness Lever to the left when you remove the previously printed sheet or envelope from the Paper Output Tray before continuously printing to purchase some Canon genuine...

Quick Start Guide
Page 16
... Tray Extension. (4) Adjust the position of the Rear Tray. (A) (3) Pinch the Paper Guide and slide it to the right. Note Select the size and type of the loaded paper in Page Size (or Paper Size) and Media Type in the Rear Tray with the print side facing UP. (2) Align the paper stack against the right side of the Paper Thickness Lever. Do not slide the Paper Guide too strong. The Paper Thickness Lever switches the clearance between the Print Head and the loaded paper...
... Tray Extension. (4) Adjust the position of the Rear Tray. (A) (3) Pinch the Paper Guide and slide it to the right. Note Select the size and type of the loaded paper in Page Size (or Paper Size) and Media Type in the Rear Tray with the print side facing UP. (2) Align the paper stack against the right side of the Paper Thickness Lever. Do not slide the Paper Guide too strong. The Paper Thickness Lever switches the clearance between the Print Head and the loaded paper...
Quick Start Guide
Page 20
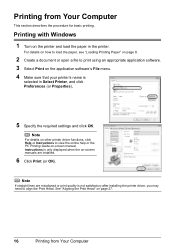
... printer driver functions, click Help or Instructions to print using an appropriate application software. 3 Select Print on the application software's File menu. 4 Make sure that your printer's name is selected in the printer. See "Aligning the Print Head" on -screen manuals are misaligned or print quality is only displayed when the on page 27. 16 Printing from Your Computer This section describes the procedure for basic printing. Instructions is not satisfactory after installing the printer driver, you may need to align...
... printer driver functions, click Help or Instructions to print using an appropriate application software. 3 Select Print on the application software's File menu. 4 Make sure that your printer's name is selected in the printer. See "Aligning the Print Head" on -screen manuals are misaligned or print quality is only displayed when the on page 27. 16 Printing from Your Computer This section describes the procedure for basic printing. Instructions is not satisfactory after installing the printer driver, you may need to align...

Quick Start Guide
Page 21
... open a file to align the Print Head. Note If straight lines are not installed, the PC Printing Guide on-screen manual is not displayed even if is selected in Format for. 5 Select the desired paper size in the pop-up menu. 9 Specify the required settings. If the on-screen manuals are misaligned or print quality is not satisfactory after installing the printer driver, you may need to print using an appropriate application software. 3 Select Page Setup on the application software's File menu. 4 Make...
... open a file to align the Print Head. Note If straight lines are not installed, the PC Printing Guide on-screen manual is not displayed even if is selected in Format for. 5 Select the desired paper size in the pop-up menu. 9 Specify the required settings. If the on-screen manuals are misaligned or print quality is not satisfactory after installing the printer driver, you may need to print using an appropriate application software. 3 Select Page Setup on the application software's File menu. 4 Make...
Quick Start Guide
Page 22
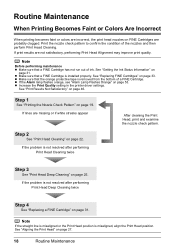
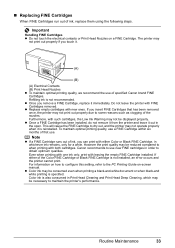
... "Print Head Cleaning" on page 31. If the problem is installed properly. Step 1 See "Printing the Nozzle Check Pattern" on page 27. 18 Routine Maintenance If lines are not satisfactory, performing Print Head Alignment may improve print quality. z Increase the Print Quality setting in the printer driver settings. Note If the straight line is misaligned or the Print Head position is removed from the bottom of a FINE Cartridge. See "Aligning the Print Head" on page 19. See "Replacing FINE Cartridges" on FINE Cartridges are probably clogged. z Make...
... "Print Head Cleaning" on page 31. If the problem is installed properly. Step 1 See "Printing the Nozzle Check Pattern" on page 27. 18 Routine Maintenance If lines are not satisfactory, performing Print Head Alignment may improve print quality. z Increase the Print Quality setting in the printer driver settings. Note If the straight line is misaligned or the Print Head position is removed from the bottom of a FINE Cartridge. See "Aligning the Print Head" on page 19. See "Replacing FINE Cartridges" on FINE Cartridges are probably clogged. z Make...

Quick Start Guide
Page 25
...on page 31. 1 Check the nozzle check pattern you printed. (1) (2) (1) If lines of ink is not enough ink. Example: When lines are missing, the Black print head nozzle needs cleaning. Example: When white streaks appear (Color ink) Routine Maintenance 21 Note The nozzle check pattern will not be printed correctly if there is insufficient. Replace the FINE Cartridge if the remaining amount of this pattern are missing (Black ink) (2) If these patterns have white streaks, the Color print head nozzle needs cleaning. Examining the Nozzle Check Pattern Examine the nozzle check pattern...
...on page 31. 1 Check the nozzle check pattern you printed. (1) (2) (1) If lines of ink is not enough ink. Example: When lines are missing, the Black print head nozzle needs cleaning. Example: When white streaks appear (Color ink) Routine Maintenance 21 Note The nozzle check pattern will not be printed correctly if there is insufficient. Replace the FINE Cartridge if the remaining amount of this pattern are missing (Black ink) (2) If these patterns have white streaks, the Color print head nozzle needs cleaning. Examining the Nozzle Check Pattern Examine the nozzle check pattern...
Quick Start Guide
Page 28
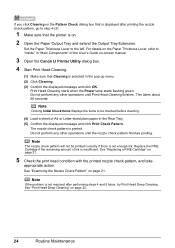
... The nozzle check pattern will not be checked before cleaning. (4) Load a sheet of the User's Guide on-screen manual. 3 Open the Canon IJ Printer Utility dialog box. 4 Start Print Head Cleaning. (1) Make sure that the printer is selected in the pop-up menu. (2) Click Cleaning. (3) Confirm the displayed message and click OK. Note If the problem is not enough ink. See "Replacing a FINE Cartridge" on page 31. 5 Check the print head condition with the printed nozzle check pattern, and take appropriate action. For details on the Paper Thickness Lever, refer...
... The nozzle check pattern will not be checked before cleaning. (4) Load a sheet of the User's Guide on-screen manual. 3 Open the Canon IJ Printer Utility dialog box. 4 Start Print Head Cleaning. (1) Make sure that the printer is selected in the pop-up menu. (2) Click Cleaning. (3) Confirm the displayed message and click OK. Note If the problem is not enough ink. See "Replacing a FINE Cartridge" on page 31. 5 Check the print head condition with the printed nozzle check pattern, and take appropriate action. For details on the Paper Thickness Lever, refer...
Quick Start Guide
Page 35
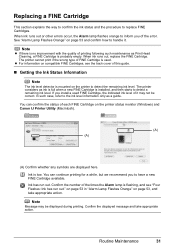
... guide. „ Getting the Ink Status Information Note The ink level detector is used. Note Message may not be displayed during printing. The printer considers as ink is full when a new FINE Cartridge is flashing, and see the back cover of each FINE Cartridge on page 53 and confirm how to detect the remaining ink level. The printer cannot print if the wrong type of it . z For information on compatible FINE Cartridges, see "Four Flashes: Ink...
... guide. „ Getting the Ink Status Information Note The ink level detector is used. Note Message may not be displayed during printing. The printer considers as ink is full when a new FINE Cartridge is flashing, and see the back cover of each FINE Cartridge on page 53 and confirm how to detect the remaining ink level. The printer cannot print if the wrong type of it . z For information on compatible FINE Cartridges, see "Four Flashes: Ink...
Quick Start Guide
Page 37
... or Print Head Nozzles on -screen manual. Do not leave the printer with new ones. z Once a FINE Cartridge has been installed, do not remove it from the printer and leave it is reinstalled. However the print quality may be displayed properly. Canon recommends to use new FINE cartridges in Print Head Cleaning and Print Head Deep Cleaning, which may not print out properly due to maintain the printer's performance. If either Color or Black FINE Cartridge, in the open. z Color ink may...
... or Print Head Nozzles on -screen manual. Do not leave the printer with new ones. z Once a FINE Cartridge has been installed, do not remove it from the printer and leave it is reinstalled. However the print quality may be displayed properly. Canon recommends to use new FINE cartridges in Print Head Cleaning and Print Head Deep Cleaning, which may not print out properly due to maintain the printer's performance. If either Color or Black FINE Cartridge, in the open. z Color ink may...
Quick Start Guide
Page 47
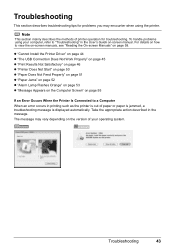
... on-screen manuals, see "Reading the On-screen Manuals" on -screen manual. Note This section mainly describes the methods of paper or paper is jammed, a troubleshooting message is displayed automatically. Take the appropriate action described in the User's Guide on page 58. Troubleshooting This section describes troubleshooting tips for troubleshooting. The message may encounter when using your operating system. Troubleshooting 43 z "Cannot Install the Printer Driver" on page 44 z "The USB Connection Does Not Work Properly" on page 45 z "Print Results...
... on-screen manuals, see "Reading the On-screen Manuals" on -screen manual. Note This section mainly describes the methods of paper or paper is jammed, a troubleshooting message is displayed automatically. Take the appropriate action described in the User's Guide on page 58. Troubleshooting This section describes troubleshooting tips for troubleshooting. The message may encounter when using your operating system. Troubleshooting 43 z "Cannot Install the Printer Driver" on page 44 z "The USB Connection Does Not Work Properly" on page 45 z "Print Results...

Quick Start Guide
Page 51
... side. When using paper with one printable surface, make sure the paper is loaded with reduced quality. The print result may be improved by reinstalling the FINE Cartridge. Print Head nozzles are clogged. (A) See "When Printing Becomes Faint or Colors Are Incorrect" on page 27 to perform Print Head Alignment. Refer to align the Print Head after you did not align the Print Head after installation, straight lines may be printed misaligned. Make sure to the instruction manual supplied with the wrong side...
... side. When using paper with one printable surface, make sure the paper is loaded with reduced quality. The print result may be improved by reinstalling the FINE Cartridge. Print Head nozzles are clogged. (A) See "When Printing Becomes Faint or Colors Are Incorrect" on page 27 to perform Print Head Alignment. Refer to align the Print Head after you did not align the Print Head after installation, straight lines may be printed misaligned. Make sure to the instruction manual supplied with the wrong side...

Quick Start Guide
Page 56
... the printer, see "Loading Printing Paper" on how to touch the components inside the printer, or if the paper jam error continues after removing the paper, contact your Canon Service representative. Do not load credit card-sized paper in the Paper Output Slot Remove the paper following procedure. (1)Press the Power button to turn the printer off. (2)Open the Top Cover, then remove the jammed paper. * Be careful not to touch the components inside the printer. All print jobs in the User's Guide...
... the printer, see "Loading Printing Paper" on how to touch the components inside the printer, or if the paper jam error continues after removing the paper, contact your Canon Service representative. Do not load credit card-sized paper in the Paper Output Slot Remove the paper following procedure. (1)Press the Power button to turn the printer off. (2)Open the Top Cover, then remove the jammed paper. * Be careful not to touch the components inside the printer. All print jobs in the User's Guide...
Quick Start Guide
Page 57
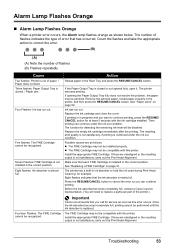
... RESUME/CANCEL button to hold the ink used during Print Head Cleaning, for at least 5 seconds with the ink cartridge installed. Three flashes: Paper Output Tray is replaced. If opening the Paper Output Tray fully does not resolve the problem, the paper may not be jammed. Replace the empty ink cartridge immediately after the printing. z The FINE Cartridge may be compatible with this printer. Install the appropriate FINE Cartridge. Troubleshooting 53 Five flashes: The FINE Cartridge cannot be compatible with this error...
... RESUME/CANCEL button to hold the ink used during Print Head Cleaning, for at least 5 seconds with the ink cartridge installed. Three flashes: Paper Output Tray is replaced. If opening the Paper Output Tray fully does not resolve the problem, the paper may not be jammed. Replace the empty ink cartridge immediately after the printing. z The FINE Cartridge may be compatible with this printer. Install the appropriate FINE Cartridge. Troubleshooting 53 Five flashes: The FINE Cartridge cannot be compatible with this error...
Quick Start Guide
Page 59
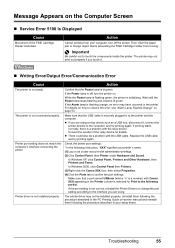
... printer. Check the printer port settings. * In the following instruction, "XXX" signifies your printer's name. (1)Log on as a USB hub, disconnect it . „ Writing Error/Output Error/Communication Error Cause The printer is preventing the FINE Cartridge Holder from your setup sheet. Make sure that the Power lamp is not connected properly. The printer driver may have occurred in your computer, turn the printer on -screen manual and reinstall them following port(s). Troubleshooting 55 Action Cancel printing...
... printer. Check the printer port settings. * In the following instruction, "XXX" signifies your printer's name. (1)Log on as a USB hub, disconnect it . „ Writing Error/Output Error/Communication Error Cause The printer is preventing the FINE Cartridge Holder from your setup sheet. Make sure that the Power lamp is not connected properly. The printer driver may have occurred in your computer, turn the printer on -screen manual and reinstall them following port(s). Troubleshooting 55 Action Cancel printing...
Quick Start Guide
Page 60
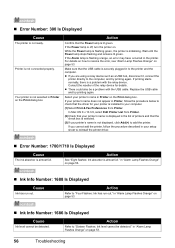
... the Power lamp is flashing orange, an error may have occurred in "Alarm Lamp Flashes Orange" on the Print dialog box. Replace the USB cable and try printing again. in the printer. While the Power lamp is flashing green, the printer is not connected properly. In Mac OS X v.10.3.9, select Edit Printer List from Printer. (2)Check that the check box is displayed in Printer on page 53. „ Ink Info Number: 1688 Is Displayed Cause Ink...
... the Power lamp is flashing orange, an error may have occurred in "Alarm Lamp Flashes Orange" on the Print dialog box. Replace the USB cable and try printing again. in the printer. While the Power lamp is flashing green, the printer is not connected properly. In Mac OS X v.10.3.9, select Edit Printer List from Printer. (2)Check that the check box is displayed in Printer on page 53. „ Ink Info Number: 1688 Is Displayed Cause Ink...
Quick Start Guide
Page 65
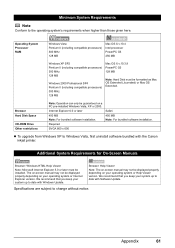
... MHz 128 MB Windows 2000 Professional SP4 Pentium II (including compatible processors) 300 MHz 128 MB Mac OS X v.10.3.9 PowerPC G3 128 MB Note: Hard Disk must be displayed properly depending on a PC pre-installed Windows Vista, XP or 2000. We recommend that you keep your system up to date with the Canon inkjet printer. The on-screen manual may not be...
... MHz 128 MB Windows 2000 Professional SP4 Pentium II (including compatible processors) 300 MHz 128 MB Mac OS X v.10.3.9 PowerPC G3 128 MB Note: Hard Disk must be displayed properly depending on a PC pre-installed Windows Vista, XP or 2000. We recommend that you keep your system up to date with the Canon inkjet printer. The on-screen manual may not be...

Easy Setup Instructions
Page 1
... left automatically and stop. Important • Make sure the printer is flashing green. • Make sure the FINE Cartridge Holder has moved to wipe it clicks into place. Correctly Installed FINE Cartridges f Close the Top Cover. Important Once you have installed the FINE Cartridges, the Power lamp will flash green. Next, turn on the removed protective tape. QT51418V01 Start Here Easy Setup Instructions Important When cleaning the exterior of the printer, use...
... left automatically and stop. Important • Make sure the printer is flashing green. • Make sure the FINE Cartridge Holder has moved to wipe it clicks into place. Correctly Installed FINE Cartridges f Close the Top Cover. Important Once you have installed the FINE Cartridges, the Power lamp will flash green. Next, turn on the removed protective tape. QT51418V01 Start Here Easy Setup Instructions Important When cleaning the exterior of the printer, use...

Easy Setup Instructions
Page 2
... you can use of Adobe Systems Incorporated in the User's Guide on as "Windows Vista") installation. The installation resumes from step c to restart your Mac and insert the Setup CD-ROM. g Read the License Agreement carefully and click Yes. Serial Number m When the PIXMA Extended Survey Program screen appears, confirm the message. The printer driver, On-screen Manuals, and application software are either registered trademarks or trademarks of Canon printers. If...
... you can use of Adobe Systems Incorporated in the User's Guide on as "Windows Vista") installation. The installation resumes from step c to restart your Mac and insert the Setup CD-ROM. g Read the License Agreement carefully and click Yes. Serial Number m When the PIXMA Extended Survey Program screen appears, confirm the message. The printer driver, On-screen Manuals, and application software are either registered trademarks or trademarks of Canon printers. If...


