
Users Manual - English
Page 2
...needle, threading the bobbin, or changing the presser foot. 15. Never operate this machine if it has a damaged cord or plug, if it is intended for use . Return the machine to be left ...burns, fire, electric shock, or injury to break. 12. This sewing machine is used or where oxygen is required around the machine needle. 11. Use only accessories recommended by or near children. 2....toy. Close attention is necessary when the machine is not intended for household use bent needles. 13. Do not pull or push fabric while stitching. The machine should always be supervised to turn it ...
...needle, threading the bobbin, or changing the presser foot. 15. Never operate this machine if it has a damaged cord or plug, if it is intended for use . Return the machine to be left ...burns, fire, electric shock, or injury to break. 12. This sewing machine is used or where oxygen is required around the machine needle. 11. Use only accessories recommended by or near children. 2....toy. Close attention is necessary when the machine is not intended for household use bent needles. 13. Do not pull or push fabric while stitching. The machine should always be supervised to turn it ...

Users Manual - English
Page 4
... CONTROLS ...10 Pattern Selection Dial ...10 Recommended Widths and Lengths for Stitches 11 Stitch Length Dial ...13 Stretch Stitching ...13 Stitch Width Dial ...14 Reverse Sewing Lever ...14 Drop Feed Lever (if the machine is equipped with a drop feed lever 14 THREADING THE MACHINE 15 Winding the Bobbin ...15 Lower Threading ...16 Upper Threading ...18 Using the Needle...
... CONTROLS ...10 Pattern Selection Dial ...10 Recommended Widths and Lengths for Stitches 11 Stitch Length Dial ...13 Stretch Stitching ...13 Stitch Width Dial ...14 Reverse Sewing Lever ...14 Drop Feed Lever (if the machine is equipped with a drop feed lever 14 THREADING THE MACHINE 15 Winding the Bobbin ...15 Lower Threading ...16 Upper Threading ...18 Using the Needle...

Users Manual - English
Page 5
... and connect the machine to the power supply. F Main power/sewing light switch (page 7) You can push this to control the sewing speed, and to start and stop sewing. J Zigzag presser foot KNOWING YOUR SEWING MACHINE PRINCIPAL PARTS 1 Bobbin-winding assembly (page 15) This winds the thread onto the bobbin, which you use this to stitch in the reverse...
... and connect the machine to the power supply. F Main power/sewing light switch (page 7) You can push this to control the sewing speed, and to start and stop sewing. J Zigzag presser foot KNOWING YOUR SEWING MACHINE PRINCIPAL PARTS 1 Bobbin-winding assembly (page 15) This winds the thread onto the bobbin, which you use this to stitch in the reverse...
Users Manual - English
Page 6
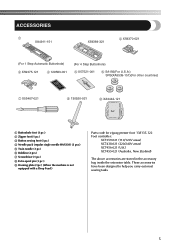
These accessories have been designed to help you carry out most sewing tasks. 5 ACCESSORIES 1 XA4911-151 X59369-321 2 X59370-021 (For 1 Step Automatic Buttonhole) 3 X59375-121 4 129583-001 (For 4 Step Buttonhole) 5 X57521-001 6...-021 9 XA3442-121 1 Buttonhole foot (1 pc.) 2 Zipper foot (1 pc.) 3 Button sewing foot (1 pc.) 4 Needle pack (regular single needle HAX130) (3 pcs.) 5 Twin needle (1 pc.) 6 Bobbins (3 pcs.) 7 Screwdriver (1 pc.) 8 Extra spool pin (1 pc.) 9 Darning plate (1pc.) (When the machine is not equipped with a Drop Feed.) Parts code for zigzag presser foot: 138135...
These accessories have been designed to help you carry out most sewing tasks. 5 ACCESSORIES 1 XA4911-151 X59369-321 2 X59370-021 (For 1 Step Automatic Buttonhole) 3 X59375-121 4 129583-001 (For 4 Step Buttonhole) 5 X57521-001 6...-021 9 XA3442-121 1 Buttonhole foot (1 pc.) 2 Zipper foot (1 pc.) 3 Button sewing foot (1 pc.) 4 Needle pack (regular single needle HAX130) (3 pcs.) 5 Twin needle (1 pc.) 6 Bobbins (3 pcs.) 7 Screwdriver (1 pc.) 8 Extra spool pin (1 pc.) 9 Darning plate (1pc.) (When the machine is not equipped with a Drop Feed.) Parts code for zigzag presser foot: 138135...
Users Manual - English
Page 16
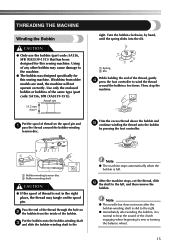
... the balance wheel. 15 Put the bobbin onto the bobbin-winding shaft 3 and slide the bobbin-winding shaft to the left, and then remove the bobbin. Then, stop the machine. Pass the end of the clutch engaging when beginning to the machine. ● The bobbin was designed specifically for this sewing machine. If bobbins from the inside of the same...
... the balance wheel. 15 Put the bobbin onto the bobbin-winding shaft 3 and slide the bobbin-winding shaft to the left, and then remove the bobbin. Then, stop the machine. Pass the end of the clutch engaging when beginning to the machine. ● The bobbin was designed specifically for this sewing machine. If bobbins from the inside of the same...

Users Manual - English
Page 17
..., breaking the needle and resulting in injury. Lower Threading CAUTION ● Setting the bobbin improperly may break the needle. 1 2 1 Wound evenly 2 Wound poorly 1 2 1 Wound evenly 2 Wound poorly ● The bobbin was designed specifically for this sewing machine. CAUTION ● Setting the bobbin improperly may cause the thread tension to loosen, and may cause the thread...
..., breaking the needle and resulting in injury. Lower Threading CAUTION ● Setting the bobbin improperly may break the needle. 1 2 1 Wound evenly 2 Wound poorly 1 2 1 Wound evenly 2 Wound poorly ● The bobbin was designed specifically for this sewing machine. CAUTION ● Setting the bobbin improperly may cause the thread tension to loosen, and may cause the thread...
Users Manual - English
Page 18
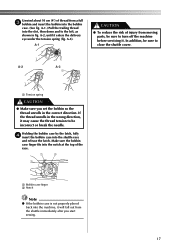
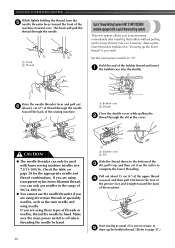
...not properly placed back into the bobbin case. (See fig. Holding the bobbin case by the latch, fully 4 insert the bobbin case into the slot, then down and to the left, as shown in the correct direction. A-2 A-3 1 1 Tension spring CAUTION ● Make sure you start sewing. 17 A-1.) Pull the trailing... wrong direction, it will fall out from the shuttle immediately after you set the bobbin so the thread unrolls in fig. Unwind about 10 cm (4") of thread from a full 3 bobbin and insert the bobbin into the machine, it may cause the thread tension to be sure to close the shuttle cover...
...not properly placed back into the bobbin case. (See fig. Holding the bobbin case by the latch, fully 4 insert the bobbin case into the slot, then down and to the left, as shown in the correct direction. A-2 A-3 1 1 Tension spring CAUTION ● Make sure you start sewing. 17 A-1.) Pull the trailing... wrong direction, it will fall out from the shuttle immediately after you set the bobbin so the thread unrolls in fig. Unwind about 10 cm (4") of thread from a full 3 bobbin and insert the bobbin into the machine, it may cause the thread tension to be sure to close the shuttle cover...
Users Manual - English
Page 21
... thread. The hook will pull the thread through the needle. 1 2 1 1 Hook 2 Thread Quick Thread-Setting System FAST START BOBBIN (models equipped with home sewing machine needles size 75/11-100/16. Set the main power switch to complete the lower threading. Hold the end of the...if you wish. Check the table on the cutter to "O". KNOWING YOUR SEWING MACHINE While lightly holding the thread, turn the 5 needle threader lever toward the front of the machine (toward the back of the sewing machine. 2 1 Bobbin case 2 Shuttle Close the shuttle cover while pulling the 2 thread through...
... thread. The hook will pull the thread through the needle. 1 2 1 1 Hook 2 Thread Quick Thread-Setting System FAST START BOBBIN (models equipped with home sewing machine needles size 75/11-100/16. Set the main power switch to complete the lower threading. Hold the end of the...if you wish. Check the table on the cutter to "O". KNOWING YOUR SEWING MACHINE While lightly holding the thread, turn the 5 needle threader lever toward the front of the machine (toward the back of the sewing machine. 2 1 Bobbin case 2 Shuttle Close the shuttle cover while pulling the 2 thread through...

Users Manual - English
Page 23
... 2 1 654 2 1 1 Reverse 2 Surface Upper tension is still not satisfactory, then adjust the bobbin thread tension as explained below . For most sewing applications, no adjustment is too loose. When sewing with a Needle Threader ● You cannot use . Decrease the thread tension by turning the dial to...the reverse side of the fabric. KNOWING YOUR SEWING MACHINE ■ Twin Needle Threading You should thread each needle separately. Tension of the Thread The tension of the thread will appear on the surface of your stitches. Instead, the thread tension must be adjusted adequately...
... 2 1 654 2 1 1 Reverse 2 Surface Upper tension is still not satisfactory, then adjust the bobbin thread tension as explained below . For most sewing applications, no adjustment is too loose. When sewing with a Needle Threader ● You cannot use . Decrease the thread tension by turning the dial to...the reverse side of the fabric. KNOWING YOUR SEWING MACHINE ■ Twin Needle Threading You should thread each needle separately. Tension of the Thread The tension of the thread will appear on the surface of your stitches. Instead, the thread tension must be adjusted adequately...
Users Manual - English
Page 25
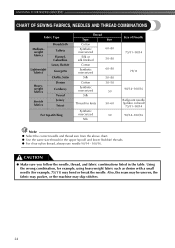
... and lower (bobbin) threads. ● For clear nylon thread, always use needle 90/14 - 100/16. Also, the seam may be uneven, the fabric may pucker, or the machine may bend or break the needle. KNOWING YOUR SEWING MACHINE CHART OF SEWING FABRICS, NEEDLES ...AND THREAD COMBINATIONS Fabric Type Mediumweight fabrics Lightweight fabrics Heavyweight fabrics Stretch fabrics Broadcloth Taffeta Flannel, Gabardine Lawn, Batiste Georgette Challis, Satin Denim Corduroy Tweed Jersey Tricot For top-stitching Thread Type Cotton...
... and lower (bobbin) threads. ● For clear nylon thread, always use needle 90/14 - 100/16. Also, the seam may be uneven, the fabric may pucker, or the machine may bend or break the needle. KNOWING YOUR SEWING MACHINE CHART OF SEWING FABRICS, NEEDLES ...AND THREAD COMBINATIONS Fabric Type Mediumweight fabrics Lightweight fabrics Heavyweight fabrics Stretch fabrics Broadcloth Taffeta Flannel, Gabardine Lawn, Batiste Georgette Challis, Satin Denim Corduroy Tweed Jersey Tricot For top-stitching Thread Type Cotton...

Users Manual - English
Page 40
... Hook Raise the needle to its center post 5 and pulling it . 1 2 1 Retaining ring 2 Latch lever Remove the hook by removing the 1 screws with machine oil. Take the bobbin case out of the feed dogs and 2 shuttle race body with a brush. Wipe lint from 1 the retaining ring, hook, driver and race body with... from the retaining 4 ring to their original positions. ■ Cleaning the Feed Dogs Remove the needle plate by grasping its highest position and 1 unplug the machine.
... Hook Raise the needle to its center post 5 and pulling it . 1 2 1 Retaining ring 2 Latch lever Remove the hook by removing the 1 screws with machine oil. Take the bobbin case out of the feed dogs and 2 shuttle race body with a brush. Wipe lint from 1 the retaining ring, hook, driver and race body with... from the retaining 4 ring to their original positions. ■ Cleaning the Feed Dogs Remove the needle plate by grasping its highest position and 1 unplug the machine.
Users Manual - English
Page 41
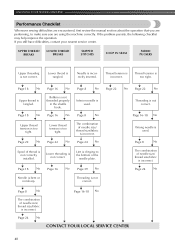
... No CONTACT YOUR LOCAL SERVICE CENTER 40 UPPER THREAD BREAKS LOWER THREAD BREAKS SKIPPED STITCHES LOOP IN SEAM FABRIC PUCKERS Upper threading is incorrect. Page 8 No The combination...is incorrect. Needle is not threaded properly in the shuttle hook. Page 18 No Bobbin is incorrectly inserted. Lint is not correctly installed. Page 24 No Spool of thread...No The combination of needle size/ thread size/fabric is used . KNOWING YOUR SEWING MACHINE Performance Checklist Whenever sewing difficulties are encountered, first review the manual section about the operation that you ...
... No CONTACT YOUR LOCAL SERVICE CENTER 40 UPPER THREAD BREAKS LOWER THREAD BREAKS SKIPPED STITCHES LOOP IN SEAM FABRIC PUCKERS Upper threading is incorrect. Page 8 No The combination...is incorrect. Needle is not threaded properly in the shuttle hook. Page 18 No Bobbin is incorrectly inserted. Lint is not correctly installed. Page 24 No Spool of thread...No The combination of needle size/ thread size/fabric is used . KNOWING YOUR SEWING MACHINE Performance Checklist Whenever sewing difficulties are encountered, first review the manual section about the operation that you ...

Users Manual - English
Page 42
... NOT FEED PROPERLY NEEDLE BREAKS MACHINE IS NOISY OR SLOW MACHINE DOES NOT START Stitch length dial is not correctly inserted. Needle is set at no feeding. Page 13 No Page 8 No Page 39 No Page 6 No The combination of the needle plate. Insufficient oiling. No Page 7 No The bobbin winding shaft is pulled... excessively. Page 15 No Feed dogs are lowered. Page 18 No Page 24 No Fabric is slid toward the bobbin presser. Let the feed dogs move the fabric. Lint is clinging to the bottom of needle size/ thread size/fabric is used. Page 14 No ...
... NOT FEED PROPERLY NEEDLE BREAKS MACHINE IS NOISY OR SLOW MACHINE DOES NOT START Stitch length dial is not correctly inserted. Needle is set at no feeding. Page 13 No Page 8 No Page 39 No Page 6 No The combination of the needle plate. Insufficient oiling. No Page 7 No The bobbin winding shaft is pulled... excessively. Page 15 No Feed dogs are lowered. Page 18 No Page 24 No Fabric is slid toward the bobbin presser. Let the feed dogs move the fabric. Lint is clinging to the bottom of needle size/ thread size/fabric is used. Page 14 No ...
Users Manual - English
Page 44
...33 Appliqués 36 Arrowhead Stitch 11, 12, 13, 29 B Blind Hem Stitch 11, 12, 13, 27 Bobbin Threading 15, 20 Bobbin Winder 15 Bridging Stitch 11 Buttonhole 30, 31 Buttonhole Fine Adjustment 33 Buttonhole Sewing 30, 31 C Changing Sewing Direction 25 Changing the Light ... Stitching 29 P Pattern Length 11 Pattern Selection Dial 10 Pattern Width 11 Performance Checklist 40 Presser foot lever 4 Presser Foot Replacement 8 Principal Parts 4 Q Quick Thread-setting System 20 R Rampart Stitch 11 Recommended Widths and Lengths for Stitches 11 Repacking the Machine 42 Reverse Sewing...
...33 Appliqués 36 Arrowhead Stitch 11, 12, 13, 29 B Blind Hem Stitch 11, 12, 13, 27 Bobbin Threading 15, 20 Bobbin Winder 15 Bridging Stitch 11 Buttonhole 30, 31 Buttonhole Fine Adjustment 33 Buttonhole Sewing 30, 31 C Changing Sewing Direction 25 Changing the Light ... Stitching 29 P Pattern Length 11 Pattern Selection Dial 10 Pattern Width 11 Performance Checklist 40 Presser foot lever 4 Presser Foot Replacement 8 Principal Parts 4 Q Quick Thread-setting System 20 R Rampart Stitch 11 Recommended Widths and Lengths for Stitches 11 Repacking the Machine 42 Reverse Sewing...
Users Manual - English
Page 45
...Stitch 26 Scallop Stitch 11, 12, 28 Sewing Buttons 33 Sewing Light Bulb Replacement 38 Sewing Light Switch 2, 7 Sewing with a Twin Needle 21 Shell Tuck Stitch 11, 12, 13, 27 Shuttle Hook Removal 39 Shuttle Race Cleaning 39 Spool pin 15, 18 Steadying the Machine 9 Stitch Length Dial 13 Stitch Width Dial 14 Straight Stitch... 11, 12, 25, 34, 35 Stretch Blind Hem Stitch 11, 12, 27 Stretch Overlock Stitch 11, 12, 13, 29 Stretch Stitching 13 T Tension of the Thread 22 Thread Tension 22 Threading Bobbin 15 ...
...Stitch 26 Scallop Stitch 11, 12, 28 Sewing Buttons 33 Sewing Light Bulb Replacement 38 Sewing Light Switch 2, 7 Sewing with a Twin Needle 21 Shell Tuck Stitch 11, 12, 13, 27 Shuttle Hook Removal 39 Shuttle Race Cleaning 39 Spool pin 15, 18 Steadying the Machine 9 Stitch Length Dial 13 Stitch Width Dial 14 Straight Stitch... 11, 12, 25, 34, 35 Stretch Blind Hem Stitch 11, 12, 27 Stretch Overlock Stitch 11, 12, 13, 29 Stretch Stitching 13 T Tension of the Thread 22 Thread Tension 22 Threading Bobbin 15 ...


