
Users Manual - English
Page 4
... Recommended Widths and Lengths for Stitches 11 Stitch Length Dial ...13 Stretch Stitching ...13 Stitch Width Dial ...14 Reverse Sewing Lever ...14 Drop Feed Lever (if the machine is equipped with a drop feed lever 14 THREADING THE MACHINE 15 Winding the Bobbin ...15 Lower Threading ...16 Upper Threading ...18 Using the Needle Threader (models equipped with a needle threader...
... Recommended Widths and Lengths for Stitches 11 Stitch Length Dial ...13 Stretch Stitching ...13 Stitch Width Dial ...14 Reverse Sewing Lever ...14 Drop Feed Lever (if the machine is equipped with a drop feed lever 14 THREADING THE MACHINE 15 Winding the Bobbin ...15 Lower Threading ...16 Upper Threading ...18 Using the Needle Threader (models equipped with a needle threader...

Users Manual - English
Page 5
...only available on and off. J Zigzag presser foot H Presser foot lever (page 8) This raises and lowers the presser foot. KNOWING YOUR SEWING MACHINE PRINCIPAL PARTS 1 Bobbin-winding assembly (page 15) This winds the thread onto the bobbin, which you use for the lower thread. 2 ...power and sewing light on certain models. 4 D Handle E Balance wheel Turn toward you want. 9 Stitch length dial (page 13) This controls the length of the stitches. 0 Reverse-sewing lever (page 14) You can use this to control the sewing speed, and to start and stop sewing. F Main power/sewing light switch...
...only available on and off. J Zigzag presser foot H Presser foot lever (page 8) This raises and lowers the presser foot. KNOWING YOUR SEWING MACHINE PRINCIPAL PARTS 1 Bobbin-winding assembly (page 15) This winds the thread onto the bobbin, which you use for the lower thread. 2 ...power and sewing light on certain models. 4 D Handle E Balance wheel Turn toward you want. 9 Stitch length dial (page 13) This controls the length of the stitches. 0 Reverse-sewing lever (page 14) You can use this to control the sewing speed, and to start and stop sewing. F Main power/sewing light switch...

Users Manual - English
Page 8
... proper outlet. If you may bend or break and cause injury. ● Never sew with Models XL-5500/XL-5600/XL-5700/ XL-5510/XL-5610/XL-5710. . A bent needle will start and you leave the main power on and step on the foot controller, the machine will easily break and cause injury. If it still does not fit, contact...
... proper outlet. If you may bend or break and cause injury. ● Never sew with Models XL-5500/XL-5600/XL-5700/ XL-5510/XL-5610/XL-5710. . A bent needle will start and you leave the main power on and step on the foot controller, the machine will easily break and cause injury. If it still does not fit, contact...
Users Manual - English
Page 16
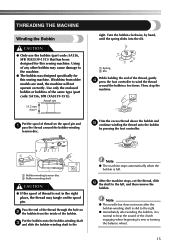
... automatically when the bobbin is not in the right place, the thread may cause damage to the machine. ● The bobbin was designed specifically for this sewing machine. Note ● The needle bar does not move after the bobbin-winding shaft is slid to the right. ● Immediately after winding the... bobbin, it is normal to hear the sound of the thread through the hole on 2 the bobbin from older models are used, the machine will ...
... automatically when the bobbin is not in the right place, the thread may cause damage to the machine. ● The bobbin was designed specifically for this sewing machine. Note ● The needle bar does not move after the bobbin-winding shaft is slid to the right. ● Immediately after winding the... bobbin, it is normal to hear the sound of the thread through the hole on 2 the bobbin from older models are used, the machine will ...

Users Manual - English
Page 17
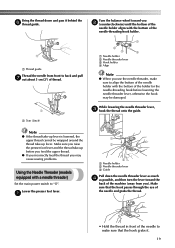
If you could be injured. If bobbins from older models are used, the machine will not operate correctly. Actual size 11.5 mm (7/16") CAUTION ● Make sure you follow the instructions carefully. Raise the needle to work, .... 1 2 1 Wound evenly 2 Wound poorly 1 2 1 Wound evenly 2 Wound poorly ● The bobbin was designed specifically for this sewing machine. Open the shuttle cover behind the extension 2 table on the foot controller and the machine starts to its highest position by pulling the latch toward you . 1 2 1 Bobbin case latch 2 Bobbin case finger 16...
If you could be injured. If bobbins from older models are used, the machine will not operate correctly. Actual size 11.5 mm (7/16") CAUTION ● Make sure you follow the instructions carefully. Raise the needle to work, .... 1 2 1 Wound evenly 2 Wound poorly 1 2 1 Wound evenly 2 Wound poorly ● The bobbin was designed specifically for this sewing machine. Open the shuttle cover behind the extension 2 table on the foot controller and the machine starts to its highest position by pulling the latch toward you . 1 2 1 Bobbin case latch 2 Bobbin case finger 16...
Users Manual - English
Page 20
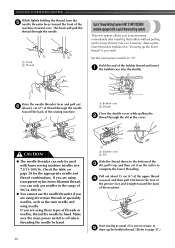
... threader, make sure that the hook passes through the eye of the needle and grabs the thread. • Hold the thread in front of the machine (away from front to back and pull 7 out about 5 cm (2") of thread. 1 1 5cm (2inch) Turn the balance wheel toward the back of the needle ... sure you raise the presser foot lever and the thread take -up before lowering the needle threader lever, otherwise the hook may cause sewing problems. Using the Needle Threader (models equipped with a needle threader) Set the main power switch to align the bottom of the needle holder with the bottom of the...
... threader, make sure that the hook passes through the eye of the needle and grabs the thread. • Hold the thread in front of the machine (away from front to back and pull 7 out about 5 cm (2") of thread. 1 1 5cm (2inch) Turn the balance wheel toward the back of the needle ... sure you raise the presser foot lever and the thread take -up before lowering the needle threader lever, otherwise the hook may cause sewing problems. Using the Needle Threader (models equipped with a needle threader) Set the main power switch to align the bottom of the needle holder with the bottom of the...
Users Manual - English
Page 21
...1 1 Hook 2 Thread Quick Thread-Setting System FAST START BOBBIN (models equipped with home sewing machine needles size 75/11-100/16. Set the main power switch to complete the lower threading. KNOWING YOUR SEWING MACHINE While lightly holding the thread, turn the 5 needle threader lever toward ...the front of the machine (toward the back of the sewing machine. 2 1 Bobbin case 2 Shuttle Close the shuttle cover while ...
...1 1 Hook 2 Thread Quick Thread-Setting System FAST START BOBBIN (models equipped with home sewing machine needles size 75/11-100/16. Set the main power switch to complete the lower threading. KNOWING YOUR SEWING MACHINE While lightly holding the thread, turn the 5 needle threader lever toward ...the front of the machine (toward the back of the sewing machine. 2 1 Bobbin case 2 Shuttle Close the shuttle cover while ...

Users Manual - English
Page 23
...Locks will affect the quality of thread guide 3 Thread guide Note Models that you change fabric or thread. Decrease the thread tension by turning...tension is needed. KNOWING YOUR SEWING MACHINE ■ Twin Needle Threading You should thread each needle separately. See page 18 for threading a single needle. When sewing with thin thread on the...machine. Tension of the Thread The tension of the thread will appear on thin fabrics, the thread tension cannot be adjusted according to adjust it through the thread guide above the needle before starting your stitches...
...Locks will affect the quality of thread guide 3 Thread guide Note Models that you change fabric or thread. Decrease the thread tension by turning...tension is needed. KNOWING YOUR SEWING MACHINE ■ Twin Needle Threading You should thread each needle separately. See page 18 for threading a single needle. When sewing with thin thread on the...machine. Tension of the Thread The tension of the thread will appear on thin fabrics, the thread tension cannot be adjusted according to adjust it through the thread guide above the needle before starting your stitches...


