
Users Manual - English
Page 2
To reduce the risk of the air openings blocked. Use only accessories recommended by pulling on the cord. Keep the ventilation openings of the sewing machine and foot controller free from the electrical outlet when removing covers, lubricating, or when making any of burns, fire, electric shock, or injury to break. 12. Do not...
To reduce the risk of the air openings blocked. Use only accessories recommended by pulling on the cord. Keep the ventilation openings of the sewing machine and foot controller free from the electrical outlet when removing covers, lubricating, or when making any of burns, fire, electric shock, or injury to break. 12. Do not...
Users Manual - English
Page 5
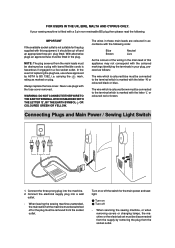
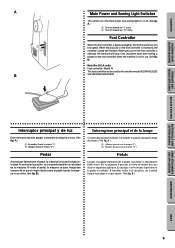
...prong plug into a wall outlet. - Turn on or off and an appropriate three pin plug fitted. When servicing the sewing machine, or when removing covers or changing lamps, the machine or the electrical set must be switched off - IMPORTANT If the available socket outlet is not suitable for the plug supplied... EITHER WIRE TO THE EARTH TERMINAL WHICH IS MARKED WITH THE LETTER 'E', BY THE EARTH SYMBOL OR COLOURED GREEN OR YELLOW. When leaving the sewing machine unattended, the main switch of replacing the plug fuse, use plugs with the letter 'L' or coloured red or brown. The wire which is ...
...prong plug into a wall outlet. - Turn on or off and an appropriate three pin plug fitted. When servicing the sewing machine, or when removing covers or changing lamps, the machine or the electrical set must be switched off - IMPORTANT If the available socket outlet is not suitable for the plug supplied... EITHER WIRE TO THE EARTH TERMINAL WHICH IS MARKED WITH THE LETTER 'E', BY THE EARTH SYMBOL OR COLOURED GREEN OR YELLOW. When leaving the sewing machine unattended, the main switch of replacing the plug fuse, use plugs with the letter 'L' or coloured red or brown. The wire which is ...

Users Manual - English
Page 6
... AND ZIGZAG STITCHING BUILT-IN STITCHES KNOWING YOUR SEWING MACHINE PRINCIPAL PARTS 1 ACCESSORIES 3 OPERATING YOUR SEWING MACHINE 5 Connecting Plugs 5 Main Power and Sewing Light Switches 6 Foot Controller 6 Inserting the Needle 7 Checking the Needle 7 Changing the Presser Foot 8 Converting to Free-Arm Style 9 Steadying the Machine 9 VARIOUS CONTROLS 10 Pattern Selection Dial 10 RECOMMENDED WIDTHS AND LENGTHS FOR STITCHES...
... AND ZIGZAG STITCHING BUILT-IN STITCHES KNOWING YOUR SEWING MACHINE PRINCIPAL PARTS 1 ACCESSORIES 3 OPERATING YOUR SEWING MACHINE 5 Connecting Plugs 5 Main Power and Sewing Light Switches 6 Foot Controller 6 Inserting the Needle 7 Checking the Needle 7 Changing the Presser Foot 8 Converting to Free-Arm Style 9 Steadying the Machine 9 VARIOUS CONTROLS 10 Pattern Selection Dial 10 RECOMMENDED WIDTHS AND LENGTHS FOR STITCHES...

Users Manual - English
Page 9
... stitch. 9 Stitch length dial Controls the length of the upper thread. D C E G F H BUTTONHOLE AND BUTTON SEWING USING ATTACHMENTS AND APPLICATIONS MAINTENANCE INDEX 1 B 0 7 Stitch width dial Controls the stitch width. 8 Pattern selection dial Turn in the...Buttonhole lever (1 Step automatic buttonhole) C Handle D Balance wheel Turn toward you (counterclockwise) to control sewing speed start and stop. CONTENTS KNOWING YOUR SEWING MACHINE STRAIGHT AND ZIGZAG STITCHING BUILT-IN STITCHES PRINCIPAL PARTS 34 62 1 1 Bobbin winding assembly Winds the...
... stitch. 9 Stitch length dial Controls the length of the upper thread. D C E G F H BUTTONHOLE AND BUTTON SEWING USING ATTACHMENTS AND APPLICATIONS MAINTENANCE INDEX 1 B 0 7 Stitch width dial Controls the stitch width. 8 Pattern selection dial Turn in the...Buttonhole lever (1 Step automatic buttonhole) C Handle D Balance wheel Turn toward you (counterclockwise) to control sewing speed start and stop. CONTENTS KNOWING YOUR SEWING MACHINE STRAIGHT AND ZIGZAG STITCHING BUILT-IN STITCHES PRINCIPAL PARTS 34 62 1 1 Bobbin winding assembly Winds the...

Users Manual - English
Page 13
...;QUINA DE COSER FONCTIONNEMENT DE LA MACHINE A COUDRE Conexión de los enchufes Raccordement 1. ATENCIÓN: 1. only This appliance has a polarized plug (one way. Conecte el enchufe de alimentación a una toma de corriente. CONTENTS KNOWING YOUR SEWING MACHINE STRAIGHT AND ZIGZAG STITCHING BUILT-IN STITCHES OPERATING YOUR SEWING MACHINE Connecting Plugs 1. PRÉCAUTION...
...;QUINA DE COSER FONCTIONNEMENT DE LA MACHINE A COUDRE Conexión de los enchufes Raccordement 1. ATENCIÓN: 1. only This appliance has a polarized plug (one way. Conecte el enchufe de alimentación a una toma de corriente. CONTENTS KNOWING YOUR SEWING MACHINE STRAIGHT AND ZIGZAG STITCHING BUILT-IN STITCHES OPERATING YOUR SEWING MACHINE Connecting Plugs 1. PRÉCAUTION...
Users Manual - English
Page 14
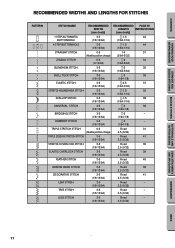
... is placed on augmente la pression, la vitesse de couture de la machine va augmenter également. CONTENTS KNOWING YOUR SEWING MACHINE STRAIGHT AND ZIGZAG STITCHING BUILT-IN STITCHES A 1 2 B Main Power and Sewing Light Switches This switch turns the main power and sewing light on or off (toward the "O" mark) Foot Controller When the foot...
... is placed on augmente la pression, la vitesse de couture de la machine va augmenter également. CONTENTS KNOWING YOUR SEWING MACHINE STRAIGHT AND ZIGZAG STITCHING BUILT-IN STITCHES A 1 2 B Main Power and Sewing Light Switches This switch turns the main power and sewing light on or off (toward the "O" mark) Foot Controller When the foot...
Users Manual - English
Page 19
CONTENTS KNOWING YOUR SEWING MACHINE STRAIGHT AND ZIGZAG STITCHING BUILT-IN STITCHES RECOMMENDED WIDTHS AND LENGTHS FOR STITCHES PATTERN C A STITCH NAME RECOMMENDED WIDTH [mm (inch)] RECOMMENDED PAGE IN LENGTH INSTRUCTIONS [... 41 (1/8-13/64) 2.5 (3/32) LEAF STITCH 3-5 Fixed - (1/8-13/64) 2.5 (3/32) TREE STITCH 3-5 Fixed - (1/8-13/64) 2.5 (3/32) LEGS STITCH 3-5 Fixed - (1/8-13/64) 2.5 (3/32) BUTTONHOLE AND BUTTON SEWING USING ATTACHMENTS AND APPLICATIONS MAINTENANCE INDEX 11
CONTENTS KNOWING YOUR SEWING MACHINE STRAIGHT AND ZIGZAG STITCHING BUILT-IN STITCHES RECOMMENDED WIDTHS AND LENGTHS FOR STITCHES PATTERN C A STITCH NAME RECOMMENDED WIDTH [mm (inch)] RECOMMENDED PAGE IN LENGTH INSTRUCTIONS [... 41 (1/8-13/64) 2.5 (3/32) LEAF STITCH 3-5 Fixed - (1/8-13/64) 2.5 (3/32) TREE STITCH 3-5 Fixed - (1/8-13/64) 2.5 (3/32) LEGS STITCH 3-5 Fixed - (1/8-13/64) 2.5 (3/32) BUTTONHOLE AND BUTTON SEWING USING ATTACHMENTS AND APPLICATIONS MAINTENANCE INDEX 11

Users Manual - English
Page 28
... on it behind the thread guide. 5 Thread guide 7. Thread the needle from front to its highest position. 2. CONTENTS KNOWING YOUR SEWING MACHINE STRAIGHT AND ZIGZAG STITCHING BUILT-IN STITCHES 1 2 4 3 BUTTONHOLE AND BUTTON SEWING USING ATTACHMENTS AND APPLICATIONS A 4 23 1 C B D 4 4 E 5 Upper (Needle) Threading Turn power switch to raise the thread take-up the spool pin...
... on it behind the thread guide. 5 Thread guide 7. Thread the needle from front to its highest position. 2. CONTENTS KNOWING YOUR SEWING MACHINE STRAIGHT AND ZIGZAG STITCHING BUILT-IN STITCHES 1 2 4 3 BUTTONHOLE AND BUTTON SEWING USING ATTACHMENTS AND APPLICATIONS A 4 23 1 C B D 4 4 E 5 Upper (Needle) Threading Turn power switch to raise the thread take-up the spool pin...

Users Manual - English
Page 30
Otherwise, the hook may be sure to #100. CONTENTS KNOWING YOUR SEWING MACHINE STRAIGHT AND ZIGZAG STITCHING BUILT-IN STITCHES 1 2 3 1 2 4 5 7 6 6 Using the Needle Threader (when the machine is equipped with the bottom of the holder for the needle-threading hook before lowering the needle threader... and needle are being used. While lightly holding the thread, rotate the needle threader lever toward the front of the machine (toward the back of the sewing machine. • Only use needles of the needle in order to #100. When using the needle threader, be damaged....
Otherwise, the hook may be sure to #100. CONTENTS KNOWING YOUR SEWING MACHINE STRAIGHT AND ZIGZAG STITCHING BUILT-IN STITCHES 1 2 3 1 2 4 5 7 6 6 Using the Needle Threader (when the machine is equipped with the bottom of the holder for the needle-threading hook before lowering the needle threader... and needle are being used. While lightly holding the thread, rotate the needle threader lever toward the front of the machine (toward the back of the sewing machine. • Only use needles of the needle in order to #100. When using the needle threader, be damaged....

Users Manual - English
Page 33
...enlace. 4. Avec la main gauche, tenir l'extrémité du fil supérieur. Pull out about 15 cm (6") of the machine straight behind the presser foot. The upper thread should have caught the lower thread in a large loop. 4. El hilo superior debe pasar entre ...la canilla Remontée du fil inférieur 1. El hilo superior debe haber enganchado el hilo inferior en un lanzo. CONTENTS KNOWING YOUR SEWING MACHINE STRAIGHT AND ZIGZAG STITCHING BUILT-IN STITCHES 1 2 Drawing Up Lower Thread 1. With your right hand, turn the balance wheel toward the back...
...enlace. 4. Avec la main gauche, tenir l'extrémité du fil supérieur. Pull out about 15 cm (6") of the machine straight behind the presser foot. The upper thread should have caught the lower thread in a large loop. 4. El hilo superior debe pasar entre ...la canilla Remontée du fil inférieur 1. El hilo superior debe haber enganchado el hilo inferior en un lanzo. CONTENTS KNOWING YOUR SEWING MACHINE STRAIGHT AND ZIGZAG STITCHING BUILT-IN STITCHES 1 2 Drawing Up Lower Thread 1. With your right hand, turn the balance wheel toward the back...

Users Manual - English
Page 35
...sample be adjusted adequately with a small screwdriver in C-1. However, do not turn the screw more than one full turn. When sewing with thin thread on thin fabrics, the thread tension cannot be made on a fabric scrap before starting your next project. ... needed. The basic thread tension setting is important since too much or too little tension will affect the quality of the fabric. CONTENTS KNOWING YOUR SEWING MACHINE STRAIGHT AND ZIGZAG STITCHING BUILT-IN STITCHES A 2 1 2 1 B 2 1 2 1 A-1 654 B-1 654 C 2 1 2 1 Thread Tension Thread tension will weaken your ...
...sample be adjusted adequately with a small screwdriver in C-1. However, do not turn the screw more than one full turn. When sewing with thin thread on thin fabrics, the thread tension cannot be made on a fabric scrap before starting your next project. ... needed. The basic thread tension setting is important since too much or too little tension will affect the quality of the fabric. CONTENTS KNOWING YOUR SEWING MACHINE STRAIGHT AND ZIGZAG STITCHING BUILT-IN STITCHES A 2 1 2 1 B 2 1 2 1 A-1 654 B-1 654 C 2 1 2 1 Thread Tension Thread tension will weaken your ...

Users Manual - English
Page 37
... INDEX Select the correct needle and thread size from the above chart. 2. CONTENTS KNOWING YOUR SEWING MACHINE STRAIGHT AND ZIGZAG STITCHING BUILT-IN STITCHES CHART OF SEWING FABRICS, NEEDLES AND THREAD COMBINATIONS VERY THIN LIGHTWEIGHT MEDIUM WEIGHT HEAVYWEIGHT SEWING FABRICS Fine tricot, Fine lace, Thin linen, Silk, Organza, Chiffon Voile, Taffeta, Synthetics, Silk, Batiste...
... INDEX Select the correct needle and thread size from the above chart. 2. CONTENTS KNOWING YOUR SEWING MACHINE STRAIGHT AND ZIGZAG STITCHING BUILT-IN STITCHES CHART OF SEWING FABRICS, NEEDLES AND THREAD COMBINATIONS VERY THIN LIGHTWEIGHT MEDIUM WEIGHT HEAVYWEIGHT SEWING FABRICS Fine tricot, Fine lace, Thin linen, Silk, Organza, Chiffon Voile, Taffeta, Synthetics, Silk, Batiste...
Users Manual - English
Page 42
... de point sur " " et régler le sélecteur de largeur de point entre "0" et "5". 34 MAINTENANCE INDEX CONTENTS KNOWING YOUR SEWING MACHINE STRAIGHT AND ZIGZAG STITCHING BUILT-IN STITCHES Zigzag Stitching Pattern (Zigzag Stitch) Stitch Length -4 Stitch Width 0-5 ZIGZAG STITCH Select the Zigzag Stitch with the...233; d'une couture en points zigzag. POINT DE BOURDON Lorsque la longueur du point zigzag est définie dans la plage " ", la machine effectue un point de bourdon (point zigzag très serré) qui peut servir à faire des boutonnières ou comme point ...
... de point sur " " et régler le sélecteur de largeur de point entre "0" et "5". 34 MAINTENANCE INDEX CONTENTS KNOWING YOUR SEWING MACHINE STRAIGHT AND ZIGZAG STITCHING BUILT-IN STITCHES Zigzag Stitching Pattern (Zigzag Stitch) Stitch Length -4 Stitch Width 0-5 ZIGZAG STITCH Select the Zigzag Stitch with the...233; d'une couture en points zigzag. POINT DE BOURDON Lorsque la longueur du point zigzag est définie dans la plage " ", la machine effectue un point de bourdon (point zigzag très serré) qui peut servir à faire des boutonnières ou comme point ...
Users Manual - English
Page 43
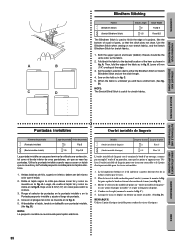
... à terminer le bord d'un ouvrage, comme par exemple l'ourlet d'un pantalon, sans que les points n'apparaissent. CONTENTS KNOWING YOUR SEWING MACHINE STRAIGHT AND ZIGZAG STITCHING BUILT-IN STITCHES A B C D Blindhem Stitching Pattern (Blindhem Stitch) (Stretch Blindhem Stitch) Stitch Length -2 -1.5...(spool) and lower (bobbin) threads should be the same color as shown in fig. C. 5. BUTTONHOLE AND BUTTON SEWING USING ATTACHMENTS AND APPLICATIONS Puntadas invisibles Ourlet invisible de lingerie Número de puntada (Puntada invisible) (Basta invisible stretch)...
... à terminer le bord d'un ouvrage, comme par exemple l'ourlet d'un pantalon, sans que les points n'apparaissent. CONTENTS KNOWING YOUR SEWING MACHINE STRAIGHT AND ZIGZAG STITCHING BUILT-IN STITCHES A B C D Blindhem Stitching Pattern (Blindhem Stitch) (Stretch Blindhem Stitch) Stitch Length -2 -1.5...(spool) and lower (bobbin) threads should be the same color as shown in fig. C. 5. BUTTONHOLE AND BUTTON SEWING USING ATTACHMENTS AND APPLICATIONS Puntadas invisibles Ourlet invisible de lingerie Número de puntada (Puntada invisible) (Basta invisible stretch)...

Users Manual - English
Page 50
...buttonhole on the underside of the foot, insert them into the grooves and temporarily tie them there. 3. Lower the presser foot and start the machine. 7. B.) 5. CONTENTS KNOWING YOUR SEWING MACHINE STRAIGHT AND ZIGZAG STITCHING BUILT-IN STITCHES A B 1 2 - 3 C PUSH D 3 2 4 1 E PUSH Making a Buttonhole (1 ... provides reliable results. A. (The front bar tack will be sewn first.) 4. Stop the machine when the buttonhole is recommended to " ". 2. E) When sewing buttonholes on the foot with tailor's chalk, attach the buttonhole foot, and set the pattern ...
...buttonhole on the underside of the foot, insert them into the grooves and temporarily tie them there. 3. Lower the presser foot and start the machine. 7. B.) 5. CONTENTS KNOWING YOUR SEWING MACHINE STRAIGHT AND ZIGZAG STITCHING BUILT-IN STITCHES A B 1 2 - 3 C PUSH D 3 2 4 1 E PUSH Making a Buttonhole (1 ... provides reliable results. A. (The front bar tack will be sewn first.) 4. Stop the machine when the buttonhole is recommended to " ". 2. E) When sewing buttonholes on the foot with tailor's chalk, attach the buttonhole foot, and set the pattern ...
Users Manual - English
Page 55
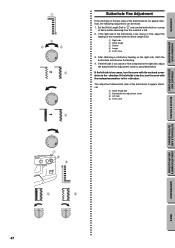
...side is fed. 2. After obtaining a satisfactory feeding on a scrap of the material with the enclosed screwdriver in the - direction. CONTENTS KNOWING YOUR SEWING MACHINE STRAIGHT AND ZIGZAG STITCHING BUILT-IN STITCHES 1 2 4 3 10 432 - SS 10 7 6 8 Buttonhole Fine Adjustment If the stitching on the... the Stitch Length Dial. 1 Right side 2 Stitch length 3 Shorter 4 Longer 5 In this case 9 9 BUTTONHOLE AND BUTTON SEWING USING ATTACHMENTS AND APPLICATIONS MAINTENANCE INDEX 47 If the right side of the buttonhole is too coarse or fine, adjust the feeding of fabric...
...side is fed. 2. After obtaining a satisfactory feeding on a scrap of the material with the enclosed screwdriver in the - direction. CONTENTS KNOWING YOUR SEWING MACHINE STRAIGHT AND ZIGZAG STITCHING BUILT-IN STITCHES 1 2 4 3 10 432 - SS 10 7 6 8 Buttonhole Fine Adjustment If the stitching on the... the Stitch Length Dial. 1 Right side 2 Stitch length 3 Shorter 4 Longer 5 In this case 9 9 BUTTONHOLE AND BUTTON SEWING USING ATTACHMENTS AND APPLICATIONS MAINTENANCE INDEX 47 If the right side of the buttonhole is too coarse or fine, adjust the feeding of fabric...

Users Manual - English
Page 57
...equipped with the stitch width dial. Attach the button sewing foot. 3. If it hits, see step 1. 5. At a slow speed, sew approximately 10 stitches. 6. Place the darning plate on the needle plate. (When the machine is 1.5 mm (1/16"), set the appropriate stitch ... the material from the machine. BUTTONHOLE AND BUTTON SEWING USING ATTACHMENTS AND APPLICATIONS MAINTENANCE INDEX 49 CONTENTS KNOWING YOUR SEWING MACHINE STRAIGHT AND ZIGZAG STITCHING BUILT-IN STITCHES Button Sewing Pattern (Zigzag Stitch) Stitch Length Stitch Width Any Foot Button Sewing Foot 1. Measure the ...
...equipped with the stitch width dial. Attach the button sewing foot. 3. If it hits, see step 1. 5. At a slow speed, sew approximately 10 stitches. 6. Place the darning plate on the needle plate. (When the machine is 1.5 mm (1/16"), set the appropriate stitch ... the material from the machine. BUTTONHOLE AND BUTTON SEWING USING ATTACHMENTS AND APPLICATIONS MAINTENANCE INDEX 49 CONTENTS KNOWING YOUR SEWING MACHINE STRAIGHT AND ZIGZAG STITCHING BUILT-IN STITCHES Button Sewing Pattern (Zigzag Stitch) Stitch Length Stitch Width Any Foot Button Sewing Foot 1. Measure the ...

Users Manual - English
Page 59
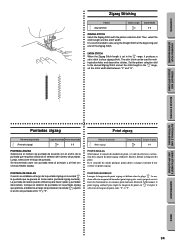
... The needle should be positioned on the zipper side of the foot for correct needle setting. Set the stitch length between "2" and "3". 2. Sew a single row or multiple rows of the material 2 cm (3/4") and place the zipper under the folded portion. 4. Pull the lower thread...or right side of the zipper foot. 5. Lower the needle into the notch on either the left pin on both sides. CONTENTS KNOWING YOUR SEWING MACHINE STRAIGHT AND ZIGZAG STITCHING BUILT-IN STITCHES A 1 2 3 B Zipper Inserting Pattern (Straight Stitch) Stitch Length 2-3 Stitch Width 2.5 (Center needle...
... The needle should be positioned on the zipper side of the foot for correct needle setting. Set the stitch length between "2" and "3". 2. Sew a single row or multiple rows of the material 2 cm (3/4") and place the zipper under the folded portion. 4. Pull the lower thread...or right side of the zipper foot. 5. Lower the needle into the notch on either the left pin on both sides. CONTENTS KNOWING YOUR SEWING MACHINE STRAIGHT AND ZIGZAG STITCHING BUILT-IN STITCHES A 1 2 3 B Zipper Inserting Pattern (Straight Stitch) Stitch Length 2-3 Stitch Width 2.5 (Center needle...
Users Manual - English
Page 65
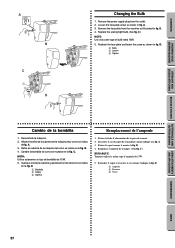
... en la fig. D. 1 Bombilla 2 Aflojar 3 Apretar 1. Remove the power supply plug from the machine as illustrated in fig. B. 4. D. 1 Ampoule 2 Desserrer 3 Visser BUTTONHOLE AND BUTTON SEWING USING ATTACHMENTS AND APPLICATIONS MAINTENANCE INDEX 57 Replace the sewing light bulb. (See fig. B. 4. D. 1 Bulb 2 Loosen 3 Tighten Cambio de la bombilla ...de la lampe. (Voir fig. Reattach the face plate and fasten the screw as shown in fig. CONTENTS KNOWING YOUR SEWING MACHINE STRAIGHT AND ZIGZAG STITCHING BUILT-IN STITCHES A B C 1 2 3 D Changing the Bulb 1.
... en la fig. D. 1 Bombilla 2 Aflojar 3 Apretar 1. Remove the power supply plug from the machine as illustrated in fig. B. 4. D. 1 Ampoule 2 Desserrer 3 Visser BUTTONHOLE AND BUTTON SEWING USING ATTACHMENTS AND APPLICATIONS MAINTENANCE INDEX 57 Replace the sewing light bulb. (See fig. B. 4. D. 1 Bulb 2 Loosen 3 Tighten Cambio de la bombilla ...de la lampe. (Voir fig. Reattach the face plate and fasten the screw as shown in fig. CONTENTS KNOWING YOUR SEWING MACHINE STRAIGHT AND ZIGZAG STITCHING BUILT-IN STITCHES A B C 1 2 3 D Changing the Bulb 1.

Users Manual - English
Page 68
... of needle size/ thread size/fabric is not threaded properly in this instruction manual that details the operation you are correctly using the machine. w Page 19 w No Page 59 No w Threading is incorrect. w Pages 19-20 No w Wrong needle is incorrect. Lower...your nearest service center. w Page 27 No w Lower threading is too tight. CONTENTS KNOWING YOUR SEWING MACHINE STRAIGHT AND ZIGZAG STITCHING BUILT-IN STITCHES Performance Checklist Whenever sewing difficulties are encountered, review the section in the shuttle hook. w Page 20 No w Upper ...
... of needle size/ thread size/fabric is not threaded properly in this instruction manual that details the operation you are correctly using the machine. w Page 19 w No Page 59 No w Threading is incorrect. w Pages 19-20 No w Wrong needle is incorrect. Lower...your nearest service center. w Page 27 No w Lower threading is too tight. CONTENTS KNOWING YOUR SEWING MACHINE STRAIGHT AND ZIGZAG STITCHING BUILT-IN STITCHES Performance Checklist Whenever sewing difficulties are encountered, review the section in the shuttle hook. w Page 20 No w Upper ...


