
Users Manual - English
Page 2
... the sewing machine, basic safety precautions should never be left unattended when plugged in. Return the sewing machine to break. 14. Do not use as threading the needle, changing the needle, threading the bobbin, or changing the presser foot. 15. Use this manual. Switch the sewing machine to break. 12.
... the sewing machine, basic safety precautions should never be left unattended when plugged in. Return the sewing machine to break. 14. Do not use as threading the needle, changing the needle, threading the bobbin, or changing the presser foot. 15. Use this manual. Switch the sewing machine to break. 12.
Users Manual - English
Page 4
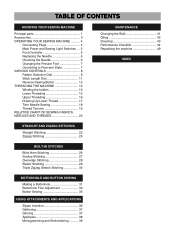
... 8 Pattern Selection Dial 8 Stitch Length Dial 11 Reverse Sewing Button 12 THREADING THE MACHINE 13 Winding the bobbin 13 Lower Threading 15 Upper Threading 16 Drawing Up Lower Thread 17 Twin Needle Sewing 18 Thread Tension 19 RELATIVE CHART OF SEWING FABRICS, NEEDLES AND THREADS 20 MAINTENANCE Changing the Bulb 41 Oiling 42 Cleaning 43 Performance...
... 8 Pattern Selection Dial 8 Stitch Length Dial 11 Reverse Sewing Button 12 THREADING THE MACHINE 13 Winding the bobbin 13 Lower Threading 15 Upper Threading 16 Drawing Up Lower Thread 17 Twin Needle Sewing 18 Thread Tension 19 RELATIVE CHART OF SEWING FABRICS, NEEDLES AND THREADS 20 MAINTENANCE Changing the Bulb 41 Oiling 42 Cleaning 43 Performance...
Users Manual - English
Page 18
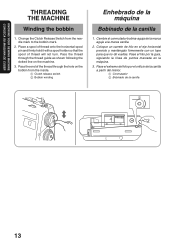
... por el orificio de la canilla a partir del nterior. 1 Conmutador 2 Bobinado de la canilla 2 1 134 KNOWING YOUR SEWING MACHINE CONOZCA SU MAQUINA DE COSER THREADING THE MACHINE Winding the bobbin 1. Place a spool of thread onto the horizontal spool pin and firmly hold it with a spool holder so that the spool of the... thread through the thread guide as shown following the dotted line on the bobbin from the needle mark to the bobbin mark. 2. Change the Clutch Release Switch from the ...
... por el orificio de la canilla a partir del nterior. 1 Conmutador 2 Bobinado de la canilla 2 1 134 KNOWING YOUR SEWING MACHINE CONOZCA SU MAQUINA DE COSER THREADING THE MACHINE Winding the bobbin 1. Place a spool of thread onto the horizontal spool pin and firmly hold it with a spool holder so that the spool of the... thread through the thread guide as shown following the dotted line on the bobbin from the needle mark to the bobbin mark. 2. Change the Clutch Release Switch from the ...
Users Manual - English
Page 22
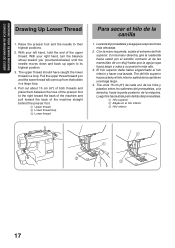
... enganchado el hilo inferior y hacer una lazada. KNOWING YOUR SEWING MACHINE CONOZCA SU MAQUINA DE COSER Drawing Up Lower Thread 1. Pull the upper thread toward the back of the upper thread. Levante el prensatelas y la aguja a sus posiciones más elevadas. 2. Raise the presser foot and the needle...to their highest positions. 2. With your left hand, hold the end of the machine straight behind the presser foot. 1 Upper thread 2 Lower thread loop 3 Lower thread Para sacar el hilo de la canilla 1. Con la mano derecha, gire la ruedecilla hacia usted (en el sentido contrario al de...
... enganchado el hilo inferior y hacer una lazada. KNOWING YOUR SEWING MACHINE CONOZCA SU MAQUINA DE COSER Drawing Up Lower Thread 1. Pull the upper thread toward the back of the upper thread. Levante el prensatelas y la aguja a sus posiciones más elevadas. 2. Raise the presser foot and the needle...to their highest positions. 2. With your left hand, hold the end of the machine straight behind the presser foot. 1 Upper thread 2 Lower thread loop 3 Lower thread Para sacar el hilo de la canilla 1. Con la mano derecha, gire la ruedecilla hacia usted (en el sentido contrario al de...

Users Manual - English
Page 25
... una tensión insuficiente o demasiado fuerte va a debilitar sus costuras o fruncir el tejido. 1 Revés 2 Derecho 1 2 1 2 RELATIVE CHART OF SEWING FABRICS, NEEDLES AND THREADS SEWING FABRICS NEEDLE SIZES THREAD SIZES Cotton: 80 VERY THIN Fine tricot, Fine lace, Thin linen, 9 Synthetic Silk, Organza, Chiffon Fine Mercerized Cotton LIGHTWEIGHT MEDIUM WEIGHT Voile, Taffeta...
... una tensión insuficiente o demasiado fuerte va a debilitar sus costuras o fruncir el tejido. 1 Revés 2 Derecho 1 2 1 2 RELATIVE CHART OF SEWING FABRICS, NEEDLES AND THREADS SEWING FABRICS NEEDLE SIZES THREAD SIZES Cotton: 80 VERY THIN Fine tricot, Fine lace, Thin linen, 9 Synthetic Silk, Organza, Chiffon Fine Mercerized Cotton LIGHTWEIGHT MEDIUM WEIGHT Voile, Taffeta...
Users Manual - English
Page 28
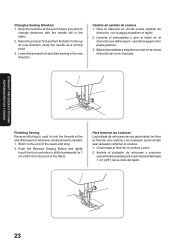
.... 2. Push the Reverse Sewing Button and lightly touch the foot controller to the end of the seam or wherever reinforcement is used to lock the threads at the point where you wish to line up its new direction using the needle as a turning point. 3. Raise the presser foot and turn the...
.... 2. Push the Reverse Sewing Button and lightly touch the foot controller to the end of the seam or wherever reinforcement is used to lock the threads at the point where you wish to line up its new direction using the needle as a turning point. 3. Raise the presser foot and turn the...
Users Manual - English
Page 31
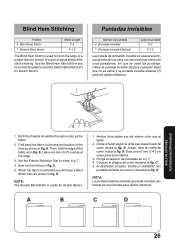
...) 7 (Stretch Blind Stitch) Stitch Length F-2 F-1.5 The Blind Hem Stitch is used to either 6 or 7. 4. B. Luego, dele la vuelta tal como indica la fig. D. Both the threads should be the same color as in fig. NOTA: La puntada elástica invisible (puntada invisible alemana) se recomienda para tejidos elásticos.
...) 7 (Stretch Blind Stitch) Stitch Length F-2 F-1.5 The Blind Hem Stitch is used to either 6 or 7. 4. B. Luego, dele la vuelta tal como indica la fig. D. Both the threads should be the same color as in fig. NOTA: La puntada elástica invisible (puntada invisible alemana) se recomienda para tejidos elásticos.
Users Manual - English
Page 47
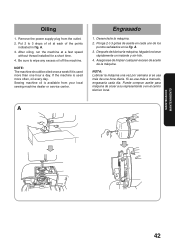
... day. A MAINTENANCE MANTENIMIENTO 423 If the machine is available from the outlet. 2. After oiling, run the machine at each of oil at a fast speed without thread installed for a short time. 4. Desenchufe la máquina. 2. Ponga 2 ó 3 gotas de aceite en cada uno de los puntos señalados en la fig...
... day. A MAINTENANCE MANTENIMIENTO 423 If the machine is available from the outlet. 2. After oiling, run the machine at each of oil at a fast speed without thread installed for a short time. 4. Desenchufe la máquina. 2. Ponga 2 ó 3 gotas de aceite en cada uno de los puntos señalados en la fig...
Users Manual - English
Page 48
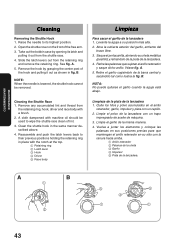
... 3 Garfio 4 Impulsor 5 Pista de la lanzadera. Take out the bobbin case by grasping the center post of the free arm. 3. Remove any accumulated lint and thread from the retaining ring, hook, driver and race body with machine oil should be removed. Limpieza de la pista de la lanzadera 1. Abra la cubierta...
... 3 Garfio 4 Impulsor 5 Pista de la lanzadera. Take out the bobbin case by grasping the center post of the free arm. 3. Remove any accumulated lint and thread from the retaining ring, hook, driver and race body with machine oil should be removed. Limpieza de la pista de la lanzadera 1. Abra la cubierta...

Users Manual - English
Page 50
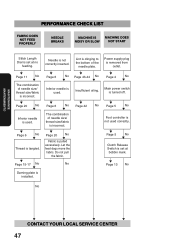
... Wrong needle is bent or not sharp. M Page 15 No M Lower thread tension is not correct. M Page 19 M No Page 19 No M Threading is too tight. Needle is too tight. M Page 16 No M Upper thread tension is incorrectly inserted. M Page 6 No M Inferior needle is incorrect. ...size/ thread size/fabric is not threaded properly in the shuttle hook. Lower thread is incorrect. Thread tension is tangled. M Page 16 No M Upper thread is incorrect. M Page 15 M No Page 43-44 No M Threading is not correctly installed. PERFORMANCE CHECK LIST UPPER THREAD LOWER THREAD BREAKS...
... Wrong needle is bent or not sharp. M Page 15 No M Lower thread tension is not correct. M Page 19 M No Page 19 No M Threading is too tight. Needle is too tight. M Page 16 No M Upper thread tension is incorrectly inserted. M Page 6 No M Inferior needle is incorrect. ...size/ thread size/fabric is not threaded properly in the shuttle hook. Lower thread is incorrect. Thread tension is tangled. M Page 16 No M Upper thread is incorrect. M Page 15 M No Page 43-44 No M Threading is not correctly installed. PERFORMANCE CHECK LIST UPPER THREAD LOWER THREAD BREAKS...
Users Manual - English
Page 52
... from outlet. Do not pull the fabric. No Power supply plug is pulled excessively. M Page 11 No M The combination of needle size/ thread size/fabric is incorrect. M Page 13 No No M M M M CONTACT YOUR LOCAL SERVICE CENTER 478 M Page 6 No... M Thread is used correctly. M M Page 6 No Page 42 No M The combination of needle size/ thread size/fabric is incorrect. M Page 6 No M M Page 43-44 No M Inferior needle is tangled. M Page 15-17 No M...
... from outlet. Do not pull the fabric. No Power supply plug is pulled excessively. M Page 11 No M The combination of needle size/ thread size/fabric is incorrect. M Page 13 No No M M M M CONTACT YOUR LOCAL SERVICE CENTER 478 M Page 6 No... M Thread is used correctly. M M Page 6 No Page 42 No M The combination of needle size/ thread size/fabric is incorrect. M Page 6 No M M Page 43-44 No M Inferior needle is tangled. M Page 15-17 No M...
Users Manual - English
Page 56
...Bulb Replacement 41 Shuttle Hook Removal 43 Shuttle Race Cleaning 43 Stitch Length Dial 11 Straight Stitch 22 Stretch Blind Stitch 26 T Thread Tension 19 Triple Stretch Stitch 22 Triple Zigzag Stretch Stitch 30 Troubleshooting 45, 47 Twin Needle Sewing 18 U Upper Tension Control Dial ...19 Upper Threading 16 W Winding the Bobbin 13 Z Zigzag Stitch 25 Zipper Insertion 36 Página M Modalidad brazo libre 7 Monogramas 39 O Ojales 31 P ...
...Bulb Replacement 41 Shuttle Hook Removal 43 Shuttle Race Cleaning 43 Stitch Length Dial 11 Straight Stitch 22 Stretch Blind Stitch 26 T Thread Tension 19 Triple Stretch Stitch 22 Triple Zigzag Stretch Stitch 30 Troubleshooting 45, 47 Twin Needle Sewing 18 U Upper Tension Control Dial ...19 Upper Threading 16 W Winding the Bobbin 13 Z Zigzag Stitch 25 Zipper Insertion 36 Página M Modalidad brazo libre 7 Monogramas 39 O Ojales 31 P ...


