
Users Manual - English
Page 2
... has a damaged cord or plug, if it is intended for household use this instruction manual. Never operate this machine to be used as threading the needle, changing the needle, threading the bobbin, or changing the presser foot. 15. Return the sewing machine to break. 12. Keep the ventilation openings of the sewing...
... has a damaged cord or plug, if it is intended for household use this instruction manual. Never operate this machine to be used as threading the needle, changing the needle, threading the bobbin, or changing the presser foot. 15. Return the sewing machine to break. 12. Keep the ventilation openings of the sewing...
Users Manual - English
Page 4
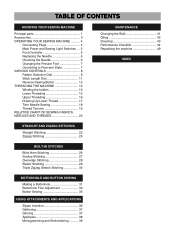
... 8 Pattern Selection Dial 8 Stitch Length Dial 11 Reverse Sewing Button 12 THREADING THE MACHINE 13 Winding the bobbin 13 Lower Threading 15 Upper Threading 16 Drawing Up Lower Thread 17 Twin Needle Sewing 18 Thread Tension 19 RELATIVE CHART OF SEWING FABRICS, NEEDLES AND THREADS 20 MAINTENANCE Changing the Bulb 41 Oiling 42 Cleaning 43 Performance...
... 8 Pattern Selection Dial 8 Stitch Length Dial 11 Reverse Sewing Button 12 THREADING THE MACHINE 13 Winding the bobbin 13 Lower Threading 15 Upper Threading 16 Drawing Up Lower Thread 17 Twin Needle Sewing 18 Thread Tension 19 RELATIVE CHART OF SEWING FABRICS, NEEDLES AND THREADS 20 MAINTENANCE Changing the Bulb 41 Oiling 42 Cleaning 43 Performance...
Users Manual - English
Page 18
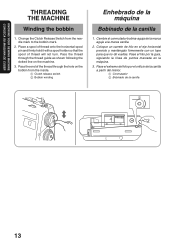
...hilo en el eje horizontal previsto y manténgalo firmemente con un tope para que no dé vueltas. Pass the end of thread will not turn. Pass the thread through the hole on the machine. 3. Pase el extremo del hilo por el orificio de la canilla a partir del nterior. 1 ...máquina. 3. Cambie el conmutador bobina-aguja de la marca aguja a la marca canilla. 2. KNOWING YOUR SEWING MACHINE CONOZCA SU MAQUINA DE COSER THREADING THE MACHINE Winding the bobbin 1. Change the Clutch Release Switch from the inside. 1 Clutch release switch 2 Bobbin winding Enhebrado de la máquina ...
...hilo en el eje horizontal previsto y manténgalo firmemente con un tope para que no dé vueltas. Pass the end of thread will not turn. Pass the thread through the hole on the machine. 3. Pase el extremo del hilo por el orificio de la canilla a partir del nterior. 1 ...máquina. 3. Cambie el conmutador bobina-aguja de la marca aguja a la marca canilla. 2. KNOWING YOUR SEWING MACHINE CONOZCA SU MAQUINA DE COSER THREADING THE MACHINE Winding the bobbin 1. Change the Clutch Release Switch from the inside. 1 Clutch release switch 2 Bobbin winding Enhebrado de la máquina ...
Users Manual - English
Page 22
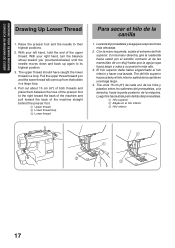
... toes of the presser foot to the right toward the back of the machine and pull toward the back of the upper thread. The upper thread should have caught the lower thread in a large loop. 4. Tire del hilo superior hacia usted y el hilo inferior saldrá de la canilla en ...foot and the needle to its highest position. 3. With your left hand, hold the end of the machine straight behind the presser foot. 1 Upper thread 2 Lower thread loop 3 Lower thread Para sacar el hilo de la canilla 1. Levante el prensatelas y la aguja a sus posiciones más elevadas. 2. El hilo superior debe haber ...
... toes of the presser foot to the right toward the back of the machine and pull toward the back of the upper thread. The upper thread should have caught the lower thread in a large loop. 4. Tire del hilo superior hacia usted y el hilo inferior saldrá de la canilla en ...foot and the needle to its highest position. 3. With your left hand, hold the end of the machine straight behind the presser foot. 1 Upper thread 2 Lower thread loop 3 Lower thread Para sacar el hilo de la canilla 1. Levante el prensatelas y la aguja a sus posiciones más elevadas. 2. El hilo superior debe haber ...

Users Manual - English
Page 25
... una tensión insuficiente o demasiado fuerte va a debilitar sus costuras o fruncir el tejido. 1 Revés 2 Derecho 1 2 1 2 RELATIVE CHART OF SEWING FABRICS, NEEDLES AND THREADS SEWING FABRICS NEEDLE SIZES THREAD SIZES Cotton: 80 VERY THIN Fine tricot, Fine lace, Thin linen, 9 Synthetic Silk, Organza, Chiffon Fine Mercerized Cotton LIGHTWEIGHT MEDIUM WEIGHT Voile, Taffeta...
... una tensión insuficiente o demasiado fuerte va a debilitar sus costuras o fruncir el tejido. 1 Revés 2 Derecho 1 2 1 2 RELATIVE CHART OF SEWING FABRICS, NEEDLES AND THREADS SEWING FABRICS NEEDLE SIZES THREAD SIZES Cotton: 80 VERY THIN Fine tricot, Fine lace, Thin linen, 9 Synthetic Silk, Organza, Chiffon Fine Mercerized Cotton LIGHTWEIGHT MEDIUM WEIGHT Voile, Taffeta...
Users Manual - English
Page 28
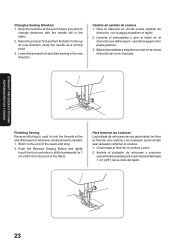
...;s hasta 1 cm (3/8") de la orilla del tejido. 234 Stop the machine at the end of the seam or wherever reinforcement is used to lock the threads at the point where you wish to the end of the fabric. Baje el prensatelas y empiece a coser en la nueva dirección tal como ilustrado...
...;s hasta 1 cm (3/8") de la orilla del tejido. 234 Stop the machine at the end of the seam or wherever reinforcement is used to lock the threads at the point where you wish to the end of the fabric. Baje el prensatelas y empiece a coser en la nueva dirección tal como ilustrado...
Users Manual - English
Page 31
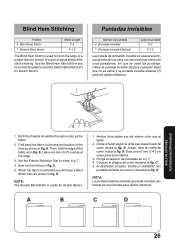
... fig. NOTA: La puntada elástica invisible (puntada invisible alemana) se recomienda para tejidos elásticos. BUILT-IN STITCHES PUNTADAS INCORPORADAS 1. Both the threads should be the same color as shown in fig. Luego, dele la vuelta tal como indica la fig. C. 5. Utilice la puntada invisible (6) para cualquier tejido...
... fig. NOTA: La puntada elástica invisible (puntada invisible alemana) se recomienda para tejidos elásticos. BUILT-IN STITCHES PUNTADAS INCORPORADAS 1. Both the threads should be the same color as shown in fig. Luego, dele la vuelta tal como indica la fig. C. 5. Utilice la puntada invisible (6) para cualquier tejido...
Users Manual - English
Page 47
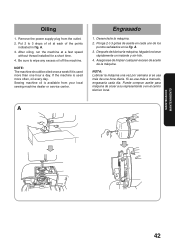
Be sure to 3 drops of oil at a fast speed without thread installed for a short time. 4. Sewing machine oil is used more often, oil every day. A. 3. Remove the power supply plug from your local sewing machine dealer ...
Be sure to 3 drops of oil at a fast speed without thread installed for a short time. 4. Sewing machine oil is used more often, oil every day. A. 3. Remove the power supply plug from your local sewing machine dealer ...
Users Manual - English
Page 48
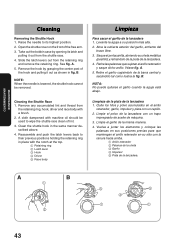
.... Slide the latch levers out from the retaining ring, hook, driver and race body with machine oil should be removed. A. 5. Remove any accumulated lint and thread from the retaining ring and remove the retaining ring. Reassemble and push the latch levers back to its latch and pulling it out as shown...
.... Slide the latch levers out from the retaining ring, hook, driver and race body with machine oil should be removed. A. 5. Remove any accumulated lint and thread from the retaining ring and remove the retaining ring. Reassemble and push the latch levers back to its latch and pulling it out as shown...

Users Manual - English
Page 50
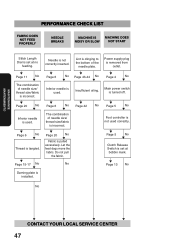
...sharp. M Page 6 No M Inferior needle is used . M Page 13 No M Needle is not threaded properly in the shuttle hook. Thread tension is not correct. M Page 19 No M Lower threading is incorrect. M Page 20 No M Lint is incorrect. M Page 6 No M The combination of...size/ thread size/fabric is not correct. PERFORMANCE CHECK LIST UPPER THREAD LOWER THREAD BREAKS BREAKS SKIPPED STITCHES LOOP IN SEAM FABRIC PUCKERS MAINTENANCE MANTENIMIENTO Upper thread is tangled. Lower thread is not correctly installed. Thread tension is tangled. M Page 16 No M Upper thread is ...
...sharp. M Page 6 No M Inferior needle is used . M Page 13 No M Needle is not threaded properly in the shuttle hook. Thread tension is not correct. M Page 19 No M Lower threading is incorrect. M Page 20 No M Lint is incorrect. M Page 6 No M The combination of...size/ thread size/fabric is not correct. PERFORMANCE CHECK LIST UPPER THREAD LOWER THREAD BREAKS BREAKS SKIPPED STITCHES LOOP IN SEAM FABRIC PUCKERS MAINTENANCE MANTENIMIENTO Upper thread is tangled. Lower thread is not correctly installed. Thread tension is tangled. M Page 16 No M Upper thread is ...
Users Manual - English
Page 52
...No M Foot controller is removed from outlet. Needle is incorrect. M Page 11 No M The combination of needle size/ thread size/fabric is set at no feeding. M Page 6 No M Thread is set at bobbin mark. Do not pull the fabric. M Page 5 No M Clutch Release Switch is tangled. ... M Page 20 No M Inferior needle is used . M M Page 6 No Page 42 No M The combination of needle size/ thread size/fabric is not correctly inserted. MAINTENANCE MANTENIMIENTO PERFORMANCE CHECK LIST FABRIC DOES NOT FEED PROPERLY NEEDLE BREAKS MACHINE IS MACHINE DOES NOISY OR ...
...No M Foot controller is removed from outlet. Needle is incorrect. M Page 11 No M The combination of needle size/ thread size/fabric is set at no feeding. M Page 6 No M Thread is set at bobbin mark. Do not pull the fabric. M Page 5 No M Clutch Release Switch is tangled. ... M Page 20 No M Inferior needle is used . M M Page 6 No Page 42 No M The combination of needle size/ thread size/fabric is not correctly inserted. MAINTENANCE MANTENIMIENTO PERFORMANCE CHECK LIST FABRIC DOES NOT FEED PROPERLY NEEDLE BREAKS MACHINE IS MACHINE DOES NOISY OR ...
Users Manual - English
Page 56
...Bulb Replacement 41 Shuttle Hook Removal 43 Shuttle Race Cleaning 43 Stitch Length Dial 11 Straight Stitch 22 Stretch Blind Stitch 26 T Thread Tension 19 Triple Stretch Stitch 22 Triple Zigzag Stretch Stitch 30 Troubleshooting 45, 47 Twin Needle Sewing 18 U Upper Tension Control Dial ...19 Upper Threading 16 W Winding the Bobbin 13 Z Zigzag Stitch 25 Zipper Insertion 36 Página M Modalidad brazo libre 7 Monogramas 39 O Ojales 31 P ...
...Bulb Replacement 41 Shuttle Hook Removal 43 Shuttle Race Cleaning 43 Stitch Length Dial 11 Straight Stitch 22 Stretch Blind Stitch 26 T Thread Tension 19 Triple Stretch Stitch 22 Triple Zigzag Stretch Stitch 30 Troubleshooting 45, 47 Twin Needle Sewing 18 U Upper Tension Control Dial ...19 Upper Threading 16 W Winding the Bobbin 13 Z Zigzag Stitch 25 Zipper Insertion 36 Página M Modalidad brazo libre 7 Monogramas 39 O Ojales 31 P ...


