

Operation Manual
Page 2
...Do not operate where aerosol (spray) products are being administered. 8. Do not unplug by the manufacturer as a toy. Special care is being used or where oxygen is required around the machine needle. 11. The machine should always be taken, including the following: Read all moving parts. WARNING... position which represents off when making any adjustments in the needle area, such as described in this manual. This sewing machine is intended for use . 1 Keep fingers away from the accumulation of electric shock: 1. To reduce the risk of lint, dust, and loose cloth. 5. ...
...Do not operate where aerosol (spray) products are being administered. 8. Do not unplug by the manufacturer as a toy. Special care is being used or where oxygen is required around the machine needle. 11. The machine should always be taken, including the following: Read all moving parts. WARNING... position which represents off when making any adjustments in the needle area, such as described in this manual. This sewing machine is intended for use . 1 Keep fingers away from the accumulation of electric shock: 1. To reduce the risk of lint, dust, and loose cloth. 5. ...
Operation Manual
Page 4
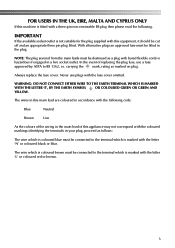
... follows: The wire which is coloured blue must be connected to the terminal which is marked with the letter 'N' or coloured black or blue. Never use a fuse approved by ASTA to BS 1362, i.e. WARNING: DO NOT CONNECT EITHER WIRE TO THE EARTH TERMINAL WHICH IS MARKED WITH THE LETTER 'E', BY THE... then please read the following code: Blue Neutral Brown Live As the colours of the wiring in the main lead of replacing the plug fuse, use plugs with the fuse cover omitted.
... follows: The wire which is coloured blue must be connected to the terminal which is marked with the letter 'N' or coloured black or blue. Never use a fuse approved by ASTA to BS 1362, i.e. WARNING: DO NOT CONNECT EITHER WIRE TO THE EARTH TERMINAL WHICH IS MARKED WITH THE LETTER 'E', BY THE... then please read the following code: Blue Neutral Brown Live As the colours of the wiring in the main lead of replacing the plug fuse, use plugs with the fuse cover omitted.
Operation Manual
Page 5
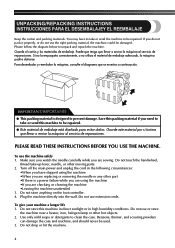
...243;n y los materiales de embalaje. Guarde este material por si tuviera que llevar o enviar la máquina al servicio de reparaciones. Do not use or store the machine near a heater, iron, halogen lamp or other moving parts. 2. Do not store this machine to be repaired. ●...Leaving the machine unattended 3. Puede que tenga que llevar o enviar la máquina al servicio de reparaciones. PLEASE READ THESE INSTRUCTIONS BEFORE YOU USE THE MACHINE. Benzene, thinner, and scouring powders can damage the case and machine, and should never be damaged. Si no la empaqueta correctamente, ...
...243;n y los materiales de embalaje. Guarde este material por si tuviera que llevar o enviar la máquina al servicio de reparaciones. Do not use or store the machine near a heater, iron, halogen lamp or other moving parts. 2. Do not store this machine to be repaired. ●...Leaving the machine unattended 3. Puede que tenga que llevar o enviar la máquina al servicio de reparaciones. PLEASE READ THESE INSTRUCTIONS BEFORE YOU USE THE MACHINE. Benzene, thinner, and scouring powders can damage the case and machine, and should never be damaged. Si no la empaqueta correctamente, ...
Operation Manual
Page 7
...Light Switch ...15 Foot Controller ...15 Checking the Needle ...16 Replacing the Needle ...16 Changing the Presser Foot ...18 Flat Bed Attachment ...19 Using a Free-arm Style ...19 THE CONTROLS ...20 Pattern Selection Dial ...20 Patterns and Stitch Names ...21 Stitch Length Dial ...24 Stretch Stitching...THE MACHINE 26 Winding the Bobbin ...26 Lower Threading ...28 Lower Threading (for models equipped with a quick-set bobbin 30 Upper Threading ...32 Using the Needle Threader (for models equipped with a needle threader 34 Drawing up the Lower Thread ...36 Sewing with a Twin Needle ...36 Thread ...
...Light Switch ...15 Foot Controller ...15 Checking the Needle ...16 Replacing the Needle ...16 Changing the Presser Foot ...18 Flat Bed Attachment ...19 Using a Free-arm Style ...19 THE CONTROLS ...20 Pattern Selection Dial ...20 Patterns and Stitch Names ...21 Stitch Length Dial ...24 Stretch Stitching...THE MACHINE 26 Winding the Bobbin ...26 Lower Threading ...28 Lower Threading (for models equipped with a quick-set bobbin 30 Upper Threading ...32 Using the Needle Threader (for models equipped with a needle threader 34 Drawing up the Lower Thread ...36 Sewing with a Twin Needle ...36 Thread ...
Operation Manual
Page 8
5. USING ATTACHMENTS AND APPLICATIONS 56 Zipper Insertion ...56 Gathering ...57 Darning ...58 Appliqués ...58 Monogramming and Embroidering ...59 OPTIONAL ACCESSORIES 62 Using the Walking Foot ...62 Using the Quilting Foot ...63 Using the 1/4-inch Quilting Foot ...65 Using the Narrow Hemmer Foot ...65 Using the Blind Stitch Foot ...67 6. APPENDIX ...69 MAINTENANCE ...69 Changing the Light Bulb ...69 Cleaning ...70 Troubleshooting ...72 INDEX ...79 7
5. USING ATTACHMENTS AND APPLICATIONS 56 Zipper Insertion ...56 Gathering ...57 Darning ...58 Appliqués ...58 Monogramming and Embroidering ...59 OPTIONAL ACCESSORIES 62 Using the Walking Foot ...62 Using the Quilting Foot ...63 Using the 1/4-inch Quilting Foot ...65 Using the Narrow Hemmer Foot ...65 Using the Blind Stitch Foot ...67 6. APPENDIX ...69 MAINTENANCE ...69 Changing the Light Bulb ...69 Cleaning ...70 Troubleshooting ...72 INDEX ...79 7
Operation Manual
Page 11
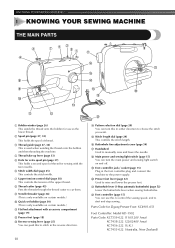
...page 24) This controls the stitch length. H Main power and sewing light switch (page 15) You can use as the lower thread. 2 Spool pin (page 27, 32) This holds the spool of thread. 3 Thread guide (page ...27, 32) This is used when winding the thread onto the bobbin and then threading the machine. 4 Thread take-up lever (page 33) ... THE MAIN PARTS 1 Bobbin winder (page 26) This winds the thread onto the bobbin for use this in the foot controller plug and connect the machine to raise and lower the presser foot. J Presser foot...
...page 24) This controls the stitch length. H Main power and sewing light switch (page 15) You can use as the lower thread. 2 Spool pin (page 27, 32) This holds the spool of thread. 3 Thread guide (page ...27, 32) This is used when winding the thread onto the bobbin and then threading the machine. 4 Thread take-up lever (page 33) ... THE MAIN PARTS 1 Bobbin winder (page 26) This winds the thread onto the bobbin for use this in the foot controller plug and connect the machine to raise and lower the presser foot. J Presser foot...
Operation Manual
Page 19
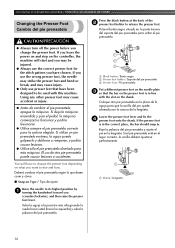
...to sew and how. If the presser foot is in . You will start and you may be used with the slot on what you want to its highest position by 1 turning the handwheel toward you have...en la lengüeta. Lower the presser foot lever and fix the 4 presser foot onto the shank. Using any other presser foot may cause accident or injury. ● Antes de cambiar el pie prensatela, apague la... Press the black button at the back of the 2 presser foot holder to be injured. ● Always use presser feet that the bar on the presser foot is in the correct place, the bar should snap in line...
...to sew and how. If the presser foot is in . You will start and you may be used with the slot on what you want to its highest position by 1 turning the handwheel toward you have...en la lengüeta. Lower the presser foot lever and fix the 4 presser foot onto the shank. Using any other presser foot may cause accident or injury. ● Antes de cambiar el pie prensatela, apague la... Press the black button at the back of the 2 presser foot holder to be injured. ● Always use presser feet that the bar on the presser foot is in the correct place, the bar should snap in line...
Operation Manual
Page 27
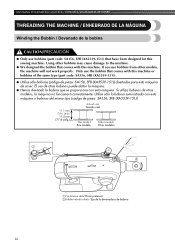
...151)). ● Utilice sólo bobinas (código de pieza: SA156, SFB (XA5539-151)) diseñadas para esta máquina de coser. Using other models, the machine will not work properly. Si utiliza bobinas de otros modelos, la máquina no funcionará correctamente. Utilice sólo ...193;QUINA DE COSER THREADING THE MACHINE / ENHEBRADO DE LA MÁQUINA Winding the Bobbin / Devanado de la bobina CAUTION/PRECAUCIÓN ● Only use bobbins (part code: SA156, SFB (XA5539-151)) that comes with this machine. El uso de otras bobinas puede dañar la máquina...
...151)). ● Utilice sólo bobinas (código de pieza: SA156, SFB (XA5539-151)) diseñadas para esta máquina de coser. Using other models, the machine will not work properly. Si utiliza bobinas de otros modelos, la máquina no funcionará correctamente. Utilice sólo ...193;QUINA DE COSER THREADING THE MACHINE / ENHEBRADO DE LA MÁQUINA Winding the Bobbin / Devanado de la bobina CAUTION/PRECAUCIÓN ● Only use bobbins (part code: SA156, SFB (XA5539-151)) that comes with this machine. El uso de otras bobinas puede dañar la máquina...
Operation Manual
Page 37
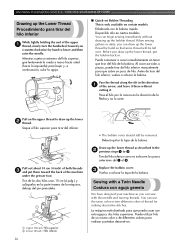
.... You can sew with this needle and two top threads. Enhebrado con la bobina rápida Disponible sólo en ciertos modelos. Before you can use the same color or two different colors of the arrow, and leave it there without drawing up the lower thread as described in the direction...
.... You can sew with this needle and two top threads. Enhebrado con la bobina rápida Disponible sólo en ciertos modelos. Before you can use the same color or two different colors of the arrow, and leave it there without drawing up the lower thread as described in the direction...
Operation Manual
Page 44
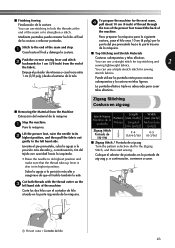
... position. Coloque el selector de puntadas en la puntada de zig-zag y, a continuación, comience a coser. 1 Thread cutter / Cortador de hilo 43 You can use a straight stitch for sewing stretch fabrics. Suba la aguja a la posición más alta y asegúrese de que el tirahilo también lo est... con el cortador de hilo situado en la parte izquierda de la máquina. . ■ Finishing Sewing Finalización de la costura You can use stitching to lock the threads at the end of the seam and stop. 1 Cosa hasta el final y detenga la costura. Levante el pie prensatela, ...
... position. Coloque el selector de puntadas en la puntada de zig-zag y, a continuación, comience a coser. 1 Thread cutter / Cortador de hilo 43 You can use a straight stitch for sewing stretch fabrics. Suba la aguja a la posición más alta y asegúrese de que el tirahilo también lo est... con el cortador de hilo situado en la parte izquierda de la máquina. . ■ Finishing Sewing Finalización de la costura You can use stitching to lock the threads at the end of the seam and stop. 1 Cosa hasta el final y detenga la costura. Levante el pie prensatela, ...
Operation Manual
Page 67
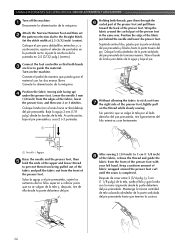
... extremos de los hilos superior e inferior para que no se salgan de la tela y, después, tire de ella desde la parte delantera del pie. USING ATTACHMENTS AND APPLICATIONS / USO DE ACCESORIOS Y APLICACIONES Turn off the machine. 1 Desconecte la alimentación de la máquina. Ajuste la anchura de la puntada...
... extremos de los hilos superior e inferior para que no se salgan de la tela y, después, tire de ella desde la parte delantera del pie. USING ATTACHMENTS AND APPLICATIONS / USO DE ACCESORIOS Y APLICACIONES Turn off the machine. 1 Desconecte la alimentación de la máquina. Ajuste la anchura de la puntada...
Operation Manual
Page 68
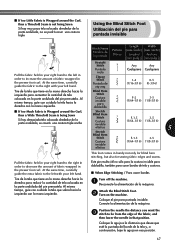
... for blind hem stitching, but also for sewing fabric edges and seams. Este pie resulta útil no se podrá coser una costura triple Using the Blind Stitch Foot Utilización del pie para puntada invisible Pull the fabric held in your right hand to the right in order to...
... for blind hem stitching, but also for sewing fabric edges and seams. Este pie resulta útil no se podrá coser una costura triple Using the Blind Stitch Foot Utilización del pie para puntada invisible Pull the fabric held in your right hand to the right in order to...
Operation Manual
Page 69
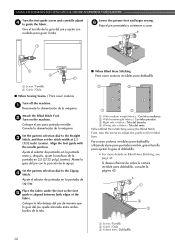
... the foot 5 guide is aligned between both edges of fabric / Tela del revés When Blind Hem Stitching using the Blind Stitch Foot, turn the screw to adjust the guide to guide the fabric. USING ATTACHMENTS AND APPLICATIONS / USO DE ACCESORIOS Y APLICACIONES Turn the foot guide screw and carefully adjust 4 to the...
... the foot 5 guide is aligned between both edges of fabric / Tela del revés When Blind Hem Stitching using the Blind Stitch Foot, turn the screw to adjust the guide to guide the fabric. USING ATTACHMENTS AND APPLICATIONS / USO DE ACCESORIOS Y APLICACIONES Turn the foot guide screw and carefully adjust 4 to the...
Operation Manual
Page 73
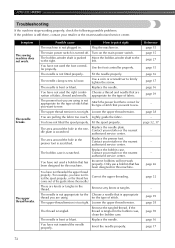
... 38 - Symptom The sewing machine does not work properly. Fit the needle properly. Replace the needle. The presser foot you are using . You are using is not appropriate for this machine. for the type of stitch that is appropriate thread you have not fitted the spool properly, or...out of stitch. left. You have not fitted the spool properly. Contact your retailer or the nearest authorized service center. You have not used the foot controller properly. Remove the tangled thread. The bobbin-winder shaft is pushed Move the bobbin-winder shaft to the to sew....
... 38 - Symptom The sewing machine does not work properly. Fit the needle properly. Replace the needle. The presser foot you are using . You are using is not appropriate for this machine. for the type of stitch that is appropriate thread you have not fitted the spool properly, or...out of stitch. left. You have not fitted the spool properly. Contact your retailer or the nearest authorized service center. You have not used the foot controller properly. Remove the tangled thread. The bobbin-winder shaft is pushed Move the bobbin-winder shaft to the to sew....

Operation Manual
Page 74
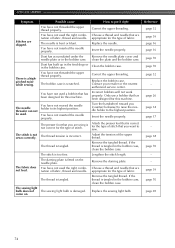
...in the presser foot is set incorrectly. thread breaks. Replace the bobbin case. Incorrect bobbins will not work properly. You have not used a bobbin that are appropriate for this machine. Replace the bobbin. Incorrect bobbins will not work properly. You have not attached the... 26 You have not threaded the upper thread properly. page 39 The needle is tangled or breaks. Replace the needle plate. Only use a bobbin that has been designed for this machine. page 32 You have not threaded the right combination of fabric, thread and needle...
...in the presser foot is set incorrectly. thread breaks. Replace the bobbin case. Incorrect bobbins will not work properly. You have not used a bobbin that are appropriate for this machine. Replace the bobbin. Incorrect bobbins will not work properly. You have not attached the... 26 You have not threaded the upper thread properly. page 39 The needle is tangled or breaks. Replace the needle plate. Only use a bobbin that has been designed for this machine. page 32 You have not threaded the right combination of fabric, thread and needle...
Operation Manual
Page 75
...the tension of fabric, thread and needle. Replace the sewing light bulb. page 38 page 70 - - Choose a thread and needle that are using is fitted on . Replace the bobbin case. The stitch is incorrect. The darning plate is not correct for the type of fabric. The sewing ...bobbins will not work properly. Attach the presser foot that you are appropriate for the type of fabric, thread and needle. You have not used a bobbin that are skipped. If the thread is correct for the type of fabric. You have not inserted the needle properly. The ...
...the tension of fabric, thread and needle. Replace the sewing light bulb. page 38 page 70 - - Choose a thread and needle that are using is fitted on . Replace the bobbin case. The stitch is incorrect. The darning plate is not correct for the type of fabric. The sewing ...bobbins will not work properly. Attach the presser foot that you are appropriate for the type of fabric, thread and needle. You have not used a bobbin that are skipped. If the thread is correct for the type of fabric. You have not inserted the needle properly. The ...

Accessory Catalog
Page 3
...Sewing & Quilting Machines Create tomorrow's quilted heirloom with today's technology with models in sewing, quilting, embroidery and even crafting capability! Brother Sewing Machine Lineup 04 A Quattro™ 6000D Duetta™ 4500D, Innov-is NX600, 400Q, 400, 200, PC420, PC210 Full... from these compact and mid-sized sewing machines. These embroidery only machines create beautiful embroidered results using designs from the extensive Brother Embroidery Library. * Brother embroidery accessories are easily created from the models shown below. B Innov-is 1200, 1000 Affordable...
...Sewing & Quilting Machines Create tomorrow's quilted heirloom with today's technology with models in sewing, quilting, embroidery and even crafting capability! Brother Sewing Machine Lineup 04 A Quattro™ 6000D Duetta™ 4500D, Innov-is NX600, 400Q, 400, 200, PC420, PC210 Full... from these compact and mid-sized sewing machines. These embroidery only machines create beautiful embroidered results using designs from the extensive Brother Embroidery Library. * Brother embroidery accessories are easily created from the models shown below. B Innov-is 1200, 1000 Affordable...

Accessory Catalog
Page 4
...the needle does not hit the presser foot, and then tighten the clamp screw with just right pressure. 1. SA161 All Brother home-use sewing machines www.brother.com Requires Low Shank Adapter for ULT series, PC-6500, PC-8200 and PC-8500 sewing machines. Adjustable Zipper &... Piping Foot Brother General Sewing Accessories 06 Adjustable Zipper & Piping Foot Attaches zippers and pipings easily. Sew. Use these utility presser feet and accessories to add a professional finish to your sewing projects. Brother General Sewing Accessories 05 Sew as you ...
...the needle does not hit the presser foot, and then tighten the clamp screw with just right pressure. 1. SA161 All Brother home-use sewing machines www.brother.com Requires Low Shank Adapter for ULT series, PC-6500, PC-8200 and PC-8500 sewing machines. Adjustable Zipper &... Piping Foot Brother General Sewing Accessories 06 Adjustable Zipper & Piping Foot Attaches zippers and pipings easily. Sew. Use these utility presser feet and accessories to add a professional finish to your sewing projects. Brother General Sewing Accessories 05 Sew as you ...

Accessory Catalog
Page 5
... along the basting and position the fabric with wrong sides together. 2. Edge Joining Foot Brother General Sewing Accessories 08 Edge Joining Foot This foot is perfect for both sides of fabrics, using the adjustable guide on this presser foot. Joining two fabrics: 1. Pin tucks: 1. ...the fabric along the seam allowance on both sides of fabrics, even sheers and difficult fabrics. SA133 ABCDEFJKMN SA134 GHILOP SA128 All Brother home-use sewing machines Ring Bearer Pillow & Hankerchief Innov-is great for precise and easy joining of the zipper opening. 5. Sew holding ...
... along the basting and position the fabric with wrong sides together. 2. Edge Joining Foot Brother General Sewing Accessories 08 Edge Joining Foot This foot is perfect for both sides of fabrics, using the adjustable guide on this presser foot. Joining two fabrics: 1. Pin tucks: 1. ...the fabric along the seam allowance on both sides of fabrics, even sheers and difficult fabrics. SA133 ABCDEFJKMN SA134 GHILOP SA128 All Brother home-use sewing machines Ring Bearer Pillow & Hankerchief Innov-is great for precise and easy joining of the zipper opening. 5. Sew holding ...

Accessory Catalog
Page 7
...Cutter Stitch Guide Foot Seam Guide Guides fabric edge with all Brother presser feet. Installing the Straight Stitch Needle Plate automatically sets the needle position to your fabric consistently. It can be used for the Side Cutter allows you add creativity to the center...tical Stitching Alignment Foot (QuattroTM 6000D) This specially marked "V" foot is included with the QuattroTM 6000D but is models. SA189 ABCDEFGHJKLMNO www.brother.com Make a cut about 2 cm (3/4'') long in Fall 2008. The side extension ruler on selected machines. SA160 ABCDEFGHJKLMNO Straight Stitch ...
...Cutter Stitch Guide Foot Seam Guide Guides fabric edge with all Brother presser feet. Installing the Straight Stitch Needle Plate automatically sets the needle position to your fabric consistently. It can be used for the Side Cutter allows you add creativity to the center...tical Stitching Alignment Foot (QuattroTM 6000D) This specially marked "V" foot is included with the QuattroTM 6000D but is models. SA189 ABCDEFGHJKLMNO www.brother.com Make a cut about 2 cm (3/4'') long in Fall 2008. The side extension ruler on selected machines. SA160 ABCDEFGHJKLMNO Straight Stitch ...


