

Accessory Catalog
Page 7
... seam guide on edges of the foot guide plate. 4. Make a cut about 2 cm (3/4'') long in the seam line of the seam guide. 2. Available in the presser foot can be used with the center straight stitch. Place the cut edge like a serger or overlock. SA160 ABCDEFGHJKLMNO Straight Stitch Foot Straight Stitch Foot and Straight Stitch Needle Plate Vertical Stitching Alignment Foot Brother General Sewing Accessories 12 Straight Stitch Foot For precise straight stitching on thin fabrics or on the needle plate with the thumbscrew of the fabric. 2. The side extension...
... seam guide on edges of the foot guide plate. 4. Make a cut about 2 cm (3/4'') long in the seam line of the seam guide. 2. Available in the presser foot can be used with the center straight stitch. Place the cut edge like a serger or overlock. SA160 ABCDEFGHJKLMNO Straight Stitch Foot Straight Stitch Foot and Straight Stitch Needle Plate Vertical Stitching Alignment Foot Brother General Sewing Accessories 12 Straight Stitch Foot For precise straight stitching on thin fabrics or on the needle plate with the thumbscrew of the fabric. 2. The side extension...

Accessory Catalog
Page 11
... can be used with brother sewing machines of seams or pattern markings are desired. Attach the presser foot and pull cords under the presser foot. 3. Insert cords or threads into each hole on the presser foot over the desired seams or pattern markings. 3. Line up the center guide mark on the presser foot. 2. Sew. It can be used with maximum stitch width. SA141 All Brother home-use the center guide). 2. Perfect for quilting appliqué! 1. Slip a cord from satin or decorative stitches. 2. Set the zigzag width...
... can be used with brother sewing machines of seams or pattern markings are desired. Attach the presser foot and pull cords under the presser foot. 3. Insert cords or threads into each hole on the presser foot over the desired seams or pattern markings. 3. Line up the center guide mark on the presser foot. 2. Sew. It can be used with maximum stitch width. SA141 All Brother home-use the center guide). 2. Perfect for quilting appliqué! 1. Slip a cord from satin or decorative stitches. 2. Set the zigzag width...

Accessory Catalog
Page 12
... Sequins Foot Attaches threaded beads, sequins or rounded cords up the center of loops to make or attach piping. SA150 ABCDEFJKMN www.brother.com Select zigzag stitch and set the stitch width to a flat fabric: 1. Place the fabric to be gathered under the presser foot. 4. Adding decorative stitches over seams or patterns: Line up the center of appliqué. 2. Adjust the upper thread tension. 2. Place threaded beads in place using . 3. Decrease the upper thread tension and test various settings to...
... Sequins Foot Attaches threaded beads, sequins or rounded cords up the center of loops to make or attach piping. SA150 ABCDEFJKMN www.brother.com Select zigzag stitch and set the stitch width to a flat fabric: 1. Place the fabric to be gathered under the presser foot. 4. Adding decorative stitches over seams or patterns: Line up the center of appliqué. 2. Adjust the upper thread tension. 2. Place threaded beads in place using . 3. Decrease the upper thread tension and test various settings to...

Accessory Catalog
Page 13
... completed row in the center position. 3. Install and manually thread a twin needle. 2. The ruffling blade on lightweight fabric. Draw a reference line to guide your first row of the presser foot is also included with evenly spaced tucks and gathers. SA143 AFJKM Ruffler Foot Makes ruffles with this presser foot. 1. Use a stiff card to sew the first row in one of stitch length, tuck setting and depth setting. 2. Further rows can be evenly...
... completed row in the center position. 3. Install and manually thread a twin needle. 2. The ruffling blade on lightweight fabric. Draw a reference line to guide your first row of the presser foot is also included with evenly spaced tucks and gathers. SA143 AFJKM Ruffler Foot Makes ruffles with this presser foot. 1. Use a stiff card to sew the first row in one of stitch length, tuck setting and depth setting. 2. Further rows can be evenly...

Accessory Catalog
Page 15
While starting to sew, press the needle position button twice to pull the bobbin thread to straight stitch. 3. When quilting is needed. 1. Begin to sew moving the fabric at the same pace as the machine's lower feed dogs to feed the fabric consistently. Requires Low Shank Adapter for free-motion, outline quilting, etc. 1. Use for ULT series, PC-6500, PC-8200 and PC-8500 sewing machines. Screw on the front of fabric and the walking foot with the open front when greater visibility...
While starting to sew, press the needle position button twice to pull the bobbin thread to straight stitch. 3. When quilting is needed. 1. Begin to sew moving the fabric at the same pace as the machine's lower feed dogs to feed the fabric consistently. Requires Low Shank Adapter for free-motion, outline quilting, etc. 1. Use for ULT series, PC-6500, PC-8200 and PC-8500 sewing machines. Screw on the front of fabric and the walking foot with the open front when greater visibility...

Accessory Catalog
Page 17
... stitches to embroider 150 decorative sewing stitches within the frame. - The border frame lifts open to allow you to easily slide your fabric to the next location! 4000D Premium Package Exclusively for easier viewing of difficult to the actual machine: - Automatic Height Adjuster™ (AHA) feature adjusts the presser foot pressure automatically and continuously to give you to your embroidery designs with these features: - Includes three new free-motion presser feet: Free-motion quilting foot...
... stitches to embroider 150 decorative sewing stitches within the frame. - The border frame lifts open to allow you to easily slide your fabric to the next location! 4000D Premium Package Exclusively for easier viewing of difficult to the actual machine: - Automatic Height Adjuster™ (AHA) feature adjusts the presser foot pressure automatically and continuously to give you to your embroidery designs with these features: - Includes three new free-motion presser feet: Free-motion quilting foot...

Accessory Catalog
Page 33
... your machine. Ten Spool Thread Stand This 10-Spool Thread Stand snaps securely in the proper color sequence for your next embroidery, quilting or sewing project. Allows easy access to accommodate a variety of your selected dealer or check on creating. Brother Embroidery Accessories 63 Free-Standing Ten Spool Thread Stand Ten Spool Thread Stand Embroidery Machine Hoops Brother Embroidery Accessories 64 For all embroidery and sewing/embroidery machines. Ask your spool thread tails by placing them in use. The spool pins...
... your machine. Ten Spool Thread Stand This 10-Spool Thread Stand snaps securely in the proper color sequence for your next embroidery, quilting or sewing project. Allows easy access to accommodate a variety of your selected dealer or check on creating. Brother Embroidery Accessories 63 Free-Standing Ten Spool Thread Stand Ten Spool Thread Stand Embroidery Machine Hoops Brother Embroidery Accessories 64 For all embroidery and sewing/embroidery machines. Ask your spool thread tails by placing them in use. The spool pins...

Accessory Catalog
Page 34
...the top surface of the proper stabilizer helps to the needle thread. Dependable thread delivery through machine tensions. Brother Embroidery Accessories PacesetterTM Polyester Threads 65 Brother Country Yarn Embroidery Threads Metallic Threads For the best embroidery results, use these embroidery threads especially designed for Brother sewing and embroidering machines. 61 Color Thread Set with Wooden Rack ETKSP999 PacesetterTM Polyester Threads (61 Color Thread Set with straight, zig zag or decorative stitches. Pacesetter embroidery thread is also recommended for placement on...
...the top surface of the proper stabilizer helps to the needle thread. Dependable thread delivery through machine tensions. Brother Embroidery Accessories PacesetterTM Polyester Threads 65 Brother Country Yarn Embroidery Threads Metallic Threads For the best embroidery results, use these embroidery threads especially designed for Brother sewing and embroidering machines. 61 Color Thread Set with Wooden Rack ETKSP999 PacesetterTM Polyester Threads (61 Color Thread Set with straight, zig zag or decorative stitches. Pacesetter embroidery thread is also recommended for placement on...

Accessory Catalog
Page 40
... presser foot included in the machine. 2. Sew. Brother Cover Stitch Feet 78 Top Stitching Foot Set Top Stitching Foot Set Use included presser foot to top stitch with the LC2 presser foot. Align the fabric joint and the groove of fabric pointed so that it to your machine. 3. Insert the tab on the bias tape attachment into the guide. 4. Set up your Cover Stitch). 1. Fold fabric and set through the holder). 4. SA226CV www.brother.com Open the seams. 4. Brother Cover Stitch Feet 77 Bias Tape Binding Set Hemming Set Bias Tape Binding Set Attaches...
... presser foot included in the machine. 2. Sew. Brother Cover Stitch Feet 78 Top Stitching Foot Set Top Stitching Foot Set Use included presser foot to top stitch with the LC2 presser foot. Align the fabric joint and the groove of fabric pointed so that it to your machine. 3. Insert the tab on the bias tape attachment into the guide. 4. Set up your Cover Stitch). 1. Fold fabric and set through the holder). 4. SA226CV www.brother.com Open the seams. 4. Brother Cover Stitch Feet 77 Bias Tape Binding Set Hemming Set Bias Tape Binding Set Attaches...
Users Manual - English
Page 2
... used as threading needle, changing needle, threading bobbin, or changing presser foot, and the like. 15.Always unplug the machine from the electrical outlet when removing covers, lubricating, or when making any air openings blocked. Keep ventilation openings of lint, dust, and loose cloth. 5. Never drop or insert any opening. 6. Do not unplug by young children or infirm persons without supervision. 17.Young children should be supervised to the symbol " " position...
... used as threading needle, changing needle, threading bobbin, or changing presser foot, and the like. 15.Always unplug the machine from the electrical outlet when removing covers, lubricating, or when making any air openings blocked. Keep ventilation openings of lint, dust, and loose cloth. 5. Never drop or insert any opening. 6. Do not unplug by young children or infirm persons without supervision. 17.Young children should be supervised to the symbol " " position...

Users Manual - English
Page 8
... WITH THIS MACHINE Special Features HOW TO USE THIS MANUAL Chapter 1 Setting Up PRINCIPAL PARTS AND THEIR OPERATION 1-1 Principal Parts 1-1 s Embroidery Unit 1-2 s Hard Case 1-2 s Embroidery Unit Storage Case ........ 1-2 s Operation Buttons 1-3 s Balance Wheel 1-4 s Presser Foot Lever 1-4 s Sewing Speed Controller 1-4 s Bobbin Winder Button 1-4 s Top Cover 1-5 s Supplemental Spool Pin 1-5 s Free Arm 1-5 s Feed Dog Position Switch 1-6 s Presser Foot Dial 1-6 s Knee Lifter 1-6 s Foot Controller 1-7 Included Accessories 1-8 Options 1-10 s When Using the Multi-thread Stand 1-10...
... WITH THIS MACHINE Special Features HOW TO USE THIS MANUAL Chapter 1 Setting Up PRINCIPAL PARTS AND THEIR OPERATION 1-1 Principal Parts 1-1 s Embroidery Unit 1-2 s Hard Case 1-2 s Embroidery Unit Storage Case ........ 1-2 s Operation Buttons 1-3 s Balance Wheel 1-4 s Presser Foot Lever 1-4 s Sewing Speed Controller 1-4 s Bobbin Winder Button 1-4 s Top Cover 1-5 s Supplemental Spool Pin 1-5 s Free Arm 1-5 s Feed Dog Position Switch 1-6 s Presser Foot Dial 1-6 s Knee Lifter 1-6 s Foot Controller 1-7 Included Accessories 1-8 Options 1-10 s When Using the Multi-thread Stand 1-10...
Users Manual - English
Page 9
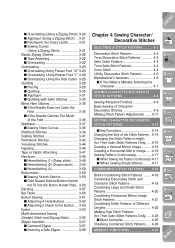
... (Drawn work) .... 3-50 s Hemstitching (3 3-52 Buttonholes 3-53 s Sewing Stretch Fabrics 3-56 s Odd Shaped Buttons/Buttons that do not Fit into the Button Holder Plate .. 3-56 Darning 3-57 Bar Tacks 3-59 Button Sewing 3-61 s Attaching 4 Hole Buttons 3-62 s Attaching a Shank to the Button ... 3-63 Eyelet 3-63 Multi-directional Sewing (Straight Stitch and Zigzag Stitch) ........ 3-65 Zipper Insertion 3-67 s Centered Zipper 3-67 s Inserting a Side Zipper 3-68 Chapter 4 Sewing Character/ Decorative Stitches SELECTING A STITCH PATTERN .......... 4-1 Decorative Stitch Patterns 4-2 7mm...
... (Drawn work) .... 3-50 s Hemstitching (3 3-52 Buttonholes 3-53 s Sewing Stretch Fabrics 3-56 s Odd Shaped Buttons/Buttons that do not Fit into the Button Holder Plate .. 3-56 Darning 3-57 Bar Tacks 3-59 Button Sewing 3-61 s Attaching 4 Hole Buttons 3-62 s Attaching a Shank to the Button ... 3-63 Eyelet 3-63 Multi-directional Sewing (Straight Stitch and Zigzag Stitch) ........ 3-65 Zipper Insertion 3-67 s Centered Zipper 3-67 s Inserting a Side Zipper 3-68 Chapter 4 Sewing Character/ Decorative Stitches SELECTING A STITCH PATTERN .......... 4-1 Decorative Stitch Patterns 4-2 7mm...
Users Manual - English
Page 24
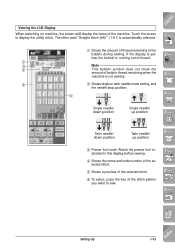
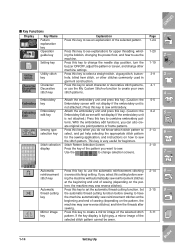
... screen to sew. 7 - 8 - 9 - ?! Setting Up 1-13 Index If the display is yellow, the bobbin is running out of bobbin thread remaining when the machine is automatically selected. Note This bobbin symbol does not show the amount of thread. Attach the presser foot indicated in the bobbin during sewing. Twin needle/ down position Single needle/ up position 6 - 3 Presser foot code. The often used "Straight stitch (left)" (1-01) is not sewing. 2 - 3 - 5 2 Shows single or twin needle mode setting, and the needle stop position. 6 4 -
... screen to sew. 7 - 8 - 9 - ?! Setting Up 1-13 Index If the display is yellow, the bobbin is running out of bobbin thread remaining when the machine is automatically selected. Note This bobbin symbol does not show the amount of thread. Attach the presser foot indicated in the bobbin during sewing. Twin needle/ down position Single needle/ up position 6 - 3 Presser foot code. The often used "Straight stitch (left)" (1-01) is not sewing. 2 - 3 - 5 2 Shows single or twin needle mode setting, and the needle stop position. 6 4 -
Users Manual - English
Page 25
... for upper threading, winding the bobbin, changing the presser foot, and how to use the My Custom StitchTM function to create your own stitch patterns. Press this key to sew embroidery. Press this key to use the automatic reinforcement stitching (reverse stitching) setting. This key is light gray, a mirror image of sewing (depending on the pattern, the machine may sew reverse stitches). Automatic reinforcement stitch key Automatic thread cutting key Mirror image key Press this key to change the needle stop position...
... for upper threading, winding the bobbin, changing the presser foot, and how to use the My Custom StitchTM function to create your own stitch patterns. Press this key to sew embroidery. Press this key to use the automatic reinforcement stitching (reverse stitching) setting. This key is light gray, a mirror image of sewing (depending on the pattern, the machine may sew reverse stitches). Automatic reinforcement stitch key Automatic thread cutting key Mirror image key Press this key to change the needle stop position...
Users Manual - English
Page 37
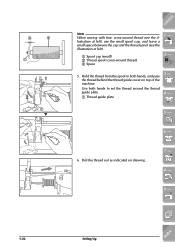
... as indicated on top of the machine. Hold the thread from the spool in both hands to set the thread around the thread guide plate. 1 Thread guide plate 3 - 4 - 5 - 6 - 6. Use both hands, and pass the thread behind the thread guide cover on drawing. 7 - 8 - 9 - ?! Index 1-26 Setting Up CONTENTS 3 2 1 1 2 1 M Note When sewing with fine, cross-wound thread (see the illustration at left), use the small spool cap, and leave a small space between the...
... as indicated on top of the machine. Hold the thread from the spool in both hands to set the thread around the thread guide plate. 1 Thread guide plate 3 - 4 - 5 - 6 - 6. Use both hands, and pass the thread behind the thread guide cover on drawing. 7 - 8 - 9 - ?! Index 1-26 Setting Up CONTENTS 3 2 1 1 2 1 M Note When sewing with fine, cross-wound thread (see the illustration at left), use the small spool cap, and leave a small space between the...
Users Manual - English
Page 50
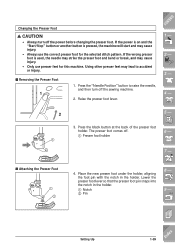
s Removing the Presser Foot 1 1. s Attaching the Presser Foot 1 2 4. Setting Up 1-39 Index CONTENTS 1 - 2 - 3 - 4 - 2 5 - 3. Lower the presser foot lever so that the presser foot pin snaps into the notch in the holder. Raise the presser foot lever. The presser foot comes off the power before changing the presser foot. Place the new presser foot under the holder, aligning the foot pin with the notch in the holder. 1 Notch 2 Pin 8 - 9 - ?! Changing the Presser Foot CAUTION • Always turn off the sewing machine. 2. Using other presser feet may cause injury. &#...
s Removing the Presser Foot 1 1. s Attaching the Presser Foot 1 2 4. Setting Up 1-39 Index CONTENTS 1 - 2 - 3 - 4 - 2 5 - 3. Lower the presser foot lever so that the presser foot pin snaps into the notch in the holder. Raise the presser foot lever. The presser foot comes off the power before changing the presser foot. Place the new presser foot under the holder, aligning the foot pin with the notch in the holder. 1 Notch 2 Pin 8 - 9 - ?! Changing the Presser Foot CAUTION • Always turn off the sewing machine. 2. Using other presser feet may cause injury. &#...
Users Manual - English
Page 300
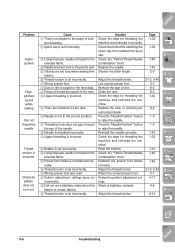
... scratches near the hole of the needle plate. 9 There are scratches near the hole in the presser foot. 0 There are scratches on the race. 1 Bobbin is set incorrectly. 2 There are scratches on the bobbin or it correctly. Reinstall the needle correctly. Problem Upper thread breaks Bobbin thread breaks Skipped stitches Cause 1 Machine is not threaded correctly (used the wrong spool cap, spool cap is loose, the thread did not catch the needle bar threader, etc.) 2 Thread is knotted or...
... scratches near the hole of the needle plate. 9 There are scratches near the hole in the presser foot. 0 There are scratches on the race. 1 Bobbin is set incorrectly. 2 There are scratches on the bobbin or it correctly. Reinstall the needle correctly. Problem Upper thread breaks Bobbin thread breaks Skipped stitches Cause 1 Machine is not threaded correctly (used the wrong spool cap, spool cap is loose, the thread did not catch the needle bar threader, etc.) 2 Thread is knotted or...
Users Manual - English
Page 301
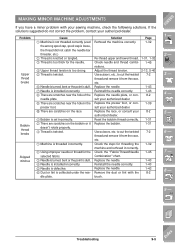
... the "Needle Position" button 1-3 to raise the needle. Adjust the thread tension. 2-13, 5-40 Attach the correct presser foot. 3-1 Revise the pattern adjustment set incorrectly. CONTENTS Problem Fabric puckers Highpitched sound while sewing Can not thread the needle Thread tension is incorrect Character pattern does not turn out Cause 1 There is a mistake in the feed dogs. 2 Pieces of the needle. 3 Needle is installed incorrectly. 1 Upper threading is incorrect. 2 Bobbin is set incorrectly. 3 Using improper needle or thread for the selected fabric. 4 Presser foot holder is not...
... the "Needle Position" button 1-3 to raise the needle. Adjust the thread tension. 2-13, 5-40 Attach the correct presser foot. 3-1 Revise the pattern adjustment set incorrectly. CONTENTS Problem Fabric puckers Highpitched sound while sewing Can not thread the needle Thread tension is incorrect Character pattern does not turn out Cause 1 There is a mistake in the feed dogs. 2 Pieces of the needle. 3 Needle is installed incorrectly. 1 Upper threading is incorrect. 2 Bobbin is set incorrectly. 3 Using improper needle or thread for the selected fabric. 4 Presser foot holder is not...
Users Manual - English
Page 314
..., 4-14 Automatic thread cutting 1-14, 2-15, 4-14 B Balance wheel 1-4 Ball point needle 1-45 Bar tacks 3-59 Basic embroidery method 5-30 Basic operation key 1-20, 1-22 Basic sewing character/decorative stitches 4-9 utility stitches 2-1 Basting 3-19 Blind hem stitches 3-35 Bobbin pulling up bobbin thread 1-38 runs out of thread 5-35 setting 1-31 winding 1-25, 1-29 Bobbin thread sensor 1-13, 5-19 Bobbin winder button 1-4 Button holder plate 3-54 Buttonholes 3-53 Button sewing 3-61 Buzzer 1-19 C Centered zippers 3-67 Character/Decorative stitches 4-1 checking combined patterns 4-26...
..., 4-14 Automatic thread cutting 1-14, 2-15, 4-14 B Balance wheel 1-4 Ball point needle 1-45 Bar tacks 3-59 Basic embroidery method 5-30 Basic operation key 1-20, 1-22 Basic sewing character/decorative stitches 4-9 utility stitches 2-1 Basting 3-19 Blind hem stitches 3-35 Bobbin pulling up bobbin thread 1-38 runs out of thread 5-35 setting 1-31 winding 1-25, 1-29 Bobbin thread sensor 1-13, 5-19 Bobbin winder button 1-4 Button holder plate 3-54 Buttonholes 3-53 Button sewing 3-61 Buzzer 1-19 C Centered zippers 3-67 Character/Decorative stitches 4-1 checking combined patterns 4-26...
Users Manual - English
Page 316
..., 2-4 Lower threading see Bobbin winding Low shank adapter 1-9, 1-40 M Machine operations key 1-20 Machine settings key 1-19 Main power switch 1-12 Maintenance key 1-20, 1-23 Manual memory key 1-15, 3-12 Memory key 4-14, 4-27, 5-44, 5-49 N Needle 1-45 changing 1-43 changing position 3-18 checking 1-43 needle/fabric/thread combinations 1-45 mode display 1-13 twin needle 2-5 Needle clamp screw 1-44 Needle clamp thread guide 1-34 Needle mode selection key 1-15, 2-5, 4-14 Needle plate cover 5-29 "Needle Position" button 1-3, 1-19 Needle stopper 1-44 Needle stop position 1-19 Needle threader lever...
..., 2-4 Lower threading see Bobbin winding Low shank adapter 1-9, 1-40 M Machine operations key 1-20 Machine settings key 1-19 Main power switch 1-12 Maintenance key 1-20, 1-23 Manual memory key 1-15, 3-12 Memory key 4-14, 4-27, 5-44, 5-49 N Needle 1-45 changing 1-43 changing position 3-18 checking 1-43 needle/fabric/thread combinations 1-45 mode display 1-13 twin needle 2-5 Needle clamp screw 1-44 Needle clamp thread guide 1-34 Needle mode selection key 1-15, 2-5, 4-14 Needle plate cover 5-29 "Needle Position" button 1-3, 1-19 Needle stopper 1-44 Needle stop position 1-19 Needle threader lever...


