

Users Manual - English
Page 1
Computerized Embroidery and Sewing Machine Operation Manual Product Code 885-V31/V33 GETTING READY SEWING BASICS UTILITY STITCHES EMBROIDERY APPENDIX
Computerized Embroidery and Sewing Machine Operation Manual Product Code 885-V31/V33 GETTING READY SEWING BASICS UTILITY STITCHES EMBROIDERY APPENDIX

Users Manual - English
Page 3
.... 1 Introduction Thank you for purchasing this manual for the correct operation of the various functions. Important Safety Instructions Please read the "Important Safety Instructions", and then study this embroidery and sewing machine. WARNING - Do not pull on the foot controller. • Do not use the machine. Plug the machine directly into the electrical outlet. Before using...
.... 1 Introduction Thank you for purchasing this manual for the correct operation of the various functions. Important Safety Instructions Please read the "Important Safety Instructions", and then study this embroidery and sewing machine. WARNING - Do not pull on the foot controller. • Do not use the machine. Plug the machine directly into the electrical outlet. Before using...
Users Manual - English
Page 4
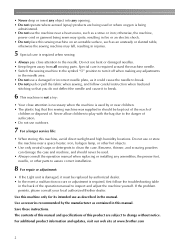
... sewn may fall, resulting in the back of the operation manual to break. 6 This machine is not a toy: • Your close attention to clean the case. Do not use outdoors. 7 For a longer service life: • When storing this sewing machine on an unstable surface, such as a stove or iron;... for its intended use a damaged or incorrect needle plate, as it to inspect and adjust the machine yourself. For additional product information and updates, visit our web site at www.brother.com 2 • Never drop or insert any object into any assemblies, the presser feet, needle, or other ...
... sewn may fall, resulting in the back of the operation manual to break. 6 This machine is not a toy: • Your close attention to clean the case. Do not use outdoors. 7 For a longer service life: • When storing this sewing machine on an unstable surface, such as a stove or iron;... for its intended use a damaged or incorrect needle plate, as it to inspect and adjust the machine yourself. For additional product information and updates, visit our web site at www.brother.com 2 • Never drop or insert any object into any assemblies, the presser feet, needle, or other ...
Users Manual - English
Page 11
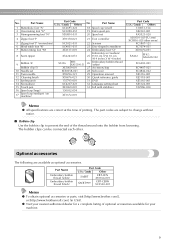
...obtain optional accessories or parts, visit [http://www.brother.com/], or [http://www.brothermall.com] (in USA). Part Name 18 Spool cap (small) 19 Extra spool pin 20 Spool net 4 Zipper foot "I" X59370-021 21 Foot controller 5 Zigzag foot "J" (on machine) 6 Blind stitch foot "R" 7 Button fitting...130012-054 22 Scissors 23 Disc-shaped screwdriver 24 Embroidery foot "Q" Embroidery set (medium) 25 H 10 cm X W 10 cm (H 4 inches X W 4 inches) 26 Embroidery bobbin thread (white) 27 Accessory bag 28 Soft cover 29 Operation manual 30 Quick reference guide 31 DVD 32 Language setting...
...obtain optional accessories or parts, visit [http://www.brother.com/], or [http://www.brothermall.com] (in USA). Part Name 18 Spool cap (small) 19 Extra spool pin 20 Spool net 4 Zipper foot "I" X59370-021 21 Foot controller 5 Zigzag foot "J" (on machine) 6 Blind stitch foot "R" 7 Button fitting...130012-054 22 Scissors 23 Disc-shaped screwdriver 24 Embroidery foot "Q" Embroidery set (medium) 25 H 10 cm X W 10 cm (H 4 inches X W 4 inches) 26 Embroidery bobbin thread (white) 27 Accessory bag 28 Soft cover 29 Operation manual 30 Quick reference guide 31 DVD 32 Language setting...

Users Manual - English
Page 23
... replacement / embroidery unit attachment / Example: Upper threading embroidery frame attachment / embroidery foot attachment / presser foot replacement on b the display panel. Press (Sewing machine help screen... appears. LCD (Liquid Crystal Display) Operation 21 c a b cd After you return to the item 1 selection screen. Simple explanations can be referred on each topic, refer to be displayed. Press the item to the corresponding page in this Operation Manual...
... replacement / embroidery unit attachment / Example: Upper threading embroidery frame attachment / embroidery foot attachment / presser foot replacement on b the display panel. Press (Sewing machine help screen... appears. LCD (Liquid Crystal Display) Operation 21 c a b cd After you return to the item 1 selection screen. Simple explanations can be referred on each topic, refer to be displayed. Press the item to the corresponding page in this Operation Manual...
Users Manual - English
Page 33
...be used with the wing needle or the twin needle. ● If the needle threader cannot be used with a 75/11 through 100/16 home sewing machine needle. If the spool cap is described below. For details on the correct combination of No. 20 or lower. ● Use the needle and the...a thickness of 130/120 or thicker cannot be used with the needle threader. ● The needle threader cannot be used, refer to "Threading the needle manually (without using the needle threader)" (page 36). ● Never use the thread of needles and threads, refer to "Selecting the needle depending on the ...
...be used with the wing needle or the twin needle. ● If the needle threader cannot be used with a 75/11 through 100/16 home sewing machine needle. If the spool cap is described below. For details on the correct combination of No. 20 or lower. ● Use the needle and the...a thickness of 130/120 or thicker cannot be used with the needle threader. ● The needle threader cannot be used, refer to "Threading the needle manually (without using the needle threader)" (page 36). ● Never use the thread of needles and threads, refer to "Selecting the needle depending on the ...
Users Manual - English
Page 38
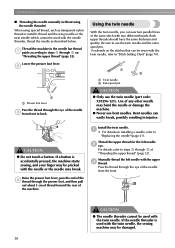
...sewing, and your finger may be pricked with the needle or the needle may be damaged. 36 Lower the presser foot lever. Install the twin needle. GETTING READY ■ Threading the needle manually (without using the needle threader) When using special thread, such as described below. Thread the machine...thread for the left needle with the twin needle, refer to steps a through the eye of the same stitch with the twin needle, the sewing machine may break. b a a Presser foot lever Pass the thread through the presser foot, and then pull out about 5 cm of thread toward...
...sewing, and your finger may be pricked with the needle or the needle may be damaged. 36 Lower the presser foot lever. Install the twin needle. GETTING READY ■ Threading the needle manually (without using the needle threader) When using special thread, such as described below. Thread the machine...thread for the left needle with the twin needle, refer to steps a through the eye of the same stitch with the twin needle, the sewing machine may break. b a a Presser foot lever Pass the thread through the presser foot, and then pull out about 5 cm of thread toward...

Users Manual - English
Page 39
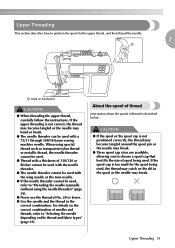
...page 43). Upper Threading 37 Then, thread the upper thread. g For details on changing the presser foot, refer to attach zigzag foot "J". Turn on the sewing machine and select a h stitch. • For stitch selection see "Selecting stitching" (page 49). • See "Stitch Setting Chart" (page 70) for... thread spool, set it . CAUTION ● When using the twin needle, be sure to steps g through the needle f bar thread guide, manually thread the right needle. CAUTION ● The needle threader cannot be used with the twin needle. Without passing the thread through j of "Threading...
...page 43). Upper Threading 37 Then, thread the upper thread. g For details on changing the presser foot, refer to attach zigzag foot "J". Turn on the sewing machine and select a h stitch. • For stitch selection see "Selecting stitching" (page 49). • See "Stitch Setting Chart" (page 70) for... thread spool, set it . CAUTION ● When using the twin needle, be sure to steps g through the needle f bar thread guide, manually thread the right needle. CAUTION ● The needle threader cannot be used with the twin needle. Without passing the thread through j of "Threading...
Users Manual - English
Page 72
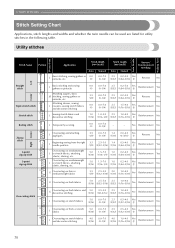
... J or stretch fabrics, attaching elastic, darning, etc. Utility stitches Twin Needle Walking Foot Presser Foot Stitch Name Pattern Application Stitch Width [mm (inch)] Auto Manual 1 J Basic stitching, sewing gathers or pintucks, etc. 0.0 (0) 0.0-7.0 (0-1/4) Stitch Length [mm (inch)] Auto Manual Reverse/ Reinforcement Stitching 2.5 0.2-5.0 Yes (3/32) (1/64-3/16) (J) Reverse No Left Straight stitch 2 J Basic stitching and...
... J or stretch fabrics, attaching elastic, darning, etc. Utility stitches Twin Needle Walking Foot Presser Foot Stitch Name Pattern Application Stitch Width [mm (inch)] Auto Manual 1 J Basic stitching, sewing gathers or pintucks, etc. 0.0 (0) 0.0-7.0 (0-1/4) Stitch Length [mm (inch)] Auto Manual Reverse/ Reinforcement Stitching 2.5 0.2-5.0 Yes (3/32) (1/64-3/16) (J) Reverse No Left Straight stitch 2 J Basic stitching and...
Users Manual - English
Page 73
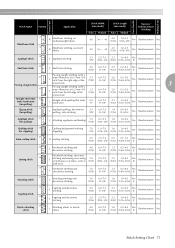
... on mediumweight fabrics R Blind hem stitching on stretch fabrics Stitch Width [mm (inch)] Stitch Length [mm (inch)] Auto Manual Auto Manual Reverse/ Reinforcement Stitching 00 3← - →3 2.0 (1/16) 1.0-3.5 (1/16-1/8) No Reinforcement No 00 3← -...stitching and decorative stitching 4.0 (3/16) 0.0-7.0 (0-1/4) 1.2 0.2-4.0 Yes (1/16) (1/64-3/16) (J) Reinforcement No Patchwork stitching, decorative J stitching and sewing overcasting on both pieces of fabric, such as 5.0 (3/16) 2.5-7.0 (3/32-1/4) 2.5 1.0-4.0 Yes (3/32) (1/16-3/16) (J) Reinforcement No with...
... on mediumweight fabrics R Blind hem stitching on stretch fabrics Stitch Width [mm (inch)] Stitch Length [mm (inch)] Auto Manual Auto Manual Reverse/ Reinforcement Stitching 00 3← - →3 2.0 (1/16) 1.0-3.5 (1/16-1/8) No Reinforcement No 00 3← -...stitching and decorative stitching 4.0 (3/16) 0.0-7.0 (0-1/4) 1.2 0.2-4.0 Yes (1/16) (1/64-3/16) (J) Reinforcement No Patchwork stitching, decorative J stitching and sewing overcasting on both pieces of fabric, such as 5.0 (3/16) 2.5-7.0 (3/32-1/4) 2.5 1.0-4.0 Yes (3/32) (1/16-3/16) (J) Reinforcement No with...
Users Manual - English
Page 74
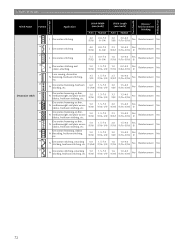
... Auto 4.0 (3/16) Manual 0.0-7.0 (0-1/4) Stitch Length [mm (inch)] Auto Manual Reverse/ Reinforcement Stitching ...3.0 (1/8) 2.0-4.0 (1/16-3/16) No Reinforcement No 36 J Decorative stitching 4.0 (3/16) 0.0-7.0 (0-1/4) 2.5 1.0-4.0 Yes (3/32) (1/16-3/16) (J) Reinforcement No 37 J Decorative stitching 5.5 (7/32) 0.0-7.0 (0-1/4) 1.6 1.0-4.0 Yes (1/16) (1/16-3/16) (J) Reinforcement No 38 N Decorative stitching and elastic-attaching 5.0 (3/16) 1.5-7.0 (1/16-1/4) 1.0 0.2-4.0 Yes (1/16) (1/64-3/16) (J) Reinforcement No 39 Lace sewing...
... Auto 4.0 (3/16) Manual 0.0-7.0 (0-1/4) Stitch Length [mm (inch)] Auto Manual Reverse/ Reinforcement Stitching ...3.0 (1/8) 2.0-4.0 (1/16-3/16) No Reinforcement No 36 J Decorative stitching 4.0 (3/16) 0.0-7.0 (0-1/4) 2.5 1.0-4.0 Yes (3/32) (1/16-3/16) (J) Reinforcement No 37 J Decorative stitching 5.5 (7/32) 0.0-7.0 (0-1/4) 1.6 1.0-4.0 Yes (1/16) (1/16-3/16) (J) Reinforcement No 38 N Decorative stitching and elastic-attaching 5.0 (3/16) 1.5-7.0 (1/16-1/4) 1.0 0.2-4.0 Yes (1/16) (1/64-3/16) (J) Reinforcement No 39 Lace sewing...
Users Manual - English
Page 75
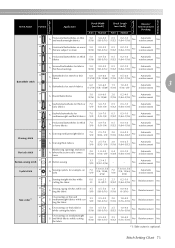
...Application 48 A Horizontal buttonholes on thin and mediumweight fabrics Stitch Width [mm (inch)] Stitch Length [mm (inch)] Auto Manual Auto Manual Reverse/ Reinforcement Stitching 5.0 (3/16) 3.0-5.0 (1/8-3/16) 0.5 (1/32) 0.2-1.0 (1/64-1/16) No Automatic reinforcement No 49... 7.0 (1/4) 3.0-7.0 (1/8-1/4) 0.5 (1/32) 0.3-1.0 (1/64-1/16) No Automatic reinforcement No 58 Darning stitch 59 60 Bar tack stitch 61 Button-sewing stitch 62 Eyelet stitch 63 A Darning mediumweight fabrics 7.0 (1/4) 2.5-7.0 (3/32-1/4) 2.0 (1/16) 0.4-2.5 (1/64-3/32) No Automatic reinforcement No...
...Application 48 A Horizontal buttonholes on thin and mediumweight fabrics Stitch Width [mm (inch)] Stitch Length [mm (inch)] Auto Manual Auto Manual Reverse/ Reinforcement Stitching 5.0 (3/16) 3.0-5.0 (1/8-3/16) 0.5 (1/32) 0.2-1.0 (1/64-1/16) No Automatic reinforcement No 49... 7.0 (1/4) 3.0-7.0 (1/8-1/4) 0.5 (1/32) 0.3-1.0 (1/64-1/16) No Automatic reinforcement No 58 Darning stitch 59 60 Bar tack stitch 61 Button-sewing stitch 62 Eyelet stitch 63 A Darning mediumweight fabrics 7.0 (1/4) 2.5-7.0 (3/32-1/4) 2.0 (1/16) 0.4-2.5 (1/64-3/32) No Automatic reinforcement No...
Users Manual - English
Page 76
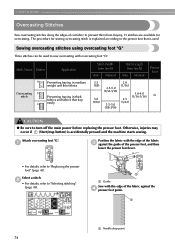
... edges of cut fabric to prevent them from fraying. 15 stitches are available for sewing overcasting stitch is explained according to the presser foot that fray easily Stitch Width [mm (inch)] Auto Manual Stitch Length [mm (inch)] Auto Manual Presser Foot 3.5 2.0 (1/8) (1/16) 2.5-5.0 (3/32-3/16) 1.0-4.0 (1/16-3/16) G ... in medium weight and thin fabrics Preventing fraying in thick fabrics and fabrics that is accidentally pressed and the machine starts sewing. a a Guide Sew with overcasting foot "G". a a Needle drop point 74 a G Position the fabric with the edge of the fabric...
... edges of cut fabric to prevent them from fraying. 15 stitches are available for sewing overcasting stitch is explained according to the presser foot that fray easily Stitch Width [mm (inch)] Auto Manual Stitch Length [mm (inch)] Auto Manual Presser Foot 3.5 2.0 (1/8) (1/16) 2.5-5.0 (3/32-3/16) 1.0-4.0 (1/16-3/16) G ... in medium weight and thin fabrics Preventing fraying in thick fabrics and fabrics that is accidentally pressed and the machine starts sewing. a a Guide Sew with overcasting foot "G". a a Needle drop point 74 a G Position the fabric with the edge of the fabric...
Users Manual - English
Page 77
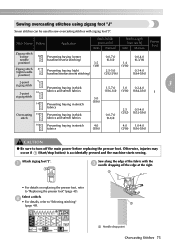
... edge of the fabric with zigzag foot "J". Otherwise, injuries may occur if (Start/stop button) is accidentally pressed and the machine starts sewing. Attach zigzag foot "J". a • For details on replacing the presser foot, refer to turn off the edge at the right.... Stitch Name Pattern Application Stitch Width [mm (inch)] Auto Manual Stitch Length [mm (inch)] Auto Manual Presser Foot Zigzag stitch (center 7 needle position) Zigzag stitch 8 (right ...
... edge of the fabric with zigzag foot "J". Otherwise, injuries may occur if (Start/stop button) is accidentally pressed and the machine starts sewing. Attach zigzag foot "J". a • For details on replacing the presser foot, refer to turn off the edge at the right.... Stitch Name Pattern Application Stitch Width [mm (inch)] Auto Manual Stitch Length [mm (inch)] Auto Manual Presser Foot Zigzag stitch (center 7 needle position) Zigzag stitch 8 (right ...

Users Manual - English
Page 78
...Manual 2.5 0.2-5.0 (3/32) (1/64-3/16) Presser Foot 1.4 0.0-4.0 (1/16) (0-3/16) 2.0 (1/16) S 2.5 (3/32) 1.0-4.0 (1/16-3/16) CAUTION ● Be sure to turn off . a b a a Notch in the presser foot holder, and then slowly lower the presser foot lever. Otherwise, injuries may occur if (Start/stop button) is accidentally pressed and the machine starts sewing.... Five stitches can be used to "Replacing the presser foot" (page 43). UTILITY STITCHES Sewing overcasting stitches using the needle threader.
...Manual 2.5 0.2-5.0 (3/32) (1/64-3/16) Presser Foot 1.4 0.0-4.0 (1/16) (0-3/16) 2.0 (1/16) S 2.5 (3/32) 1.0-4.0 (1/16-3/16) CAUTION ● Be sure to turn off . a b a a Notch in the presser foot holder, and then slowly lower the presser foot lever. Otherwise, injuries may occur if (Start/stop button) is accidentally pressed and the machine starts sewing.... Five stitches can be used to "Replacing the presser foot" (page 43). UTILITY STITCHES Sewing overcasting stitches using the needle threader.
Users Manual - English
Page 80
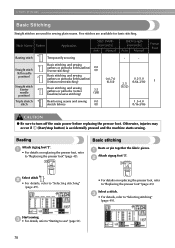
..."Selecting stitching" (page 49). b J Select stitch 6 . Otherwise, injuries may occur if (Start/stop button) is accidentally pressed and the machine starts sewing. Select a stitch. b • For details, refer to "Selecting stitching" (page 49). • For details on replacing the presser foot,...)] Auto Manual Stitch Length [mm (inch)] Auto Manual - - J Basic stitching Baste or pin together the fabric pieces. Basting Attach zigzag foot "J". c • For details, refer to "Starting to "Replacing the presser foot" (page 43). a Attach zigzag foot "J". Start sewing. UTILITY ...
..."Selecting stitching" (page 49). b J Select stitch 6 . Otherwise, injuries may occur if (Start/stop button) is accidentally pressed and the machine starts sewing. Select a stitch. b • For details, refer to "Selecting stitching" (page 49). • For details on replacing the presser foot,...)] Auto Manual Stitch Length [mm (inch)] Auto Manual - - J Basic stitching Baste or pin together the fabric pieces. Basting Attach zigzag foot "J". c • For details, refer to "Starting to "Replacing the presser foot" (page 43). a Attach zigzag foot "J". Start sewing. UTILITY ...

Users Manual - English
Page 82
...may occur if (Start/stop button) is accidentally pressed and the machine starts sewing. Memo z When the size of cylindrical pieces is too small to mark on stretch fabrics Stitch Width [mm (inch)] Auto Manual Stitch Length [mm (inch)] Auto Manual Presser Foot 00 3← - →3 2.0 (1/16) ...1.0-3.5 (1/16-1/8) R CAUTION ● Be sure to the following procedure. Sew a blind hem according to turn off the main power before ...
...may occur if (Start/stop button) is accidentally pressed and the machine starts sewing. Memo z When the size of cylindrical pieces is too small to mark on stretch fabrics Stitch Width [mm (inch)] Auto Manual Stitch Length [mm (inch)] Auto Manual Presser Foot 00 3← - →3 2.0 (1/16) ...1.0-3.5 (1/16-1/8) R CAUTION ● Be sure to the following procedure. Sew a blind hem according to turn off the main power before ...
Users Manual - English
Page 85
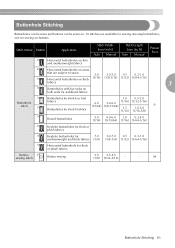
...fabrics Stitch Width [mm (inch)] Auto Manual Stitch Length [mm (inch)] Auto Manual Presser Foot 49 Horizontal buttonholes on areas that are available for sewing one-step buttonholes, one for sewing on both ends for stabilized fabrics 52 Buttonhole...for 7.0 3.0-7.0 0.5 0.3-1.0 mediumweight and thick fabrics (1/4) (1/8-1/4) (1/32) (1/64-1/16) 57 Horizontal buttonhole for thick or plush fabrics Button- 61 sewing stitch Button sewing 3.5 2.5-4.5 (1/8) (3/32-3/16) - - M Buttonhole Stitching 83 Buttonhole Stitching Buttonholes can be sewn and buttons can be sewn on. 10 ...
...fabrics Stitch Width [mm (inch)] Auto Manual Stitch Length [mm (inch)] Auto Manual Presser Foot 49 Horizontal buttonholes on areas that are available for sewing one-step buttonholes, one for sewing on both ends for stabilized fabrics 52 Buttonhole...for 7.0 3.0-7.0 0.5 0.3-1.0 mediumweight and thick fabrics (1/4) (1/8-1/4) (1/32) (1/64-1/16) 57 Horizontal buttonhole for thick or plush fabrics Button- 61 sewing stitch Button sewing 3.5 2.5-4.5 (1/8) (3/32-3/16) - - M Buttonhole Stitching 83 Buttonhole Stitching Buttonholes can be sewn and buttons can be sewn on. 10 ...

Users Manual - English
Page 92
... be sewn in place. Stitch Name Pattern Application Straight stitch (center 3 needle position) Attaching zippers Sewing concealed seams and pintucks Stitch Width [mm (inch)] Auto Manual Stitch Length [mm (inch)] Auto Manual Presser Foot 3.5 0.0-7.0 2.5 0.2-5.0 (1/8) (0-1/4) (3/32) (1/64-3/16) I CAUTION ● Be... sewing to turn off the main power before replacing the pressor foot. b With the right sides of the fabric facing each other , sew reverse stitches after reaching the zipper opening Attach zigzag foot "J". Stitching is accidentally pressed and the machine starts sewing....
... be sewn in place. Stitch Name Pattern Application Straight stitch (center 3 needle position) Attaching zippers Sewing concealed seams and pintucks Stitch Width [mm (inch)] Auto Manual Stitch Length [mm (inch)] Auto Manual Presser Foot 3.5 0.0-7.0 2.5 0.2-5.0 (1/8) (0-1/4) (3/32) (1/64-3/16) I CAUTION ● Be... sewing to turn off the main power before replacing the pressor foot. b With the right sides of the fabric facing each other , sew reverse stitches after reaching the zipper opening Attach zigzag foot "J". Stitching is accidentally pressed and the machine starts sewing....

Users Manual - English
Page 97
..., injuries may occur if (Start/stop button) is accidentally pressed and the machine starts sewing. CAUTION ● Be sure to "Selecting stitching" (page 49). a J Sew the fabric without stretching it. Select stitch 4 or 5 . c •...; For details on replacing the presser foot, refer to stretch fabrics Stitch Width [mm (inch)] Auto Manual 0.0 0.0-7.0 (0) (0-1/4) Stitch Length [mm (inch)] Auto Manual Presser Foot 2.5 1.5-4.0 (3/32) (1/16-3/16) 1.0 ...
..., injuries may occur if (Start/stop button) is accidentally pressed and the machine starts sewing. CAUTION ● Be sure to "Selecting stitching" (page 49). a J Sew the fabric without stretching it. Select stitch 4 or 5 . c •...; For details on replacing the presser foot, refer to stretch fabrics Stitch Width [mm (inch)] Auto Manual 0.0 0.0-7.0 (0) (0-1/4) Stitch Length [mm (inch)] Auto Manual Presser Foot 2.5 1.5-4.0 (3/32) (1/16-3/16) 1.0 ...


