

Users Manual - English
Page 1
Computerized Embroidery and Sewing Machine Operation Manual Product Code 885-V31/V33 GETTING READY SEWING BASICS UTILITY STITCHES EMBROIDERY APPENDIX
Computerized Embroidery and Sewing Machine Operation Manual Product Code 885-V31/V33 GETTING READY SEWING BASICS UTILITY STITCHES EMBROIDERY APPENDIX

Users Manual - English
Page 3
... "O" position to carry it by any air openings blocked. Do not use . In addition, after using this machine, carefully read these safety instructions before attempting to make any adjustments mentioned in this embroidery and sewing machine. This machine is intended for household use an extension cord. • Always unplug your work area clear: • Never...
... "O" position to carry it by any air openings blocked. Do not use . In addition, after using this machine, carefully read these safety instructions before attempting to make any adjustments mentioned in this embroidery and sewing machine. This machine is intended for household use an extension cord. • Always unplug your work area clear: • Never...
Users Manual - English
Page 9
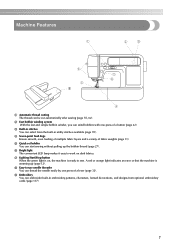
...LED lamp makes it easy to sew. i Embroidery You can thread the needle easily by one press of a button (page 22). g Lighting Start/Stop button When the green light is on dark fabrics. h Easy-to-use needle threader You can embroider built-in embroidery patterns, characters, framed decorations, and...and simple bobbin winder, you can be cut automatically after sewing (page 55, 62). A red or orange light indicates an error or that the machine is ready to work on , the machine is warming up the bobbin thread (page 27). Machine Features 9 a Automatic thread cutting The thread can wind ...
...LED lamp makes it easy to sew. i Embroidery You can thread the needle easily by one press of a button (page 22). g Lighting Start/Stop button When the green light is on dark fabrics. h Easy-to-use needle threader You can embroider built-in embroidery patterns, characters, framed decorations, and...and simple bobbin winder, you can be cut automatically after sewing (page 55, 62). A red or orange light indicates an error or that the machine is ready to work on , the machine is warming up the bobbin thread (page 27). Machine Features 9 a Automatic thread cutting The thread can wind ...

Users Manual - English
Page 12
...guide (page 24, 33) Pass the thread under this panel to select stitches or embroidery patterns, or check how to operate the machine. c Spool pin (page 23, 32) Place a spool of the sewing machine and their functions are described below. e LCD (liquid crystal display) (touch panel) ...Pass the threads through the thread cutter to learn the names of the machine parts. g Embroidery unit connector slot (page 123) Plug in the LCD. Before using the sewing machine, carefully read these buttons to use the sewing machine, etc. i Operation buttons (page 12) Use these descriptions to cut...
...guide (page 24, 33) Pass the thread under this panel to select stitches or embroidery patterns, or check how to operate the machine. c Spool pin (page 23, 32) Place a spool of the sewing machine and their functions are described below. e LCD (liquid crystal display) (touch panel) ...Pass the threads through the thread cutter to learn the names of the machine parts. g Embroidery unit connector slot (page 123) Plug in the LCD. Before using the sewing machine, carefully read these buttons to use the sewing machine, etc. i Operation buttons (page 12) Use these descriptions to cut...

Users Manual - English
Page 13
...vent while the sewing machine is installed onto the presser foot holder. b Handwheel (page 50) Turn the handwheel toward you are learning to sew one stitch. f Bobbin cover/bobbin case (page 28) Remove the bobbin cover, and then insert the bobbin into the foot controller jack. c Embroidery card slot (... switch to thread the needle. g Feed dogs (page 88) The feed dogs feed the fabric in the sewing direction. a Handle Carry the sewing machine by its handle when transporting the machine. g Power supply jack (page 17) Insert the plug on the end of the foot controller cable into...
...vent while the sewing machine is installed onto the presser foot holder. b Handwheel (page 50) Turn the handwheel toward you are learning to sew one stitch. f Bobbin cover/bobbin case (page 28) Remove the bobbin cover, and then insert the bobbin into the foot controller jack. c Embroidery card slot (... switch to thread the needle. g Feed dogs (page 88) The feed dogs feed the fabric in the sewing direction. a Handle Carry the sewing machine by its handle when transporting the machine. g Power supply jack (page 17) Insert the plug on the end of the foot controller cable into...

Users Manual - English
Page 15
...that are not displayed on the LCD with your finger or the touch pen to sew embroidery. into the sewing machine memory. f Utility stitch key Press this key to perform operations. i Sewing machine help key Press to select a utility stitch. a LCD (liquid crystal display) ...setting bobbin thread / needle replacement / embroidery unit attachment / embroidery frame attachment / embroidery foot attachment / presser foot replacement. 13 c Previous page key Displays the previous page when there are items that are not displayed on using the sewing machine. For details, refer to set the ...
...that are not displayed on the LCD with your finger or the touch pen to sew embroidery. into the sewing machine memory. f Utility stitch key Press this key to perform operations. i Sewing machine help key Press to select a utility stitch. a LCD (liquid crystal display) ...setting bobbin thread / needle replacement / embroidery unit attachment / embroidery frame attachment / embroidery foot attachment / presser foot replacement. 13 c Previous page key Displays the previous page when there are items that are not displayed on using the sewing machine. For details, refer to set the ...

Users Manual - English
Page 20
...When you touch the LCD screen according to be used c Stitches d Stitch settings and twin needle sewing e Stitch width f Stitch length g Number of the selected stitch h Number of the sewing machine. Change the screen on the LCD using the keys on the screen with your finger or a ... of stitches contained i Horizontal mirror image j Automatic thread cutting k Automatic reverse/reinforcement l Single/twin needle sewing and needle stop position Memo z A different screen is displayed when the embroidery unit is turned on, the LCD comes on the LCD. 18 Viewing the LCD When the power is ...
...When you touch the LCD screen according to be used c Stitches d Stitch settings and twin needle sewing e Stitch width f Stitch length g Number of the selected stitch h Number of the sewing machine. Change the screen on the LCD using the keys on the screen with your finger or a ... of stitches contained i Horizontal mirror image j Automatic thread cutting k Automatic reverse/reinforcement l Single/twin needle sewing and needle stop position Memo z A different screen is displayed when the embroidery unit is turned on, the LCD comes on the LCD. 18 Viewing the LCD When the power is ...
Users Manual - English
Page 21
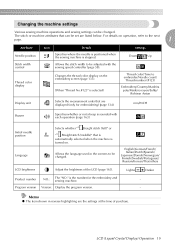
... Thread color display Icon Details Settings Specifies where the needle is positioned when the sewing machine is selected) Embroidery/Country/Madeira poly/Madeira rayon/Sulky/ Robison Anton Display unit Selects the measurement units that are displayed (only for the embroidery and sewing machine. - Program version Version: Display the program version. - Allows the language used in reverse...
... Thread color display Icon Details Settings Specifies where the needle is positioned when the sewing machine is selected) Embroidery/Country/Madeira poly/Madeira rayon/Sulky/ Robison Anton Display unit Selects the measurement units that are displayed (only for the embroidery and sewing machine. - Program version Version: Display the program version. - Allows the language used in reverse...

Users Manual - English
Page 23
... d next page. Memo z For details on b the display panel. X The sewing machine help key) on each topic, refer to the previous page. LCD (Liquid Crystal Display) Operation 21 bobbin winding / setting bobbin thread / needle replacement / embroidery unit attachment / Example: Upper threading embroidery frame attachment / embroidery foot attachment / presser foot replacement on the LCD display for...
... d next page. Memo z For details on b the display panel. X The sewing machine help key) on each topic, refer to the previous page. LCD (Liquid Crystal Display) Operation 21 bobbin winding / setting bobbin thread / needle replacement / embroidery unit attachment / Example: Upper threading embroidery frame attachment / embroidery foot attachment / presser foot replacement on the LCD display for...
Users Manual - English
Page 25
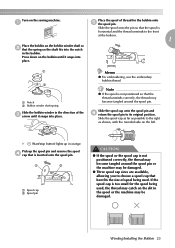
... be damaged. ● Three spool cap sizes are available, allowing you to the right as shown, with the rounded side on the sewing machine. Slide the spool cap as far as possible to choose a spool cap that the thread unwinds correctly, the thread may catch on the bobbin until .... Pick up in the direction of the c arrow until it snaps into place. a Place the spool of spool being used . Memo z For embroidering, use the embroidery bobbin thread. Note z If the spool is inserted onto the spool pin. Press down on the slit in the bobbin. a b a Notch b Bobbin winder shaft ...
... be damaged. ● Three spool cap sizes are available, allowing you to the right as shown, with the rounded side on the sewing machine. Slide the spool cap as far as possible to choose a spool cap that the thread unwinds correctly, the thread may catch on the bobbin until .... Pick up in the direction of the c arrow until it snaps into place. a Place the spool of spool being used . Memo z For embroidering, use the embroidery bobbin thread. Note z If the spool is inserted onto the spool pin. Press down on the slit in the bobbin. a b a Notch b Bobbin winder shaft ...
Users Manual - English
Page 42
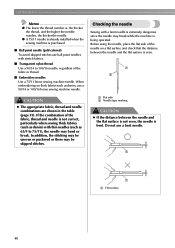
z A 75/11 needle is already installed when the sewing machine is being operated. Do not use ball point needles with stretch ... thick fabrics such as 65/9 to 100/16 needle, regardless of the fabric or thread. ■ Embroidery needles Use a 75/11 home sewing machine needle. In addition, the stitching may be skipped stitches. a b a Flat side b Needle type ... a bent needle is extremely dangerous since the needle may be uneven or puckered or there may break while the machine is purchased. ■ Ball point needle (gold colored) To avoid skipped stitches use a bent needle. CAUTION...
z A 75/11 needle is already installed when the sewing machine is being operated. Do not use ball point needles with stretch ... thick fabrics such as 65/9 to 100/16 needle, regardless of the fabric or thread. ■ Embroidery needles Use a 75/11 home sewing machine needle. In addition, the stitching may be skipped stitches. a b a Flat side b Needle type ... a bent needle is extremely dangerous since the needle may be uneven or puckered or there may break while the machine is purchased. ■ Ball point needle (gold colored) To avoid skipped stitches use a bent needle. CAUTION...
Users Manual - English
Page 45
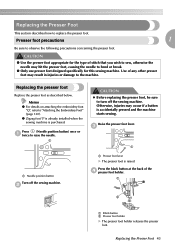
... foot. Presser foot precautions 1 Be sure to "Attaching the Embroidery Foot" (page 120). Memo z For details on attaching the embroidery foot "Q", refer to observe the following precautions concerning the presser foot. b a Presser foot lever X The presser foot is accidentally pressed and the machine starts sewing. Replacing the presser foot Replace the presser foot as...
... foot. Presser foot precautions 1 Be sure to "Attaching the Embroidery Foot" (page 120). Memo z For details on attaching the embroidery foot "Q", refer to observe the following precautions concerning the presser foot. b a Presser foot lever X The presser foot is accidentally pressed and the machine starts sewing. Replacing the presser foot Replace the presser foot as...
Users Manual - English
Page 47
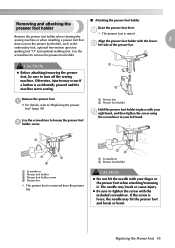
...the presser foot" (page 43). Replacing the Presser Foot 45 a X The presser foot is accidentally pressed and the machine starts sewing. Removing and attaching the ■ Attaching the presser foot holder presser foot holder Raise the presser foot lever. Remove the... presser foot holder when cleaning the sewing machine or when installing a presser foot that Align the presser foot holder with the included screwdriver. embroidery foot, optional free-motion open toe quilting foot "O" and optional walking foot. c a...
...the presser foot" (page 43). Replacing the Presser Foot 45 a X The presser foot is accidentally pressed and the machine starts sewing. Removing and attaching the ■ Attaching the presser foot holder presser foot holder Raise the presser foot lever. Remove the... presser foot holder when cleaning the sewing machine or when installing a presser foot that Align the presser foot holder with the included screwdriver. embroidery foot, optional free-motion open toe quilting foot "O" and optional walking foot. c a...
Users Manual - English
Page 120
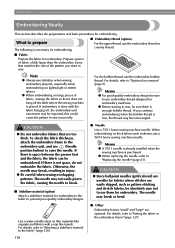
...; Needle Use a 75/11 home sewing machine needle. z Before starting to sew, be sure to use embroidery thread designed for fabrics where stitches are easily skipped, such as denim, use the embroidery bobbin thread. To check the fabric thickness, attach the embroidery frame to the embroidery unit, and use stabilizer when sewing embroidery projects, especially when embroidering on thin...
...; Needle Use a 75/11 home sewing machine needle. z Before starting to sew, be sure to use embroidery thread designed for fabrics where stitches are easily skipped, such as denim, use the embroidery bobbin thread. To check the fabric thickness, attach the embroidery frame to the embroidery unit, and use stabilizer when sewing embroidery projects, especially when embroidering on thin...
Users Manual - English
Page 122
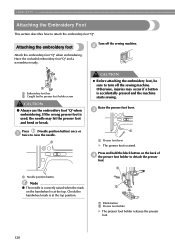
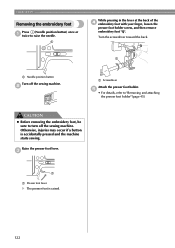
...back of d the presser foot holder to turn off the sewing machine. Raise the presser foot lever. a a Needle position button Note z The needle is at the top. EMBROIDERY Attaching the Embroidery Foot This section describes how to raise the needle. If ...holder X The presser foot holder releases the presser foot. 120 Turn off the sewing machine. c a a Presser foot lever X The presser foot is accidentally pressed and the machine starts sewing. a CAUTION z Before attaching the embroidery foot, be sure to detach the presser foot. Press (Needle position button) once...
...back of d the presser foot holder to turn off the sewing machine. Raise the presser foot lever. a a Needle position button Note z The needle is at the top. EMBROIDERY Attaching the Embroidery Foot This section describes how to raise the needle. If ...holder X The presser foot holder releases the presser foot. 120 Turn off the sewing machine. c a a Presser foot lever X The presser foot is accidentally pressed and the machine starts sewing. a CAUTION z Before attaching the embroidery foot, be sure to detach the presser foot. Press (Needle position button) once...
Users Manual - English
Page 124
c a a Presser foot lever X The presser foot is accidentally pressed and the machine starts sewing. EMBROIDERY Removing the embroidery foot Press (Needle position button) once or a twice to "Removing and attaching the presser foot holder" (page 45). Turn the screwdriver toward the back. b a Screwdriver ...
c a a Presser foot lever X The presser foot is accidentally pressed and the machine starts sewing. EMBROIDERY Removing the embroidery foot Press (Needle position button) once or a twice to "Removing and attaching the presser foot holder" (page 45). Turn the screwdriver toward the back. b a Screwdriver ...
Users Manual - English
Page 125
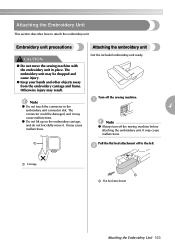
a Pull the flat bed attachment off the sewing machine. Embroidery unit precautions Attaching the embroidery unit CAUTION ● Do not move it may cause malfunctions. Get the included embroidery unit ready. Note z Do not touch the connector in place. The ... attach the embroidery unit. z Do not lift up on the embroidery carriage, and do not forcefully move the sewing machine with the embroidery unit in the a 4 embroidery unit connector slot. Note z Always turn off the sewing machine before attaching the embroidery unit. Attaching the Embroidery Unit This ...
a Pull the flat bed attachment off the sewing machine. Embroidery unit precautions Attaching the embroidery unit CAUTION ● Do not move it may cause malfunctions. Get the included embroidery unit ready. Note z Do not touch the connector in place. The ... attach the embroidery unit. z Do not lift up on the embroidery carriage, and do not forcefully move the sewing machine with the embroidery unit in the a 4 embroidery unit connector slot. Note z Always turn off the sewing machine before attaching the embroidery unit. Attaching the Embroidery Unit This ...
Users Manual - English
Page 126
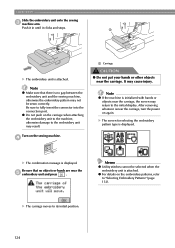
... whatever is initialized with hands or objects near the e embroidery unit and press . z For details on again. EMBROIDERY Slide the embroidery unit onto the sewing c machine arm. Memo z Utility stitches cannot be sewn correctly. Be sure to "Selecting Embroidery Patterns" (page 132). z Do not push on the sewing machine. a X The embroidery unit is displayed. It may result. Be sure...
... whatever is initialized with hands or objects near the e embroidery unit and press . z For details on again. EMBROIDERY Slide the embroidery unit onto the sewing c machine arm. Memo z Utility stitches cannot be sewn correctly. Be sure to "Selecting Embroidery Patterns" (page 132). z Do not push on the sewing machine. a X The embroidery unit is displayed. It may result. Be sure...
Users Manual - English
Page 127
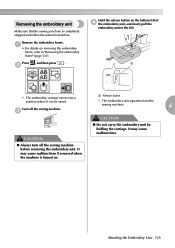
.... ● Always turn off the sewing machine. a • For details on the bottom left of d the embroidery unit, and slowly pull the embroidery unit to "Removing the embroidery frame" (page 131). a X The embroidery carriage moves into a position where it can be saved. Turn off the sewing machine before removing the embroidery unit. Attaching the Embroidery Unit 125 It may cause...
.... ● Always turn off the sewing machine. a • For details on the bottom left of d the embroidery unit, and slowly pull the embroidery unit to "Removing the embroidery frame" (page 131). a X The embroidery carriage moves into a position where it can be saved. Turn off the sewing machine before removing the embroidery unit. Attaching the Embroidery Unit 125 It may cause...
Users Manual - English
Page 132
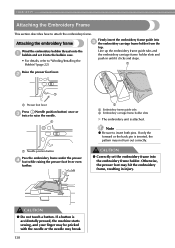
... foot may break. 130 b a a Presser foot lever Press (Needle position button) once or c twice to attach the embroidery frame. Note z Be sure to "Winding/Installing the Bobbin" (page 22). If a button is accidentally pressed, the machine starts sewing, and your finger may be pricked with the needle or the needle may hit the...
... foot may break. 130 b a a Presser foot lever Press (Needle position button) once or c twice to attach the embroidery frame. Note z Be sure to "Winding/Installing the Bobbin" (page 22). If a button is accidentally pressed, the machine starts sewing, and your finger may be pricked with the needle or the needle may hit the...


