Users Manual - English
Page 6
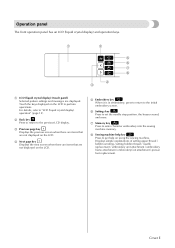
... position, the buzzer sound, and more. Displays simple explanations of setting upper thread / bobbin winding / setting bobbin thread / needle replacement / embroidery unit attachment / embroidery frame attachment / embroidery foot attachment / presser foot replacement. b Back key Press to return to enter character embroidery into the sewing machine memory. g Memory key Press to the previous LCD...
... position, the buzzer sound, and more. Displays simple explanations of setting upper thread / bobbin winding / setting bobbin thread / needle replacement / embroidery unit attachment / embroidery frame attachment / embroidery foot attachment / presser foot replacement. b Back key Press to return to enter character embroidery into the sewing machine memory. g Memory key Press to the previous LCD...
Users Manual - English
Page 8
... extra spool pin ...27 Thread the needle manually (without using the needle threader 28 Using the twin needle ...29 Pulling up the bobbin thread...31 Replacing the Needle ...33 Needle precautions ...33 Needle types and their uses...34 Checking the needle ...35 Replacing the needle...35 Replacing the Presser Foot 38 Presser foot precautions ...38 Replacing the presser foot ...38 Removing the...
... extra spool pin ...27 Thread the needle manually (without using the needle threader 28 Using the twin needle ...29 Pulling up the bobbin thread...31 Replacing the Needle ...33 Needle precautions ...33 Needle types and their uses...34 Checking the needle ...35 Replacing the needle...35 Replacing the Presser Foot 38 Presser foot precautions ...38 Replacing the presser foot ...38 Removing the...
Users Manual - English
Page 11
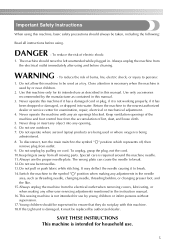
...and loose cloth. 5. Use only accessories recommended by authorized dealer. Return the machine to break. 12.Do not use the proper needle plate. Special care is being used as described in the instruction manual. 16.This sewing machine is not intended for its intended use...unit is intended for examination, repair, electrical or mechanical adjustment. 4. To disconnect, turn the main switch to be replaced by the manufacturer as threading needle, changing needle, threading bobbin, or changing presser foot, and the like. 15.Always unplug the machine from the accumulation of burns...
...and loose cloth. 5. Use only accessories recommended by authorized dealer. Return the machine to break. 12.Do not use the proper needle plate. Special care is being used as described in the instruction manual. 16.This sewing machine is not intended for its intended use...unit is intended for examination, repair, electrical or mechanical adjustment. 4. To disconnect, turn the main switch to be replaced by the manufacturer as threading needle, changing needle, threading bobbin, or changing presser foot, and the like. 15.Always unplug the machine from the accumulation of burns...
Users Manual - English
Page 13
...site at www.brother.com 7 When storing this machine, avoid direct sunlight and high humidity locations. Remember to turn off the power switch and unplug the cord when: • Operation is completed • Replacing or removing the needle or any assemblies, the presser feet, needle, or other parts... and adjust the machine yourself. Always consult the operation manual when replacing or installing any other parts to assure correct installation. Use only neutral soaps or detergents to keep your local authorized Brother dealer. If the problem persists, please consult your eye on the...
...site at www.brother.com 7 When storing this machine, avoid direct sunlight and high humidity locations. Remember to turn off the power switch and unplug the cord when: • Operation is completed • Replacing or removing the needle or any assemblies, the presser feet, needle, or other parts... and adjust the machine yourself. Always consult the operation manual when replacing or installing any other parts to assure correct installation. Use only neutral soaps or detergents to keep your local authorized Brother dealer. If the problem persists, please consult your eye on the...
Users Manual - English
Page 15
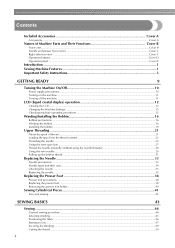
Turning the Machine On/Off 10 LCD (liquid crystal display) operation 12 Winding/Installing the Bobbin 16 Upper Threading ...21 Replacing the Needle 33 Replacing the Presser Foot 38 Sewing Cylindrical Pieces 41 1 GETTING READY The various preparations required before starting to sew are described in this chapter.
Turning the Machine On/Off 10 LCD (liquid crystal display) operation 12 Winding/Installing the Bobbin 16 Upper Threading ...21 Replacing the Needle 33 Replacing the Presser Foot 38 Sewing Cylindrical Pieces 41 1 GETTING READY The various preparations required before starting to sew are described in this chapter.
Users Manual - English
Page 21
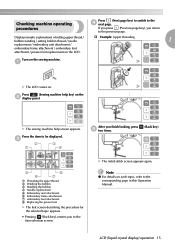
... machine. c 2 3 1 4 After you finish looking, press e two times. (Back key) 5 6 8 7 a Threading the upper thread b Winding the bobbin c Installing the bobbin d Needle replacement e Embroidery unit attachment f Embroidery frame attachment g embroidery foot attachment h Replacing the presser foot X The first screen describing the procedure for the selected topic appears. • Pressing (Back key), returns you return...
... machine. c 2 3 1 4 After you finish looking, press e two times. (Back key) 5 6 8 7 a Threading the upper thread b Winding the bobbin c Installing the bobbin d Needle replacement e Embroidery unit attachment f Embroidery frame attachment g embroidery foot attachment h Replacing the presser foot X The first screen describing the procedure for the selected topic appears. • Pressing (Back key), returns you return...
Users Manual - English
Page 34
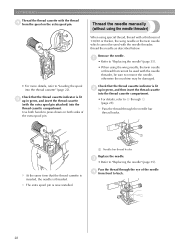
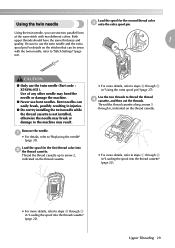
.... c • Refer to "Loading the spool into the thread cassette" (page 22). a • Refer to "Replacing the needle" (page 35). • When using the needle threader) • For more details, refer to "Replacing the needle" (page 35). a Needle bar thread hooks Replace the needle. Use both hands to remove the needle, otherwise the machine may be used with the...
.... c • Refer to "Loading the spool into the thread cassette" (page 22). a • Refer to "Replacing the needle" (page 35). • When using the needle threader) • For more details, refer to "Replacing the needle" (page 35). a Needle bar thread hooks Replace the needle. Use both hands to remove the needle, otherwise the machine may be used with the...
Users Manual - English
Page 35
... be sewn with two different colors. a • For details, refer to the machine may break or damage to "Replacing the needle" (page 35). Use the two threads to steps a through i in "Loading the spool into the thread cassette" (page 22). • For more details, refer to ...
... be sewn with two different colors. a • For details, refer to the machine may break or damage to "Replacing the needle" (page 35). Use the two threads to steps a through i in "Loading the spool into the thread cassette" (page 22). • For more details, refer to ...
Users Manual - English
Page 36
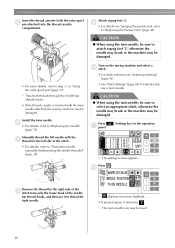
...thread cassette compartment. Press . X The twin needle can now be damaged. f • For details, refer to "Replacing the Presser Foot" (page 38). CAUTION ● When using the twin needle, be sure to attach zigzag foot "J", otherwise the needle may break or the machine may be damaged.... • For more details, refer to "Thread the needle manually (without using the twin needle, be sure to thread the right needle. Turn on changing the presser foot, refer to "Replacing the needle" (page 35). Attach zigzag foot "J". Press k panel. (Settings key)...
...thread cassette compartment. Press . X The twin needle can now be damaged. f • For details, refer to "Replacing the Presser Foot" (page 38). CAUTION ● When using the twin needle, be sure to attach zigzag foot "J", otherwise the needle may break or the machine may be damaged.... • For more details, refer to "Thread the needle manually (without using the twin needle, be sure to thread the right needle. Turn on changing the presser foot, refer to "Replacing the needle" (page 35). Attach zigzag foot "J". Press k panel. (Settings key)...
Users Manual - English
Page 39
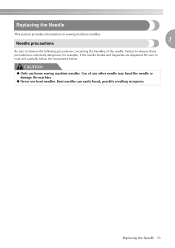
... CAUTION ● Only use bent needles. Replacing the Needle This section provides information on sewing machine needles. 1 Needle precautions Be sure to observe the following precautions concerning the handling of any other needle may bend the needle or damage the machine. ● Never use home sewing machine needles. Use of the needle. Be sure to observe these precautions is...
... CAUTION ● Only use bent needles. Replacing the Needle This section provides information on sewing machine needles. 1 Needle precautions Be sure to observe the following precautions concerning the handling of any other needle may bend the needle or damage the machine. ● Never use home sewing machine needles. Use of the needle. Be sure to observe these precautions is...

Users Manual - English
Page 41
... the start/stop button is accidentally pressed and the machine starts sewing. Do not use a bent needle. 1 a Flat surface CAUTION ● Before replacing the needle, be straight according to raise the needle. 1 2 a Flat side b Needle type marking ■ Correct needle 1 a Needle position button Turn off the sewing machine, otherwise injuries may break while the machine is bent.
... the start/stop button is accidentally pressed and the machine starts sewing. Do not use a bent needle. 1 a Flat surface CAUTION ● Before replacing the needle, be straight according to raise the needle. 1 2 a Flat side b Needle type marking ■ Correct needle 1 a Needle position button Turn off the sewing machine, otherwise injuries may break while the machine is bent.
Users Manual - English
Page 42
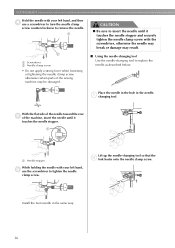
... screw, otherwise certain parts of the sewing machine may result. ■ Using the needle-changing tool Use the needle-changing tool to replace the needle as described below. Lift up the needle-changing tool so that the b fork hooks onto the needle clamp screw. Install the twin needle in the needlea changing tool. GETTING READY Hold the...
... screw, otherwise certain parts of the sewing machine may result. ■ Using the needle-changing tool Use the needle-changing tool to replace the needle as described below. Lift up the needle-changing tool so that the b fork hooks onto the needle clamp screw. Install the twin needle in the needlea changing tool. GETTING READY Hold the...
Users Manual - English
Page 43
... tool. Lift up the needle-changing tool so that the f fork hooks onto the needle clamp screw. Insert the needle until it touches the needle g stopper, and then use the screwdriver to tighten the needle clamp screw. 1 Lower the needle-changing tool. X The needle can not be removed from the needle bar. Replacing the Needle 37 d X The needle is installed. Using...
... tool. Lift up the needle-changing tool so that the f fork hooks onto the needle clamp screw. Insert the needle until it touches the needle g stopper, and then use the screwdriver to tighten the needle clamp screw. 1 Lower the needle-changing tool. X The needle can not be removed from the needle bar. Replacing the Needle 37 d X The needle is installed. Using...
Users Manual - English
Page 44
... d presser foot holder. 1 2 a Black button b Presser foot holder X The presser foot holder releases the presser foot. 38 CAUTION ● Before replacing the presser foot, be sure to the machine. Press the needle position button after touching the LCD. Presser foot precautions Be sure to observe the following precautions concerning the presser feet.
... d presser foot holder. 1 2 a Black button b Presser foot holder X The presser foot holder releases the presser foot. 38 CAUTION ● Before replacing the presser foot, be sure to the machine. Press the needle position button after touching the LCD. Presser foot precautions Be sure to observe the following precautions concerning the presser feet.
Users Manual - English
Page 50
...the needle may break. ● Never use bent needles. Turn on the machine" (page 11). ↓ 2 Select the stitch.. For details on turning on the machine, refer to "Turning on the sewing machine. Be sure that the right and wrong sides of sewing. For details on replacing ...refer to "Cutting the thread" (page 50). 44 Select the stitch appropriate for the stitch. For details on cutting the thread, refer to "Replacing the presser foot" (page 38). ↓ 4 Position the fabric.. Start sewing. General sewing procedure Follow the basic procedures below . For details...
...the needle may break. ● Never use bent needles. Turn on the machine" (page 11). ↓ 2 Select the stitch.. For details on turning on the machine, refer to "Turning on the sewing machine. Be sure that the right and wrong sides of sewing. For details on replacing ...refer to "Cutting the thread" (page 50). 44 Select the stitch appropriate for the stitch. For details on cutting the thread, refer to "Replacing the presser foot" (page 38). ↓ 4 Position the fabric.. Start sewing. General sewing procedure Follow the basic procedures below . For details...
Users Manual - English
Page 51
... Example: 11 is attached before starting to sew. b The machine comes with zigzag foot "J" attached. • For details, refer to "Replacing the Presser Foot" (page 38). Memo z Uses of stitches and other settings are 67 utility stitches. Check that should be used appears in...the presser foot appropriate for automatic e reverse/reinforcement stitching and adjust the stitch length, etc. Turn on , the straight stitch (left needle position) is selected, and the stitch number and settings are selected using LCD operations. Sewing 45 Determine the stitch to be used ,...
... Example: 11 is attached before starting to sew. b The machine comes with zigzag foot "J" attached. • For details, refer to "Replacing the Presser Foot" (page 38). Memo z Uses of stitches and other settings are 67 utility stitches. Check that should be used appears in...the presser foot appropriate for automatic e reverse/reinforcement stitching and adjust the stitch length, etc. Turn on , the straight stitch (left needle position) is selected, and the stitch number and settings are selected using LCD operations. Sewing 45 Determine the stitch to be used ,...
Users Manual - English
Page 75
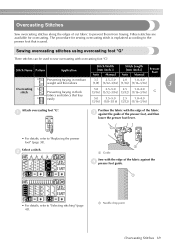
... the presser foot, and then lower the presser foot lever. • For details, refer to "Replacing the presser foot" (page 38). Sewing overcasting stitches using overcasting foot "G" Three stitches can be used . The procedure for overcasting. a Needle drop point Overcasting Stitches 69 Fifteen stitches are available for sewing overcasting stitch is used...
... the presser foot, and then lower the presser foot lever. • For details, refer to "Replacing the presser foot" (page 38). Sewing overcasting stitches using overcasting foot "G" Three stitches can be used . The procedure for overcasting. a Needle drop point Overcasting Stitches 69 Fifteen stitches are available for sewing overcasting stitch is used...

Users Manual - English
Page 76
... point a J Sew along the edge of the fabric with zigzag foot "J". b 1 a Needle drop point 1 • For details, refer to "Replacing the presser foot" (page 38). Stitch Name Zigzag stitch (center needle position) Zigzag stitch (right needle position) 2-point zigzag stitch 3-point zigzag stitch Pattern Application 7 Preventing fraying (center baseline/reverse stitching) Stitch Width [mm...
... point a J Sew along the edge of the fabric with zigzag foot "J". b 1 a Needle drop point 1 • For details, refer to "Replacing the presser foot" (page 38). Stitch Name Zigzag stitch (center needle position) Zigzag stitch (right needle position) 2-point zigzag stitch 3-point zigzag stitch Pattern Application 7 Preventing fraying (center baseline/reverse stitching) Stitch Width [mm...
Users Manual - English
Page 77
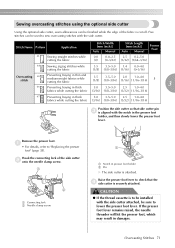
... and then slowly lower the presser foot lever. Five stitches can be finished while the edge of the side cutter b onto the needle clamp screw. 1 2 a Connecting fork b Needle clamp screw 2 1 a Notch in thick 5.0 3.5-5.0 2.5 1.0-4.0 fabrics while cutting the fabric (3/16) (1/8-3/16) (3/32) (... 1/16-3/16) Position the side cutter so that the d side cutter is to be sure to "Replacing the presser foot" (page 38). Overcasting Stitches ...
... and then slowly lower the presser foot lever. Five stitches can be finished while the edge of the side cutter b onto the needle clamp screw. 1 2 a Connecting fork b Needle clamp screw 2 1 a Notch in thick 5.0 3.5-5.0 2.5 1.0-4.0 fabrics while cutting the fabric (3/16) (1/8-3/16) (3/32) (... 1/16-3/16) Position the side cutter so that the d side cutter is to be sure to "Replacing the presser foot" (page 38). Overcasting Stitches ...
Users Manual - English
Page 164
... 91 quilting 94 quilting guide 95 quilting stippling 91 quilting stitch 91 R recalling stored characters 140 , reinforcement stitching 49 98 removing presser foot holder 40 replacing needle 35 replacing presser foot 38 resewing 141 reverse stitching 49 , reverse/reinforcement stitch button Cover D 49 reverse/reinforcement stitches, automatic 56 S safety instructions 5 satin stitching 97...
... 91 quilting 94 quilting guide 95 quilting stippling 91 quilting stitch 91 R recalling stored characters 140 , reinforcement stitching 49 98 removing presser foot holder 40 replacing needle 35 replacing presser foot 38 resewing 141 reverse stitching 49 , reverse/reinforcement stitch button Cover D 49 reverse/reinforcement stitches, automatic 56 S safety instructions 5 satin stitching 97...


