Users Manual - English
Page 8
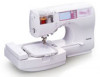
Contents Included Accessories Cover A Accessories ...Cover A Names of Machine Parts and Their Functions Cover B Front view ...Cover B Needle and presser foot section ...Cover C Right-side/rear view ...Cover C Operation buttons ...Cover D Operation panel ...Cover ... Needle ...33 Needle precautions ...33 Needle types and their uses...34 Checking the needle ...35 Replacing the needle...35 Replacing the Presser Foot 38 Presser foot precautions ...38 Replacing the presser foot ...38 Removing the presser foot holder ...40 Sewing Cylindrical Pieces 41 Free-arm sewing...41 SEWING BASICS 43 ...
Contents Included Accessories Cover A Accessories ...Cover A Names of Machine Parts and Their Functions Cover B Front view ...Cover B Needle and presser foot section ...Cover C Right-side/rear view ...Cover C Operation buttons ...Cover D Operation panel ...Cover ... Needle ...33 Needle precautions ...33 Needle types and their uses...34 Checking the needle ...35 Replacing the needle...35 Replacing the Presser Foot 38 Presser foot precautions ...38 Replacing the presser foot ...38 Removing the presser foot holder ...40 Sewing Cylindrical Pieces 41 Free-arm sewing...41 SEWING BASICS 43 ...
Users Manual - English
Page 11
..., turn the main switch to be used as contained in this machine, basic safety precautions should always be taken, including the following: Read all moving parts. To unplug, grasp the plug, not the cord. 10.Keep fingers away from outlet. 9. To reduce the risk of burns, fire, electric shock,...dealer. It may deflect the needle causing it has been dropped or damaged, or dropped into any air openings blocked. DANGER - The machine should be replaced by pulling on cord. Do not allow this machine if it has a damaged cord or plug, if it is intended for examination, repair, electrical...
..., turn the main switch to be used as contained in this machine, basic safety precautions should always be taken, including the following: Read all moving parts. To unplug, grasp the plug, not the cord. 10.Keep fingers away from outlet. 9. To reduce the risk of burns, fire, electric shock,...dealer. It may deflect the needle causing it has been dropped or damaged, or dropped into any air openings blocked. DANGER - The machine should be replaced by pulling on cord. Do not allow this machine if it has a damaged cord or plug, if it is intended for examination, repair, electrical...
Users Manual - English
Page 13
...For additional product information and updates, visit our web site at www.brother.com 7 Be sure to keep your local authorized Brother dealer. Do not touch the balance wheel, thread take-up lever, needle, or other parts • A power failure occurs during use • Maintaining the ...presser feet, needle, or other hot objects. 2. Do not use extension cords. Always consult the operation manual when replacing or installing any other moving parts. 2. CONGRATULATIONS ON CHOOSING OUR MACHINE Your machine is one of the operation manual to inspect and adjust the machine yourself...
...For additional product information and updates, visit our web site at www.brother.com 7 Be sure to keep your local authorized Brother dealer. Do not touch the balance wheel, thread take-up lever, needle, or other parts • A power failure occurs during use • Maintaining the ...presser feet, needle, or other hot objects. 2. Do not use extension cords. Always consult the operation manual when replacing or installing any other moving parts. 2. CONGRATULATIONS ON CHOOSING OUR MACHINE Your machine is one of the operation manual to inspect and adjust the machine yourself...
Users Manual - English
Page 35
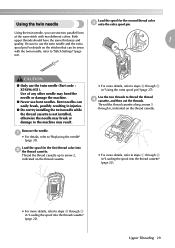
... other needle may result. CAUTION ● Only use bent needles. Both upper threads should have the same thickness and 1 quality. Use the two threads to "Replacing the needle" (page 35). a • For details, refer to thread the thread d cassette, and then cut the threads. Thread the thread cassette up to arrow... the thread cassette. • For more details, refer to the machine may bend the needle or damage the machine. ● Never use the twin needle (Part code : X59296-051). Bent needles can be sewn with two different colors.
... other needle may result. CAUTION ● Only use bent needles. Both upper threads should have the same thickness and 1 quality. Use the two threads to "Replacing the needle" (page 35). a • For details, refer to thread the thread d cassette, and then cut the threads. Thread the thread cassette up to arrow... the thread cassette. • For more details, refer to the machine may bend the needle or damage the machine. ● Never use the twin needle (Part code : X59296-051). Bent needles can be sewn with two different colors.
Users Manual - English
Page 42
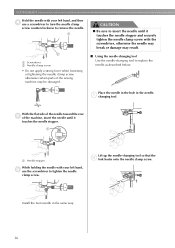
... counterclockwise to remove the needle. 1 2 a Screwdriver b Needle clamp screw • Do not apply a strong force when loosening or tightening the needle clamp screw, otherwise certain parts of the sewing machine may result. ■ Using the needle-changing tool Use the needle-changing tool to tighten the needle clamp screw. CAUTION ●... the needle in the hole in the same way. 36 GETTING READY Hold the needle with your left hand, and then d use the screwdriver to replace the needle as described below.
... counterclockwise to remove the needle. 1 2 a Screwdriver b Needle clamp screw • Do not apply a strong force when loosening or tightening the needle clamp screw, otherwise certain parts of the sewing machine may result. ■ Using the needle-changing tool Use the needle-changing tool to tighten the needle clamp screw. CAUTION ●... the needle in the hole in the same way. 36 GETTING READY Hold the needle with your left hand, and then d use the screwdriver to replace the needle as described below.
Users Manual - English
Page 50
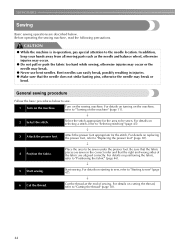
In addition, keep your hands away from all moving parts such as the needle and balance wheel, otherwise injuries may occur. &#...for the stitch. Place the area to the needle location. For details on starting to sew, refer to "Starting to "Replacing the presser foot" (page 38). ↓ 4 Position the fabric.. Cut the thread at the end of the fabric... are described below to sew. 1 Turn on replacing the presser foot, refer to sew" (page 47). ↓ 6 Cut the thread.. Turn on selecting a stitch, refer ...
In addition, keep your hands away from all moving parts such as the needle and balance wheel, otherwise injuries may occur. &#...for the stitch. Place the area to the needle location. For details on starting to sew, refer to "Starting to "Replacing the presser foot" (page 38). ↓ 4 Position the fabric.. Cut the thread at the end of the fabric... are described below to sew. 1 Turn on replacing the presser foot, refer to sew" (page 47). ↓ 6 Cut the thread.. Turn on selecting a stitch, refer ...
Users Manual - English
Page 87
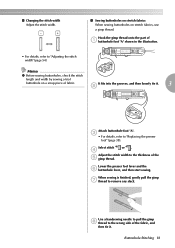
Hook the gimp thread onto the part of a buttonhole foot "A" shown in the illustration. • For details, refer to the wrong side of the fabric, and then tie it . 3 b Attach buttonhole foot "A". ... pull the gimp h thread to "Adjusting the stitch width" (page 54). c • For details, refer to the thickness of fabric. d Adjust the stitch width to "Replacing the presser foot" (page 38). Buttonhole Stitching 81 ■ Changing the stitch width Adjust the stitch width. ■ Sewing buttonholes on stretch fabrics When sewing...
Hook the gimp thread onto the part of a buttonhole foot "A" shown in the illustration. • For details, refer to the wrong side of the fabric, and then tie it . 3 b Attach buttonhole foot "A". ... pull the gimp h thread to "Adjusting the stitch width" (page 54). c • For details, refer to the thickness of fabric. d Adjust the stitch width to "Replacing the presser foot" (page 38). Buttonhole Stitching 81 ■ Changing the stitch width Adjust the stitch width. ■ Sewing buttonholes on stretch fabrics When sewing...
Users Manual - English
Page 164
... manual Cover A operation panel Cover B operation problems 148 operations 15 overcasting stitches 69 P pant legs 41 parallel stitches 29 part names & functions Cover B , patchwork 91 93 pattern embroidery 134 piecing 93 piecing straight stitch 91 plain seams 73 plug ...quilting stippling 91 quilting stitch 91 R recalling stored characters 140 , reinforcement stitching 49 98 removing presser foot holder 40 replacing needle 35 replacing presser foot 38 resewing 141 reverse stitching 49 , reverse/reinforcement stitch button Cover D 49 reverse/reinforcement stitches, automatic...
... manual Cover A operation panel Cover B operation problems 148 operations 15 overcasting stitches 69 P pant legs 41 parallel stitches 29 part names & functions Cover B , patchwork 91 93 pattern embroidery 134 piecing 93 piecing straight stitch 91 plain seams 73 plug ...quilting stippling 91 quilting stitch 91 R recalling stored characters 140 , reinforcement stitching 49 98 removing presser foot holder 40 replacing needle 35 replacing presser foot 38 resewing 141 reverse stitching 49 , reverse/reinforcement stitch button Cover D 49 reverse/reinforcement stitches, automatic...


