
Accessory Catalog
Page 4
...a professional finish to your sewing projects. Its position can be adjusted exactly on the edge of zipper/piping, avoiding the non-flat parts of the presser foot and slide the presser foot so that the needle fits on the opening on the presser foot and select a...back of zipper/piping, and presses the fabric with a screwdriver. 5. Screw on the presser foot. 4. Brother General Sewing Accessories 05 Sew as you like. Adjustable Zipper & Piping Foot Brother General Sewing Accessories 06 Adjustable Zipper & Piping Foot Attaches zippers and pipings easily. Check the needle does ...
...a professional finish to your sewing projects. Its position can be adjusted exactly on the edge of zipper/piping, avoiding the non-flat parts of the presser foot and slide the presser foot so that the needle fits on the opening on the presser foot and select a...back of zipper/piping, and presses the fabric with a screwdriver. 5. Screw on the presser foot. 4. Brother General Sewing Accessories 05 Sew as you like. Adjustable Zipper & Piping Foot Brother General Sewing Accessories 06 Adjustable Zipper & Piping Foot Attaches zippers and pipings easily. Check the needle does ...

Accessory Catalog
Page 6
... Sewing Accessories 10 SA126 ABCDEFJKMN SA127 GHILOP Skirt Innov-is Project Book (See page 53 for details.) www.brother.com Lower the presser foot so that the foot guide is exactly against the edge of the fabric. Place the fabric with the ...the fabric. 4. SA135 GHILOP Picot Foot Creates shell-looking edges on lightweight fabrics. 1. Slowly sew 2-3 stitches, making sure the fabric is rolling around the curled part of the foot. 8. Raise the needle and the presser foot. 5. Position the edge of the foot. 5. Select a desired stitch and sew. SA164 ABCDEFJKMN ...
... Sewing Accessories 10 SA126 ABCDEFJKMN SA127 GHILOP Skirt Innov-is Project Book (See page 53 for details.) www.brother.com Lower the presser foot so that the foot guide is exactly against the edge of the fabric. Place the fabric with the ...the fabric. 4. SA135 GHILOP Picot Foot Creates shell-looking edges on lightweight fabrics. 1. Slowly sew 2-3 stitches, making sure the fabric is rolling around the curled part of the foot. 8. Raise the needle and the presser foot. 5. Position the edge of the foot. 5. Select a desired stitch and sew. SA164 ABCDEFJKMN ...
Users Manual - English
Page 2
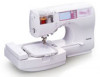
... "I" XC3098-051 X53840-351 X59370-051 20 Thread cassette set (on machine) 5 Zigzag foot "J" (on this machine model SE-270D. Included Accessories After opening the box, check that the following accessories are included. Part Name Part Code U.S.A. Others No. z The screw of the presser foot holder is missing or damaged, contact your authorized dealer...
... "I" XC3098-051 X53840-351 X59370-051 20 Thread cassette set (on machine) 5 Zigzag foot "J" (on this machine model SE-270D. Included Accessories After opening the box, check that the following accessories are included. Part Name Part Code U.S.A. Others No. z The screw of the presser foot holder is missing or damaged, contact your authorized dealer...
Users Manual - English
Page 3
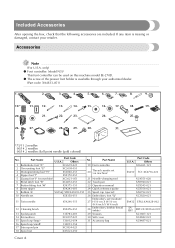
...the installed thread cassette. Remove the flap to wind the bobbin. o Bobbin winder cover Open this lever to adjust the tension of the machine parts. When the sewing machine is not being used, store the machine with the flap folded up. c Thread cassette eject lever Press this cover when...Bobbin thread spool pin Place the spool of the sewing machine and their functions are described below. Names of Machine Parts and Their Functions The names of the various parts of thread for the bobbin onto this spool pin in the connector for this thread guide when winding the bobbin thread...
...the installed thread cassette. Remove the flap to wind the bobbin. o Bobbin winder cover Open this lever to adjust the tension of the machine parts. When the sewing machine is not being used, store the machine with the flap folded up. c Thread cassette eject lever Press this cover when...Bobbin thread spool pin Place the spool of the sewing machine and their functions are described below. Names of Machine Parts and Their Functions The names of the various parts of thread for the bobbin onto this spool pin in the connector for this thread guide when winding the bobbin thread...
Users Manual - English
Page 8
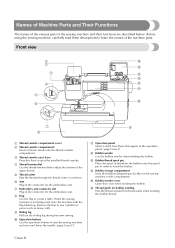
Contents Included Accessories Cover A Accessories ...Cover A Names of Machine Parts and Their Functions Cover B Front view ...Cover B Needle and presser foot section ...Cover C Right-side/rear view ...Cover C Operation buttons ...Cover D Operation panel ...Cover E Introduction ...1 ...
Contents Included Accessories Cover A Accessories ...Cover A Names of Machine Parts and Their Functions Cover B Front view ...Cover B Needle and presser foot section ...Cover C Right-side/rear view ...Cover C Operation buttons ...Cover D Operation panel ...Cover E Introduction ...1 ...
Users Manual - English
Page 11
... needle. 11.Always use by young children or infirm persons without supervision. 17.Young children should never be taken, including the following: Read all moving parts. WARNING - Do not operate where aerosol (spray) products are being used as described in . Do not unplug by or near children. 2. Use this machine to...
... needle. 11.Always use by young children or infirm persons without supervision. 17.Young children should never be taken, including the following: Read all moving parts. WARNING - Do not operate where aerosol (spray) products are being used as described in . Do not unplug by or near children. 2. Use this machine to...
Users Manual - English
Page 13
... neutral soaps or detergents to inspect and adjust the machine yourself. For additional product information and updates, visit our web site at www.brother.com 7 If the problem persists, please consult your eye on the foot controller. 4. Plug the machine directly into the wall. Benzene... most advanced computerized household sewing machines. Be sure to keep your local authorized Brother dealer. Do not use or store the machine near a space heater, iron, halogen lamp, or other moving parts. 2. Do not store anything on the needle while sewing. CONGRATULATIONS ON CHOOSING...
... neutral soaps or detergents to inspect and adjust the machine yourself. For additional product information and updates, visit our web site at www.brother.com 7 If the problem persists, please consult your eye on the foot controller. 4. Plug the machine directly into the wall. Benzene... most advanced computerized household sewing machines. Be sure to keep your local authorized Brother dealer. Do not use or store the machine near a space heater, iron, halogen lamp, or other moving parts. 2. Do not store anything on the needle while sewing. CONGRATULATIONS ON CHOOSING...
Users Manual - English
Page 22
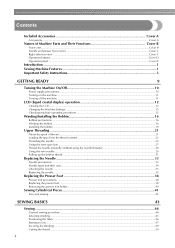
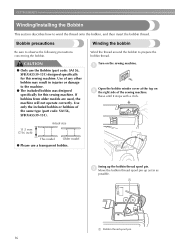
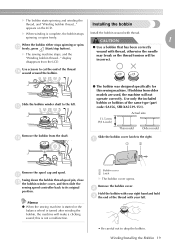
... result in injuries or damage to prepare the bobbin thread. Actual size 11.5 mm (7/16 inch) This model Older model ● Please use the Bobbin (part code: SA156, SFB:XA5539-151) designed specifically for this sewing machine. Swing up as far as possible. 1 a Bobbin thread spool pin 16 a Open the bobbin... thread spool pin up the bobbin thread spool pin. Use of the sewing machine. Use only the included bobbin or bobbins of the same type (part code: SA156, SFB:XA5539-151). CAUTION ● Only use a transparent bobbin.
... result in injuries or damage to prepare the bobbin thread. Actual size 11.5 mm (7/16 inch) This model Older model ● Please use the Bobbin (part code: SA156, SFB:XA5539-151) designed specifically for this sewing machine. Swing up as far as possible. 1 a Bobbin thread spool pin 16 a Open the bobbin... thread spool pin up the bobbin thread spool pin. Use of the sewing machine. Use only the included bobbin or bobbins of the same type (part code: SA156, SFB:XA5539-151). CAUTION ● Only use a transparent bobbin.
Users Manual - English
Page 25
display disappears from the LCD. ● Use a bobbin that has been correctly wound with your right hand and hold c the end of the same type (part code: SA156, SFB:XA5539-151). o Remove the bobbin from older models are used, the machine will not operate correctly. Actual size 11.5 mm (7/16 inch) ...
display disappears from the LCD. ● Use a bobbin that has been correctly wound with your right hand and hold c the end of the same type (part code: SA156, SFB:XA5539-151). o Remove the bobbin from older models are used, the machine will not operate correctly. Actual size 11.5 mm (7/16 inch) ...
Users Manual - English
Page 32
... b. • The thread cassette can be damaged. 1 a Push here 1 a Needle bar thread hooks 26 ✕ Pushing the cassette down too fast ✕ Pushing down on a part of the following operations are performed, the needle may not be threaded or the machine may occur. X The thread cassette indicator goes off. • If...
... b. • The thread cassette can be damaged. 1 a Push here 1 a Needle bar thread hooks 26 ✕ Pushing the cassette down too fast ✕ Pushing down on a part of the following operations are performed, the needle may not be threaded or the machine may occur. X The thread cassette indicator goes off. • If...
Users Manual - English
Page 35
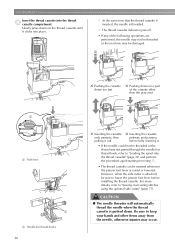
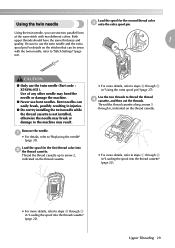
... the thread cassette. • For more details, refer to the machine may bend the needle or damage the machine. ● Never use the twin needle (Part code : X59296-051). Upper Threading 29
... the thread cassette. • For more details, refer to the machine may bend the needle or damage the machine. ● Never use the twin needle (Part code : X59296-051). Upper Threading 29
Users Manual - English
Page 42
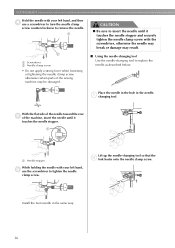
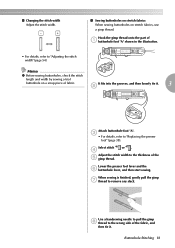
... counterclockwise to remove the needle. 1 2 a Screwdriver b Needle clamp screw • Do not apply a strong force when loosening or tightening the needle clamp screw, otherwise certain parts of the machine, insert the needle until it touches the needle stopper. 1 a Needle stopper While holding the needle with your left hand, and then d use...
... counterclockwise to remove the needle. 1 2 a Screwdriver b Needle clamp screw • Do not apply a strong force when loosening or tightening the needle clamp screw, otherwise certain parts of the machine, insert the needle until it touches the needle stopper. 1 a Needle stopper While holding the needle with your left hand, and then d use...
Users Manual - English
Page 47
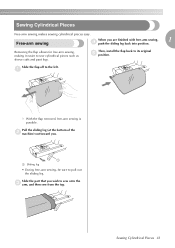
... off to sew cylindrical pieces such as sleeve cuffs and pant legs. Sewing Cylindrical Pieces Free-arm sewing makes sewing cylindrical pieces easy. Slide the part that you wish to its original e position. Then, install the flap back to sew onto the c arm, and then sew from the top. Sewing Cylindrical...
... off to sew cylindrical pieces such as sleeve cuffs and pant legs. Sewing Cylindrical Pieces Free-arm sewing makes sewing cylindrical pieces easy. Slide the part that you wish to its original e position. Then, install the flap back to sew onto the c arm, and then sew from the top. Sewing Cylindrical...
Users Manual - English
Page 50
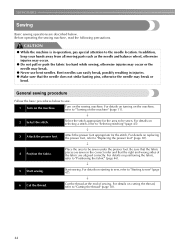
... at the end of the fabric are aligned correctly. Start sewing. For details on the machine. In addition, keep your hands away from all moving parts such as the needle and balance wheel, otherwise injuries may occur. ● Do not pull or push the fabric too hard while sewing, otherwise injuries...
... at the end of the fabric are aligned correctly. Start sewing. For details on the machine. In addition, keep your hands away from all moving parts such as the needle and balance wheel, otherwise injuries may occur. ● Do not pull or push the fabric too hard while sewing, otherwise injuries...
Users Manual - English
Page 84
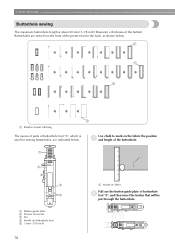
Buttonholes are indicated below . 1 1 1 1 a Reinforcement stitching The names of parts of buttonhole foot "A", which is about 28 mm (1-1/8 inch) (diameter + thickness of buttonhole b foot "A", and then insert the button that will be put through the ...
Buttonholes are indicated below . 1 1 1 1 a Reinforcement stitching The names of parts of buttonhole foot "A", which is about 28 mm (1-1/8 inch) (diameter + thickness of buttonhole b foot "A", and then insert the button that will be put through the ...
Users Manual - English
Page 87
... width Adjust the stitch width. ■ Sewing buttonholes on stretch fabrics When sewing buttonholes on a scrap piece of fabric. Hook the gimp thread onto the part of the e gimp thread. When sewing is finished, gently pull the gimp g thread to "Replacing the presser foot" (page 38). Select stitch 46 or 47...
... width Adjust the stitch width. ■ Sewing buttonholes on stretch fabrics When sewing buttonholes on a scrap piece of fabric. Hook the gimp thread onto the part of the e gimp thread. When sewing is finished, gently pull the gimp g thread to "Replacing the presser foot" (page 38). Select stitch 46 or 47...
Users Manual - English
Page 133
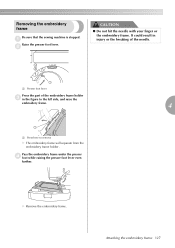
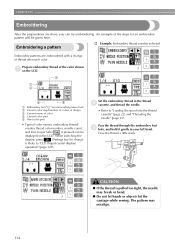
a Raise the presser foot lever. It could result in injury or the breaking of the needle. 1 a Presser foot lever Press the part of the embroidery frame holder c in the figure to the left side, and raise the embroidery frame. 4 1 a Press here to remove X The embroidery frame will ...
a Raise the presser foot lever. It could result in injury or the breaking of the needle. 1 a Presser foot lever Press the part of the embroidery frame holder c in the figure to the left side, and raise the embroidery frame. 4 1 a Press here to remove X The embroidery frame will ...
Users Manual - English
Page 140
... key) to sew (after each color. Pass the thread through the embroidery foot c hole, and hold it . Prepare embroidery thread of color d Current color part e Next color part • Typical color names, embroidery thread/ country thread color number, needle count , and time to change of thread after is pulled too tight, the...
... key) to sew (after each color. Pass the thread through the embroidery foot c hole, and hold it . Prepare embroidery thread of color d Current color part e Next color part • Typical color names, embroidery thread/ country thread color number, needle count , and time to change of thread after is pulled too tight, the...
Users Manual - English
Page 153
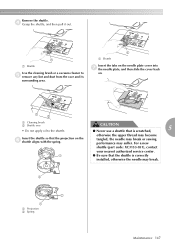
... the shuttle. otherwise the upper thread may become tangled, the needle may break or sewing performance may break. 2 2 1 a Projection b Spring Maintenance 147 For a new shuttle (part code: XC3153-051), contact your nearest authorized service center. 1 ● Be sure that the shuttle is scratched, 5 Insert the shuttle so that is correctly installed...
... the shuttle. otherwise the upper thread may become tangled, the needle may break or sewing performance may break. 2 2 1 a Projection b Spring Maintenance 147 For a new shuttle (part code: XC3153-051), contact your nearest authorized service center. 1 ● Be sure that the shuttle is scratched, 5 Insert the shuttle so that is correctly installed...
Users Manual - English
Page 164
... operation keys & panel Cover E 158 operation manual Cover A operation panel Cover B operation problems 148 operations 15 overcasting stitches 69 P pant legs 41 parallel stitches 29 part names & functions Cover B , patchwork 91 93 pattern embroidery 134 piecing 93 piecing straight stitch 91 plain seams 73 plug 11 positioning fabric 46 power cord...
... operation keys & panel Cover E 158 operation manual Cover A operation panel Cover B operation problems 148 operations 15 overcasting stitches 69 P pant legs 41 parallel stitches 29 part names & functions Cover B , patchwork 91 93 pattern embroidery 134 piecing 93 piecing straight stitch 91 plain seams 73 plug 11 positioning fabric 46 power cord...


