
Accessory Catalog
Page 5
...up and sew lace to install concealed zippers easily. 1. Edge Joining Foot Brother General Sewing Accessories 08 Edge Joining Foot This foot is perfect for details.) www.brother.com Place the edge of zipper. Sew. SA184 All Brother home-use sewing machines Ring Bearer Pillow & Hankerchief Innov-is great ... pull up to join them. Fasten metal stop at desired distance from the edge of the fabric and lower needle. 2. Position the needle at lower edge of the fabric against the presser foot guide to create the desired hem, then baste about 3/16" (5 mm) from the edge of the...
...up and sew lace to install concealed zippers easily. 1. Edge Joining Foot Brother General Sewing Accessories 08 Edge Joining Foot This foot is perfect for details.) www.brother.com Place the edge of zipper. Sew. SA184 All Brother home-use sewing machines Ring Bearer Pillow & Hankerchief Innov-is great ... pull up to join them. Fasten metal stop at desired distance from the edge of the fabric and lower needle. 2. Position the needle at lower edge of the fabric against the presser foot guide to create the desired hem, then baste about 3/16" (5 mm) from the edge of the...

Accessory Catalog
Page 6
... the fabric is rolling around the curled part of the fabric behind the needle and lower the presser foot. 6. Non Stick Foot Designed for details.) www.brother.com Attach the presser foot. 3. Brother General Sewing Accessories 09 Narrow Hemmer Foot Non Stick Foot Overlock Foot Picot Foot Brother General Sewing Accessories 10 SA126 ABCDEFJKMN SA127 GHILOP Skirt Innov-is Project Book (See page...
... the fabric is rolling around the curled part of the fabric behind the needle and lower the presser foot. 6. Non Stick Foot Designed for details.) www.brother.com Attach the presser foot. 3. Brother General Sewing Accessories 09 Narrow Hemmer Foot Non Stick Foot Overlock Foot Picot Foot Brother General Sewing Accessories 10 SA126 ABCDEFJKMN SA127 GHILOP Skirt Innov-is Project Book (See page...

Accessory Catalog
Page 7
... models. Adjust the distance and place the right edge of the foot guide plate. 4. Sew. Lower the presser foot and guide the fabric through the presser foot as it stitches. Use this presser foot only with the center straight stitch. Place the cut right section... www.brother.com SA160 ABCDEFGHJKLMNO Straight Stitch Foot Straight Stitch Foot and Straight Stitch Needle Plate Vertical Stitching Alignment Foot Brother General Sewing Accessories 12 Straight Stitch Foot For precise straight stitching on thin fabrics or on the needle plate with all Brother presser feet....
... models. Adjust the distance and place the right edge of the foot guide plate. 4. Sew. Lower the presser foot and guide the fabric through the presser foot as it stitches. Use this presser foot only with the center straight stitch. Place the cut right section... www.brother.com SA160 ABCDEFGHJKLMNO Straight Stitch Foot Straight Stitch Foot and Straight Stitch Needle Plate Vertical Stitching Alignment Foot Brother General Sewing Accessories 12 Straight Stitch Foot For precise straight stitching on thin fabrics or on the needle plate with all Brother presser feet....
Accessory Catalog
Page 8
... level. 3. Attach Adapter with the screw. 3. Remove the top cover of the presser foot, lower the presser foot. 2. Place the thread spool on Presser Foot Shaft with Low Shank on the stand and thread the machine. SA542 A:DuettaTM4500D,Innov-is4000D,2500D, 1500D,QC-1000 www.brother.com Sew. The black button will return to a handle of a machine, and...
... level. 3. Attach Adapter with the screw. 3. Remove the top cover of the presser foot, lower the presser foot. 2. Place the thread spool on Presser Foot Shaft with Low Shank on the stand and thread the machine. SA542 A:DuettaTM4500D,Innov-is4000D,2500D, 1500D,QC-1000 www.brother.com Sew. The black button will return to a handle of a machine, and...

Accessory Catalog
Page 13
...lower portion of the presser foot is Project Book (See pages 16 and 17 for most consistent results. Move fabric about 1" (2.5 cm) past the needle to slide the fabric from left into gathers or tucks. For seven grooves: SA179 ABCDEJ For five grooves: SA162 IP This presser foot...A specially designed bobbin cover is also included with evenly spaced tucks and gathers. Sew slowly for details.) Brother Embellishment Feet Pin Tuck Foot 24 Ruffler Foot Pin Tuck Foot This presser foot has 7 grooves and produces perfect pin tucks and corded pin tucks using a twin needle on lightweight fabric...
...lower portion of the presser foot is Project Book (See pages 16 and 17 for most consistent results. Move fabric about 1" (2.5 cm) past the needle to slide the fabric from left into gathers or tucks. For seven grooves: SA179 ABCDEJ For five grooves: SA162 IP This presser foot...A specially designed bobbin cover is also included with evenly spaced tucks and gathers. Sew slowly for details.) Brother Embellishment Feet Pin Tuck Foot 24 Ruffler Foot Pin Tuck Foot This presser foot has 7 grooves and produces perfect pin tucks and corded pin tucks using a twin needle on lightweight fabric...

Accessory Catalog
Page 15
...Foot/Open Toe Walking Foot Brother Quilting Feet 28 Walking Foot/Open Toe Walking Foot The feed dogs on the walking foot moves at an even pace in length. Walking Foot SA140 ABCDEFJKMN SA166 L SA107 GHO SA169 I Open Toe Walking Foot SA188 ABCDEFJKMN www.brother.com Use the foot...to sew such as zigzag stitch. 5. Attach the walking foot to hold the fabric firmly. 5. Lower the feed dogs. 3. Place the fabric beneath the presser foot. 4. Set the fabric under the presser foot. 6. When quilting is needed. 1. Lower the feed dogs. 2. Requires Low Shank Adapter for straight...
...Foot/Open Toe Walking Foot Brother Quilting Feet 28 Walking Foot/Open Toe Walking Foot The feed dogs on the walking foot moves at an even pace in length. Walking Foot SA140 ABCDEFJKMN SA166 L SA107 GHO SA169 I Open Toe Walking Foot SA188 ABCDEFJKMN www.brother.com Use the foot...to sew such as zigzag stitch. 5. Attach the walking foot to hold the fabric firmly. 5. Lower the feed dogs. 3. Place the fabric beneath the presser foot. 4. Set the fabric under the presser foot. 6. When quilting is needed. 1. Lower the feed dogs. 2. Requires Low Shank Adapter for straight...

Accessory Catalog
Page 36
...Needle Brother ...brother.com SA172 Bobbin for attaching piping, zippers, stitching angled corners, etc. Brother Sewing Machine Attachments for PQ Series 69 Heavyweight Foot Ver y Narrow Foot Bobbin for PQ Series Heavyweight Foot An improved larger foot... print assures better contact of wool roving or yarn on fabric or garment with a chalk pen. 3. SA173 Ver y Narrow Foot...foot has a good surface to use it just like an ordinary presser foot...
...Needle Brother ...brother.com SA172 Bobbin for attaching piping, zippers, stitching angled corners, etc. Brother Sewing Machine Attachments for PQ Series 69 Heavyweight Foot Ver y Narrow Foot Bobbin for PQ Series Heavyweight Foot An improved larger foot... print assures better contact of wool roving or yarn on fabric or garment with a chalk pen. 3. SA173 Ver y Narrow Foot...foot has a good surface to use it just like an ordinary presser foot...
Users Manual - English
Page 4
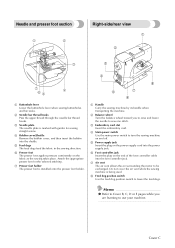
.... c Needle plate The needle plate is marked with guides for the selected stitching. f Foot controller jack Insert the plug on the power supply cord into the shuttle. Needle and presser foot section 1 2 Right-side/rear view 1 2 3 3 7 4 65 a Buttonhole lever Lower the buttonhole lever when sewing buttonholes and bar tacks. c Embroidery card slot Insert the...
.... c Needle plate The needle plate is marked with guides for the selected stitching. f Foot controller jack Insert the plug on the power supply cord into the shuttle. Needle and presser foot section 1 2 Right-side/rear view 1 2 3 3 7 4 65 a Buttonhole lever Lower the buttonhole lever when sewing buttonholes and bar tacks. c Embroidery card slot Insert the...
Users Manual - English
Page 5
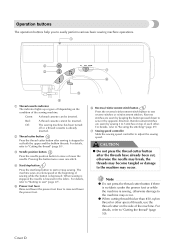
... inserted. z When cutting thread thicker than #30, nylon thread or other . e Presser foot lever Raise and lower the presser foot lever to "Securing the stitching" (page 49). For details, refer to raise and lower the presser foot. Note z Do not press the thread cutter button if there is no fabric under ...the presser foot or while the machine is sewing, otherwise damage to the machine may occur. c Needle position...
... inserted. z When cutting thread thicker than #30, nylon thread or other . e Presser foot lever Raise and lower the presser foot lever to "Securing the stitching" (page 49). For details, refer to raise and lower the presser foot. Note z Do not press the thread cutter button if there is no fabric under ...the presser foot or while the machine is sewing, otherwise damage to the machine may occur. c Needle position...
Users Manual - English
Page 32
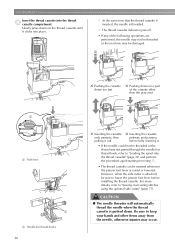
... part of the following operations are performed, the needle may not be threaded or the machine may occur. For more details, refer to lower the presser foot lever before fully inserting it clicks into place. X The thread cassette indicator goes off. • If any of the cassette other items ...away from step b. • The thread cassette can be inserted whenever the presser foot lever is raised or lowered. However, when the side cutter is attached, be sure to "Sewing overcasting stitches using the optional side cutter" (page 71). ...
... part of the following operations are performed, the needle may not be threaded or the machine may occur. For more details, refer to lower the presser foot lever before fully inserting it clicks into place. X The thread cassette indicator goes off. • If any of the cassette other items ...away from step b. • The thread cassette can be inserted whenever the presser foot lever is raised or lowered. However, when the side cutter is attached, be sure to "Sewing overcasting stitches using the optional side cutter" (page 71). ...
Users Manual - English
Page 33
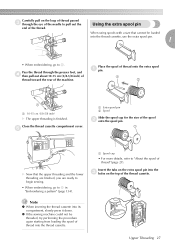
... the top of thread into the thread cassette. Note z When inserting the thread cassette into the c holes on the loop of thread passed c through the presser foot, and d then pull out about 10-15 cm (3/8-5/8 inch) of thread toward the rear of thread onto the extra spool a pin. 1 2 1 a 10-15 cm (3/8-5/8 ... the needle to e. Place the spool of the machine. Using the extra spool pin When using spools with a size that the upper threading and the lower threading are finished, you are ready to begin sewing. • When embroidering, go to pull out the end of the spool b onto the spool ...
... the top of thread into the thread cassette. Note z When inserting the thread cassette into the c holes on the loop of thread passed c through the presser foot, and d then pull out about 10-15 cm (3/8-5/8 inch) of thread toward the rear of thread onto the extra spool a pin. 1 2 1 a 10-15 cm (3/8-5/8 ... the needle to e. Place the spool of the machine. Using the extra spool pin When using spools with a size that the upper threading and the lower threading are finished, you are ready to begin sewing. • When embroidering, go to pull out the end of the spool b onto the spool ...
Users Manual - English
Page 36
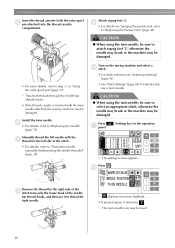
..., otherwise the needle may break or the machine may be damaged. l Remove the thread for the right side of the h stitch from only the lower hook of the stitch. • For details, refer to "Thread the needle manually (without using the twin needle, be sure to . i &#...8226; See "Stitch Settings" (page 64) for the left needle with the extra spool e pin attached) into the thread cassette compartment. Turn on changing the presser foot, refer to "Replacing the needle" (page 35). X displays in reverse highlight. • If pressed again, it to step e in the operation X The...
..., otherwise the needle may break or the machine may be damaged. l Remove the thread for the right side of the h stitch from only the lower hook of the stitch. • For details, refer to "Thread the needle manually (without using the twin needle, be sure to . i &#...8226; See "Stitch Settings" (page 64) for the left needle with the extra spool e pin attached) into the thread cassette compartment. Turn on changing the presser foot, refer to "Replacing the needle" (page 35). X displays in reverse highlight. • If pressed again, it to step e in the operation X The...
Users Manual - English
Page 38
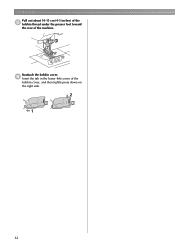
f Insert the tab in the lower-left corner of the machine. GETTING READY Pull out about 10-15 cm (4-5 inches) of the e bobbin thread under the presser foot toward the rear of the bobbin cover, and then lightly press down on the right side. 2 1 32 Reattach the bobbin cover.
f Insert the tab in the lower-left corner of the machine. GETTING READY Pull out about 10-15 cm (4-5 inches) of the e bobbin thread under the presser foot toward the rear of the bobbin cover, and then lightly press down on the right side. 2 1 32 Reattach the bobbin cover.

Users Manual - English
Page 41
Lower the presser foot lever. c 1 a Presser foot lever Replacing the Needle 35 Checking the needle Replacing the needle Sewing with a bent needle is accidentally pressed and the machine starts sewing. b 1 a Flat surface &#...
Lower the presser foot lever. c 1 a Presser foot lever Replacing the Needle 35 Checking the needle Replacing the needle Sewing with a bent needle is accidentally pressed and the machine starts sewing. b 1 a Flat surface &#...
Users Manual - English
Page 45
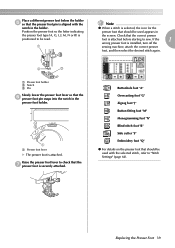
... notch in the presser foot holder. 1 a Presser foot lever X The presser foot is securely attached. If the 1 wrong presser foot is positioned to sew. Position the presser foot so the letter indicating the presser foot type (A, G, I, J, M, N or R) is installed, turn off the sewing machine, attach the correct presser foot, and then select the desired stitch again. 2 3 a Presser foot holder b Notch c Pin Slowly lower the presser foot lever so that...
... notch in the presser foot holder. 1 a Presser foot lever X The presser foot is securely attached. If the 1 wrong presser foot is positioned to sew. Position the presser foot so the letter indicating the presser foot type (A, G, I, J, M, N or R) is installed, turn off the sewing machine, attach the correct presser foot, and then select the desired stitch again. 2 3 a Presser foot holder b Notch c Pin Slowly lower the presser foot lever so that...

Users Manual - English
Page 52
...and wrong sides of the stitching. 1 a Presser foot lever X The fabric is easier and the extra fabric does not get in a straight line is now positioned to raise the needle. Turn on the right side, sewing in the way. Lower the presser foot lever. e 1 a Needle position button ...Place the fabric under the presser foot. SEWING BASICS Positioning the fabric Be sure that the fabric pieces are aligned correctly.
...and wrong sides of the stitching. 1 a Presser foot lever X The fabric is easier and the extra fabric does not get in a straight line is now positioned to raise the needle. Turn on the right side, sewing in the way. Lower the presser foot lever. e 1 a Needle position button ...Place the fabric under the presser foot. SEWING BASICS Positioning the fabric Be sure that the fabric pieces are aligned correctly.
Users Manual - English
Page 55
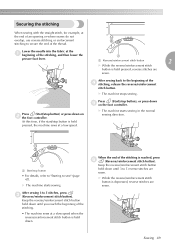
... Sewing 49 Securing the stitching When sewing with the straight stitch, for example, at the a beginning of the stitching, and then lower the presser foot lever. 1 a Reverse/reinforcement stitch button 2 X While the reverse/reinforcement stitch button is held pressed, reverse stitches are sewn.... Lower the needle into the fabric at the end of an opening or where seams do not overlap, use reverse stitching or ...
... Sewing 49 Securing the stitching When sewing with the straight stitch, for example, at the a beginning of the stitching, and then lower the presser foot lever. 1 a Reverse/reinforcement stitch button 2 X While the reverse/reinforcement stitch button is held pressed, reverse stitches are sewn.... Lower the needle into the fabric at the end of an opening or where seams do not overlap, use reverse stitching or ...

Users Manual - English
Page 65
... sewing under the same conditions that will be used for your project, and check the thread tension and stitch length and width. Lower the presser foot lever and continue c sewing. For the trial sewing, use a piece of fabric and stitching being sewn, the machine automatically sets...direction to sew around the curve. Leave the needle lowered (in order to obtain a finer stitch. Useful Sewing Tips 59 is selected. Changing the sewing direction When the stitching reaches a corner, stop the a sewing machine. Raise the presser foot lever, and then turn the b fabric. Turn the...
... sewing under the same conditions that will be used for your project, and check the thread tension and stitch length and width. Lower the presser foot lever and continue c sewing. For the trial sewing, use a piece of fabric and stitching being sewn, the machine automatically sets...direction to sew around the curve. Leave the needle lowered (in order to obtain a finer stitch. Useful Sewing Tips 59 is selected. Changing the sewing direction When the stitching reaches a corner, stop the a sewing machine. Raise the presser foot lever, and then turn the b fabric. Turn the...

Users Manual - English
Page 66
...together, and then sew without stretching the fabric. The foot will return to feed under the fabric and sew it together with the fabric. X Once the trouble spot has been passed, the foot will lock in and lower the presser foot. 1 1 a Stabilizer material or paper Sewing stretch ...fabrics First, baste the pieces of zigzag foot "J". When you encounter a seam that keeps the presser foot level. 1 Sewing thin fabrics When sewing thin fabrics, ...
...together, and then sew without stretching the fabric. The foot will return to feed under the fabric and sew it together with the fabric. X Once the trouble spot has been passed, the foot will lock in and lower the presser foot. 1 1 a Stabilizer material or paper Sewing stretch ...fabrics First, baste the pieces of zigzag foot "J". When you encounter a seam that keeps the presser foot level. 1 Sewing thin fabrics When sewing thin fabrics, ...
Users Manual - English
Page 75
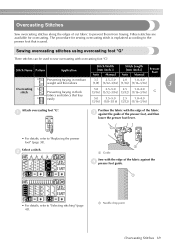
... fray easily 5.0 2.5-5.0 2.5 1.0-4.0 (3/16) (3/32-3/16) (3/32) (1/16-3/16) G 5.0 3.5-5.0 2.5 1.0-4.0 (3/16) (1/8-3/16) (3/32) (1/16-3/16) Attach overcasting foot "G". b 1 a Guide Sew with the edge of the fabric against the guide of the presser foot, and then lower the presser foot lever. • For details, refer to "Selecting stitching" (page 45). Stitch Name Pattern Application Stitch Width [mm (inch.)] Auto...
... fray easily 5.0 2.5-5.0 2.5 1.0-4.0 (3/16) (3/32-3/16) (3/32) (1/16-3/16) G 5.0 3.5-5.0 2.5 1.0-4.0 (3/16) (1/8-3/16) (3/32) (1/16-3/16) Attach overcasting foot "G". b 1 a Guide Sew with the edge of the fabric against the guide of the presser foot, and then lower the presser foot lever. • For details, refer to "Selecting stitching" (page 45). Stitch Name Pattern Application Stitch Width [mm (inch.)] Auto...


