Operation Manual
Page 3
..., or other parts to assure correct installation. 8 For repair or adjustment: • If the Light unit is damaged, it must be replaced by the manufacturer as described in the manual. Use this machine only for household use. 1 For additional product information and updates, visit our web site at www.brother.com SAVE THESE INSTRUCTIONS This machine is required, first follow the troubleshooting table in this product...
..., or other parts to assure correct installation. 8 For repair or adjustment: • If the Light unit is damaged, it must be replaced by the manufacturer as described in the manual. Use this machine only for household use. 1 For additional product information and updates, visit our web site at www.brother.com SAVE THESE INSTRUCTIONS This machine is required, first follow the troubleshooting table in this product...
Operation Manual
Page 5
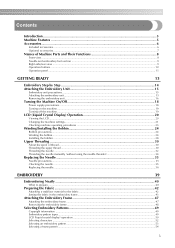
... ...19 LCD (Liquid Crystal Display) Operation 20 Viewing the LCD...20 Changing the machine settings ...21 Checking machine operating procedures ...23 Winding/Installing the Bobbin 24 Bobbin precautions ...24 Winding the bobbin ...24 Installing the bobbin ...28 Upper Threading ...30 About the spool of thread ...30 Threading the upper thread ...30 Threading the needle ...32 Threading the needle manually (without using the needle threader 34 Replacing the Needle ...35 Needle precautions ...35 Checking the needle ...35 Replacing the needle...36 EMBROIDERY 39 Embroidering Neatly ...40 What to...
... ...19 LCD (Liquid Crystal Display) Operation 20 Viewing the LCD...20 Changing the machine settings ...21 Checking machine operating procedures ...23 Winding/Installing the Bobbin 24 Bobbin precautions ...24 Winding the bobbin ...24 Installing the bobbin ...28 Upper Threading ...30 About the spool of thread ...30 Threading the upper thread ...30 Threading the needle ...32 Threading the needle manually (without using the needle threader 34 Replacing the Needle ...35 Needle precautions ...35 Checking the needle ...35 Replacing the needle...36 EMBROIDERY 39 Embroidering Neatly ...40 What to...
Operation Manual
Page 8
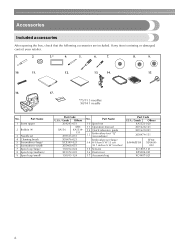
... Quick reference guide 13 Embroidery foot "Q" (on machine) Embroidery set 4 Cleaning brush 5 Screwdriver (large) 6 Screwdriver (small) 7 Spool cap (large) 8 Spool cap (medium) 9 Spool cap (small) Part Code U.S.A. / Canada Others X54243-051 SA156 SFB: XA5539- 151 X59535-051 X59476-021 XC8349-021 X55468-051 130012-024 XE1372-001 130013-124 No. Part Name 1 Seam ripper 2 Bobbin (4) 3 Needle set (large) 14 H 18cm X W 13 cm (H 7 inches X W 5 inches) 15 Scissors 16 Dust cover...
... Quick reference guide 13 Embroidery foot "Q" (on machine) Embroidery set 4 Cleaning brush 5 Screwdriver (large) 6 Screwdriver (small) 7 Spool cap (large) 8 Spool cap (medium) 9 Spool cap (small) Part Code U.S.A. / Canada Others X54243-051 SA156 SFB: XA5539- 151 X59535-051 X59476-021 XC8349-021 X55468-051 130012-024 XE1372-001 130013-124 No. Part Name 1 Seam ripper 2 Bobbin (4) 3 Needle set (large) 14 H 18cm X W 13 cm (H 7 inches X W 5 inches) 15 Scissors 16 Dust cover...
Operation Manual
Page 11
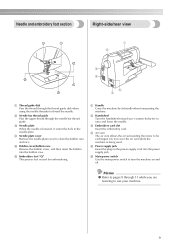
... surrounding the motor to clean the bobbin case and race. e Power supply jack Insert the plug on and off. b Needle bar thread guide Pass the upper thread through the needle bar thread guide. e Bobbin cover/bobbin case Remove the bobbin cover, and then insert the bobbin into the power supply jack. a Handle Carry the machine by its handle when transporting the machine. c Embroidery card slot Insert the embroidery card. Do not cover the air vent while the machine is lowered, it enters the hole in the needle plate. Memo...
... surrounding the motor to clean the bobbin case and race. e Power supply jack Insert the plug on and off. b Needle bar thread guide Pass the upper thread through the needle bar thread guide. e Bobbin cover/bobbin case Remove the bobbin cover, and then insert the bobbin into the power supply jack. a Handle Carry the machine by its handle when transporting the machine. c Embroidery card slot Insert the embroidery card. Do not cover the air vent while the machine is lowered, it enters the hole in the needle plate. Memo...

Operation Manual
Page 12
.... c Thread cutter button Press the thread cutter button after the threads have already been cut both the upper and the bobbin threads. z When cutting thread thicker than #30, nylon thread or other special threads, use the thread cutter on the side of the machine. 10 The machine embroiders at a slow speed while the button is embroidering, otherwise damage to the machine may occur. Orange: The machine is winding the bobbin thread, or the bobbin winder shaft is embroidering. Operation buttons The operation buttons help you...
.... c Thread cutter button Press the thread cutter button after the threads have already been cut both the upper and the bobbin threads. z When cutting thread thicker than #30, nylon thread or other special threads, use the thread cutter on the side of the machine. 10 The machine embroiders at a slow speed while the button is embroidering, otherwise damage to the machine may occur. Orange: The machine is winding the bobbin thread, or the bobbin winder shaft is embroidering. Operation buttons The operation buttons help you...
Operation Manual
Page 16
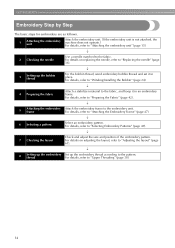
... not attached, the machine does not operate.) For details, refer to "Attaching the embroidery unit" (page 15). ↓ 2 Checking the needle Use a needle matched to "Selecting Embroidery Patterns" (page 49). ↓ 7 Checking the layout Check and adjust the size and position of the embroidery pattern. For details, refer to "Winding/Installing the Bobbin" (page 24). ↓ 4 Preparing the fabric Attach a stabilizer material to the pattern. For details, refer to the fabric. thread For...
... not attached, the machine does not operate.) For details, refer to "Attaching the embroidery unit" (page 15). ↓ 2 Checking the needle Use a needle matched to "Selecting Embroidery Patterns" (page 49). ↓ 7 Checking the layout Check and adjust the size and position of the embroidery pattern. For details, refer to "Winding/Installing the Bobbin" (page 24). ↓ 4 Preparing the fabric Attach a stabilizer material to the pattern. For details, refer to the fabric. thread For...
Operation Manual
Page 25
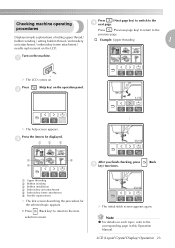
... screen. Displays simple explanations of setting upper thread / bobbin winding / setting bobbin thread / embroidery † Example: Upper threading 1 unit attachment / embroidery frame attachment / needle replacement on . a X The LCD comes on the LCD. Press b (Help key) on each topic, refer to the corresponding page in this Operation Manual. Note z For details on the operation panel. X The help screen appears. c 1 2 3 4 6 After you finish checking, press (Back 5 e key) two times. X The initial stitch screen appears again. procedures...
... screen. Displays simple explanations of setting upper thread / bobbin winding / setting bobbin thread / embroidery † Example: Upper threading 1 unit attachment / embroidery frame attachment / needle replacement on . a X The LCD comes on the LCD. Press b (Help key) on each topic, refer to the corresponding page in this Operation Manual. Note z For details on the operation panel. X The help screen appears. c 1 2 3 4 6 After you finish checking, press (Back 5 e key) two times. X The initial stitch screen appears again. procedures...

Operation Manual
Page 26
... bobbin was designed specifically for this machine. Use of the same type (part code: SA156, SFB: XA5539151). 2 a Notch b Bobbin winder shaft spring Slide the bobbin winder in injuries or damage to wind the thread onto the bobbin, and then insert the bobbin thread. Use only the included bobbin or bobbins of any other models are used, the machine will not operate correctly. CAUTION Place the bobbin on the bobbin winder shaft so c that is inserted onto the e spool pin. 1 2 a Spool pin b Spool cap Open the top cover...
... bobbin was designed specifically for this machine. Use of the same type (part code: SA156, SFB: XA5539151). 2 a Notch b Bobbin winder shaft spring Slide the bobbin winder in injuries or damage to wind the thread onto the bobbin, and then insert the bobbin thread. Use only the included bobbin or bobbins of any other models are used, the machine will not operate correctly. CAUTION Place the bobbin on the bobbin winder shaft so c that is inserted onto the e spool pin. 1 2 a Spool pin b Spool cap Open the top cover...

Operation Manual
Page 27
... the spool. 1 cb • If the spool is not positioned so that the thread unwinds correctly, the thread may become tangled around the spool pin, causing the needle to break. ● Three spool cap sizes are available, allowing you to choose a spool cap that the spool is too long, fold it to fit the size of the spool. 1 2 3 4 a Spool net b Spool c Spool cap d Spool pin Winding/Installing the Bobbin 25 If the spool net...
... the spool. 1 cb • If the spool is not positioned so that the thread unwinds correctly, the thread may become tangled around the spool pin, causing the needle to break. ● Three spool cap sizes are available, allowing you to choose a spool cap that the spool is too long, fold it to fit the size of the spool. 1 2 3 4 a Spool net b Spool c Spool cap d Spool pin Winding/Installing the Bobbin 25 If the spool net...

Operation Manual
Page 30
... used, the machine will be incorrect. a Bobbin cover b Latch X The bobbin cover opens. Be sure to insert the bobbin correctly. Memo z The order that d the thread unrolls to install the bobbin so that has been correctly wound with your left . b Hold the bobbin with your right hand and hold down with thread, otherwise the needle may break or the thread tension will not operate correctly. Slide the bobbin cover latch to drop...
... used, the machine will be incorrect. a Bobbin cover b Latch X The bobbin cover opens. Be sure to insert the bobbin correctly. Memo z The order that d the thread unrolls to install the bobbin so that has been correctly wound with your left . b Hold the bobbin with your right hand and hold down with thread, otherwise the needle may break or the thread tension will not operate correctly. Slide the bobbin cover latch to drop...

Operation Manual
Page 38
... the needle clamp screw toward you (counterclockwise) to remove the needle. 1 a Needle position button Turn off the machine, otherwise injuries may occur if (Start/stop button) is accidentally pressed and the machine starts embroidering. Use the screwdriver and a needle that has been determined to be straight according to the instructions in the needle plate. Replace the needle as described below. Lower the presser foot lever. GETTING READY Replacing the needle Place fabric or paper under the embroidery d foot to cover the hole in...
... the needle clamp screw toward you (counterclockwise) to remove the needle. 1 a Needle position button Turn off the machine, otherwise injuries may occur if (Start/stop button) is accidentally pressed and the machine starts embroidering. Use the screwdriver and a needle that has been determined to be straight according to the instructions in the needle plate. Replace the needle as described below. Lower the presser foot lever. GETTING READY Replacing the needle Place fabric or paper under the embroidery d foot to cover the hole in...

Operation Manual
Page 58
... this machine. Otherwise, the embroidery unit cannot move freely, and the pattern may strike the object and cause a poor finish to "Optional accessories" (page 7). z Do not leave objects in the range of motion of threads below. The frame may not turn out correctly. Another important point is enough thread in the bobbin. Thread Upper thread Bobbin thread Use embroidery thread, or country embroidery thread intended for use threads other heavy fabrics...
... this machine. Otherwise, the embroidery unit cannot move freely, and the pattern may strike the object and cause a poor finish to "Optional accessories" (page 7). z Do not leave objects in the range of motion of threads below. The frame may not turn out correctly. Another important point is enough thread in the bobbin. Thread Upper thread Bobbin thread Use embroidery thread, or country embroidery thread intended for use threads other heavy fabrics...

Operation Manual
Page 60
... the automatic cutting setting, refer to the initial screen. c 1 a Presser foot lever Press d (Start/stop button) again. When automatic thread cutting is set, the thread is finished. Press h (Thread cutter button) once. 1 1 a Start/stop button After progressing 5-6 stitches, press e stop button) to stop the machine. (Start/ Use scissors to the machine may occur. ● Do not press (Thread cutter button) if there is no fabric under the embroidery foot or while the machine is embroidering, otherwise damage to cut . Set up embroidery thread...
... the automatic cutting setting, refer to the initial screen. c 1 a Presser foot lever Press d (Start/stop button) again. When automatic thread cutting is set, the thread is finished. Press h (Thread cutter button) once. 1 1 a Start/stop button After progressing 5-6 stitches, press e stop button) to stop the machine. (Start/ Use scissors to the machine may occur. ● Do not press (Thread cutter button) if there is no fabric under the embroidery foot or while the machine is embroidering, otherwise damage to cut . Set up embroidery thread...
Operation Manual
Page 67
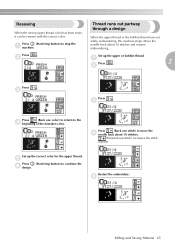
... the upper or bobbin thread. Press . b Set up the correct color for the upper thread. e Press (Start/stop button) to stop button) to continue the f design. c Press (Back one stitch) increases the stitch number. c Press . e Editing and Saving Patterns 65 Move the needle back about 10 stitches. (Forward one color) to return to move the d needle back about 10 stitches and resume embroidering. Restart the embroidery. Resewing When the wrong upper thread...
... the upper or bobbin thread. Press . b Set up the correct color for the upper thread. e Press (Start/stop button) to stop button) to continue the f design. c Press (Back one stitch) increases the stitch number. c Press . e Editing and Saving Patterns 65 Move the needle back about 10 stitches. (Forward one color) to return to move the d needle back about 10 stitches and resume embroidering. Restart the embroidery. Resewing When the wrong upper thread...

Operation Manual
Page 70
EMBROIDERY Bobbin Case Adjustment The bobbin case installed in this occurs, turn the slotted-head screw (b) counterclockwise being careful not to over -loosen the screw, approximately 30-45 degrees to the bobbin case. Using a small slotted screwdriver, turn , do not use . The insertion below describes how to be lifting/looping and bobbin thread is tight Upper thread on the right side of fabric seems to adjust the bobbin tension for embroidering. Bobbin thread is not seen...
EMBROIDERY Bobbin Case Adjustment The bobbin case installed in this occurs, turn the slotted-head screw (b) counterclockwise being careful not to over -loosen the screw, approximately 30-45 degrees to the bobbin case. Using a small slotted screwdriver, turn , do not use . The insertion below describes how to be lifting/looping and bobbin thread is tight Upper thread on the right side of fabric seems to adjust the bobbin tension for embroidering. Bobbin thread is not seen...
Operation Manual
Page 76
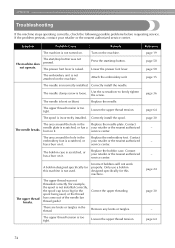
... big for this machine is not attached on it. Lower the presser foot lever. The area around the hole in the thread. There are knots or tangles in the Replace the needle plate. Correct the upper threading. Loosen the upper thread tension. Correctly install the needle. Correctly install the spool. If the problem persists, contact your retailer or the nearest authorized service center. The upper thread breaks. Replace the needle. Loosen the upper thread tension. A bobbin designed specifically for this machine. Remove any knots or...
... big for this machine is not attached on it. Lower the presser foot lever. The area around the hole in the thread. There are knots or tangles in the Replace the needle plate. Correct the upper threading. Loosen the upper thread tension. Correctly install the needle. Correctly install the spool. If the problem persists, contact your retailer or the nearest authorized service center. The upper thread breaks. Replace the needle. Loosen the upper thread tension. A bobbin designed specifically for this machine. Remove any knots or...

Operation Manual
Page 77
... breaks. Replace the needle. The area around the hole in the Replace the embroidery foot. Replace the bobbin case. page 24 Bobbin thread does not wind neatly on it . page 28 The lower thread is bent or blunt. Replace the bobbin. page 30 The thread tension is incorrectly installed. The bobbin thread is incorrect. service center. Incorrect bobbins will not work properly. Only use a bobbin designed specifically for example, in the bobbin case, clean the race. page 26 The bobbin thread is incorrect. The thread tension...
... breaks. Replace the needle. The area around the hole in the Replace the embroidery foot. Replace the bobbin case. page 24 Bobbin thread does not wind neatly on it . page 28 The lower thread is bent or blunt. Replace the bobbin. page 30 The thread tension is incorrectly installed. The bobbin thread is incorrect. service center. Incorrect bobbins will not work properly. Only use a bobbin designed specifically for example, in the bobbin case, clean the race. page 26 The bobbin thread is incorrect. The thread tension...

Operation Manual
Page 78
... upper threading. Press the needle position button. The needle is pressed. Correctly install the needle. Contact your retailer or the nearest authorized service center. Touch the LCD with your finger, and the animation will not work properly. Select a pattern. thread sensor. Stitches are damaged. Dust has accumulated under the Remove the needle plate cover and needle plate or in the bobbin case. clean the race. Replace the bobbin case. Machine does not operate when button is incorrectly installed. No pattern...
... upper threading. Press the needle position button. The needle is pressed. Correctly install the needle. Contact your retailer or the nearest authorized service center. Touch the LCD with your finger, and the animation will not work properly. Select a pattern. thread sensor. Stitches are damaged. Dust has accumulated under the Remove the needle plate cover and needle plate or in the bobbin case. clean the race. Replace the bobbin case. Machine does not operate when button is incorrectly installed. No pattern...
Operation Manual
Page 79
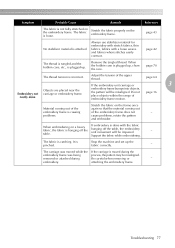
.... Adjust the tension of embroidery frame motion. page 64 If the embroidery unit carriage or 3 Embroidery not neatly done. page 16 Stretch the fabric on the embroidery frame. Support the fabric while embroidering. - The fabric is moved during the embroidery frame was being removed or attached during process, the pattern may be misaligned. page 43 No stabilizer material is catching. page 42 The thread is tangled and the bobbin case...
.... Adjust the tension of embroidery frame motion. page 64 If the embroidery unit carriage or 3 Embroidery not neatly done. page 16 Stretch the fabric on the embroidery frame. Support the fabric while embroidering. - The fabric is moved during the embroidery frame was being removed or attached during process, the pattern may be misaligned. page 43 No stabilizer material is catching. page 42 The thread is tangled and the bobbin case...
Operation Manual
Page 85
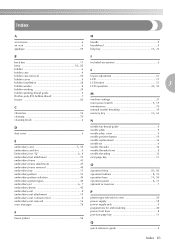
... 8 embroidery unit attachment 15 embroidery unit connector slot 8 embroidery unit removal 16 error messages 78 F frame pattern 54 needle bar thread guide 9 needle plate 9 needle plate cover 9 needle position button 10 needle replacement 36 needle set 6 needle threader 32 needle threader lever 8 needle threading 32 next page key 11 O , operation beep 81 82 , operation buttons 8 10 , operation keys 11 50 , operation panel 8 11 optional accessories 7 P pattern type selection screen 20 power supply 18 power supply jack 9 preparations for embroidering 40 presser foot lever...
... 8 embroidery unit attachment 15 embroidery unit connector slot 8 embroidery unit removal 16 error messages 78 F frame pattern 54 needle bar thread guide 9 needle plate 9 needle plate cover 9 needle position button 10 needle replacement 36 needle set 6 needle threader 32 needle threader lever 8 needle threading 32 next page key 11 O , operation beep 81 82 , operation buttons 8 10 , operation keys 11 50 , operation panel 8 11 optional accessories 7 P pattern type selection screen 20 power supply 18 power supply jack 9 preparations for embroidering 40 presser foot lever...


