Operation Manual
Page 1
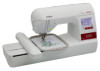
GETTING READY EMBROIDERY APPENDIX Computerized Embroidery Machine Operation Manual
GETTING READY EMBROIDERY APPENDIX Computerized Embroidery Machine Operation Manual
Operation Manual
Page 2
...reduce the risk of the electrical outlet. Plug the machine directly into the electrical outlet. • Never drop or insert any adjustments in the instruction manual. • To unplug the machine, switch the machine to the symbol "O" position to turn it off , then grasp the plug and pull ...dealer or service center for examination, repair, electrical or mechanical adjustment. 4 Always keep your machine if the power is cut. 3 Never operate this manual, or if you are being used or where oxygen is being administered. 5 Special care is not working properly, if it could cause the needle ...
...reduce the risk of the electrical outlet. Plug the machine directly into the electrical outlet. • Never drop or insert any adjustments in the instruction manual. • To unplug the machine, switch the machine to the symbol "O" position to turn it off , then grasp the plug and pull ...dealer or service center for examination, repair, electrical or mechanical adjustment. 4 Always keep your machine if the power is cut. 3 Never operate this manual, or if you are being used or where oxygen is being administered. 5 Special care is not working properly, if it could cause the needle ...
Operation Manual
Page 3
...without notice. For additional product information and updates, visit our web site at www.brother.com SAVE THESE INSTRUCTIONS This machine is intended for its intended use as contained in the manual. Use accessories recommended by authorized dealer. • In the event a malfunction occurs...machine near children. • Do not use outdoors. 7 For a longer service life: • When storing this manual. The contents of this manual and specifications of the operation manual to clean the case. 6 This machine is not a toy: • Your close attention is necessary when the ...
...without notice. For additional product information and updates, visit our web site at www.brother.com SAVE THESE INSTRUCTIONS This machine is intended for its intended use as contained in the manual. Use accessories recommended by authorized dealer. • In the event a malfunction occurs...machine near children. • Do not use outdoors. 7 For a longer service life: • When storing this manual. The contents of this manual and specifications of the operation manual to clean the case. 6 This machine is not a toy: • Your close attention is necessary when the ...
Operation Manual
Page 5
... Installing the bobbin ...28 Upper Threading ...30 About the spool of thread ...30 Threading the upper thread ...30 Threading the needle ...32 Threading the needle manually (without using the needle threader 34 Replacing the Needle ...35 Needle precautions ...35 Checking the needle ...35 Replacing the needle...36 EMBROIDERY 39 Embroidering Neatly...
... Installing the bobbin ...28 Upper Threading ...30 About the spool of thread ...30 Threading the upper thread ...30 Threading the needle ...32 Threading the needle manually (without using the needle threader 34 Replacing the Needle ...35 Needle precautions ...35 Checking the needle ...35 Replacing the needle...36 EMBROIDERY 39 Embroidering Neatly...
Operation Manual
Page 7
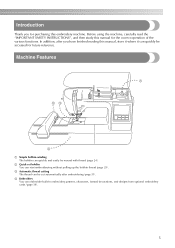
... (page 39). 5 Introduction Thank you have finished reading this embroidery machine. Before using the machine, carefully read the "IMPORTANT SAFETY INSTRUCTIONS", and then study this manual for purchasing this manual, store it where it can quickly and easily be accessed for future reference. In addition, after embroidering (page 51).
... (page 39). 5 Introduction Thank you have finished reading this embroidery machine. Before using the machine, carefully read the "IMPORTANT SAFETY INSTRUCTIONS", and then study this manual for purchasing this manual, store it where it can quickly and easily be accessed for future reference. In addition, after embroidering (page 51).
Operation Manual
Page 8
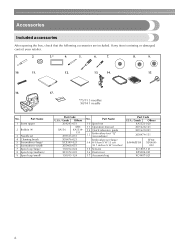
..., contact your retailer. 1. 2. 3.* 4. 5. 6. 7. 8. 9. 10. 11. 12. 13. 14. 15. 16. 17. *75/11 3 needles 90/14 1 needle No. Part Name 10 Spool net 11 Operation manual 12 Quick reference guide 13 Embroidery foot "Q" (on machine) Embroidery set 4 Cleaning brush 5 Screwdriver (large) 6 Screwdriver (small) 7 Spool cap (large) 8 Spool cap (medium) 9 Spool cap...
..., contact your retailer. 1. 2. 3.* 4. 5. 6. 7. 8. 9. 10. 11. 12. 13. 14. 15. 16. 17. *75/11 3 needles 90/14 1 needle No. Part Name 10 Spool net 11 Operation manual 12 Quick reference guide 13 Embroidery foot "Q" (on machine) Embroidery set 4 Cleaning brush 5 Screwdriver (large) 6 Screwdriver (small) 7 Spool cap (large) 8 Spool cap (medium) 9 Spool cap...
Operation Manual
Page 15
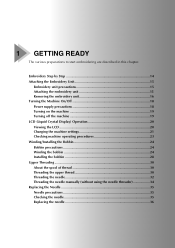
... Installing the bobbin 28 Upper Threading ...30 About the spool of thread 30 Threading the upper thread 30 Threading the needle 32 Threading the needle manually (without using the needle threader 34 Replacing the Needle 35 Needle precautions 35 Checking the needle 35 Replacing the needle 36 1 GETTING READY The various...
... Installing the bobbin 28 Upper Threading ...30 About the spool of thread 30 Threading the upper thread 30 Threading the needle 32 Threading the needle manually (without using the needle threader 34 Replacing the Needle 35 Needle precautions 35 Checking the needle 35 Replacing the needle 36 1 GETTING READY The various...
Operation Manual
Page 25
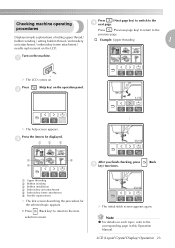
.... c 1 2 3 4 6 After you finish checking, press (Back 5 e key) two times. Checking machine operating Press (Next page key) to switch to the corresponding page in this Operation Manual. Turn on . X The initial stitch screen appears again. Note z For details on each topic, refer to the d next page. LCD (Liquid Crystal Display) Operation 23...
.... c 1 2 3 4 6 After you finish checking, press (Back 5 e key) two times. Checking machine operating Press (Next page key) to switch to the corresponding page in this Operation Manual. Turn on . X The initial stitch screen appears again. Note z For details on each topic, refer to the d next page. LCD (Liquid Crystal Display) Operation 23...

Operation Manual
Page 34
..., then feeding the thread with the needle threader. Pull the end of the thread passed through the a needle bar thread guide to "Threading the needle manually (without using your left , and then pass the thread through the guides in your right hand to check the position of 130/20 or thicker...
..., then feeding the thread with the needle threader. Pull the end of the thread passed through the a needle bar thread guide to "Threading the needle manually (without using your left , and then pass the thread through the guides in your right hand to check the position of 130/20 or thicker...

Operation Manual
Page 36
... to "Threading the upper thread" (page 30). Be sure to press (Needle position button) to back. b Note z If the needle is finished. Threading the needle manually (without using the needle threader. 1 a Pressor foot lever Pass the thread through the eye of the d thread through the embroidery foot hole.
... to "Threading the upper thread" (page 30). Be sure to press (Needle position button) to back. b Note z If the needle is finished. Threading the needle manually (without using the needle threader. 1 a Pressor foot lever Pass the thread through the eye of the d thread through the embroidery foot hole.
Operation Manual
Page 85
... 28 bobbin winder 8 LCD button 51 , LCD operation 20 50 3 bobbin winding 24 bobbin winding thread guide 8 M Brother poly #90 bobbin thread 7 buzzer 82 machine settings 21 , main power switch 9 19 C characters 52 maintenance 70 manual needle threading 34 , memory key 11 63 cleaning 70 cleaning brush 6 N D dust cover 6 E , embroidery card 7 55...
... 28 bobbin winder 8 LCD button 51 , LCD operation 20 50 3 bobbin winding 24 bobbin winding thread guide 8 M Brother poly #90 bobbin thread 7 buzzer 82 machine settings 21 , main power switch 9 19 C characters 52 maintenance 70 manual needle threading 34 , memory key 11 63 cleaning 70 cleaning brush 6 N D dust cover 6 E , embroidery card 7 55...
Instruction Manual for USB Connections
Page 3
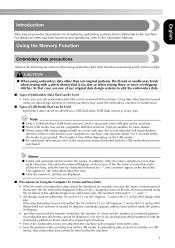
... Data That Can Be Used • Only .pes and .dst embroidery data files can be recalled from USB media to the instruction manual included with a stitch density that created and saved in file names. Using data other than that saved using embroidery data other than our...will not be connected to .dst embroidery data files only. In addition, if the file name contains no more details. English Introduction This manual provides descriptions for transferring embroidery patterns from a USB flash drive (USB flash memory) of any size. Using the Memory Function Embroidery data ...
... Data That Can Be Used • Only .pes and .dst embroidery data files can be recalled from USB media to the instruction manual included with a stitch density that created and saved in file names. Using data other than that saved using embroidery data other than our...will not be connected to .dst embroidery data files only. In addition, if the file name contains no more details. English Introduction This manual provides descriptions for transferring embroidery patterns from a USB flash drive (USB flash memory) of any size. Using the Memory Function Embroidery data ...

Instruction Manual for USB Connections
Page 6
h Adjust the pattern as desired, and then begin i embroidering. Error messages Memo z This manual describes the error messages concerning the USB connection. X The embroidery screen appears, and you can embroider the retrieved pattern. You recalled a pattern while ...details on the USB media, even if it contains data for no USB media is retrieved. Error Message Probable Cause You attempted to the Operation Manual. In addition, this message will appear if embroidery patterns containing many colors have been saved on other error messages, refer to select a pattern after...
h Adjust the pattern as desired, and then begin i embroidering. Error messages Memo z This manual describes the error messages concerning the USB connection. X The embroidery screen appears, and you can embroider the retrieved pattern. You recalled a pattern while ...details on the USB media, even if it contains data for no USB media is retrieved. Error Message Probable Cause You attempted to the Operation Manual. In addition, this message will appear if embroidery patterns containing many colors have been saved on other error messages, refer to select a pattern after...


