
Accessory Catalog
Page 23
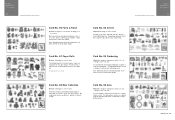
The card consists of today's Brother machines. Note: Embroidery machine models with maximum 4" x 4" frame sizes will not accept larger designs. Our card provides numerous possibilities to embellish on hand. Card No. 56 Asia SA356: 3 designs for a multiple hoop (12" x 5"), 35 designs for a 4" x 4"... beautiful images of bears made in many of numerous outfits to add elegance and style to stock on children's clothing. NO.52 Brother Embroidery Card Collection Brother Embroidery Accessories 44 Card No. 53 Scenes SA353: 45 designs for a 4" x 4" area A design for a 4"x 4" ...
The card consists of today's Brother machines. Note: Embroidery machine models with maximum 4" x 4" frame sizes will not accept larger designs. Our card provides numerous possibilities to embellish on hand. Card No. 56 Asia SA356: 3 designs for a multiple hoop (12" x 5"), 35 designs for a 4" x 4"... beautiful images of bears made in many of numerous outfits to add elegance and style to stock on children's clothing. NO.52 Brother Embroidery Card Collection Brother Embroidery Accessories 44 Card No. 53 Scenes SA353: 45 designs for a 4" x 4" area A design for a 4"x 4" ...
Accessory Catalog
Page 27
... JAS-SCHMITT Card No. 77 Holidays SA377: 8 designs for a 7" x 5" area, 35 design for almost everyone who owns a home embroidery machine. R NO 80 www.brother.com all in -the-hoop" projects as well as Valentine's Day, St. Note: Embroidery machine models with most brands of home embroidery machines (.pes, .dst, vip, .hus, .art...
... JAS-SCHMITT Card No. 77 Holidays SA377: 8 designs for a 7" x 5" area, 35 design for almost everyone who owns a home embroidery machine. R NO 80 www.brother.com all in -the-hoop" projects as well as Valentine's Day, St. Note: Embroidery machine models with most brands of home embroidery machines (.pes, .dst, vip, .hus, .art...

Accessory Catalog
Page 33
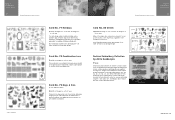
...: 60 x 60 mm (approx. 2-1/2 x 2-1/2 inches) SA411 www.brother.com For all models: SA503 Free-Standing Ten Spool Thread Stand You can set up to 10 spools of thread on creating. Take control of your machine. For Quattro™ 6000D: • Extra-large: 300 x 200 mm (approx. 12 x ...x 2-1/2 inches) SA442 For Innov-is 900D series, SE-350, HE-240, LB6770, Innov-is 4000D/2500D/1500D SA560 QuattroTM 6000D Embroidery Machine Hoops Select hoops appropriate for your spool thread tails by placing them in place on our website for thread delivery or bobbin storage. Ask your selected...
...: 60 x 60 mm (approx. 2-1/2 x 2-1/2 inches) SA411 www.brother.com For all models: SA503 Free-Standing Ten Spool Thread Stand You can set up to 10 spools of thread on creating. Take control of your machine. For Quattro™ 6000D: • Extra-large: 300 x 200 mm (approx. 12 x ...x 2-1/2 inches) SA442 For Innov-is 900D series, SE-350, HE-240, LB6770, Innov-is 4000D/2500D/1500D SA560 QuattroTM 6000D Embroidery Machine Hoops Select hoops appropriate for your spool thread tails by placing them in place on our website for thread delivery or bobbin storage. Ask your selected...

Accessory Catalog
Page 34
...colors specifically designed for fabrics and applications when it is designed to hoop your machine. Consult your instruction manual for greater utility and space saving. Available in Japan for Brother® Embroidery Machines, but compatible with a stabilizer. SA519 Iron-on...CYTPK30 Brother Countr y Yarn Embroider y Threads (30 Color Thread Pack) Attention all embroiderers, Quilters and Heirloom stitchers! Pacesetter embroidery thread is completed. A and B (Black and White): The 1,100-meter (approx.1,200-yds) filament thread is best suited for the Quattro™ 6000D, ...
...colors specifically designed for fabrics and applications when it is designed to hoop your machine. Consult your instruction manual for greater utility and space saving. Available in Japan for Brother® Embroidery Machines, but compatible with a stabilizer. SA519 Iron-on...CYTPK30 Brother Countr y Yarn Embroider y Threads (30 Color Thread Pack) Attention all embroiderers, Quilters and Heirloom stitchers! Pacesetter embroidery thread is completed. A and B (Black and White): The 1,100-meter (approx.1,200-yds) filament thread is best suited for the Quattro™ 6000D, ...

Users Manual - Multi
Page 3
ENGLISH CONTENTS Accessories...2 Embroidering with the Border Embroidery Frame 2 Sample Projects Using the Border Embroidery Frame 2 Selecting a Pattern ...3 Hooping the Fabric in the Border Embroidery Frame 5 Attaching the Border Embroidery Frame to the Embroidery Unit 6 Embroidering the First Pattern 7 Removing the Border Embroidery Frame 8 Embroidering the Next Pattern 8 1
ENGLISH CONTENTS Accessories...2 Embroidering with the Border Embroidery Frame 2 Sample Projects Using the Border Embroidery Frame 2 Selecting a Pattern ...3 Hooping the Fabric in the Border Embroidery Frame 5 Attaching the Border Embroidery Frame to the Embroidery Unit 6 Embroidering the First Pattern 7 Removing the Border Embroidery Frame 8 Embroidering the Next Pattern 8 1
Users Manual - Multi
Page 7
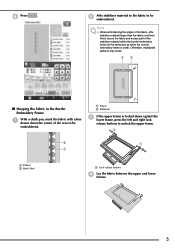
... right lock release buttons to be embroidered. f Press . b Affix stabilizer material to the fabric to unlock the upper frame. Otherwise, misaligned patterns may result. ■ Hooping the Fabric in the same way as when the normal embroidery frame is locked down the center of the area to be embroidered. a Fabric b Stabilizer...
... right lock release buttons to be embroidered. f Press . b Affix stabilizer material to the fabric to unlock the upper frame. Otherwise, misaligned patterns may result. ■ Hooping the Fabric in the same way as when the normal embroidery frame is locked down the center of the area to be embroidered. a Fabric b Stabilizer...
Users Manual - Multi
Page 8
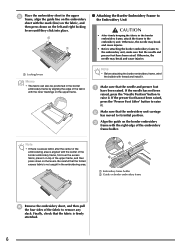
... the left and right locking levers until they click into place. ■ Attaching the Border Embroidery Frame to the Embroidery Unit CAUTION • After firmly hooping the fabric in the border embroidery frame by aligning the edge of the fabric with the inner markings on the upper frame. Note • If...
... the left and right locking levers until they click into place. ■ Attaching the Border Embroidery Frame to the Embroidery Unit CAUTION • After firmly hooping the fabric in the border embroidery frame by aligning the edge of the fabric with the inner markings on the upper frame. Note • If...
Users Manual - English
Page 13
...Embroidery Step by Step 182 Attaching Embroidery Foot "W 183 Attaching the Embroidery Unit 184 SELECTING PATTERNS 186 Selecting Embroidery Patterns/Brother "Exclusives"/Greek Alphabet Patterns/Floral Alphabet Patterns/Utility Embroidery Patterns 189 Selecting Alphabet Character Patterns 190 Selecting Frame Patterns 192 ...195 VIEWING THE SEWING SCREEN 196 PREPARING THE FABRIC 198 Attaching Iron-on Stabilizers (Backing) to the Fabric 198 Hooping the Fabric in the Embroidery Frame 200 Embroidering Small Fabrics or Fabric Edges 203 ATTACHING THE EMBROIDERY FRAME..........204 CONFIRMING ...
...Embroidery Step by Step 182 Attaching Embroidery Foot "W 183 Attaching the Embroidery Unit 184 SELECTING PATTERNS 186 Selecting Embroidery Patterns/Brother "Exclusives"/Greek Alphabet Patterns/Floral Alphabet Patterns/Utility Embroidery Patterns 189 Selecting Alphabet Character Patterns 190 Selecting Frame Patterns 192 ...195 VIEWING THE SEWING SCREEN 196 PREPARING THE FABRIC 198 Attaching Iron-on Stabilizers (Backing) to the Fabric 198 Hooping the Fabric in the Embroidery Frame 200 Embroidering Small Fabrics or Fabric Edges 203 ATTACHING THE EMBROIDERY FRAME..........204 CONFIRMING ...

Users Manual - English
Page 195
... the Embroidery Unit 185 SELECTING PATTERNS 186 ■ Copyright Information 186 ■ Pattern Selection Screens 187 Selecting Embroidery Patterns/Brother "Exclusives"/Greek Alphabet Patterns/Floral Alphabet Patterns/Utility Embroidery Patterns 189 Selecting Alphabet Character Patterns 190 Selecting Frame Patterns 192 Selecting... SEWING SCREEN 196 ■ Key Functions 197 PREPARING THE FABRIC 198 Attaching Iron-on Stabilizers (Backing) to the Fabric 198 Hooping the Fabric in the Embroidery Frame 200 ■ Types of Embroidery Frames 200 ■ Inserting the Fabric 201 ■...
... the Embroidery Unit 185 SELECTING PATTERNS 186 ■ Copyright Information 186 ■ Pattern Selection Screens 187 Selecting Embroidery Patterns/Brother "Exclusives"/Greek Alphabet Patterns/Floral Alphabet Patterns/Utility Embroidery Patterns 189 Selecting Alphabet Character Patterns 190 Selecting Frame Patterns 192 Selecting... SEWING SCREEN 196 ■ Key Functions 197 PREPARING THE FABRIC 198 Attaching Iron-on Stabilizers (Backing) to the Fabric 198 Hooping the Fabric in the Embroidery Frame 200 ■ Types of Embroidery Frames 200 ■ Inserting the Fabric 201 ■...

Users Manual - English
Page 196
... needle should be used when embroidering on heavy weight fabrics or stabilizing products (for embroidery. 182 Set up embroidery thread according to the fabric, and hoop it in the embroidery frame. BEFORE EMBROIDERING BEFORE EMBROIDERING Embroidery Step by Step Follow the steps below to prepare the machine for embroidery. * Attach the...
... needle should be used when embroidering on heavy weight fabrics or stabilizing products (for embroidery. 182 Set up embroidery thread according to the fabric, and hoop it in the embroidery frame. BEFORE EMBROIDERING BEFORE EMBROIDERING Embroidery Step by Step Follow the steps below to prepare the machine for embroidery. * Attach the...

Users Manual - English
Page 214
PREPARING THE FABRIC Hooping the Fabric in the Embroidery Frame ■ Types of the optional frame. Other optional embroidery frame can be sure to check the design size of ...
PREPARING THE FABRIC Hooping the Fabric in the Embroidery Frame ■ Types of the optional frame. Other optional embroidery frame can be sure to check the design size of ...

Users Manual - English
Page 226
... page 326 for use threads other heavy fabrics), do not let the fabric hang over the table. Using the appropriate stabilizer (see page 198) and hooping the fabric in the bobbin.
... page 326 for use threads other heavy fabrics), do not let the fabric hang over the table. Using the appropriate stabilizer (see page 198) and hooping the fabric in the bobbin.

Users Manual - English
Page 231
..., print the background onto iron-on paper, and print the embroidery position sheet on or printed, check the embroidering position, and then start embroidering. Step4 Hoop in their original dimensions. Beautiful three-dimensional embroidered designs can be combined with the background image ironed on plain paper.
..., print the background onto iron-on paper, and print the embroidery position sheet on or printed, check the embroidering position, and then start embroidering. Step4 Hoop in their original dimensions. Beautiful three-dimensional embroidered designs can be combined with the background image ironed on plain paper.

Users Manual - English
Page 236
Memo • For details on transfer sheet to the size of the pattern before transferring the image. Sewing Embroidery Patterns a Hoop in the embroidery frame the with the background. a Cellophane tape d After checking that a pattern is perfectly aligned with the background image ironed fabric on transfer ...
Memo • For details on transfer sheet to the size of the pattern before transferring the image. Sewing Embroidery Patterns a Hoop in the embroidery frame the with the background. a Cellophane tape d After checking that a pattern is perfectly aligned with the background image ironed fabric on transfer ...

Users Manual - English
Page 273
..., "Recalling from USB Media" on page 252, or "Recalling from USB media and embroider it. With split embroidery patterns, embroidery designs larger than the embroidery hoop are 13 or more detailed sewing instructions, refer to be selected. 259 EMBROIDERY APPLICATIONS Sewing Split Embroidery Patterns Split embroidery patterns created with PE-DESIGN...
..., "Recalling from USB Media" on page 252, or "Recalling from USB media and embroider it. With split embroidery patterns, embroidery designs larger than the embroidery hoop are 13 or more detailed sewing instructions, refer to be selected. 259 EMBROIDERY APPLICATIONS Sewing Split Embroidery Patterns Split embroidery patterns created with PE-DESIGN...
Users Manual - English
Page 312
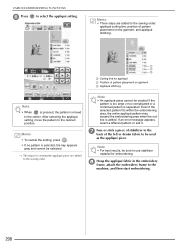
... material for creating the appliqué piece are added to the machine, and then start embroidering. 298 VARIOUS EMBROIDERING FUNCTIONS f Press to the desired position. h Hoop the appliqué fabric in the embroidery frame, attach the embroidery frame to the sewing order.
... material for creating the appliqué piece are added to the machine, and then start embroidering. 298 VARIOUS EMBROIDERING FUNCTIONS f Press to the desired position. h Hoop the appliqué fabric in the embroidery frame, attach the embroidery frame to the sewing order.

Users Manual - English
Page 313
... cutting it out. • Carefully cut out the pattern on the pattern density and fabric used , it aligns with their sticky sides together, and then hoop them in the embroidery frame. Note • Before pasting the appliqué piece down, make sure the appliqué piece is used , there may be...
... cutting it out. • Carefully cut out the pattern on the pattern density and fabric used , it aligns with their sticky sides together, and then hoop them in the embroidery frame. Note • Before pasting the appliqué piece down, make sure the appliqué piece is used , there may be...

Users Manual - English
Page 320
o See "Outputting the Background Image and Positioning Image" on page 307. o See "Selecting a Pattern" on page 308. Step4 Hoop in a different size, the sizes of the background. If an image is printed in the embroidery frame the fabric with the background image ironed on ...
o See "Outputting the Background Image and Positioning Image" on page 307. o See "Selecting a Pattern" on page 308. Step4 Hoop in a different size, the sizes of the background. If an image is printed in the embroidery frame the fabric with the background image ironed on ...

Users Manual - English
Page 324
... the Adobe Systems website: http://www.adobe.com/ a Open the PDF file to be able to correctly detect the embroidery positioning mark. Sewing Embroidery Patterns a Hoop in a different size, the sizes of the embroidery pattern and background may not be "File"-"Print", and then printed, click set "Page Scaling" to the...
... the Adobe Systems website: http://www.adobe.com/ a Open the PDF file to be able to correctly detect the embroidery positioning mark. Sewing Embroidery Patterns a Hoop in a different size, the sizes of the embroidery pattern and background may not be "File"-"Print", and then printed, click set "Page Scaling" to the...

Operation Manual Kit 1 - English
Page 15
... and thread density cannot be turned on the top. If necessary, flip the image to "Adjusting Thread Tension" in "reverse" of the machine's Operation Manual. a Hoop the fabric so the right side of the fabric is sewn from the wrong side of the fabric so technically you are working in chapter...
... and thread density cannot be turned on the top. If necessary, flip the image to "Adjusting Thread Tension" in "reverse" of the machine's Operation Manual. a Hoop the fabric so the right side of the fabric is sewn from the wrong side of the fabric so technically you are working in chapter...


