

Users Manual - English
Page 4
...available, we suggest that you study the manual before using the machine. PLEASE READ BEFORE USING THIS MACHINE For safe operation 1. Be sure to keep your local authorized Brother dealer. up lever, needle, or other hot objects. 2. ...parts. 2. Benzene, thinner, and scouring powders can damage the machine, and should never be used. 3. Do not use • Maintaining the machine • Leaving the machine unattended 3. For additional product information and updates, visit our web site at the back of the most advanced computerized household embroidery machines. Plug the machine...
...available, we suggest that you study the manual before using the machine. PLEASE READ BEFORE USING THIS MACHINE For safe operation 1. Be sure to keep your local authorized Brother dealer. up lever, needle, or other hot objects. 2. ...parts. 2. Benzene, thinner, and scouring powders can damage the machine, and should never be used. 3. Do not use • Maintaining the machine • Leaving the machine unattended 3. For additional product information and updates, visit our web site at the back of the most advanced computerized household embroidery machines. Plug the machine...
Users Manual - English
Page 5
... the CONTENT in combination with an embroidery machine to create embroidery. • Use the CONTENT in combination with an embroidery machine that CUSTOMER owns or uses, provided that are licensed (not sold) to you ("CUSTOMER") under the terms and conditions of BROTHER under any part thereof for use of Japan. BROTHER retains ownership of all rights to CONTENT...
... the CONTENT in combination with an embroidery machine to create embroidery. • Use the CONTENT in combination with an embroidery machine that CUSTOMER owns or uses, provided that are licensed (not sold) to you ("CUSTOMER") under the terms and conditions of BROTHER under any part thereof for use of Japan. BROTHER retains ownership of all rights to CONTENT...

Users Manual - English
Page 15
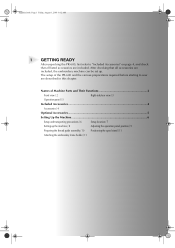
... 1 Names of Machine Parts and Their Functions 2 Front view ...2 Right-side/rear view ...3 Operation panel...3 Included Accessories ...4 Accessories ...4 Optional Accessories...5 Setting Up the Machine...6 Setup and transporting precautions ...6 Setup location ...7 Setting up the machine...8 Adjusting the operation panel position ...9 Preparing the thread guide assembly ...10 Positioning the spool stand...11 Attaching the embroidery frame holder...
... 1 Names of Machine Parts and Their Functions 2 Front view ...2 Right-side/rear view ...3 Operation panel...3 Included Accessories ...4 Accessories ...4 Optional Accessories...5 Setting Up the Machine...6 Setup and transporting precautions ...6 Setup location ...7 Setting up the machine...8 Adjusting the operation panel position ...9 Preparing the thread guide assembly ...10 Positioning the spool stand...11 Attaching the embroidery frame holder...

Users Manual - English
Page 19
... PR-600 and the various preparations required before starting to "Included Accessories" on page 4, and check that all listed accessories are included, the embroidery machine can be set up the machine / 8 Adjusting the operation panel position / 9 Preparing the thread guide assembly / 10 Positioning the spool stand / 11 Attaching the embroidery frame holder / 11 The setup of Machine Parts...
... PR-600 and the various preparations required before starting to "Included Accessories" on page 4, and check that all listed accessories are included, the embroidery machine can be set up the machine / 8 Adjusting the operation panel position / 9 Preparing the thread guide assembly / 10 Positioning the spool stand / 11 Attaching the embroidery frame holder / 11 The setup of Machine Parts...

Users Manual - English
Page 20
Sapphire.book Page 2 Friday, August 1, 2003 9:12 AM GETTING READY Names of Machine Parts and Their Functions The names of the various parts of the machine parts. Front view 6 7 1 2 8 3 9 4 6 54321 5 0 1 Thread tension knobs Adjusts the tension of the thread. 2 Thread Guide Pin 3 Needle bar...Feet Use the feet to adjust the height of the legs. 2 Before using the sewing machine, carefully read these descriptions to the carriage. When the machine is turned on or when the machine does embroidery, the carriage moves forward, backward, left and right to move the needle to the ...
Sapphire.book Page 2 Friday, August 1, 2003 9:12 AM GETTING READY Names of Machine Parts and Their Functions The names of the various parts of the machine parts. Front view 6 7 1 2 8 3 9 4 6 54321 5 0 1 Thread tension knobs Adjusts the tension of the thread. 2 Thread Guide Pin 3 Needle bar...Feet Use the feet to adjust the height of the legs. 2 Before using the sewing machine, carefully read these descriptions to the carriage. When the machine is turned on or when the machine does embroidery, the carriage moves forward, backward, left and right to move the needle to the ...

Users Manual - English
Page 21
... Floppy disk drive connector 4 Embroidery card slot Insert the embroidery cards (sold separately) into the embroidery card slot. 5 CompactFlash card slot Insert the CompactFlash cards (commercially available) into the power supply plug. 9 Main power switch Use the main power switch to turn the machine ON (I) and OFF ({). 0... patterns from a computer to the machine, plug the USB cable from the computer into the USB port connector. 8 Power supply plug Insert the plug on the power supply cord into the CompactFlash card slot. The lighting status and color of Machine Parts and Their Functions 3
... Floppy disk drive connector 4 Embroidery card slot Insert the embroidery cards (sold separately) into the embroidery card slot. 5 CompactFlash card slot Insert the CompactFlash cards (commercially available) into the power supply plug. 9 Main power switch Use the main power switch to turn the machine ON (I) and OFF ({). 0... patterns from a computer to the machine, plug the USB cable from the computer into the USB port connector. 8 Power supply plug Insert the plug on the power supply cord into the CompactFlash card slot. The lighting status and color of Machine Parts and Their Functions 3
Users Manual - English
Page 23
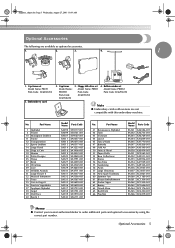
... Wednesday, August 27, 2003 10:39 AM Optional Accessories The following are not compatible with this embroidery machine. Floppy disk drive set Model Name: PRBW1 Parts Code: XC6290-052 Note ● Embroidery cards sold overseas are available as optional accessories. 1. 2. 3. 4. 1 1. No. Bobbin... winder set Model Name: PRFD1 Parts Code: XC6289-052 4. Part Name 41 Renaissance Alphabet 42 Farm 43 ...
... Wednesday, August 27, 2003 10:39 AM Optional Accessories The following are not compatible with this embroidery machine. Floppy disk drive set Model Name: PRBW1 Parts Code: XC6290-052 Note ● Embroidery cards sold overseas are available as optional accessories. 1. 2. 3. 4. 1 1. No. Bobbin... winder set Model Name: PRFD1 Parts Code: XC6289-052 4. Part Name 41 Renaissance Alphabet 42 Farm 43 ...
Users Manual - English
Page 34
...characteristic of a malfunction. This is sewn, the needle may be embroidered. Note ● Fabric that rayon or polyester embroidery thread be dark immediately after the embroidery machine is turned on page 64 for the needle to penetrate the fabric, possibly resulting in front of the display while .... In addition, do not apply extreme pressure to the display screen, otherwise damage to the display screen may result. • All or part of fabric, make sure that the fabric is difficult to read, adjust its normal level of a malfunction. Sapphire.book Page 16 Friday, ...
...characteristic of a malfunction. This is sewn, the needle may be embroidered. Note ● Fabric that rayon or polyester embroidery thread be dark immediately after the embroidery machine is turned on page 64 for the needle to penetrate the fabric, possibly resulting in front of the display while .... In addition, do not apply extreme pressure to the display screen, otherwise damage to the display screen may result. • All or part of fabric, make sure that the fabric is difficult to read, adjust its normal level of a malfunction. Sapphire.book Page 16 Friday, ...

Users Manual - English
Page 48
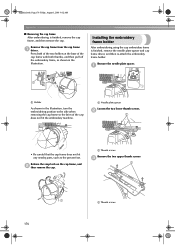
.... ● When attaching the embroidery frame, make sure that the embroidery frame does not hit any other part of the embroidery frame, and then attach the embroidery frame to the size of the embroidery machine. Attaching the embroidery frame Adjust the width of the embroidery frame holder to the machine. Embroidery frame Holes Left arm of embroidery frame holder Move the arm...
.... ● When attaching the embroidery frame, make sure that the embroidery frame does not hit any other part of the embroidery frame, and then attach the embroidery frame to the size of the embroidery machine. Attaching the embroidery frame Adjust the width of the embroidery frame holder to the machine. Embroidery frame Holes Left arm of embroidery frame holder Move the arm...
Users Manual - English
Page 59
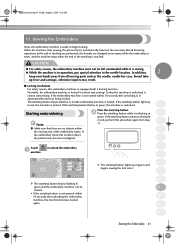
... sewing, the presser foot is reached. If the embroidery machine is not pressed within 4 the moving parts such as necessary while the embroidery is sewn, and the machine stops when the end of the embroidery frame. If the start sewing. Sewing the Embroidery Now, the embroidery machine is locked. If the start/stop button lights up lever and carriage...
... sewing, the presser foot is reached. If the embroidery machine is not pressed within 4 the moving parts such as necessary while the embroidery is sewn, and the machine stops when the end of the embroidery frame. If the start sewing. Sewing the Embroidery Now, the embroidery machine is locked. If the start/stop button lights up lever and carriage...

Users Manual - English
Page 160
...of the error. To make the screen darker, touch Turning the buzzer on or off . 142 OFF: The buzzer does not sound. When the embroidery machine is purchased, "142" was pressed or a key on or off If "ON" is selected. • The number beside indicates the brightness. This... is a normal characteristic of the backlight and is not a malfunction. Note ● All or part of the display may sometimes become darker or lighter due to read " on . Sapphire.book Page 142 Friday, August 1, 2003 9:12 AM Basic Settings...
...of the error. To make the screen darker, touch Turning the buzzer on or off . 142 OFF: The buzzer does not sound. When the embroidery machine is purchased, "142" was pressed or a key on or off If "ON" is selected. • The number beside indicates the brightness. This... is a normal characteristic of the backlight and is not a malfunction. Note ● All or part of the display may sometimes become darker or lighter due to read " on . Sapphire.book Page 142 Friday, August 1, 2003 9:12 AM Basic Settings...
Users Manual - English
Page 193
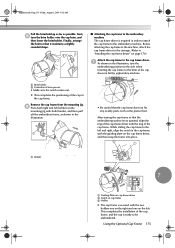
...Be careful that it maintains a slightly rounded shape. ■ Attaching the cap frame to the embroidery machine The cap frame driver is required in the cap frame with the guiding plate on the cap frame... ready to the side when inserting the cap frame so the brim of the cap does not hit the embroidery machine. 1 Brim holder 2 Centerline of the cap frame, and the cap is secured with the two holders... comes out. Finally, arrange the brim so that the cap frame does not hit any nearby parts, such as possible. Sapphire.book Page 175 Friday, August 1, 2003 9:12 AM Pull the brim hold ...
...Be careful that it maintains a slightly rounded shape. ■ Attaching the cap frame to the embroidery machine The cap frame driver is required in the cap frame with the guiding plate on the cap frame... ready to the side when inserting the cap frame so the brim of the cap does not hit the embroidery machine. 1 Brim holder 2 Centerline of the cap frame, and the cap is secured with the two holders... comes out. Finally, arrange the brim so that the cap frame does not hit any nearby parts, such as possible. Sapphire.book Page 175 Friday, August 1, 2003 9:12 AM Pull the brim hold ...
Users Manual - English
Page 194
...of the two holders at the base of the cap does not hit the embroidery machine. 1 Needle plate spacer Loosen the two lower thumb screws. 2 • Be careful that the cap frame does not hit any nearby parts, such as shown in the illustration. Release the snap lock on the cap... frame, and 2 then remove the cap. 1 Thumb screws Remove the two upper thumb screws 3 1 2 1 1 Thumb screws 176 Installing the embroidery frame holder After embroidering using the cap embroidery frame is finished, remove...
...of the two holders at the base of the cap does not hit the embroidery machine. 1 Needle plate spacer Loosen the two lower thumb screws. 2 • Be careful that the cap frame does not hit any nearby parts, such as shown in the illustration. Release the snap lock on the cap... frame, and 2 then remove the cap. 1 Thumb screws Remove the two upper thumb screws 3 1 2 1 1 Thumb screws 176 Installing the embroidery frame holder After embroidering using the cap embroidery frame is finished, remove...
Users Manual - English
Page 202
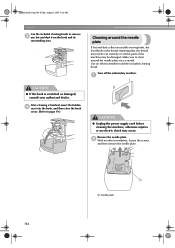
...or the thread retaining plate, the thread may not be cut correctly or various parts of the machine may occur. Make sure to remove 3 any lint and dust from the hook and its surrounding area. Turn off the embroidery machine. 1 CAUTION ● If the hook is finished, insert the bobbin 4... case into the hook, and then close the hook cover. (Refer to page 19.) CAUTION ● Unplug the power supply cord before cleaning the machine, otherwise injuries or an electric shock...
...or the thread retaining plate, the thread may not be cut correctly or various parts of the machine may occur. Make sure to remove 3 any lint and dust from the hook and its surrounding area. Turn off the embroidery machine. 1 CAUTION ● If the hook is finished, insert the bobbin 4... case into the hook, and then close the hook cover. (Refer to page 19.) CAUTION ● Unplug the power supply cord before cleaning the machine, otherwise injuries or an electric shock...
Users Manual - English
Page 204
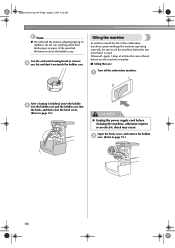
... page 19.) CAUTION ● Unplug the power supply cord before use the machine everyday. ■ Oiling the race Turn off the embroidery machine. 1 After cleaning is used. Oiling the machine In order to extend the life of hook before cleaning the machine, otherwise injuries or an electric shock may occur. Open the hook cover, ... Friday, August 1, 2003 9:12 AM Appendix Note ● Do not bend the tension-adjusting spring. Afterward, apply 1 drop of oil into the race of the embroidery machine's parts and keep the machine operating correctly, be sure to clean the bobbin case.
... page 19.) CAUTION ● Unplug the power supply cord before use the machine everyday. ■ Oiling the race Turn off the embroidery machine. 1 After cleaning is used. Oiling the machine In order to extend the life of hook before cleaning the machine, otherwise injuries or an electric shock may occur. Open the hook cover, ... Friday, August 1, 2003 9:12 AM Appendix Note ● Do not bend the tension-adjusting spring. Afterward, apply 1 drop of oil into the race of the embroidery machine's parts and keep the machine operating correctly, be sure to clean the bobbin case.

Users Manual - English
Page 226
...187 Headwear 167 Help key 48, 153 Hook 183 Hook cover/Hook 2 Hooping 28, 65, 166 Horizontal mirror image key 50, 52, 100, 120 I Industrial embroidery frame 168 J Jump code 149 L Language 141, 143 LCD 3, 16, 48, 142, 204 Lingerie 167 Lock stitching key 54, 86 Locking mechanism 41 Locking the...55 Merge key 52 Mounting jig 172 Moving needle 40 Multi color key 52, 125 N Names of machine parts 2 Needle 15 changing 61 Needle bar case 2 Needle bar key 35, 55 Needle plate 184 New embroidery key 48 Next page key 50 Number of thread color changes 50, 51, 53 O Oiling 186 ...
...187 Headwear 167 Help key 48, 153 Hook 183 Hook cover/Hook 2 Hooping 28, 65, 166 Horizontal mirror image key 50, 52, 100, 120 I Industrial embroidery frame 168 J Jump code 149 L Language 141, 143 LCD 3, 16, 48, 142, 204 Lingerie 167 Lock stitching key 54, 86 Locking mechanism 41 Locking the...55 Merge key 52 Mounting jig 172 Moving needle 40 Multi color key 52, 125 N Names of machine parts 2 Needle 15 changing 61 Needle bar case 2 Needle bar key 35, 55 Needle plate 184 New embroidery key 48 Next page key 50 Number of thread color changes 50, 51, 53 O Oiling 186 ...

Users Manual - English
Page 4
...to keep your local authorized Brother dealer. Do not use or store the machine near a space heater, iron, halogen lamp, or other parts to assure correct installation. PLEASE READ BEFORE USING THIS MACHINE For safe operation 1. Be...parts • A power failure occurs during use • Maintaining the machine • Leaving the machine unattended 3. Benzene, thinner, and scouring powders can damage the machine, and should never be used. 3. For additional product information and updates, visit our web site at the back of the most advanced computerized household embroidery machines...
...to keep your local authorized Brother dealer. Do not use or store the machine near a space heater, iron, halogen lamp, or other parts to assure correct installation. PLEASE READ BEFORE USING THIS MACHINE For safe operation 1. Be...parts • A power failure occurs during use • Maintaining the machine • Leaving the machine unattended 3. Benzene, thinner, and scouring powders can damage the machine, and should never be used. 3. For additional product information and updates, visit our web site at the back of the most advanced computerized household embroidery machines...

Users Manual - English
Page 5
..."). v CUSTOMER is licensed to: • Use the CONTENT in combination with an embroidery machine to create embroidery. • Use the CONTENT in this agreement constitutes a waiver of the rights of BROTHER under the terms and conditions of the CONTENT included in writing by use at a time...8226; Alter, translate, modify or adapt the CONTENT or any part thereof for use of Brother Industries, Ltd. ("BROTHER"). BY USING THE CONTENT, THE CUSTOMER ACCEPTS THE TERMS AND CONDITIONS OF THIS AGREEMENT. BROTHER retains all inquiries concerning this Agreement in this Agreement. The CONTENT...
..."). v CUSTOMER is licensed to: • Use the CONTENT in combination with an embroidery machine to create embroidery. • Use the CONTENT in this agreement constitutes a waiver of the rights of BROTHER under the terms and conditions of the CONTENT included in writing by use at a time...8226; Alter, translate, modify or adapt the CONTENT or any part thereof for use of Brother Industries, Ltd. ("BROTHER"). BY USING THE CONTENT, THE CUSTOMER ACCEPTS THE TERMS AND CONDITIONS OF THIS AGREEMENT. BROTHER retains all inquiries concerning this Agreement in this Agreement. The CONTENT...

Users Manual - English
Page 15
... 1 Names of Machine Parts and Their Functions 2 Front view ...2 Right-side/rear view ...3 Operation panel...3 Included Accessories ...4 Accessories ...4 Optional Accessories...5 Setting Up the Machine...6 Setup and transporting precautions ...6 Setup location ...7 Setting up the machine...8 Adjusting the operation panel position ...9 Preparing the thread guide assembly ...10 Positioning the spool stand...11 Attaching the embroidery frame holder...
... 1 Names of Machine Parts and Their Functions 2 Front view ...2 Right-side/rear view ...3 Operation panel...3 Included Accessories ...4 Accessories ...4 Optional Accessories...5 Setting Up the Machine...6 Setup and transporting precautions ...6 Setup location ...7 Setting up the machine...8 Adjusting the operation panel position ...9 Preparing the thread guide assembly ...10 Positioning the spool stand...11 Attaching the embroidery frame holder...
Users Manual - English
Page 19
... 9:12 AM 1 GETTING READY After unpacking the PR-600, first refer to sew are included, the embroidery machine can be set up the machine / 8 Adjusting the operation panel position / 9 Preparing the thread guide assembly / 10 Positioning the spool stand / 11 Attaching the embroidery frame holder / 11 The setup of Machine Parts and Their Functions 2 Front view / 2 Right-side...
... 9:12 AM 1 GETTING READY After unpacking the PR-600, first refer to sew are included, the embroidery machine can be set up the machine / 8 Adjusting the operation panel position / 9 Preparing the thread guide assembly / 10 Positioning the spool stand / 11 Attaching the embroidery frame holder / 11 The setup of Machine Parts and Their Functions 2 Front view / 2 Right-side...


