

Users Manual - English
Page 4
... safe operation 1. Be sure to keep your local authorized Brother dealer. Plug the machine directly into the wall. For a longer service life 1. When storing this Operation Manual to turn off the power switch and unplug the cord when: • Operation is ...completed • Replacing or removing the needle or any assemblies, needle, or other hot objects. 2. For additional product information and updates, visit our web site at the back of the most advanced computerized household embroidery machines...
... safe operation 1. Be sure to keep your local authorized Brother dealer. Plug the machine directly into the wall. For a longer service life 1. When storing this Operation Manual to turn off the power switch and unplug the cord when: • Operation is ...completed • Replacing or removing the needle or any assemblies, needle, or other hot objects. 2. For additional product information and updates, visit our web site at the back of the most advanced computerized household embroidery machines...
Users Manual - English
Page 8
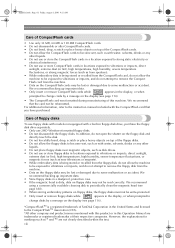
...to change disks by a message on the display (see page 114). • The CompactFlash card was formatted during manufacturing of this Operation Manual are not clearly described within the text. However, the explanations for markings such as ® and TM are trademarks or registered trademarks of..., severe temperature fluctuations, or magnetic forces (such as near televisions or magnets). • While embroidery data is being stored or recalled from the CompactFlash card, do not allow the machine to be exposed to vibrations or impacts, and do not open the shutter on the floppy disk...
...to change disks by a message on the display (see page 114). • The CompactFlash card was formatted during manufacturing of this Operation Manual are not clearly described within the text. However, the explanations for markings such as ® and TM are trademarks or registered trademarks of..., severe temperature fluctuations, or magnetic forces (such as near televisions or magnets). • While embroidery data is being stored or recalled from the CompactFlash card, do not allow the machine to be exposed to vibrations or impacts, and do not open the shutter on the floppy disk...
Users Manual - English
Page 13
...2: Embroidering Tutorial This chapter describes the basic embroidering operations in this manual. Searching for information ■ Searching the manual By title Check the descriptions at the end of this embroidery machine. For details, refer to change the needle. Chapter 6: Basic ...chapter provides details on using the help key. For details on selecting, editing and saving embroidery patterns. Manual Structure xiii Details on changing the basic embroidery machine settings and viewing operations on page 57. Chapter 3: Other Basic Procedures This chapter provides...
...2: Embroidering Tutorial This chapter describes the basic embroidering operations in this manual. Searching for information ■ Searching the manual By title Check the descriptions at the end of this embroidery machine. For details, refer to change the needle. Chapter 6: Basic ...chapter provides details on using the help key. For details on selecting, editing and saving embroidery patterns. Manual Structure xiii Details on changing the basic embroidery machine settings and viewing operations on page 57. Chapter 3: Other Basic Procedures This chapter provides...

Users Manual - English
Page 15
... Instructions i License Agreement ...v Warning Labels...vi Precautions...vii Concerning optional embroidery cards ...vii Care of CompactFlash cards...viii Care of floppy disks...viii Machine Structure and Features ix Six-needle machine embroidering ...ix Differences with single-needle machines ...x Other features ...xi Available features...xii Manual Structure...xiii Read before use ...xiii Read when additional information...
... Instructions i License Agreement ...v Warning Labels...vi Precautions...vii Concerning optional embroidery cards ...vii Care of CompactFlash cards...viii Care of floppy disks...viii Machine Structure and Features ix Six-needle machine embroidering ...ix Differences with single-needle machines ...x Other features ...xi Available features...xii Manual Structure...xiii Read before use ...xiii Read when additional information...

Users Manual - English
Page 22
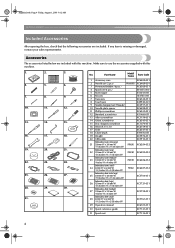
No. Accessories The accessories listed below are included. Make sure to use the accessories supplied with this machine. 1. 2. 3. 4. 5. 6. 7. 8. 9. 10. 11. 12. 13. 14. 15. 16. 17. 18. 19. 20. 21. 22. 23. 24. 25. 26....(5-1/8 inches (H) × 7-1/8 inches (W)) XC5721-051 Embroidery sheet (medium) 27 100 mm (H) × 100 mm (W) (4 inches (H) × 4 inches (W)) XC5759-051 Embroidery sheet (small) 28 40 mm (H) × 60 mm (W) (1-1/2 inches (H) × 2-3/8 inches (W)) XC5761-051 29 Operation manual XC6103-051 30 Quick reference guide XC7141-051 31 Spool ...
No. Accessories The accessories listed below are included. Make sure to use the accessories supplied with this machine. 1. 2. 3. 4. 5. 6. 7. 8. 9. 10. 11. 12. 13. 14. 15. 16. 17. 18. 19. 20. 21. 22. 23. 24. 25. 26....(5-1/8 inches (H) × 7-1/8 inches (W)) XC5721-051 Embroidery sheet (medium) 27 100 mm (H) × 100 mm (W) (4 inches (H) × 4 inches (W)) XC5759-051 Embroidery sheet (small) 28 40 mm (H) × 60 mm (W) (1-1/2 inches (H) × 2-3/8 inches (W)) XC5761-051 29 Operation manual XC6103-051 30 Quick reference guide XC7141-051 31 Spool ...

Users Manual - English
Page 74
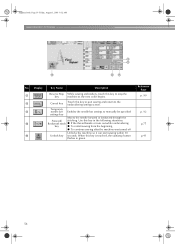
Use this key to quit sewing and return to the embroidering settings screen. Display Key Name Description B Reserve Stop While sewing embroidery, touch this key is touched, the start sewing within 10 F Unlock key seconds. Temporary D needle bar Enables the needle bar settings to...from the beginning ● To continue sewing after the machine was turned off Unlocks the machine so it can start /stop the key machine as the next color begins. C Cancel key Touch this key in green. When this key to manually be specified settings key Moves the needle forward or backward...
Use this key to quit sewing and return to the embroidering settings screen. Display Key Name Description B Reserve Stop While sewing embroidery, touch this key is touched, the start sewing within 10 F Unlock key seconds. Temporary D needle bar Enables the needle bar settings to...from the beginning ● To continue sewing after the machine was turned off Unlocks the machine so it can start /stop the key machine as the next color begins. C Cancel key Touch this key in green. When this key to manually be specified settings key Moves the needle forward or backward...

Users Manual - English
Page 129
... refer to the instruction manual for the corresponding equipment. ● Connection through a USB hub may not be possible, depending on the operating environment. Sapphire.book Page 111 Friday, August 1, 2003 9:12 AM Computer (USB) Using the included USB cable, the embroidery machine can be connected to ...your computer, and the embroidery patterns saved on the computer can be temporarily recalled and used from our Web site (www.brother.com).
... refer to the instruction manual for the corresponding equipment. ● Connection through a USB hub may not be possible, depending on the operating environment. Sapphire.book Page 111 Friday, August 1, 2003 9:12 AM Computer (USB) Using the included USB cable, the embroidery machine can be connected to ...your computer, and the embroidery patterns saved on the computer can be temporarily recalled and used from our Web site (www.brother.com).

Users Manual - English
Page 224
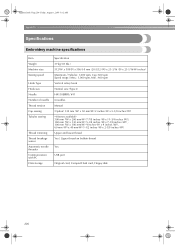
Sapphire.book Page 206 Friday, August 1, 2003 9:12 AM Appendix Specifications Embroidery machine specifications Item Weight Machine size Sewing speed Hook Type Hook size Needle Number of needle Thread tension Cap sewing Tubular sewing Thread ...x 589(D) x 586 (H) mm (20-5/32 (W) x 23-3/16 (D) x 23-1/16(H) inches) Maximum / Tubular: 1,000 spm, Cap: 600 spm Speed range / Max.: 1,000 spm, Min.: 400 spm Vertical rotary hook Normal size (Type L) HA130EBBR / #11 6 needles Manual (Option) 130 mm (W) x 50 mm(H) (2 inches (H) x 5-1/8 inches (W)) (4 frames available) 300 mm (W) x 200 mm(H) (7-7/8 ...
Sapphire.book Page 206 Friday, August 1, 2003 9:12 AM Appendix Specifications Embroidery machine specifications Item Weight Machine size Sewing speed Hook Type Hook size Needle Number of needle Thread tension Cap sewing Tubular sewing Thread ...x 589(D) x 586 (H) mm (20-5/32 (W) x 23-3/16 (D) x 23-1/16(H) inches) Maximum / Tubular: 1,000 spm, Cap: 600 spm Speed range / Max.: 1,000 spm, Min.: 400 spm Vertical rotary hook Normal size (Type L) HA130EBBR / #11 6 needles Manual (Option) 130 mm (W) x 50 mm(H) (2 inches (H) x 5-1/8 inches (W)) (4 frames available) 300 mm (W) x 200 mm(H) (7-7/8 ...

Users Manual - English
Page 226
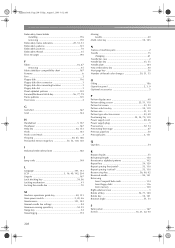
... 142, 204 Lingerie 167 Lock stitching key 54, 86 Locking mechanism 41 Locking the needle bar 70 M Machine operations guide key 48, 151 Main power switch 3, 20, 46 Maintenance 151, 183 Manual needle bar settings 94 Maximum sewing speed key 54, 55 Merge key 52 Mounting jig 172 Moving needle 40... Multi color key 52, 125 N Names of machine parts 2 Needle 15 changing 61 Needle bar case 2 Needle bar key 35, 55 Needle plate 184 New embroidery key 48 Next...
... 142, 204 Lingerie 167 Lock stitching key 54, 86 Locking mechanism 41 Locking the needle bar 70 M Machine operations guide key 48, 151 Main power switch 3, 20, 46 Maintenance 151, 183 Manual needle bar settings 94 Maximum sewing speed key 54, 55 Merge key 52 Mounting jig 172 Moving needle 40... Multi color key 52, 125 N Names of machine parts 2 Needle 15 changing 61 Needle bar case 2 Needle bar key 35, 55 Needle plate 184 New embroidery key 48 Next...

Users Manual - English
Page 4
... and high humidity locations. To fully enjoy all the features available, we suggest that you study the manual before using the machine. Remember to turn off the power switch and unplug the cord when: • Operation is completed ...embroidery machines. PLEASE READ BEFORE USING THIS MACHINE For safe operation 1. up lever, needle, or other parts • A power failure occurs during use • Maintaining the machine • Leaving the machine unattended 3. Do not use or store the machine near a space heater, iron, halogen lamp, or other parts to keep your local authorized Brother...
... and high humidity locations. To fully enjoy all the features available, we suggest that you study the manual before using the machine. Remember to turn off the power switch and unplug the cord when: • Operation is completed ...embroidery machines. PLEASE READ BEFORE USING THIS MACHINE For safe operation 1. up lever, needle, or other parts • A power failure occurs during use • Maintaining the machine • Leaving the machine unattended 3. Do not use or store the machine near a space heater, iron, halogen lamp, or other parts to keep your local authorized Brother...

Users Manual - English
Page 8
...CompactFlash card was formatted during manufacturing of this Operation Manual are not clearly described within the text. However, the explanations for markings such as near televisions or magnets). • While embroidery data is being stored or recalled from the machine. • Data on floppy disks may be ..., severe temperature fluctuations, or strong magnetic forces (such as from speakers). • While embroidery data is being stored or recalled from the floppy disk, do not allow the machine to be exposed to vibrations or impacts, and do not attempt to remove the floppy disk...
...CompactFlash card was formatted during manufacturing of this Operation Manual are not clearly described within the text. However, the explanations for markings such as near televisions or magnets). • While embroidery data is being stored or recalled from the machine. • Data on floppy disks may be ..., severe temperature fluctuations, or strong magnetic forces (such as from speakers). • While embroidery data is being stored or recalled from the floppy disk, do not allow the machine to be exposed to vibrations or impacts, and do not attempt to remove the floppy disk...

Users Manual - English
Page 13
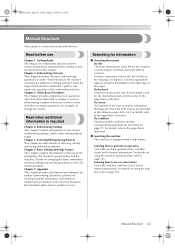
... Page xiii Friday, August 1, 2003 9:12 AM Manual Structure This manual is indicated. Read before starting to the page that is indicated. Read when additional information is equipped with seven or more colors, and other information that should be provided. Details on changing the basic embroidery machine settings and viewing operations on the various...
... Page xiii Friday, August 1, 2003 9:12 AM Manual Structure This manual is indicated. Read before starting to the page that is indicated. Read when additional information is equipped with seven or more colors, and other information that should be provided. Details on changing the basic embroidery machine settings and viewing operations on the various...

Users Manual - English
Page 15
... Instructions i License Agreement ...v Warning Labels...vi Precautions...vii Concerning optional embroidery cards ...vii Care of CompactFlash cards...viii Care of floppy disks...viii Machine Structure and Features ix Six-needle machine embroidering ...ix Differences with single-needle machines ...x Other features ...xi Available features...xii Manual Structure...xiii Read before use ...xiii Read when additional information...
... Instructions i License Agreement ...v Warning Labels...vi Precautions...vii Concerning optional embroidery cards ...vii Care of CompactFlash cards...viii Care of floppy disks...viii Machine Structure and Features ix Six-needle machine embroidering ...ix Differences with single-needle machines ...x Other features ...xi Available features...xii Manual Structure...xiii Read before use ...xiii Read when additional information...
Users Manual - English
Page 22
No. Make sure to use the accessories supplied with this machine. 1. 2. 3. 4. 5. 6. 7. 8. 9. 10. 11. 12. 13. 14. 15. 16. 17. 18. 19. 20. 21. 22. 23. 24. 25. 26. 27. 28. 29. 30. 31... (H) × 180 mm (W) (5-1/8 inches (H) × 7-1/8 inches (W)) XC5721-051 Embroidery sheet (medium) 27 100 mm (H) × 100 mm (W) (4 inches (H) × 4 inches (W)) XC5759-051 Embroidery sheet (small) 28 40 mm (H) × 60 mm (W) (1-1/2 inches (H) × 2-3/8 inches (W)) XC5761-051 29 Operation manual XC6103-051 30 Quick reference guide XC7141-051 31 Spool mat...
No. Make sure to use the accessories supplied with this machine. 1. 2. 3. 4. 5. 6. 7. 8. 9. 10. 11. 12. 13. 14. 15. 16. 17. 18. 19. 20. 21. 22. 23. 24. 25. 26. 27. 28. 29. 30. 31... (H) × 180 mm (W) (5-1/8 inches (H) × 7-1/8 inches (W)) XC5721-051 Embroidery sheet (medium) 27 100 mm (H) × 100 mm (W) (4 inches (H) × 4 inches (W)) XC5759-051 Embroidery sheet (small) 28 40 mm (H) × 60 mm (W) (1-1/2 inches (H) × 2-3/8 inches (W)) XC5761-051 29 Operation manual XC6103-051 30 Quick reference guide XC7141-051 31 Spool mat...
Users Manual - English
Page 74
... embroidering key ● To restart sewing from the beginning ● To continue sewing after the machine was turned off Unlocks the machine so it can start /stop the key machine as the next color begins. When this key in green. Use this key is touched, the... D needle bar Enables the needle bar settings to the embroidering settings screen. Display Key Name Description B Reserve Stop While sewing embroidery, touch this key to quit sewing and return to manually be specified settings key Moves the needle forward or backward through the Forward/ stitching.
... embroidering key ● To restart sewing from the beginning ● To continue sewing after the machine was turned off Unlocks the machine so it can start /stop the key machine as the next color begins. When this key in green. Use this key is touched, the... D needle bar Enables the needle bar settings to the embroidering settings screen. Display Key Name Description B Reserve Stop While sewing embroidery, touch this key to quit sewing and return to manually be specified settings key Moves the needle forward or backward through the Forward/ stitching.

Users Manual - English
Page 129
... data in the "Removable Disk" folder is written to the machine. • While data is not possible, connect the cable to the USB port of the USB port on the computer (or USB hub), refer to the instruction manual for the corresponding equipment. ● Connection through a USB hub...Web site (www.brother.com). If it with a USB port as standard equipment ● Compatible operating systems: Microsoft Windows Me/2000/XP * Windows 98 requires a driver. Sapphire.book Page 111 Friday, August 1, 2003 9:12 AM Computer (USB) Using the included USB cable, the embroidery machine can be connected...
... data in the "Removable Disk" folder is written to the machine. • While data is not possible, connect the cable to the USB port of the USB port on the computer (or USB hub), refer to the instruction manual for the corresponding equipment. ● Connection through a USB hub...Web site (www.brother.com). If it with a USB port as standard equipment ● Compatible operating systems: Microsoft Windows Me/2000/XP * Windows 98 requires a driver. Sapphire.book Page 111 Friday, August 1, 2003 9:12 AM Computer (USB) Using the included USB cable, the embroidery machine can be connected...
Users Manual - English
Page 224
Sapphire.book Page 206 Friday, August 1, 2003 9:12 AM Appendix Specifications Embroidery machine specifications Item Weight Machine size Sewing speed Hook Type Hook size Needle Number of needle Thread tension Cap sewing Tubular sewing Thread ...x 589(D) x 586 (H) mm (20-5/32 (W) x 23-3/16 (D) x 23-1/16(H) inches) Maximum / Tubular: 1,000 spm, Cap: 600 spm Speed range / Max.: 1,000 spm, Min.: 400 spm Vertical rotary hook Normal size (Type L) HA130EBBR / #11 6 needles Manual (Option) 130 mm (W) x 50 mm(H) (2 inches (H) x 5-1/8 inches (W)) (4 frames available) 300 mm (W) x 200 mm(H) (7-7/8 ...
Sapphire.book Page 206 Friday, August 1, 2003 9:12 AM Appendix Specifications Embroidery machine specifications Item Weight Machine size Sewing speed Hook Type Hook size Needle Number of needle Thread tension Cap sewing Tubular sewing Thread ...x 589(D) x 586 (H) mm (20-5/32 (W) x 23-3/16 (D) x 23-1/16(H) inches) Maximum / Tubular: 1,000 spm, Cap: 600 spm Speed range / Max.: 1,000 spm, Min.: 400 spm Vertical rotary hook Normal size (Type L) HA130EBBR / #11 6 needles Manual (Option) 130 mm (W) x 50 mm(H) (2 inches (H) x 5-1/8 inches (W)) (4 frames available) 300 mm (W) x 200 mm(H) (7-7/8 ...
Users Manual - English
Page 226
... 142, 204 Lingerie 167 Lock stitching key 54, 86 Locking mechanism 41 Locking the needle bar 70 M Machine operations guide key 48, 151 Main power switch 3, 20, 46 Maintenance 151, 183 Manual needle bar settings 94 Maximum sewing speed key 54, 55 Merge key 52 Mounting jig 172 Moving needle 40... Multi color key 52, 125 N Names of machine parts 2 Needle 15 changing 61 Needle bar case 2 Needle bar key 35, 55 Needle plate 184 New embroidery key 48 Next...
... 142, 204 Lingerie 167 Lock stitching key 54, 86 Locking mechanism 41 Locking the needle bar 70 M Machine operations guide key 48, 151 Main power switch 3, 20, 46 Maintenance 151, 183 Manual needle bar settings 94 Maximum sewing speed key 54, 55 Merge key 52 Mounting jig 172 Moving needle 40... Multi color key 52, 125 N Names of machine parts 2 Needle 15 changing 61 Needle bar case 2 Needle bar key 35, 55 Needle plate 184 New embroidery key 48 Next...


