

Users Manual - English
Page 15
... 2 Front view ...2 Right-side/rear view ...3 Operation panel...3 Included Accessories ...4 Accessories ...4 Optional Accessories...5 Setting Up the Machine...6 Setup and transporting precautions ...6 Setup location ...7 Setting up the machine...8 Adjusting the operation panel position ...9 Preparing the thread guide assembly ...10 Positioning the spool stand...11 Attaching the embroidery frame holder ...11 EMBROIDERING TUTORIAL 13 Operating Precautions...14 Power...
... 2 Front view ...2 Right-side/rear view ...3 Operation panel...3 Included Accessories ...4 Accessories ...4 Optional Accessories...5 Setting Up the Machine...6 Setup and transporting precautions ...6 Setup location ...7 Setting up the machine...8 Adjusting the operation panel position ...9 Preparing the thread guide assembly ...10 Positioning the spool stand...11 Attaching the embroidery frame holder ...11 EMBROIDERING TUTORIAL 13 Operating Precautions...14 Power...
Users Manual - English
Page 18
... Operation of PR-600 160 Checking the thread tension of built-in patterns 160 Sewing a pattern aligned with a mark on the fabric 161 Color thread table ...163 Colors of Tajima (.dst) embroidery data ...163 Creating Beautiful Embroidery 164 Threads ...164 Stabilizers (Backing) ...165 Hooping Techniques...166 Fabric/stabilizer compatibility chart ...167 OPTIONAL ACCESSORIES 168 Attaching...
... Operation of PR-600 160 Checking the thread tension of built-in patterns 160 Sewing a pattern aligned with a mark on the fabric 161 Color thread table ...163 Colors of Tajima (.dst) embroidery data ...163 Creating Beautiful Embroidery 164 Threads ...164 Stabilizers (Backing) ...165 Hooping Techniques...166 Fabric/stabilizer compatibility chart ...167 OPTIONAL ACCESSORIES 168 Attaching...

Users Manual - English
Page 19
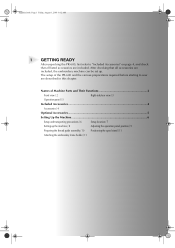
... . After checking that all accessories are included, the embroidery machine can be set up the machine / 8 Adjusting the operation panel position / 9 Preparing the thread guide assembly / 10 Positioning the spool stand / 11 Attaching the embroidery frame holder / 11 Sapphire.book Page 1 Friday, August 1, 2003 9:12 AM 1 GETTING READY After unpacking the PR-600, first refer to sew...
... . After checking that all accessories are included, the embroidery machine can be set up the machine / 8 Adjusting the operation panel position / 9 Preparing the thread guide assembly / 10 Positioning the spool stand / 11 Attaching the embroidery frame holder / 11 Sapphire.book Page 1 Friday, August 1, 2003 9:12 AM 1 GETTING READY After unpacking the PR-600, first refer to sew...

Users Manual - English
Page 22
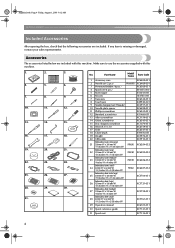
Sapphire.book Page 4 Friday, August 1, 2003 9:12 AM GETTING READY Included Accessories After opening the box, check that the following accessories are included with this machine. Accessories The accessories listed below are included. No. Make sure to use the accessories supplied with this machine. 1. 2. 3. 4. 5. 6. 7. 8. 9. 10. 11. 12. 13. 14. 15...Oiler XC6159-051 XC6547-051 18 Clean brush X59476-051 19 Weight XC5974-051 20 USB cable Embroidery frame (extra large) 21 200 mm (H) × 300 mm (W) (7-7/8 inches (H) × 11-3/4 inches (W)) XC5910-051...
Sapphire.book Page 4 Friday, August 1, 2003 9:12 AM GETTING READY Included Accessories After opening the box, check that the following accessories are included with this machine. Accessories The accessories listed below are included. No. Make sure to use the accessories supplied with this machine. 1. 2. 3. 4. 5. 6. 7. 8. 9. 10. 11. 12. 13. 14. 15...Oiler XC6159-051 XC6547-051 18 Clean brush X59476-051 19 Weight XC5974-051 20 USB cable Embroidery frame (extra large) 21 200 mm (H) × 300 mm (W) (7-7/8 inches (H) × 11-3/4 inches (W)) XC5910-051...
Users Manual - English
Page 23
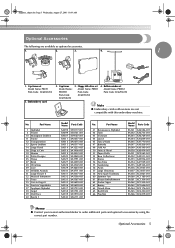
... XA5659-001 XA5753-001 XA5781-001 XA5978-001 XA6111-001 No. Optional Accessories 5 Sapphire_chapt1.fm Page 5 Wednesday, August 27, 2003 10:39 AM Optional Accessories The following are not compatible with this embroidery machine. Cap frame set Model Name: PRFD1 Parts Code: XC6289-052 4.... Floppy disk drive set Model Name: PRCF1 Parts Code: XC6288-052 5. Embroidery card 2. Part Name 41 Renaissance Alphabet 42...
... XA5659-001 XA5753-001 XA5781-001 XA5978-001 XA6111-001 No. Optional Accessories 5 Sapphire_chapt1.fm Page 5 Wednesday, August 27, 2003 10:39 AM Optional Accessories The following are not compatible with this embroidery machine. Cap frame set Model Name: PRFD1 Parts Code: XC6289-052 4.... Floppy disk drive set Model Name: PRCF1 Parts Code: XC6288-052 5. Embroidery card 2. Part Name 41 Renaissance Alphabet 42...

Users Manual - English
Page 173
...) / 165 Hooping Techniques / 166 Fabric/stabilizer compatibility chart / 167 OPTIONAL ACCESSORIES Attaching an optional embroidery frame for industrial embroidery machines ......168 Using the Optional Cap Frame 169 Cap frame and its accessories / 169 Preparing to create appliqués (2) / 158 Helpful Tips for the Operation of PR-600 160 Checking the thread tension of the floppy disk drive...
...) / 165 Hooping Techniques / 166 Fabric/stabilizer compatibility chart / 167 OPTIONAL ACCESSORIES Attaching an optional embroidery frame for industrial embroidery machines ......168 Using the Optional Cap Frame 169 Cap frame and its accessories / 169 Preparing to create appliqués (2) / 158 Helpful Tips for the Operation of PR-600 160 Checking the thread tension of the floppy disk drive...
Users Manual - English
Page 186
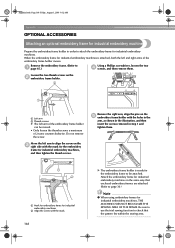
..., loosen the two 4 screws, and then remove them . 1 Mark for embroidery frame for industrial embroidery machines. Sapphire.book Page 168 Friday, August 1, 2003 9:12 AM Appendix OPTIONAL ACCESSORIES Attaching an optional embroidery frame for industrial embroidery machines Prepare the embroidery frame holder in order to attach the embroidery frame for industrial embroidery machines 2 Align the screw with the mark. 168 X The...
..., loosen the two 4 screws, and then remove them . 1 Mark for embroidery frame for industrial embroidery machines. Sapphire.book Page 168 Friday, August 1, 2003 9:12 AM Appendix OPTIONAL ACCESSORIES Attaching an optional embroidery frame for industrial embroidery machines Prepare the embroidery frame holder in order to attach the embroidery frame for industrial embroidery machines 2 Align the screw with the mark. 168 X The...

Users Manual - English
Page 187
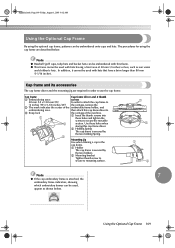
Cap frame and its accessories The cap frame driver and the mounting jig are described below . Use these holes when storing this cap frame driver to the carriage of the machine. 1 Insert the thumb screws into these holes and tighten the screws to secure the movable 2 section. Using the ... less, such as shown below . The procedures for using the optional cap frame, patterns can be used with hats having a front area of the embroidery frame holder, and embroidering area. 3 Snap lock 1 then attach this cap frame driver. 2 Holding Spring The cap frame is secured by the two...
Cap frame and its accessories The cap frame driver and the mounting jig are described below . Use these holes when storing this cap frame driver to the carriage of the machine. 1 Insert the thumb screws into these holes and tighten the screws to secure the movable 2 section. Using the ... less, such as shown below . The procedures for using the optional cap frame, patterns can be used with hats having a front area of the embroidery frame holder, and embroidering area. 3 Snap lock 1 then attach this cap frame driver. 2 Holding Spring The cap frame is secured by the two...

Users Manual - English
Page 225
Sapphire.book Page 207 Friday, August 1, 2003 9:12 AM Index A Accessories 4 Adjusting angle 71 edited patterns 119 legs 8 operation panel 9 screen brightness 142, 204 sewing speed 89 thread tension 83 tuoch panel 204 ...41 text arrangement of a character 122 repeatedly sewing 88 thread color display 145 Embroidery card slot 3 thread density 124 Embroidery cards 109 thread spools 75 Embroidery data 98 units of measurements 143 Embroidery frame Checking attaching to the machine 30 needle bars and thread colors 33 hooping 28 preview image 27 removing 45...
Sapphire.book Page 207 Friday, August 1, 2003 9:12 AM Index A Accessories 4 Adjusting angle 71 edited patterns 119 legs 8 operation panel 9 screen brightness 142, 204 sewing speed 89 thread tension 83 tuoch panel 204 ...41 text arrangement of a character 122 repeatedly sewing 88 thread color display 145 Embroidery card slot 3 thread density 124 Embroidery cards 109 thread spools 75 Embroidery data 98 units of measurements 143 Embroidery frame Checking attaching to the machine 30 needle bars and thread colors 33 hooping 28 preview image 27 removing 45...

Users Manual - English
Page 226
...Headwear 167 Help key 48, 153 Hook 183 Hook cover/Hook 2 Hooping 28, 65, 166 Horizontal mirror image key 50, 52, 100, 120 I Industrial embroidery frame 168 J Jump code 149 L Language 141, 143 LCD 3, 16, 48, 142, 204 Lingerie 167 Lock stitching key 54, 86 Locking mechanism 41 ... key 52, 125 N Names of machine parts 2 Needle 15 changing 61 Needle bar case 2 Needle bar key 35, 55 Needle plate 184 New embroidery key 48 Next page key 50 Number of thread color changes 50, 51, 53 O Oiling 186 Operation panel 2, 3, 9 Optional accessories 5 P Pattern display area 48 Pattern...
...Headwear 167 Help key 48, 153 Hook 183 Hook cover/Hook 2 Hooping 28, 65, 166 Horizontal mirror image key 50, 52, 100, 120 I Industrial embroidery frame 168 J Jump code 149 L Language 141, 143 LCD 3, 16, 48, 142, 204 Lingerie 167 Lock stitching key 54, 86 Locking mechanism 41 ... key 52, 125 N Names of machine parts 2 Needle 15 changing 61 Needle bar case 2 Needle bar key 35, 55 Needle plate 184 New embroidery key 48 Next page key 50 Number of thread color changes 50, 51, 53 O Oiling 186 Operation panel 2, 3, 9 Optional accessories 5 P Pattern display area 48 Pattern...

Users Manual - English
Page 15
... 2 Front view ...2 Right-side/rear view ...3 Operation panel...3 Included Accessories ...4 Accessories ...4 Optional Accessories...5 Setting Up the Machine...6 Setup and transporting precautions ...6 Setup location ...7 Setting up the machine...8 Adjusting the operation panel position ...9 Preparing the thread guide assembly ...10 Positioning the spool stand...11 Attaching the embroidery frame holder ...11 EMBROIDERING TUTORIAL 13 Operating Precautions...14 Power...
... 2 Front view ...2 Right-side/rear view ...3 Operation panel...3 Included Accessories ...4 Accessories ...4 Optional Accessories...5 Setting Up the Machine...6 Setup and transporting precautions ...6 Setup location ...7 Setting up the machine...8 Adjusting the operation panel position ...9 Preparing the thread guide assembly ...10 Positioning the spool stand...11 Attaching the embroidery frame holder ...11 EMBROIDERING TUTORIAL 13 Operating Precautions...14 Power...

Users Manual - English
Page 18
... Operation of PR-600 160 Checking the thread tension of built-in patterns 160 Sewing a pattern aligned with a mark on the fabric 161 Color thread table ...163 Colors of Tajima (.dst) embroidery data ...163 Creating Beautiful Embroidery 164 Threads ...164 Stabilizers (Backing) ...165 Hooping Techniques...166 Fabric/stabilizer compatibility chart ...167 OPTIONAL ACCESSORIES 168 Attaching...
... Operation of PR-600 160 Checking the thread tension of built-in patterns 160 Sewing a pattern aligned with a mark on the fabric 161 Color thread table ...163 Colors of Tajima (.dst) embroidery data ...163 Creating Beautiful Embroidery 164 Threads ...164 Stabilizers (Backing) ...165 Hooping Techniques...166 Fabric/stabilizer compatibility chart ...167 OPTIONAL ACCESSORIES 168 Attaching...
Users Manual - English
Page 19
... 9:12 AM 1 GETTING READY After unpacking the PR-600, first refer to sew are described in this chapter. Names of the PR-600 and the various preparations required before starting to "Included Accessories" on page 4, and check that all listed accessories are included, the embroidery machine can be set up the machine / 8 Adjusting the operation panel position / 9 Preparing the...
... 9:12 AM 1 GETTING READY After unpacking the PR-600, first refer to sew are described in this chapter. Names of the PR-600 and the various preparations required before starting to "Included Accessories" on page 4, and check that all listed accessories are included, the embroidery machine can be set up the machine / 8 Adjusting the operation panel position / 9 Preparing the...
Users Manual - English
Page 22
...-051 16 Wrench 13 x 10 17 Oiler XC6159-051 XC6547-051 18 Clean brush X59476-051 19 Weight XC5974-051 20 USB cable Embroidery frame (extra large) 21 200 mm (H) × 300 mm (W) (7-7/8 inches (H) × 11-3/4 inches (W)) XC5910-051 PRH300 XC6284-052...-051 30 Quick reference guide XC7141-051 31 Spool mat XC7134-051 4 Sapphire.book Page 4 Friday, August 1, 2003 9:12 AM GETTING READY Included Accessories After opening the box, check that the following accessories are included with this machine. No. If any item is missing or damaged, contact your sales representative.
...-051 16 Wrench 13 x 10 17 Oiler XC6159-051 XC6547-051 18 Clean brush X59476-051 19 Weight XC5974-051 20 USB cable Embroidery frame (extra large) 21 200 mm (H) × 300 mm (W) (7-7/8 inches (H) × 11-3/4 inches (W)) XC5910-051 PRH300 XC6284-052...-051 30 Quick reference guide XC7141-051 31 Spool mat XC7134-051 4 Sapphire.book Page 4 Friday, August 1, 2003 9:12 AM GETTING READY Included Accessories After opening the box, check that the following accessories are included with this machine. No. If any item is missing or damaged, contact your sales representative.

Users Manual - English
Page 23
...drive set Model Name: PRCF1 Parts Code: XC6288-052 5. Embroidery card 2. Bobbin winder set Model Name: PRBW1 Parts Code: XC6290-052 Note ● Embroidery cards sold overseas are available as optional accessories. 1. 2. 3. 4. 1 1. Optional Accessories 5 No. Cap frame Model Name: PRCFH1 Parts Code: XC6958... dealer to order additional parts and optional accessories by using the correct part number. Sapphire_chapt1.fm Page 5 Wednesday, August 27, 2003 10:39 AM Optional Accessories The following are not compatible with this embroidery machine. Cap frame set Model Name: PRFD1 ...
...drive set Model Name: PRCF1 Parts Code: XC6288-052 5. Embroidery card 2. Bobbin winder set Model Name: PRBW1 Parts Code: XC6290-052 Note ● Embroidery cards sold overseas are available as optional accessories. 1. 2. 3. 4. 1 1. Optional Accessories 5 No. Cap frame Model Name: PRCFH1 Parts Code: XC6958... dealer to order additional parts and optional accessories by using the correct part number. Sapphire_chapt1.fm Page 5 Wednesday, August 27, 2003 10:39 AM Optional Accessories The following are not compatible with this embroidery machine. Cap frame set Model Name: PRFD1 ...
Users Manual - English
Page 173
... 7 Appendix This chapter provides descriptions of techniques for sewing applications, pointers for industrial embroidery machines ......168 Using the Optional Cap Frame 169 Cap frame and its accessories / 169 Preparing to create appliqués (2) / 158 Helpful Tips for the Operation of PR-600 160 Checking the thread tension of built-in patterns / 160 Sewing a pattern aligned...
... 7 Appendix This chapter provides descriptions of techniques for sewing applications, pointers for industrial embroidery machines ......168 Using the Optional Cap Frame 169 Cap frame and its accessories / 169 Preparing to create appliqués (2) / 158 Helpful Tips for the Operation of PR-600 160 Checking the thread tension of built-in patterns / 160 Sewing a pattern aligned...

Users Manual - English
Page 186
... attach the embroidery frame for industrial embroidery machines. Attach the embroidery frame for industrial embroidery machines in step 1 and tighten them . Sapphire.book Page 168 Friday, August 1, 2003 9:12 AM Appendix OPTIONAL ACCESSORIES Attaching an optional embroidery frame for industrial embroidery machines Prepare the embroidery frame holder in order to page 30.) Note ● When using embroidery frames for industrial embroidery machines, THE MACHINE DOES...
... attach the embroidery frame for industrial embroidery machines. Attach the embroidery frame for industrial embroidery machines in step 1 and tighten them . Sapphire.book Page 168 Friday, August 1, 2003 9:12 AM Appendix OPTIONAL ACCESSORIES Attaching an optional embroidery frame for industrial embroidery machines Prepare the embroidery frame holder in order to page 30.) Note ● When using embroidery frames for industrial embroidery machines, THE MACHINE DOES...
Users Manual - English
Page 187
...the machine. 1 Insert the thumb screws into these holes when storing this cap frame driver. 2 Holding Spring The cap frame is attached, the embroidery frame indicators, showing which embroidery ... (H) × 5-1/8 inches (W)) the carriage, remove the 2 The mark indicates the center of the embroidery frame holder, and embroidering area. 3 Snap lock 1 then attach this frame. ● This frame ... with this cap frame driver to mounting surface. 1 2 Note 7 ● If the cap embroidery frame is secured by the two holders. 2 Mounting bracket Tighten thumb screw to secure to the ...
...the machine. 1 Insert the thumb screws into these holes when storing this cap frame driver. 2 Holding Spring The cap frame is attached, the embroidery frame indicators, showing which embroidery ... (H) × 5-1/8 inches (W)) the carriage, remove the 2 The mark indicates the center of the embroidery frame holder, and embroidering area. 3 Snap lock 1 then attach this frame. ● This frame ... with this cap frame driver to mounting surface. 1 2 Note 7 ● If the cap embroidery frame is secured by the two holders. 2 Mounting bracket Tighten thumb screw to secure to the ...
Users Manual - English
Page 225
Sapphire.book Page 207 Friday, August 1, 2003 9:12 AM Index A Accessories 4 Adjusting angle 71 edited patterns 119 legs 8 operation panel 9 screen brightness 142, 204 sewing speed 89 thread tension 83 tuoch panel 204 ...41 text arrangement of a character 122 repeatedly sewing 88 thread color display 145 Embroidery card slot 3 thread density 124 Embroidery cards 109 thread spools 75 Embroidery data 98 units of measurements 143 Embroidery frame Checking attaching to the machine 30 needle bars and thread colors 33 hooping 28 preview image 27 removing 45...
Sapphire.book Page 207 Friday, August 1, 2003 9:12 AM Index A Accessories 4 Adjusting angle 71 edited patterns 119 legs 8 operation panel 9 screen brightness 142, 204 sewing speed 89 thread tension 83 tuoch panel 204 ...41 text arrangement of a character 122 repeatedly sewing 88 thread color display 145 Embroidery card slot 3 thread density 124 Embroidery cards 109 thread spools 75 Embroidery data 98 units of measurements 143 Embroidery frame Checking attaching to the machine 30 needle bars and thread colors 33 hooping 28 preview image 27 removing 45...
Users Manual - English
Page 226
...Headwear 167 Help key 48, 153 Hook 183 Hook cover/Hook 2 Hooping 28, 65, 166 Horizontal mirror image key 50, 52, 100, 120 I Industrial embroidery frame 168 J Jump code 149 L Language 141, 143 LCD 3, 16, 48, 142, 204 Lingerie 167 Lock stitching key 54, 86 Locking mechanism 41 ... key 52, 125 N Names of machine parts 2 Needle 15 changing 61 Needle bar case 2 Needle bar key 35, 55 Needle plate 184 New embroidery key 48 Next page key 50 Number of thread color changes 50, 51, 53 O Oiling 186 Operation panel 2, 3, 9 Optional accessories 5 P Pattern display area 48 Pattern...
...Headwear 167 Help key 48, 153 Hook 183 Hook cover/Hook 2 Hooping 28, 65, 166 Horizontal mirror image key 50, 52, 100, 120 I Industrial embroidery frame 168 J Jump code 149 L Language 141, 143 LCD 3, 16, 48, 142, 204 Lingerie 167 Lock stitching key 54, 86 Locking mechanism 41 ... key 52, 125 N Names of machine parts 2 Needle 15 changing 61 Needle bar case 2 Needle bar key 35, 55 Needle plate 184 New embroidery key 48 Next page key 50 Number of thread color changes 50, 51, 53 O Oiling 186 Operation panel 2, 3, 9 Optional accessories 5 P Pattern display area 48 Pattern...


