

Users Manual - English
Page 15
......14 Power supply precautions ...14 Needle precautions ...15 Checking the needle ...15 Bobbin precautions ...15 Upper thread recommendations ...16 Fabric recommendations...16 Display recommendations...16 Basic Procedures ...17 Installing the Bobbin ...18 Removing the bobbin case ...18 Installing the bobbin ...19 Installing the bobbin case...19 Turning ON the Machine 20 Understanding the screens ...21 Screen overview...
......14 Power supply precautions ...14 Needle precautions ...15 Checking the needle ...15 Bobbin precautions ...15 Upper thread recommendations ...16 Fabric recommendations...16 Display recommendations...16 Basic Procedures ...17 Installing the Bobbin ...18 Removing the bobbin case ...18 Installing the bobbin ...19 Installing the bobbin case...19 Turning ON the Machine 20 Understanding the screens ...21 Screen overview...
Users Manual - English
Page 18
... a frame pattern to create appliqués (1 157 Using a frame pattern to create appliqués (2 158 Helpful Tips for the Operation of PR-600 160 Checking the thread tension of built-in patterns 160 Sewing a pattern aligned with a mark on the fabric 161 Color thread table ...163 Colors......183 Cleaning the LCD...183 Cleaning the machine surface ...183 Cleaning the hook ...183 Cleaning around the needle plate...184 Cleaning the bobbin case ...185 Oiling the machine ...186 Cleaning the magnetic head of the floppy disk drive 188 Troubleshooting ...189 On-screen troubleshooting ...189 ...
... a frame pattern to create appliqués (1 157 Using a frame pattern to create appliqués (2 158 Helpful Tips for the Operation of PR-600 160 Checking the thread tension of built-in patterns 160 Sewing a pattern aligned with a mark on the fabric 161 Color thread table ...163 Colors......183 Cleaning the LCD...183 Cleaning the machine surface ...183 Cleaning the hook ...183 Cleaning around the needle plate...184 Cleaning the bobbin case ...185 Oiling the machine ...186 Cleaning the magnetic head of the floppy disk drive 188 Troubleshooting ...189 On-screen troubleshooting ...189 ...

Users Manual - English
Page 20
...or when the machine does embroidery, the carriage moves forward, backward, left and right. 5 Hook cover/Hook Open the hook cover, and then insert the bobbin case into the hook. 6 Thread guide 7 Thread guide assembly support 8 Spool stand Put 6 thread spools to embroider. 9 Operation panel 0 Feet Use the feet... to adjust the height of the thread. 2 Thread Guide Pin 3 Needle bar case The case moves to the left and right to move the needle to the embroidering position. 4 Carriage Attach the embroidery frame to learn the names of the...
...or when the machine does embroidery, the carriage moves forward, backward, left and right. 5 Hook cover/Hook Open the hook cover, and then insert the bobbin case into the hook. 6 Thread guide 7 Thread guide assembly support 8 Spool stand Put 6 thread spools to embroider. 9 Operation panel 0 Feet Use the feet... to adjust the height of the thread. 2 Thread Guide Pin 3 Needle bar case The case moves to the left and right to move the needle to the embroidering position. 4 Carriage Attach the embroidery frame to learn the names of the...
Users Manual - English
Page 36
... with this machine. The race should be moved within a certain range. For precautions concerning the bobbin, refer to sew or when trimming the thread. Grab the bobbin case latch, and remove the 3 bobbin case. 1 Removing the bobbin case Open the hook cover. 1 Pull the hook cover toward you . 2 1 1 Thread Picker To gain access to oil the race...
... with this machine. The race should be moved within a certain range. For precautions concerning the bobbin, refer to sew or when trimming the thread. Grab the bobbin case latch, and remove the 3 bobbin case. 1 Removing the bobbin case Open the hook cover. 1 Pull the hook cover toward you . 2 1 1 Thread Picker To gain access to oil the race...

Users Manual - English
Page 37
... the opposite direction, the embroidery will not be used. (Refer to page 5, 168.) Installing the Bobbin 19 Sapphire.book Page 19 Friday, August 1, 2003 9:12 AM Installing the bobbin Insert the bobbin into the bobbin case. 1 Installing the bobbin case Insert the bobbin case into place. 2 3 4 5 6 Close the hook cover. 2 7 8 9 10 11 Memo 12 ● This embroidery machine is...
... the opposite direction, the embroidery will not be used. (Refer to page 5, 168.) Installing the Bobbin 19 Sapphire.book Page 19 Friday, August 1, 2003 9:12 AM Installing the bobbin Insert the bobbin into the bobbin case. 1 Installing the bobbin case Insert the bobbin case into place. 2 3 4 5 6 Close the hook cover. 2 7 8 9 10 11 Memo 12 ● This embroidery machine is...

Users Manual - English
Page 101
...thread tension. 3 1 2 3 As shown in embroidery patterns, one pattern is correct. Memo ● In the built-in the illustration, hold the bobbin 2 case against a smooth vertical surface. 1 Tension-adjusting screw 2 Tighter 3 Looser After making the adjustments, try 4 embroidering with the weight attached is slowly pulled ...out, the thread tension is used . Adjusting the tension of the bobbin thread Tie the included weight to the end of the 1 thread extending from the bobbin case. For details, refer to page 160. • If the thread with all needle ...
...thread tension. 3 1 2 3 As shown in embroidery patterns, one pattern is correct. Memo ● In the built-in the illustration, hold the bobbin 2 case against a smooth vertical surface. 1 Tension-adjusting screw 2 Tighter 3 Looser After making the adjustments, try 4 embroidering with the weight attached is slowly pulled ...out, the thread tension is used . Adjusting the tension of the bobbin thread Tie the included weight to the end of the 1 thread extending from the bobbin case. For details, refer to page 160. • If the thread with all needle ...

Users Manual - English
Page 173
... frame pattern to create appliqués (1) / 157 Using a frame pattern to create appliqués (2) / 158 Helpful Tips for the Operation of PR-600 160 Checking the thread tension of built-in patterns / 160 Sewing a pattern aligned with a mark on the fabric / 161 Color thread table / ...Cleaning the LCD / 183 Cleaning the machine surface / 183 Cleaning the hook / 183 Cleaning around the needle plate / 184 Cleaning the bobbin case / 185 Oiling the machine / 186 Cleaning the magnetic head of techniques for sewing applications, pointers for creating beautiful embroidery, and details on ...
... frame pattern to create appliqués (1) / 157 Using a frame pattern to create appliqués (2) / 158 Helpful Tips for the Operation of PR-600 160 Checking the thread tension of built-in patterns / 160 Sewing a pattern aligned with a mark on the fabric / 161 Color thread table / ...Cleaning the LCD / 183 Cleaning the machine surface / 183 Cleaning the hook / 183 Cleaning around the needle plate / 184 Cleaning the bobbin case / 185 Oiling the machine / 186 Cleaning the magnetic head of techniques for sewing applications, pointers for creating beautiful embroidery, and details on ...
Users Manual - English
Page 203
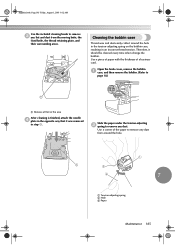
Cleaning the bobbin case Thread wax and dust easily collect around the hole. 1 7 1 Tension-adjusting spring 2 Hole 3 ...was removed in an incorrect thread tension. Use a corner of a business card. Open the hook cover, remove the bobbin 1 case, and then remove the bobbin. (Refer to page 18.) 1 1 Remove all lint in this area After cleaning is finished, attach the needle ...4 plate in the opposite way that it should be cleaned every time when change the bobbin. Sapphire.book Page 185 Friday, August 1, 2003 9:12 AM Use the included cleaning brush to remove 3 any ...
Cleaning the bobbin case Thread wax and dust easily collect around the hole. 1 7 1 Tension-adjusting spring 2 Hole 3 ...was removed in an incorrect thread tension. Use a corner of a business card. Open the hook cover, remove the bobbin 1 case, and then remove the bobbin. (Refer to page 18.) 1 1 Remove all lint in this area After cleaning is finished, attach the needle ...4 plate in the opposite way that it should be cleaned every time when change the bobbin. Sapphire.book Page 185 Friday, August 1, 2003 9:12 AM Use the included cleaning brush to remove 3 any ...
Users Manual - English
Page 204
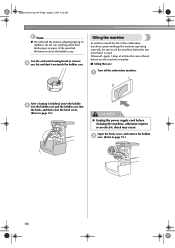
... before use anything other than thick paper or paper of oil into the hook, and then close the hook cover. (Refer to clean the bobbin case. Use the enclosed cleaning brush to page 19.) 186 Oiling the machine In order to extend the life of the embroidery machine's parts and ...keep the machine operating correctly, be sure to oil the machine before the first time that it is finished, insert the bobbin 4 into the bobbin case and the bobbin case into the race of hook before cleaning the machine, otherwise injuries or an electric shock may occur. Open the hook cover, and remove...
... before use anything other than thick paper or paper of oil into the hook, and then close the hook cover. (Refer to clean the bobbin case. Use the enclosed cleaning brush to page 19.) 186 Oiling the machine In order to extend the life of the embroidery machine's parts and ...keep the machine operating correctly, be sure to oil the machine before the first time that it is finished, insert the bobbin 4 into the bobbin case and the bobbin case into the race of hook before cleaning the machine, otherwise injuries or an electric shock may occur. Open the hook cover, and remove...

Users Manual - English
Page 205
... other type of oil into the hook race. 4 Note ● Apply 1 drop of oil may get contaminated. If too much oil. After oiling, insert the bobbin case into the 5 hook, and then close the hook cover. (Refer to rotate the handwheel counterclockwise. Add 1 drop of oil into the hook race every day...
... other type of oil into the hook race. 4 Note ● Apply 1 drop of oil may get contaminated. If too much oil. After oiling, insert the bobbin case into the 5 hook, and then close the hook cover. (Refer to rotate the handwheel counterclockwise. Add 1 drop of oil into the hook race every day...
Users Manual - English
Page 211
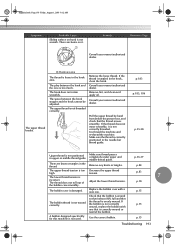
...foot, and check that the thread is evenly wound. p.183 p.183, 186 p.35-38 Upper thread is not used. p.18 the bobbin case smoothly. p.15 A bobbin designed specifically for this machine is not positioned in upper or middle thread guide. The hook does not rotate smoothly. p.36-37 There ...correctly threaded. Consult your nearest authorized dealer. If the thread does not move smoothly, it is not wound correctly. The bobbin case is not threaded correctly. If the bobbin is not smooth. The space between the hook and the race is wound so that it about 80% full and ...
...foot, and check that the thread is evenly wound. p.183 p.183, 186 p.35-38 Upper thread is not used. p.18 the bobbin case smoothly. p.15 A bobbin designed specifically for this machine is not positioned in upper or middle thread guide. The hook does not rotate smoothly. p.36-37 There ...correctly threaded. Consult your nearest authorized dealer. If the thread does not move smoothly, it is not wound correctly. The bobbin case is not threaded correctly. If the bobbin is not smooth. The space between the hook and the race is wound so that it about 80% full and ...

Users Manual - English
Page 212
... Improper twisting results in the embroidery data. Try using a new spool. The embroidery pattern is poor. The thread quality is misaligned. The bobbin case is bent or blunt. The needle is damaged. Remedy Consult your nearest authorized dealer. Replace the needle with a pitch of the embroidery data... p.28, 65 p.63 194 The fabric is not well framed in the embroidery frame so that matches the size of thread. Replace the bobbin case. Firmly set the fabric in the embroidery frame (for the size of the embroidery. Sapphire.book Page 194 Friday, August 1, 2003 9:12...
... Improper twisting results in the embroidery data. Try using a new spool. The embroidery pattern is poor. The thread quality is misaligned. The bobbin case is bent or blunt. The needle is damaged. Remedy Consult your nearest authorized dealer. Replace the needle with a pitch of the embroidery data... p.28, 65 p.63 194 The fabric is not well framed in the embroidery frame so that matches the size of thread. Replace the bobbin case. Firmly set the fabric in the embroidery frame (for the size of the embroidery. Sapphire.book Page 194 Friday, August 1, 2003 9:12...

Users Manual - English
Page 225
...122 Arrrow key 70, 119 Automatic lock stitch 86 thread spool changes 73 thread tension 44 Cleaning around the needle plate 184 bobbin case 185 hook 183 LCD 183 machine surface 183 Color information 145 Color thread table 163 Combining patterns 118 Common screen 48 CompactFlash card... 3, 39 Automatic needle-threading mechanism 39 D Delete file key 109, 115, 117 B Backing 165 Basic procedures 17 Bobbin 15, 18, 19 Bobbin case 18, 19, 83, 185 Bobbin winder 178 Brightness of LCD 141, 142 Buzzer 141, 142 Delete key 52, 107 Deleting pattern 127 previously saved pattern...
...122 Arrrow key 70, 119 Automatic lock stitch 86 thread spool changes 73 thread tension 44 Cleaning around the needle plate 184 bobbin case 185 hook 183 LCD 183 machine surface 183 Color information 145 Color thread table 163 Combining patterns 118 Common screen 48 CompactFlash card... 3, 39 Automatic needle-threading mechanism 39 D Delete file key 109, 115, 117 B Backing 165 Basic procedures 17 Bobbin 15, 18, 19 Bobbin case 18, 19, 83, 185 Bobbin winder 178 Brightness of LCD 141, 142 Buzzer 141, 142 Delete key 52, 107 Deleting pattern 127 previously saved pattern...

Users Manual - English
Page 15
......14 Power supply precautions ...14 Needle precautions ...15 Checking the needle ...15 Bobbin precautions ...15 Upper thread recommendations ...16 Fabric recommendations...16 Display recommendations...16 Basic Procedures ...17 Installing the Bobbin ...18 Removing the bobbin case ...18 Installing the bobbin ...19 Installing the bobbin case...19 Turning ON the Machine 20 Understanding the screens ...21 Screen overview...
......14 Power supply precautions ...14 Needle precautions ...15 Checking the needle ...15 Bobbin precautions ...15 Upper thread recommendations ...16 Fabric recommendations...16 Display recommendations...16 Basic Procedures ...17 Installing the Bobbin ...18 Removing the bobbin case ...18 Installing the bobbin ...19 Installing the bobbin case...19 Turning ON the Machine 20 Understanding the screens ...21 Screen overview...

Users Manual - English
Page 18
... a frame pattern to create appliqués (1 157 Using a frame pattern to create appliqués (2 158 Helpful Tips for the Operation of PR-600 160 Checking the thread tension of built-in patterns 160 Sewing a pattern aligned with a mark on the fabric 161 Color thread table ...163 Colors......183 Cleaning the LCD...183 Cleaning the machine surface ...183 Cleaning the hook ...183 Cleaning around the needle plate...184 Cleaning the bobbin case ...185 Oiling the machine ...186 Cleaning the magnetic head of the floppy disk drive 188 Troubleshooting ...189 On-screen troubleshooting ...189 ...
... a frame pattern to create appliqués (1 157 Using a frame pattern to create appliqués (2 158 Helpful Tips for the Operation of PR-600 160 Checking the thread tension of built-in patterns 160 Sewing a pattern aligned with a mark on the fabric 161 Color thread table ...163 Colors......183 Cleaning the LCD...183 Cleaning the machine surface ...183 Cleaning the hook ...183 Cleaning around the needle plate...184 Cleaning the bobbin case ...185 Oiling the machine ...186 Cleaning the magnetic head of the floppy disk drive 188 Troubleshooting ...189 On-screen troubleshooting ...189 ...

Users Manual - English
Page 20
...or when the machine does embroidery, the carriage moves forward, backward, left and right. 5 Hook cover/Hook Open the hook cover, and then insert the bobbin case into the hook. 6 Thread guide 7 Thread guide assembly support 8 Spool stand Put 6 thread spools to embroider. 9 Operation panel 0 Feet Use the feet... to adjust the height of the thread. 2 Thread Guide Pin 3 Needle bar case The case moves to the left and right to move the needle to the embroidering position. 4 Carriage Attach the embroidery frame to learn the names of the...
...or when the machine does embroidery, the carriage moves forward, backward, left and right. 5 Hook cover/Hook Open the hook cover, and then insert the bobbin case into the hook. 6 Thread guide 7 Thread guide assembly support 8 Spool stand Put 6 thread spools to embroider. 9 Operation panel 0 Feet Use the feet... to adjust the height of the thread. 2 Thread Guide Pin 3 Needle bar case The case moves to the left and right to move the needle to the embroidering position. 4 Carriage Attach the embroidery frame to learn the names of the...

Users Manual - English
Page 36
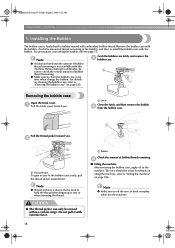
... to page 15. For precautions concerning the bobbin, refer to clean the bobbin case every time when change the bobbin. Grab the bobbin case latch, and remove the 3 bobbin case. 1 Removing the bobbin case Open the hook cover. 1 Pull the hook cover toward you. 1 Latch Close the latch, and then remove the bobbin 4 from the bobbin case. 1 Pull the thread picker toward front...
... to page 15. For precautions concerning the bobbin, refer to clean the bobbin case every time when change the bobbin. Grab the bobbin case latch, and remove the 3 bobbin case. 1 Removing the bobbin case Open the hook cover. 1 Pull the hook cover toward you. 1 Latch Close the latch, and then remove the bobbin 4 from the bobbin case. 1 Pull the thread picker toward front...

Users Manual - English
Page 37
... the 3 tension-adjusting spring. 1 1 Pull out about 50 mm (2 inches) of thread. 1 Tab 2 Notch • Fully insert the bobbin case until it snaps 1 into the hook. 1 Insert the bobbin case while aligning the tab on the bobbin case with the notch in the hook, as shown in the illustration. 1 2 2 Note ● Check that the thread winds...
... the 3 tension-adjusting spring. 1 1 Pull out about 50 mm (2 inches) of thread. 1 Tab 2 Notch • Fully insert the bobbin case until it snaps 1 into the hook. 1 Insert the bobbin case while aligning the tab on the bobbin case with the notch in the hook, as shown in the illustration. 1 2 2 Note ● Check that the thread winds...

Users Manual - English
Page 101
... before adjusting the tension of the upper thread. After adjusting the tension of the bobbin thread, adjust the tension of the 1 thread extending from the bobbin case. Adjusting the Thread Tension 83 For details, refer to page 160. • If the thread with all... tension. 3 1 2 3 As shown in embroidery patterns, one pattern is correct. Memo ● In the built-in the illustration, hold the bobbin 2 case against a smooth vertical surface. 1 Tension-adjusting screw 2 Tighter 3 Looser After making the adjustments, try 4 embroidering with the weight attached is slowly ...
... before adjusting the tension of the upper thread. After adjusting the tension of the bobbin thread, adjust the tension of the 1 thread extending from the bobbin case. Adjusting the Thread Tension 83 For details, refer to page 160. • If the thread with all... tension. 3 1 2 3 As shown in embroidery patterns, one pattern is correct. Memo ● In the built-in the illustration, hold the bobbin 2 case against a smooth vertical surface. 1 Tension-adjusting screw 2 Tighter 3 Looser After making the adjustments, try 4 embroidering with the weight attached is slowly ...
Users Manual - English
Page 173
... the LCD / 183 Cleaning the machine surface / 183 Cleaning the hook / 183 Cleaning around the needle plate / 184 Cleaning the bobbin case / 185 Oiling the machine / 186 Cleaning the magnetic head of built-in patterns / 160 Sewing a pattern aligned with a mark on...) / 165 Hooping Techniques / 166 Fabric/stabilizer compatibility chart / 167 OPTIONAL ACCESSORIES Attaching an optional embroidery frame for the Operation of PR-600 160 Checking the thread tension of the floppy disk drive / 188 Troubleshooting ...189 On-screen troubleshooting / 189 Troubleshooting / 190 Error messages...
... the LCD / 183 Cleaning the machine surface / 183 Cleaning the hook / 183 Cleaning around the needle plate / 184 Cleaning the bobbin case / 185 Oiling the machine / 186 Cleaning the magnetic head of built-in patterns / 160 Sewing a pattern aligned with a mark on...) / 165 Hooping Techniques / 166 Fabric/stabilizer compatibility chart / 167 OPTIONAL ACCESSORIES Attaching an optional embroidery frame for the Operation of PR-600 160 Checking the thread tension of the floppy disk drive / 188 Troubleshooting ...189 On-screen troubleshooting / 189 Troubleshooting / 190 Error messages...


