
Accessory Catalog - English
Page 2
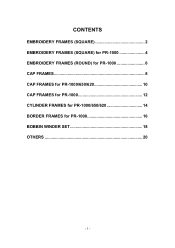
CONTENTS EMBROIDERY FRAMES (SQUARE 2 EMBROIDERY FRAMES (SQUARE) for PR-1000 4 EMBROIDERY FRAMES (ROUND) for PR-1000 6 CAP FRAMES 8 CAP FRAMES for PR-1000/650/620 10 CAP FRAMES for PR-1000 12 CYLINDER FRAMES for PR-1000/650/620 14 BORDER FRAMES for PR-1000 16 BOBBIN WINDER SET 18 OTHERS 20 - 1 -
CONTENTS EMBROIDERY FRAMES (SQUARE 2 EMBROIDERY FRAMES (SQUARE) for PR-1000 4 EMBROIDERY FRAMES (ROUND) for PR-1000 6 CAP FRAMES 8 CAP FRAMES for PR-1000/650/620 10 CAP FRAMES for PR-1000 12 CYLINDER FRAMES for PR-1000/650/620 14 BORDER FRAMES for PR-1000 16 BOBBIN WINDER SET 18 OTHERS 20 - 1 -
Accessory Catalog - English
Page 20
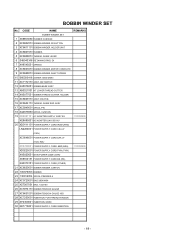
..., E4 7 XA9545051 SPRING 8 XC6633051 BOBBIN WINDER MOTOR COMPLETE 9 XC6628051 BOBBIN WINDER SHAFT SPRING 10 060300416 SCREW, BIND M3X4 11 XC7172151 ASSY, BW SWITCH 12 XA5876051 BOBBIN BASE ASSY 13 X80321001 NT LOWER THREAD CUTTER 14 XA5877051 BOBBIN THREAD CUTTER HOLDER 15 XC6639151 ASSY:...(IRL) XA0070151 POWER SUPPLY CORD (OTHER) 21 XC6630051 BOBBIN WINDER CARTON 22 100376053 BOBBIN 23 130012054 SPOOL PRESSER A 24 XC5720051 BAG 260X440H 25 X57367051 BAG, 135X150 26 XC5974151 BOBBIN TENSION GAUGE 27 XC6631051 BOBBIN TENSION GAUGE 45G 28 XC7250051 INSERTION FOR THREAD TENSION 29...
..., E4 7 XA9545051 SPRING 8 XC6633051 BOBBIN WINDER MOTOR COMPLETE 9 XC6628051 BOBBIN WINDER SHAFT SPRING 10 060300416 SCREW, BIND M3X4 11 XC7172151 ASSY, BW SWITCH 12 XA5876051 BOBBIN BASE ASSY 13 X80321001 NT LOWER THREAD CUTTER 14 XA5877051 BOBBIN THREAD CUTTER HOLDER 15 XC6639151 ASSY:...(IRL) XA0070151 POWER SUPPLY CORD (OTHER) 21 XC6630051 BOBBIN WINDER CARTON 22 100376053 BOBBIN 23 130012054 SPOOL PRESSER A 24 XC5720051 BAG 260X440H 25 X57367051 BAG, 135X150 26 XC5974151 BOBBIN TENSION GAUGE 27 XC6631051 BOBBIN TENSION GAUGE 45G 28 XC7250051 INSERTION FOR THREAD TENSION 29...

Users Manual - English
Page 15
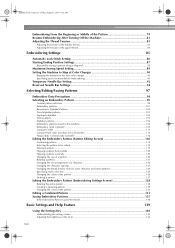
... ...15 Upper thread recommendations ...16 Fabric recommendations...16 Display recommendations...16 Basic Procedures ...17 Installing the Bobbin ...18 Removing the bobbin case ...18 Installing the bobbin ...19 Installing the bobbin case...19 Turning ON the Machine 20 Understanding the screens ...21 Screen overview...22 Selecting an Embroidery Pattern 23 Selecting an embroidery pattern ...24...
... ...15 Upper thread recommendations ...16 Fabric recommendations...16 Display recommendations...16 Basic Procedures ...17 Installing the Bobbin ...18 Removing the bobbin case ...18 Installing the bobbin ...19 Installing the bobbin case...19 Turning ON the Machine 20 Understanding the screens ...21 Screen overview...22 Selecting an Embroidery Pattern 23 Selecting an embroidery pattern ...24...

Users Manual - English
Page 16
... with Designs of Seven or More Colors 75 Change thread spools message ...75 Easily changing the thread spools...76 If the Thread Breaks or the Bobbin Thread Runs Out While Embroidering 77 If the upper thread breaks...77 If the...
... with Designs of Seven or More Colors 75 Change thread spools message ...75 Easily changing the thread spools...76 If the Thread Breaks or the Bobbin Thread Runs Out While Embroidering 77 If the upper thread breaks...77 If the...
Users Manual - English
Page 17
... Beginning or Middle of the Pattern 79 Resume Embroidering After Turning Off the Machine 81 Adjusting the Thread Tension 83 Adjusting the tension of the bobbin thread ...83 Adjusting the tension of the upper thread ...84 Embroidering Settings 85 Automatic Lock Stitch Setting 86 Starting/Ending Position Settings 87 Repeatedly sewing...
... Beginning or Middle of the Pattern 79 Resume Embroidering After Turning Off the Machine 81 Adjusting the Thread Tension 83 Adjusting the tension of the bobbin thread ...83 Adjusting the tension of the upper thread ...84 Embroidering Settings 85 Automatic Lock Stitch Setting 86 Starting/Ending Position Settings 87 Repeatedly sewing...
Users Manual - English
Page 18
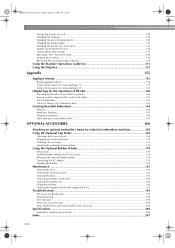
...Using a frame pattern to create appliqués (1 157 Using a frame pattern to create appliqués (2 158 Helpful Tips for the Operation of PR-600 160 Checking the thread tension of built-in patterns 160 Sewing a pattern aligned with a mark on the fabric 161 Color thread table ...163 Colors ......183 Cleaning the LCD...183 Cleaning the machine surface ...183 Cleaning the hook ...183 Cleaning around the needle plate...184 Cleaning the bobbin case ...185 Oiling the machine ...186 Cleaning the magnetic head of the floppy disk drive 188 Troubleshooting ...189 On-screen troubleshooting ......
...Using a frame pattern to create appliqués (1 157 Using a frame pattern to create appliqués (2 158 Helpful Tips for the Operation of PR-600 160 Checking the thread tension of built-in patterns 160 Sewing a pattern aligned with a mark on the fabric 161 Color thread table ...163 Colors ......183 Cleaning the LCD...183 Cleaning the machine surface ...183 Cleaning the hook ...183 Cleaning around the needle plate...184 Cleaning the bobbin case ...185 Oiling the machine ...186 Cleaning the magnetic head of the floppy disk drive 188 Troubleshooting ...189 On-screen troubleshooting ......

Users Manual - English
Page 20
.... 2 Thread Guide Pin 3 Needle bar case The case moves to the left and right. 5 Hook cover/Hook Open the hook cover, and then insert the bobbin case into the hook. 6 Thread guide 7 Thread guide assembly support 8 Spool stand Put 6 thread spools to embroider. 9 Operation panel 0 Feet Use the feet to the...
.... 2 Thread Guide Pin 3 Needle bar case The case moves to the left and right. 5 Hook cover/Hook Open the hook cover, and then insert the bobbin case into the hook. 6 Thread guide 7 Thread guide assembly support 8 Spool stand Put 6 thread spools to embroider. 9 Operation panel 0 Feet Use the feet to the...

Users Manual - English
Page 21
... machine is sewing Off :When the machine is turned off 4 2 Thread trimming button Press the thread trimming button to trim both the upper and the bobbin threads. 3 Automatic needle-threading button Press the automatic needle threading button to thread the needle. 4 LCD (touch panel) Touch the keys that appear on the...
... machine is sewing Off :When the machine is turned off 4 2 Thread trimming button Press the thread trimming button to trim both the upper and the bobbin threads. 3 Automatic needle-threading button Press the automatic needle threading button to thread the needle. 4 LCD (touch panel) Touch the keys that appear on the...
Users Manual - English
Page 22
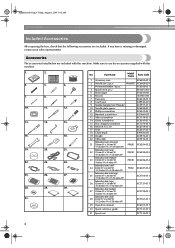
... is missing or damaged, contact your sales representative. Part Name Model Name Parts Code 1 Accessory case XC6482-051 2 Needle set (2 pcs.) PRHA1BR11 XC6469-001 3 Prewound bobbin (6 pcs.) XC6368-051 4 Spool net (6 pcs.) 5 Seam ripper S34455-000 X54243-001 6 Scissors 184783-001 7 Tweezers XC6542-051 8 Touch pen 9 Needle changing tool (Threader) XA9940...
... is missing or damaged, contact your sales representative. Part Name Model Name Parts Code 1 Accessory case XC6482-051 2 Needle set (2 pcs.) PRHA1BR11 XC6469-001 3 Prewound bobbin (6 pcs.) XC6368-051 4 Spool net (6 pcs.) 5 Seam ripper S34455-000 X54243-001 6 Scissors 184783-001 7 Tweezers XC6542-051 8 Touch pen 9 Needle changing tool (Threader) XA9940...
Users Manual - English
Page 23
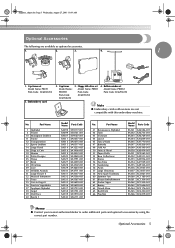
... parts and optional accessories by using the correct part number. Embroidery card 2. Floppy disk drive set Model Name: PRCF1 Parts Code: XC6288-052 5. Optional Accessories 5 Bobbin winder set Model Name: PRBW1 Parts Code: XC6290-052 Note ● Embroidery cards sold overseas are available as optional accessories. 1. 2. 3. 4. 1 1. Sapphire_chapt1.fm Page 5 Wednesday, August...
... parts and optional accessories by using the correct part number. Embroidery card 2. Floppy disk drive set Model Name: PRCF1 Parts Code: XC6288-052 5. Optional Accessories 5 Bobbin winder set Model Name: PRBW1 Parts Code: XC6290-052 Note ● Embroidery cards sold overseas are available as optional accessories. 1. 2. 3. 4. 1 1. Sapphire_chapt1.fm Page 5 Wednesday, August...

Users Manual - English
Page 31
... to finishing sewing. Operating Precautions 14 Basic Procedures ...17 Screen Quick Reference Guide 48 When You Have a Question, This May Help You 57 Installing the Bobbin 1 Turning ON the Machine 2 Selecting an Embroidery Pattern 3 Editing the Embroidery Pattern 4 Specifying Embroidering Setting 5 Previewing the Image 6 Hooping the Fabric in order-from turning...
... to finishing sewing. Operating Precautions 14 Basic Procedures ...17 Screen Quick Reference Guide 48 When You Have a Question, This May Help You 57 Installing the Bobbin 1 Turning ON the Machine 2 Selecting an Embroidery Pattern 3 Editing the Embroidery Pattern 4 Specifying Embroidering Setting 5 Previewing the Image 6 Hooping the Fabric in order-from turning...

Users Manual - English
Page 33
...9679; Only use household embroidery needles. Use of any other needles may break or the thread tension will be incorrect. ● When winding the bobbin, be used as a substitute. CAUTION ● Your machine is being operated. threading mechanism or result to injuries. ● Never use cotton or spun...Bad needle If the distance between the needle and the flat surface is not even, the needle is bent. COATS L Polyester ● Use a bobbin thread that the distance between 74 dtex/2 and 100 dtex/2). If the needle is bent or the tip of the needle is broken, replace the...
...9679; Only use household embroidery needles. Use of any other needles may break or the thread tension will be incorrect. ● When winding the bobbin, be used as a substitute. CAUTION ● Your machine is being operated. threading mechanism or result to injuries. ● Never use cotton or spun...Bad needle If the distance between the needle and the flat surface is not even, the needle is bent. COATS L Polyester ● Use a bobbin thread that the distance between 74 dtex/2 and 100 dtex/2). If the needle is bent or the tip of the needle is broken, replace the...
Users Manual - English
Page 35
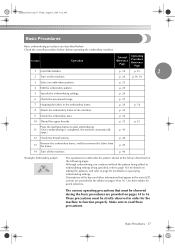
.... Tutorial Reference Page Operating Procedure Reference Page p. 18 p.15 2 p. 20 p.14, 16 3 Select an embroidery pattern. Check the overall procedure below . Procedure Operation 1 Install the bobbin. 2 Turn on specifying embroidering settings. p. 26 6 Check the previewed image. p. 44 13 Remove the embroidery frame, and then remove the fabric from the frame. Descriptions...
.... Tutorial Reference Page Operating Procedure Reference Page p. 18 p.15 2 p. 20 p.14, 16 3 Select an embroidery pattern. Check the overall procedure below . Procedure Operation 1 Install the bobbin. 2 Turn on specifying embroidering settings. p. 26 6 Check the previewed image. p. 44 13 Remove the embroidery frame, and then remove the fabric from the frame. Descriptions...
Users Manual - English
Page 36
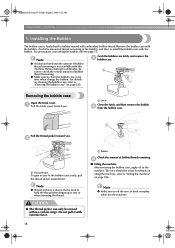
... Make sure to embroider, be oiled. Do not pull it with the bobbin. Before starting to clean the bobbin case every time when change the bobbin. Grab the bobbin case latch, and remove the 3 bobbin case. 1 Removing the bobbin case Open the hook cover. 1 Pull the hook cover toward you. ... to check the certain amount of bobbin thread remaining is not available with embroidery bobbin thread. Remove the bobbin case with the bobbin, check the amount of thread remaining in the bobbin, and then re-install the bobbin case with extreme force. 18 1 Bobbin Check the amount of hook everyday...
... Make sure to embroider, be oiled. Do not pull it with the bobbin. Before starting to clean the bobbin case every time when change the bobbin. Grab the bobbin case latch, and remove the 3 bobbin case. 1 Removing the bobbin case Open the hook cover. 1 Pull the hook cover toward you. ... to check the certain amount of bobbin thread remaining is not available with embroidery bobbin thread. Remove the bobbin case with the bobbin, check the amount of thread remaining in the bobbin, and then re-install the bobbin case with extreme force. 18 1 Bobbin Check the amount of hook everyday...

Users Manual - English
Page 37
...about 50 mm (2 inches) of thread. 1 Tab 2 Notch • Fully insert the bobbin case until it snaps 1 into the hook. 1 Insert the bobbin case while aligning the tab on the bobbin case with the notch in the hook, as shown in the opposite direction, the embroidery will... not be used. (Refer to page 5, 168.) Installing the Bobbin 19 Sapphire.book Page 19 Friday, August 1, 2003 9:12 AM Installing the bobbin Insert the bobbin into the bobbin case. 1 Installing the bobbin case Insert the bobbin case into place. 2 3 4 5 6 Close the hook cover. 2 7 8 ...
...about 50 mm (2 inches) of thread. 1 Tab 2 Notch • Fully insert the bobbin case until it snaps 1 into the hook. 1 Insert the bobbin case while aligning the tab on the bobbin case with the notch in the hook, as shown in the opposite direction, the embroidery will... not be used. (Refer to page 5, 168.) Installing the Bobbin 19 Sapphire.book Page 19 Friday, August 1, 2003 9:12 AM Installing the bobbin Insert the bobbin into the bobbin case. 1 Installing the bobbin case Insert the bobbin case into place. 2 3 4 5 6 Close the hook cover. 2 7 8 ...

Users Manual - English
Page 48
... the embroidery frame, check that there is enough thread in the embroidery frame, attach the frame to the Machine After hooping the fabric in the bobbin. Positioning slots Positioning Pin Clip on the embroidery frame holder. 30 As an example, the procedure for attaching the small embroidery frame is not correctly...
... the embroidery frame, check that there is enough thread in the embroidery frame, attach the frame to the Machine After hooping the fabric in the bobbin. Positioning slots Positioning Pin Clip on the embroidery frame holder. 30 As an example, the procedure for attaching the small embroidery frame is not correctly...

Users Manual - English
Page 61
...red. • The thread is not trimmed. Re-thread the broken thread, back up several stitches to "If the Thread Breaks or the Bobbin 14 Thread Runs Out While Embroidering" on page 90.) 11 ■ If the thread breaks while sewing 12 If a problem occurs while sewing...button lights up in red. • The thread is not trimmed. • To continue sewing, after the embroidery machine is turned on again. X The bobbin and upper threads are trimmed. 2 • Before turning off . 4 • Sewing can be sure to "Specifying 10 pause locations before embroidering" on page...
...red. • The thread is not trimmed. Re-thread the broken thread, back up several stitches to "If the Thread Breaks or the Bobbin 14 Thread Runs Out While Embroidering" on page 90.) 11 ■ If the thread breaks while sewing 12 If a problem occurs while sewing...button lights up in red. • The thread is not trimmed. • To continue sewing, after the embroidery machine is turned on again. X The bobbin and upper threads are trimmed. 2 • Before turning off . 4 • Sewing can be sure to "Specifying 10 pause locations before embroidering" on page...
Users Manual - English
Page 62
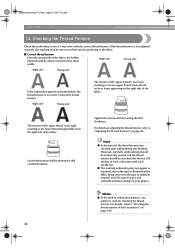
... the embroidery to see if it was finished. For details on adjusting the thread tension, refer to "Checking the thread tension of the fabric, the bobbin thread should be about one pattern is too loose, resulting in the lower thread being visible from the right side of the fabric being sewn...
... the embroidery to see if it was finished. For details on adjusting the thread tension, refer to "Checking the thread tension of the fabric, the bobbin thread should be about one pattern is too loose, resulting in the lower thread being visible from the right side of the fabric being sewn...

Users Manual - English
Page 76
... the tension disk pulley. (Refer to page 37) EMBROIDERING: ■ Want to set the own embroidery colors instead of upper thread is caught under the bobbin's tension spring. ■ The frame came out from the PC to the machine. - The patterns saved on a rough edge of the spool of thread. - The...
... the tension disk pulley. (Refer to page 37) EMBROIDERING: ■ Want to set the own embroidery colors instead of upper thread is caught under the bobbin's tension spring. ■ The frame came out from the PC to the machine. - The patterns saved on a rough edge of the spool of thread. - The...
Users Manual - English
Page 77
... spools message / 75 Easily changing the thread spools / 76 If the Thread Breaks or the Bobbin Thread Runs Out While Embroidering 77 If the upper thread breaks / 77 If the bobbin thread breaks or runs out / 78 Embroidering From the Beginning or Middle of the Pattern 79 ...Resume Embroidering After Turning Off the Machine 81 Adjusting the Thread Tension 83 Adjusting the tension of the bobbin thread / 83 Adjusting the tension of fabric / 67 Embroidery Frame Position and Movement 68 Changing the Embroidering Position 70 Adjusting the angle /...
... spools message / 75 Easily changing the thread spools / 76 If the Thread Breaks or the Bobbin Thread Runs Out While Embroidering 77 If the upper thread breaks / 77 If the bobbin thread breaks or runs out / 78 Embroidering From the Beginning or Middle of the Pattern 79 ...Resume Embroidering After Turning Off the Machine 81 Adjusting the Thread Tension 83 Adjusting the tension of the bobbin thread / 83 Adjusting the tension of fabric / 67 Embroidery Frame Position and Movement 68 Changing the Embroidering Position 70 Adjusting the angle /...


